

Add controller support to your game
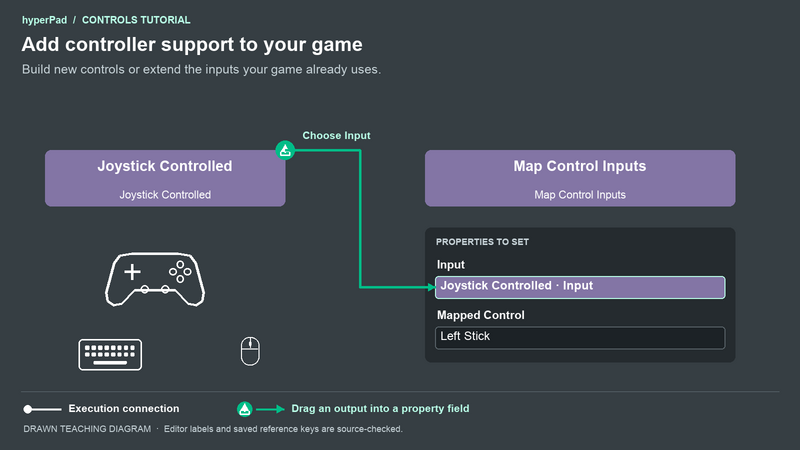
Give your players a controller, keep your touch controls, and let them choose their own bindings. This tutorial takes you through each part in hyperPad.
You can follow the whole tutorial or start with the part that fits your game:
- Build controller controls from scratch.
- Map an existing touch game.
- Map custom touch and keyboard inputs.
- Show connected devices.
- Add the Controls overlay and rebinding.
- Give each player a controller.
The examples use Object names such as Player, Move Joystick, and Jump Button. Select the matching Objects in your own Project. The from-scratch movement example is a small top-down scene. The existing-game example keeps your game's current movement rules.
Before you start
Connect a supported controller using your device's Bluetooth or USB setup. hyperPad detects connected controllers. Your game can show and assign those devices through its own UI.
You can build the behaviors before connecting a controller. Use actual hardware when you check movement, button presses, and multiplayer. A controller drawing in a menu shows the layout; the device selector shows the current device.
Controller Event creates gameplay from physical controller input. Map Control Inputs adds a physical alternative to an input your game already uses. Both let you select a Player. Player 1 and Player 2 are assignment slots. For Controller Event and Controller Status, Player 0 listens to any controller. Use it in a selection menu. Map Control Inputs uses Player 1 or higher.
In the teaching diagrams, white connections run the next behavior. Drag from the bottom white connector to the next behavior's top connector. Green arrows show an output being dragged into a property. Open the receiving behavior's properties, drag the source behavior's green output icon into the field, then choose the named output if a picker appears. A behavior with one output fills the field directly.
The rounded behavior diagrams are drawn teaching guides. Property panels and overlay screens are real hyperPad captures in dark mode. The GIFs show the native drag, output picker, and completed reference.
Build controller controls from scratch
1. Set up a small movement scene
Create an empty Scene. Add a Graphic Object named Player on the Main layer. Select it and set its physics mode to Physics. Add a Label Object named ActionLabel on Scene UI. Give the label some starting text, such as Press the bottom button.
Open Global Properties with the globe button. In its physics section, select Birds Eye View. Set World Gravity X and Y to 0. Set Air Resistance to 0 too. Check it after choosing Birds Eye View, because that preset can change the resistance.
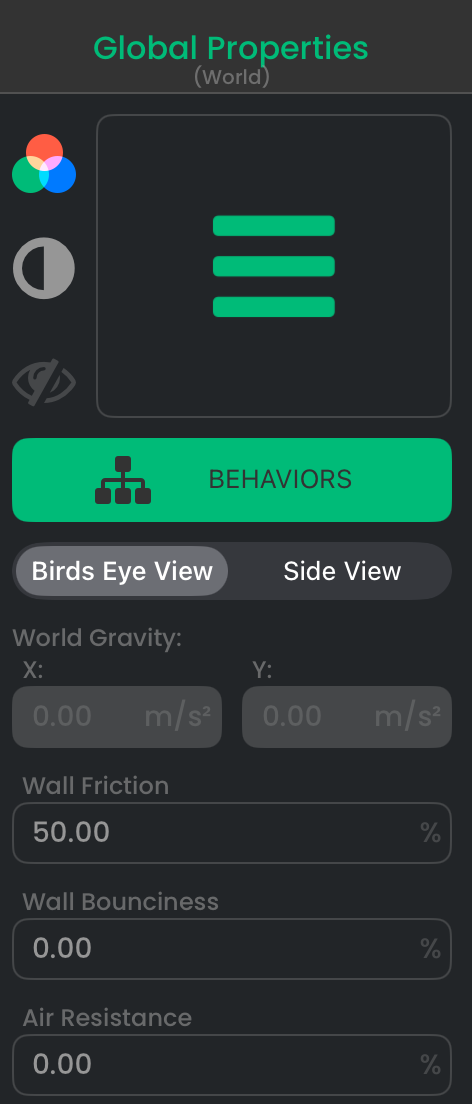
This setup lets you see the stick's movement without gravity pulling the Player down. Use your own Graphic for the Player.
2. Listen to the left stick
Select ActionLabel, tap Behaviors, and add Controller Event from Interaction → Controls. Leave it without an incoming white connection. Set Player to 1, Control to Left Stick, and Event to Value Changed.
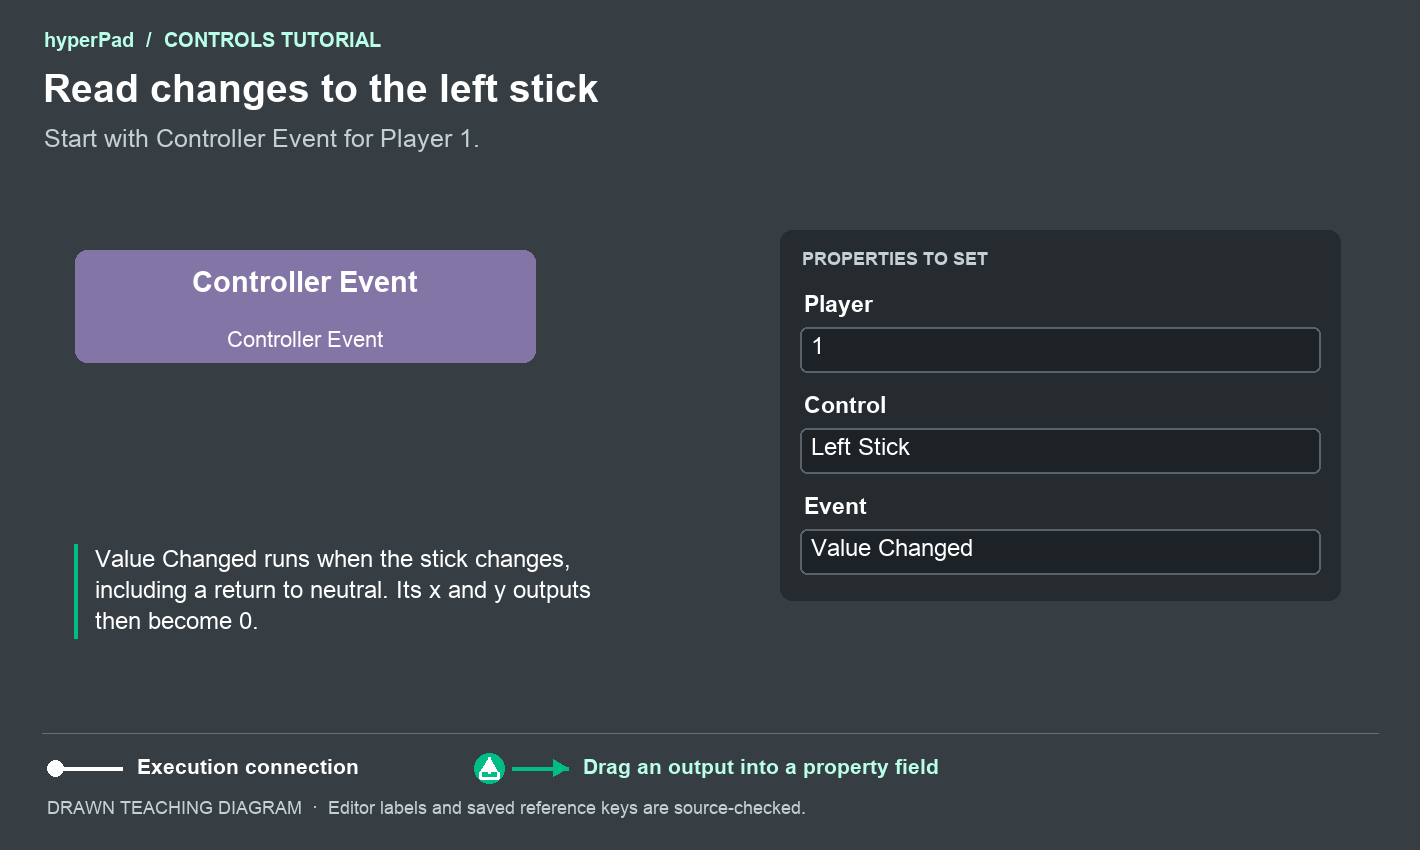
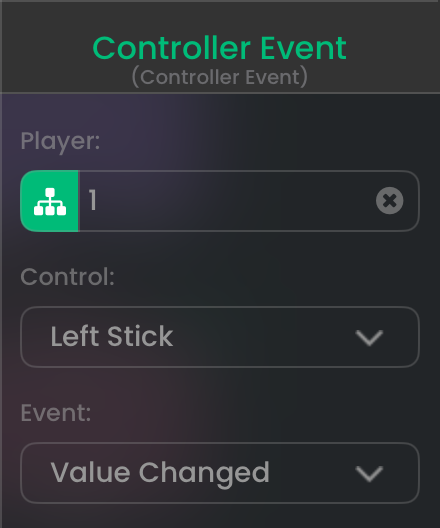
Value Changed runs when the stick changes, including returning to neutral. Its x and y outputs describe the stick direction, from -1 to 1.
3. Turn the horizontal input into speed
Add Multiply Values from Logic. Change its title to Scale X so you can tell the two calculations apart. It is still a Multiply Values behavior.
Connect Controller Event's bottom white connector to Scale X's top connector. Open Scale X's properties. Drag Controller Event's green output icon into the upper calculation field and choose x. Enter 5 in the lower field. Keep times between them.
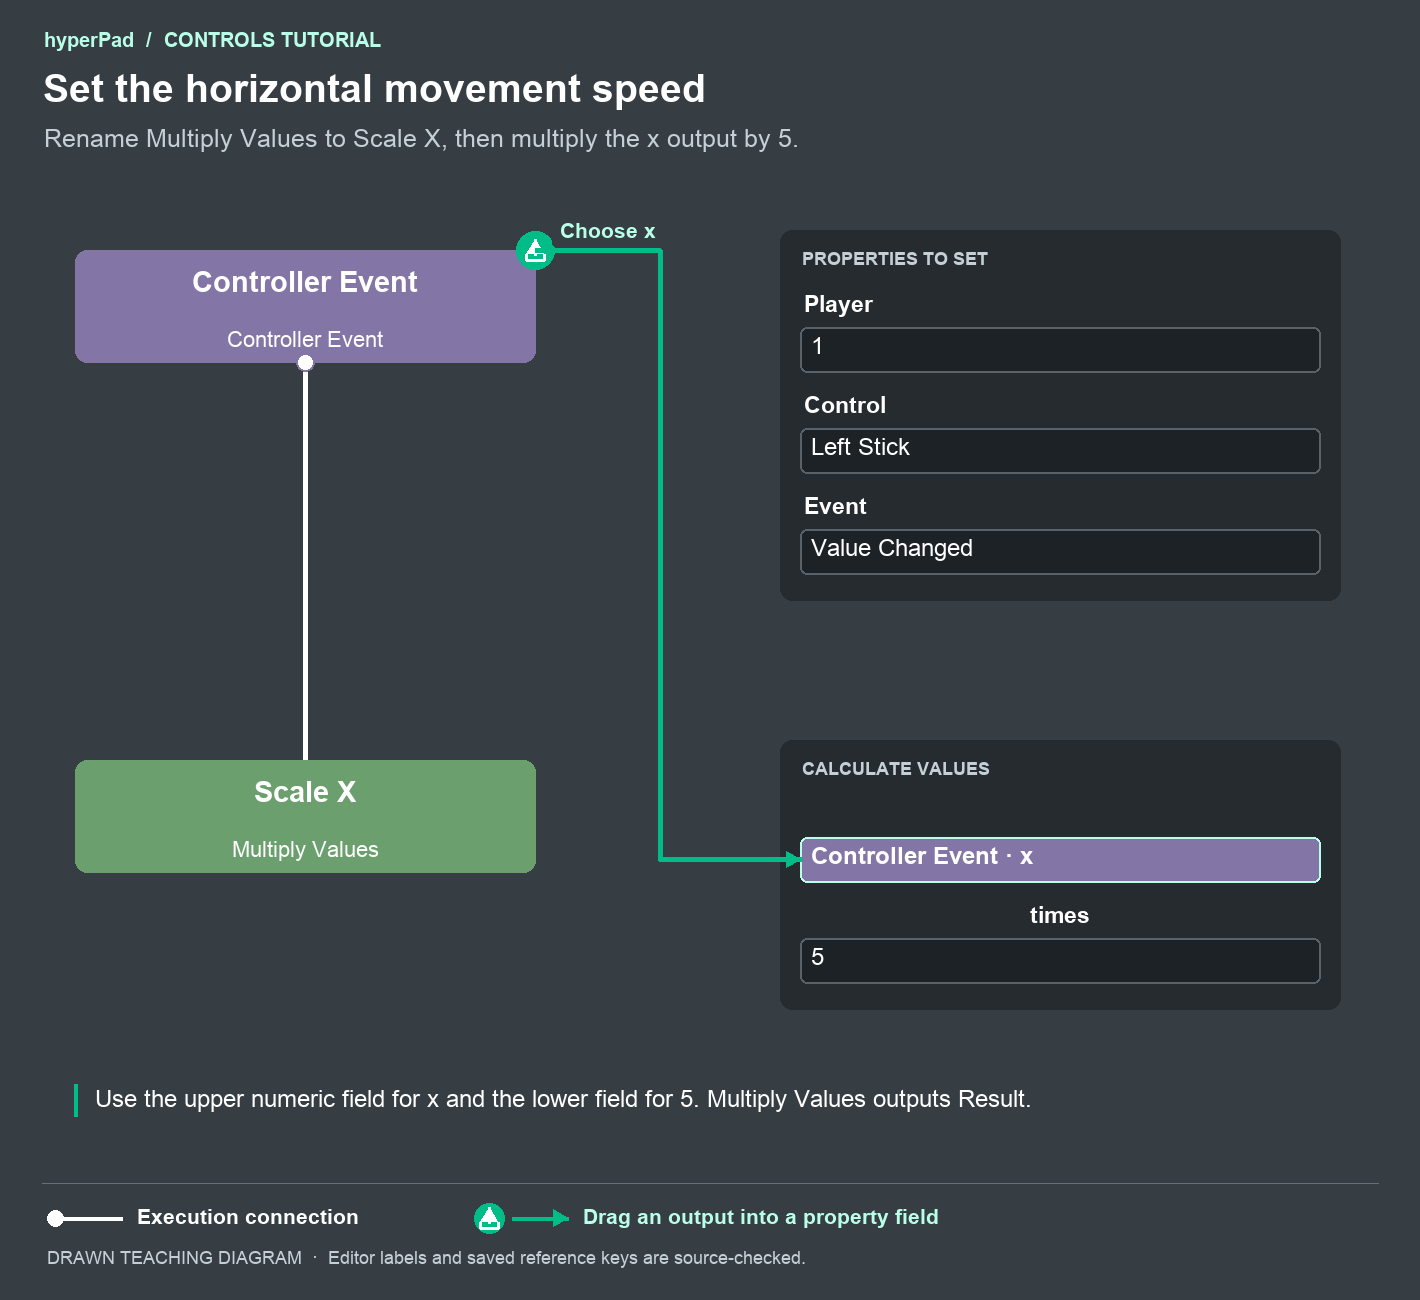
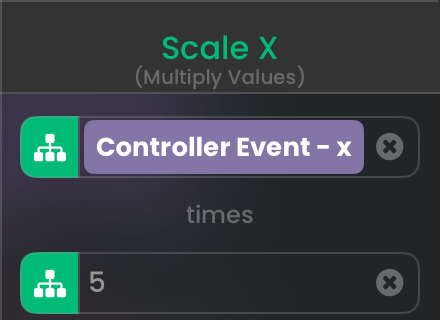
A full horizontal stick input now gives a speed of 5. A half input gives 2.5.
4. Set both movement axes
Add another Multiply Values and name it Scale Y. Drag Controller Event's y output into its upper field. Enter 5 in the lower field.
Add Set Velocity from Physics. Select Player as Object A. Turn Keep X Velocity and Keep Y Velocity off to expose the x and y fields.
Connect the white chain in this order: Controller Event → Scale X → Scale Y → Set Velocity. Drag Scale X's Result output into Set Velocity's x field. Drag Scale Y's Result into y.
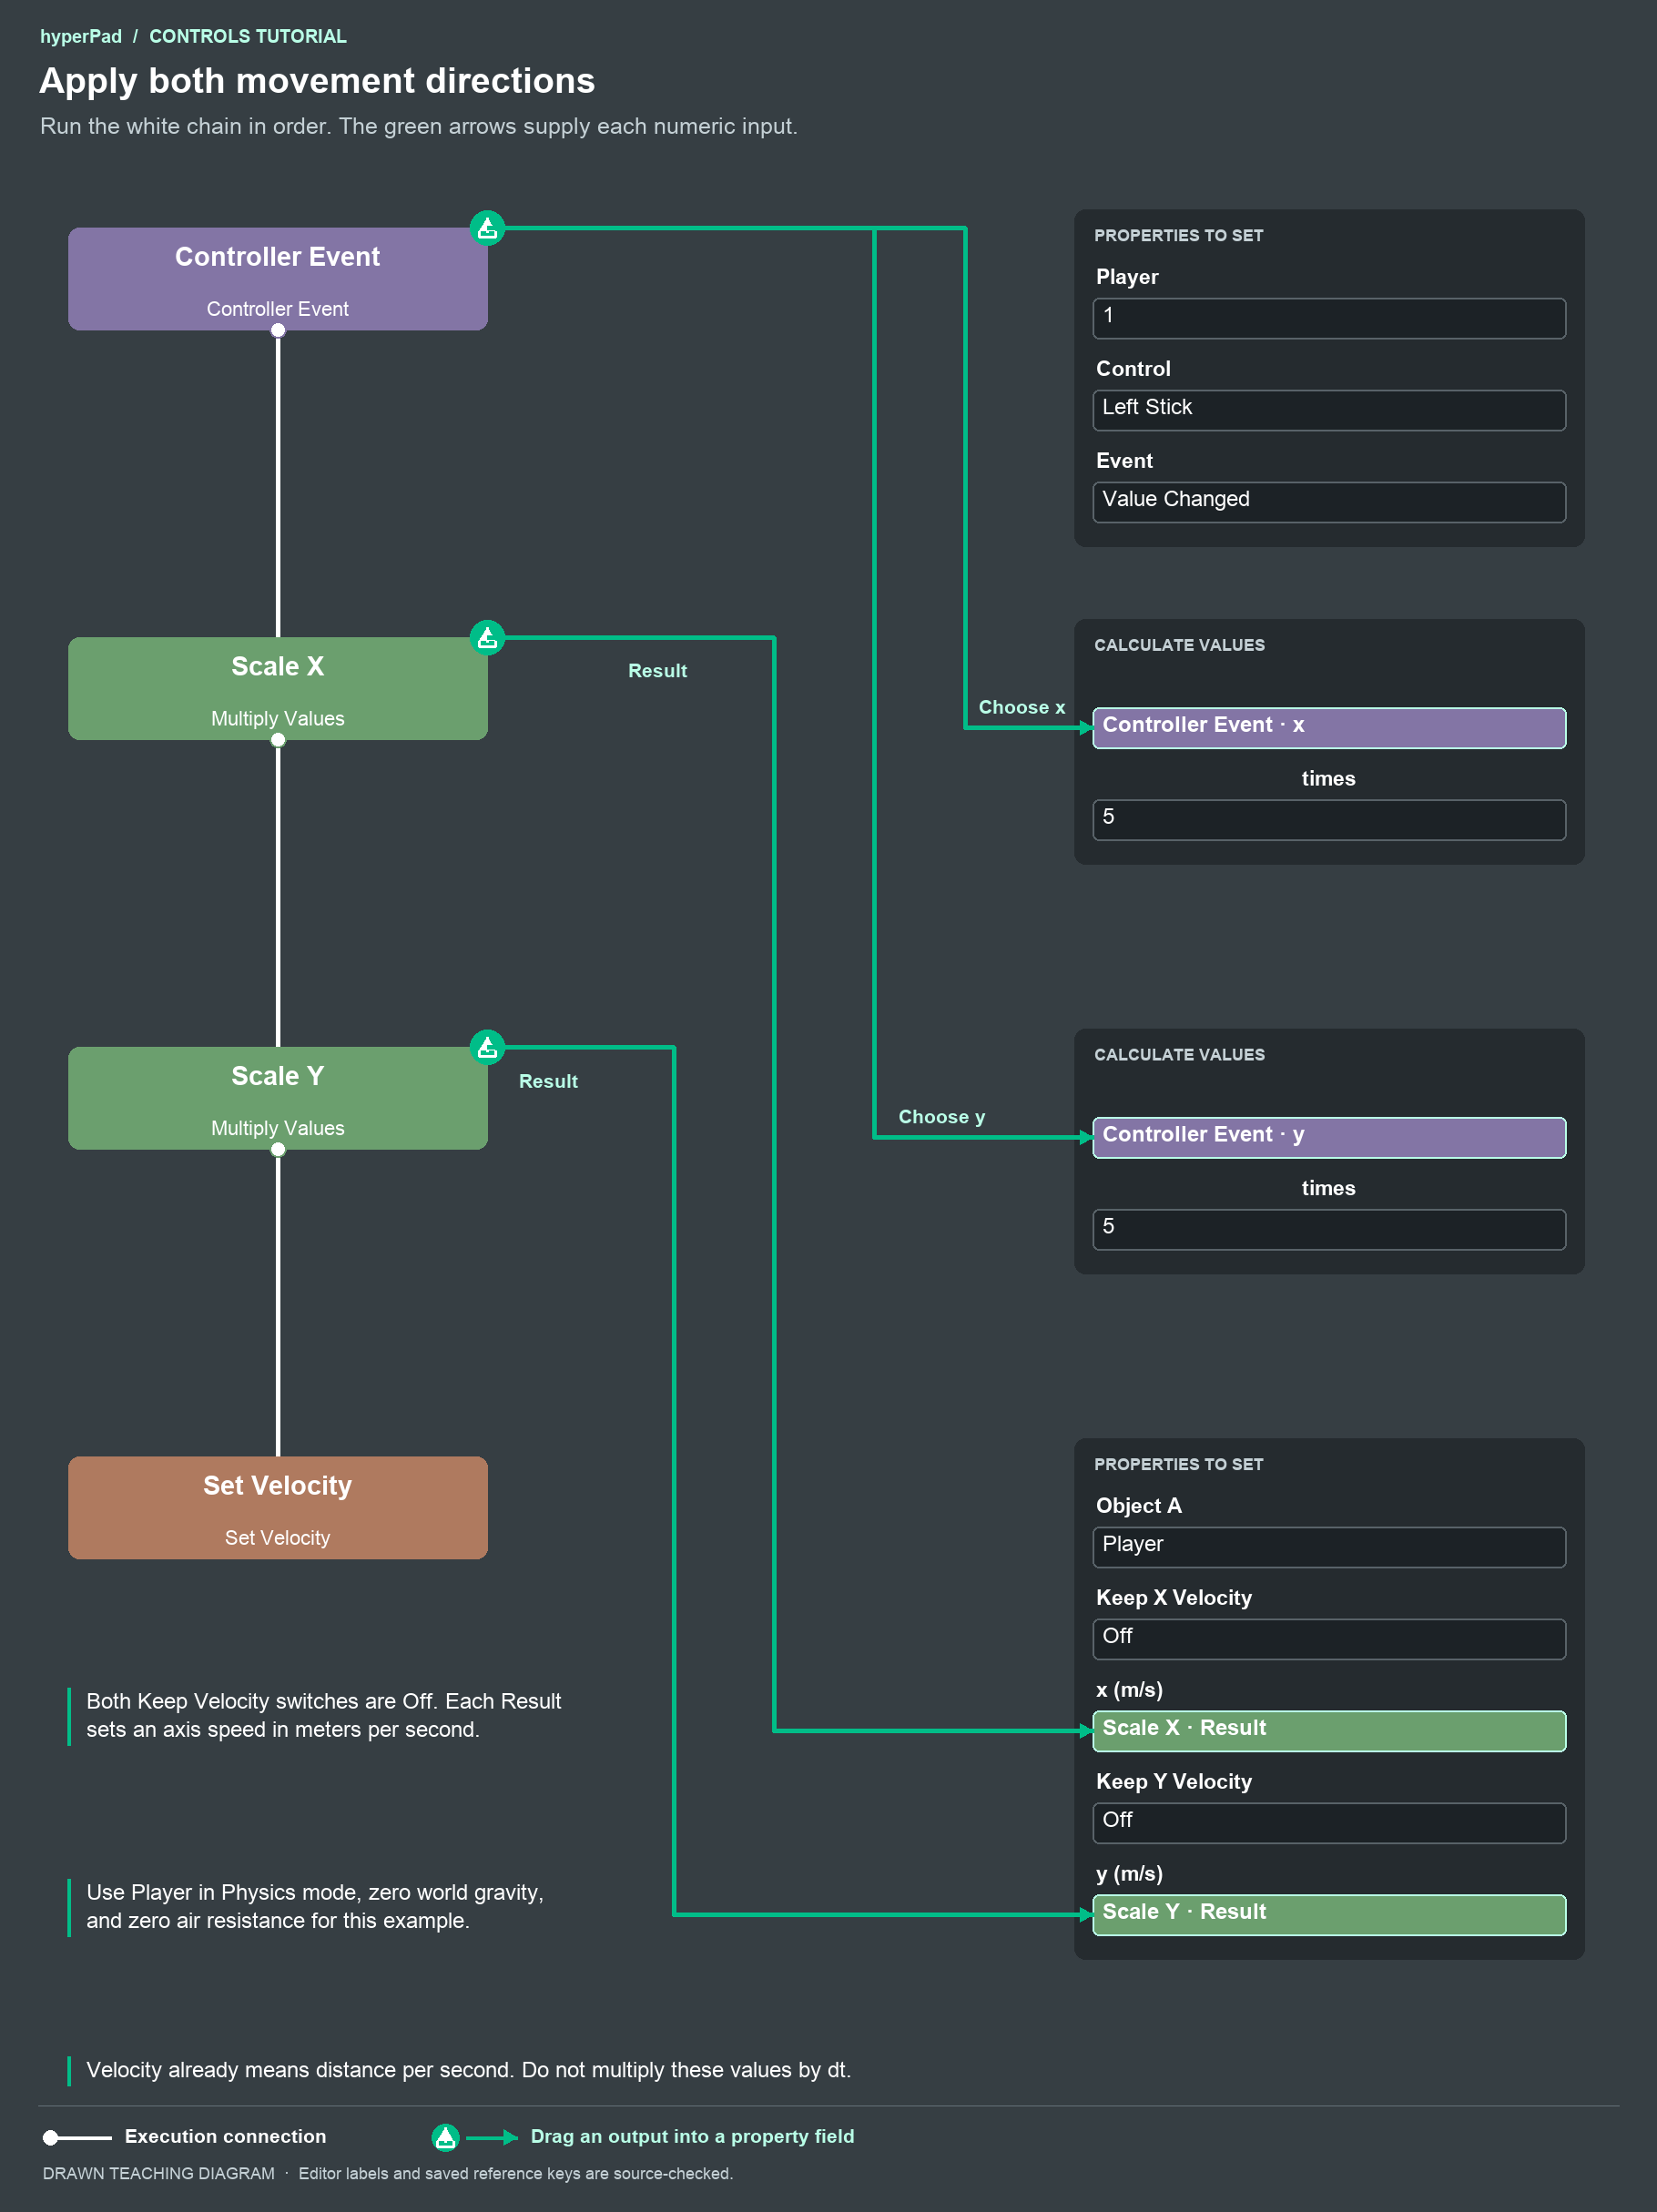
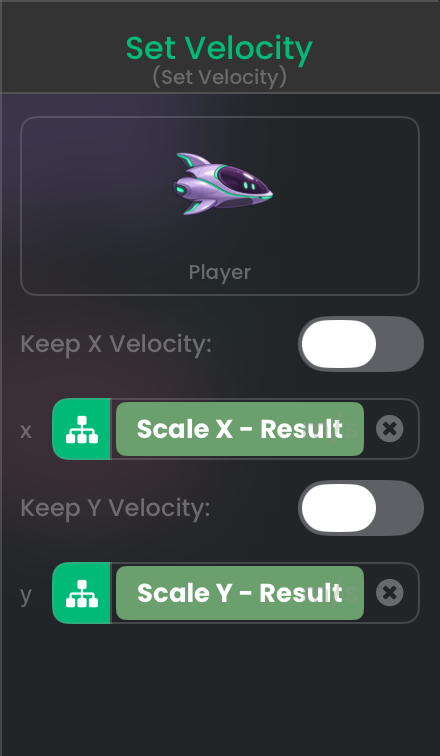
Both calculations run before Set Velocity uses their results. The velocity fields use meters per second. Use the same multiplier for both axes, then adjust that number to change the speed.
5. Check returning to neutral
Run the Scene and move the left stick. Let it return to its center. The same Value Changed event supplies 0 for x and y, so the calculations set both velocity axes to 0.
Keep movement on this one event. Rebinding it changes the stick used for both movement and stopping.
6. Stop after a device or assignment change
Add Controller Status with Player 1 and Event Changed. Connect it to another Set Velocity for Player, with both Keep Velocity switches off and both axes 0.
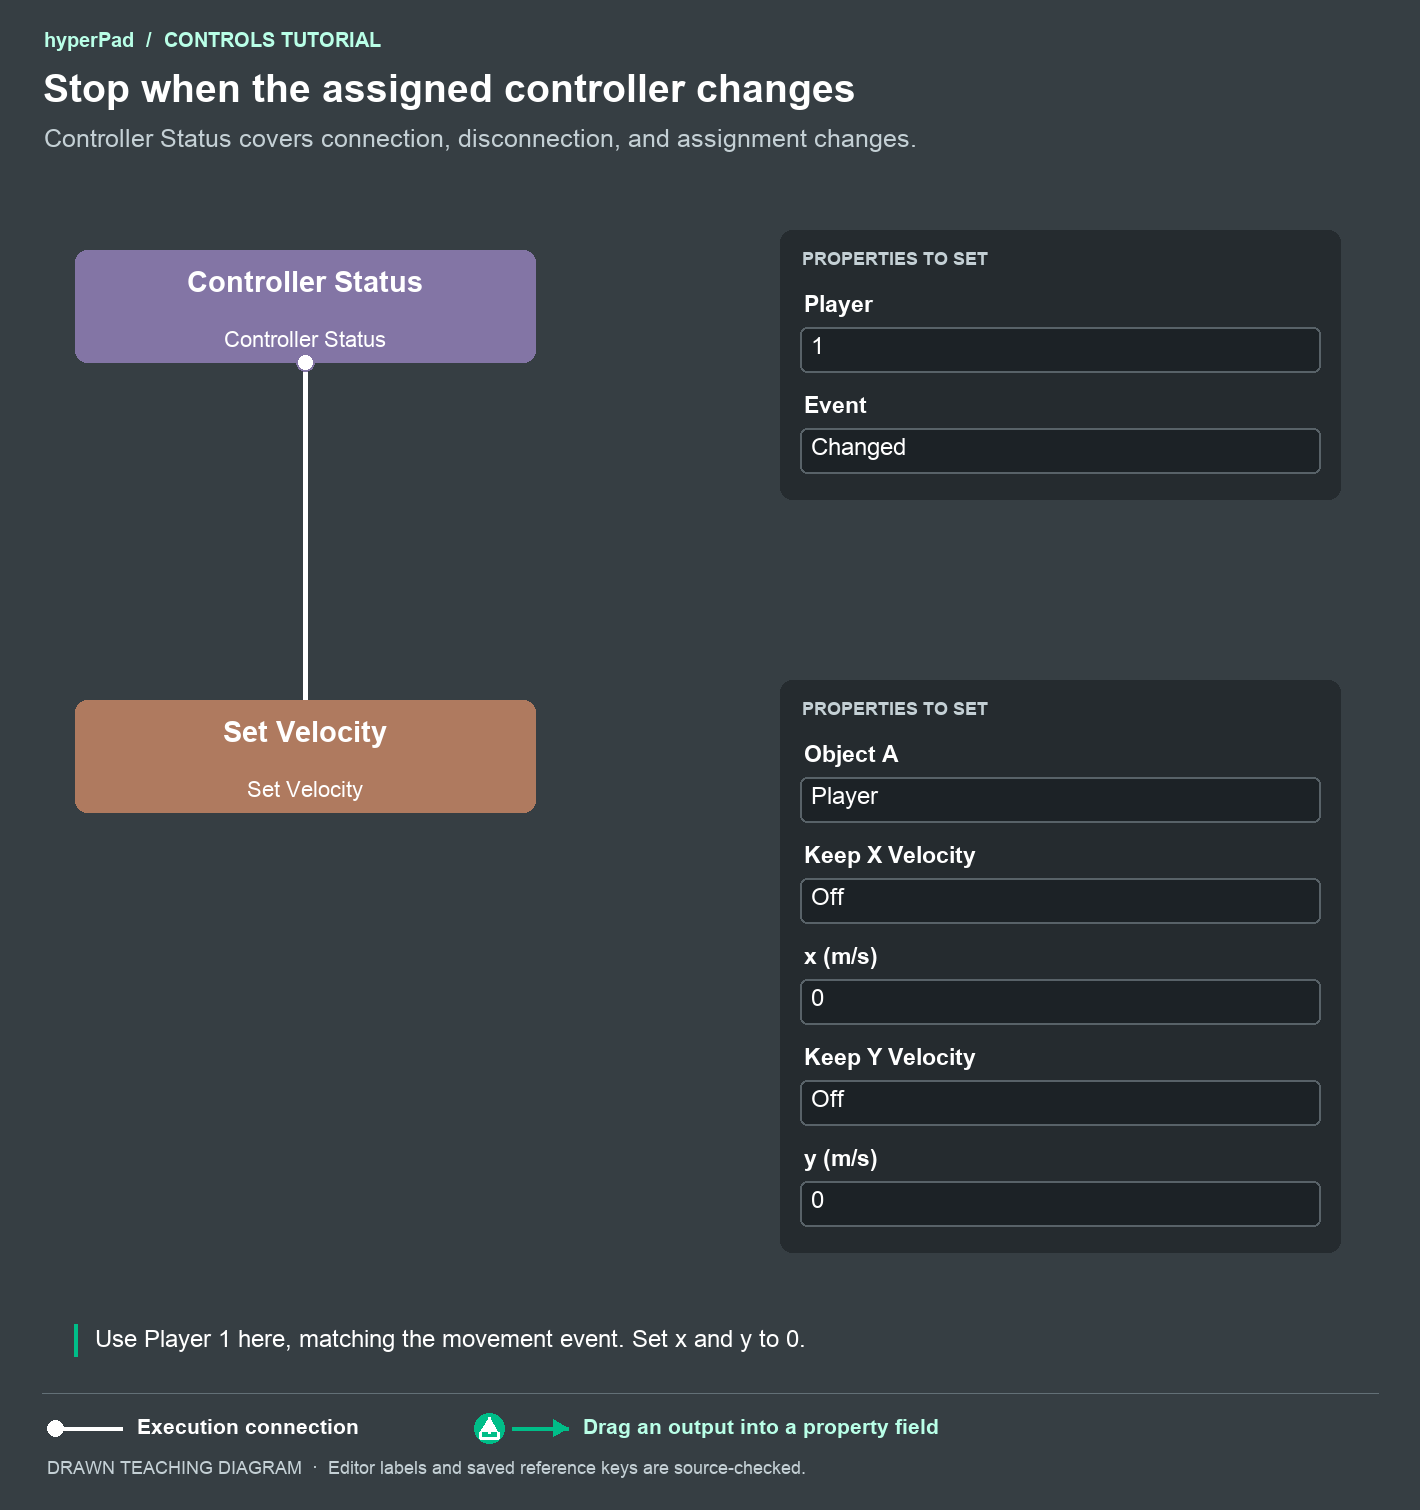
This stops your custom movement when Player 1's controller disconnects or its assignment changes. A disconnect is handled by Controller Status. The Value Changed movement branch handles normal stick release.
7. Add a button action
Add another root Controller Event with Player 1, Bottom Button (A / ×), and Pressed. Connect it to Set Label. Select ActionLabel as Object A and enter Action! in Text.
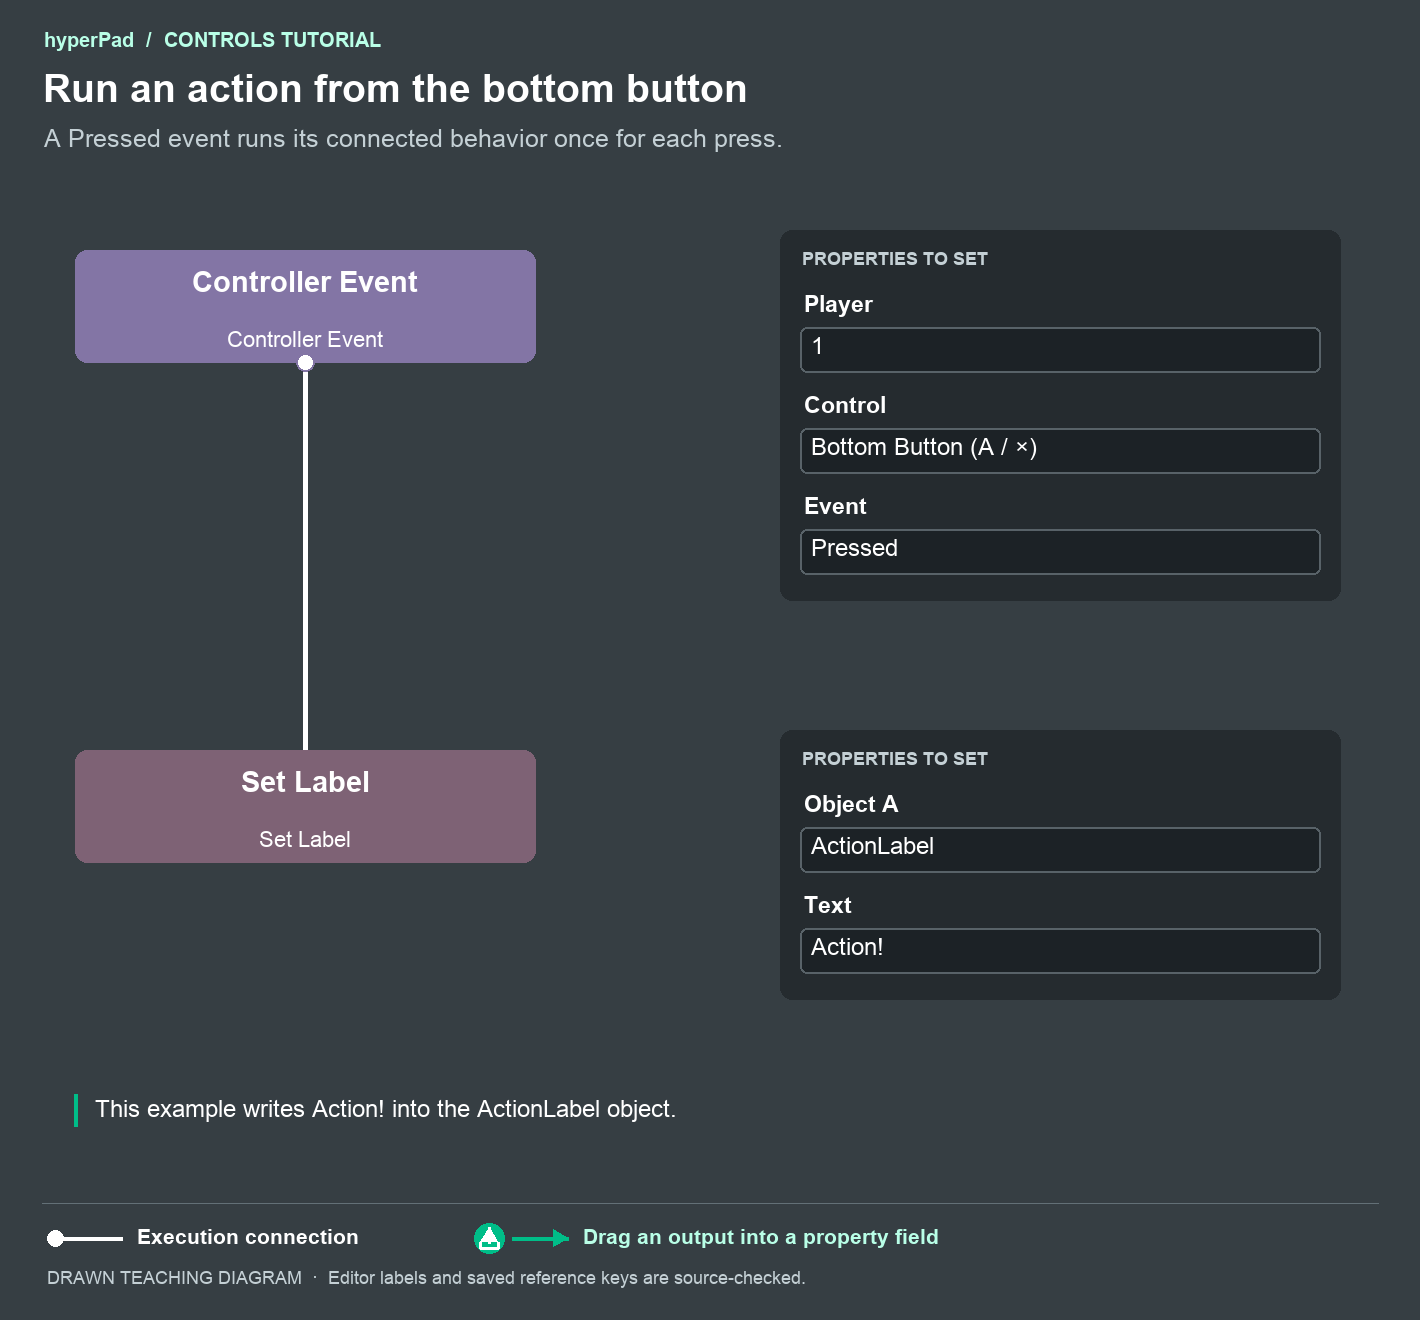
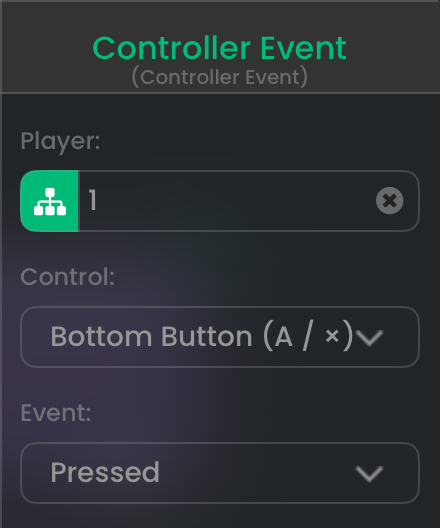
Run the Scene. Move the left stick, let it return to neutral, and press the bottom face button. You should see movement stop at neutral and the label change on the press. You can replace Set Label with your own action once you have checked this connection.
Button names describe positions. Bottom Button is A on a typical Xbox layout and × on a PlayStation layout. Keep the same mapping when you switch between supported controller brands.
Map an existing touch game
Use this path when your game already moves, jumps, or shoots with on-screen controls. Keep your authored speed, animations, jump rules, and shooting settings.
8. Find the input Objects your game uses
Play your game with touch first. Open the Behavior Tree that contains Joystick Controlled, Jump with Button, or Shoot with Button. Inspect Object A and Object B on each.
For these behaviors, Object A is the joystick or button. Object B is the character that moves, jumps, or shoots. In this example, those input Objects are Move Joystick, Jump Button, and Shoot Button.
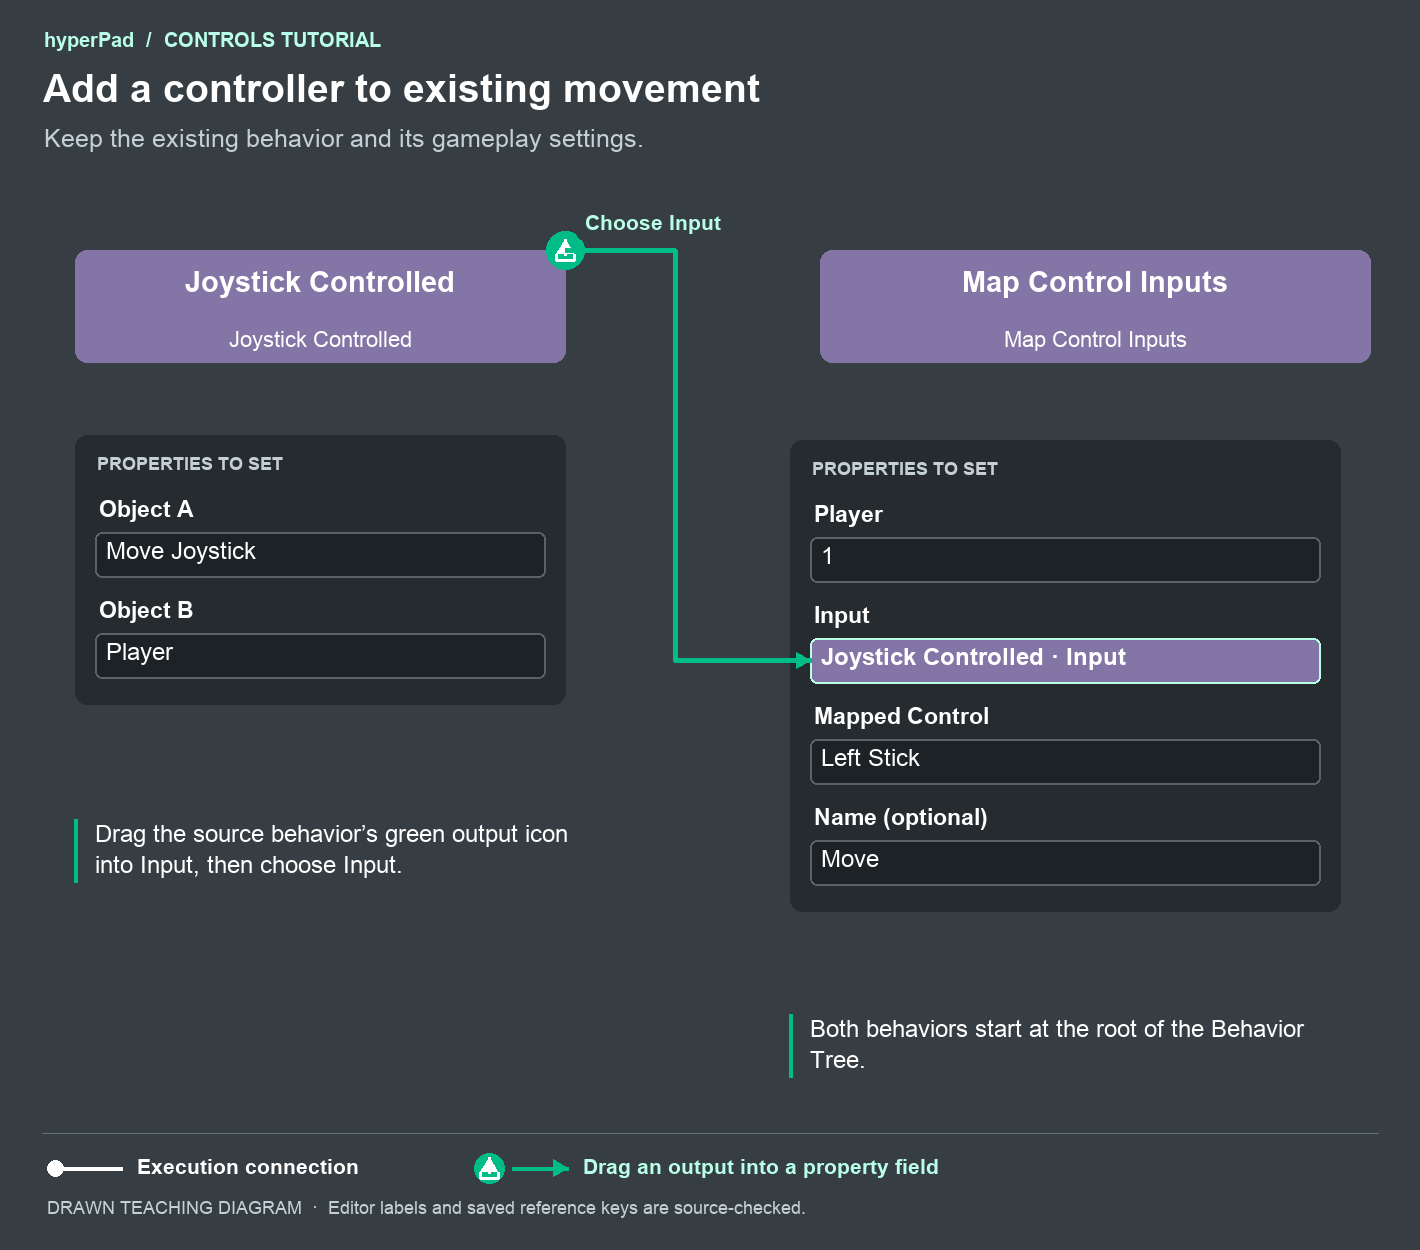
Each of these behaviors has an Input output that identifies its input Object. Use that output for mapping. The character's Object ID is a different output.
9. Add controller movement
In the same Behavior Tree, add Map Control Inputs as a separate root. Leave it without an incoming white connection. Set Player to 1.
Open its properties. Drag Joystick Controlled's green output icon into the first Input field and choose Input. Set Mapped Control to Left Stick. Enter Move in Name (optional).
Map Control Inputs feeds the same joystick input that Joystick Controlled already reads. Your movement settings stay on Joystick Controlled.
10. Map the jump button
Tap + Add Input on Map Control Inputs. Drag Jump with Button's green output into the new Input field and choose Input. Set Mapped Control to Bottom Button (A / ×) and Name to Jump.
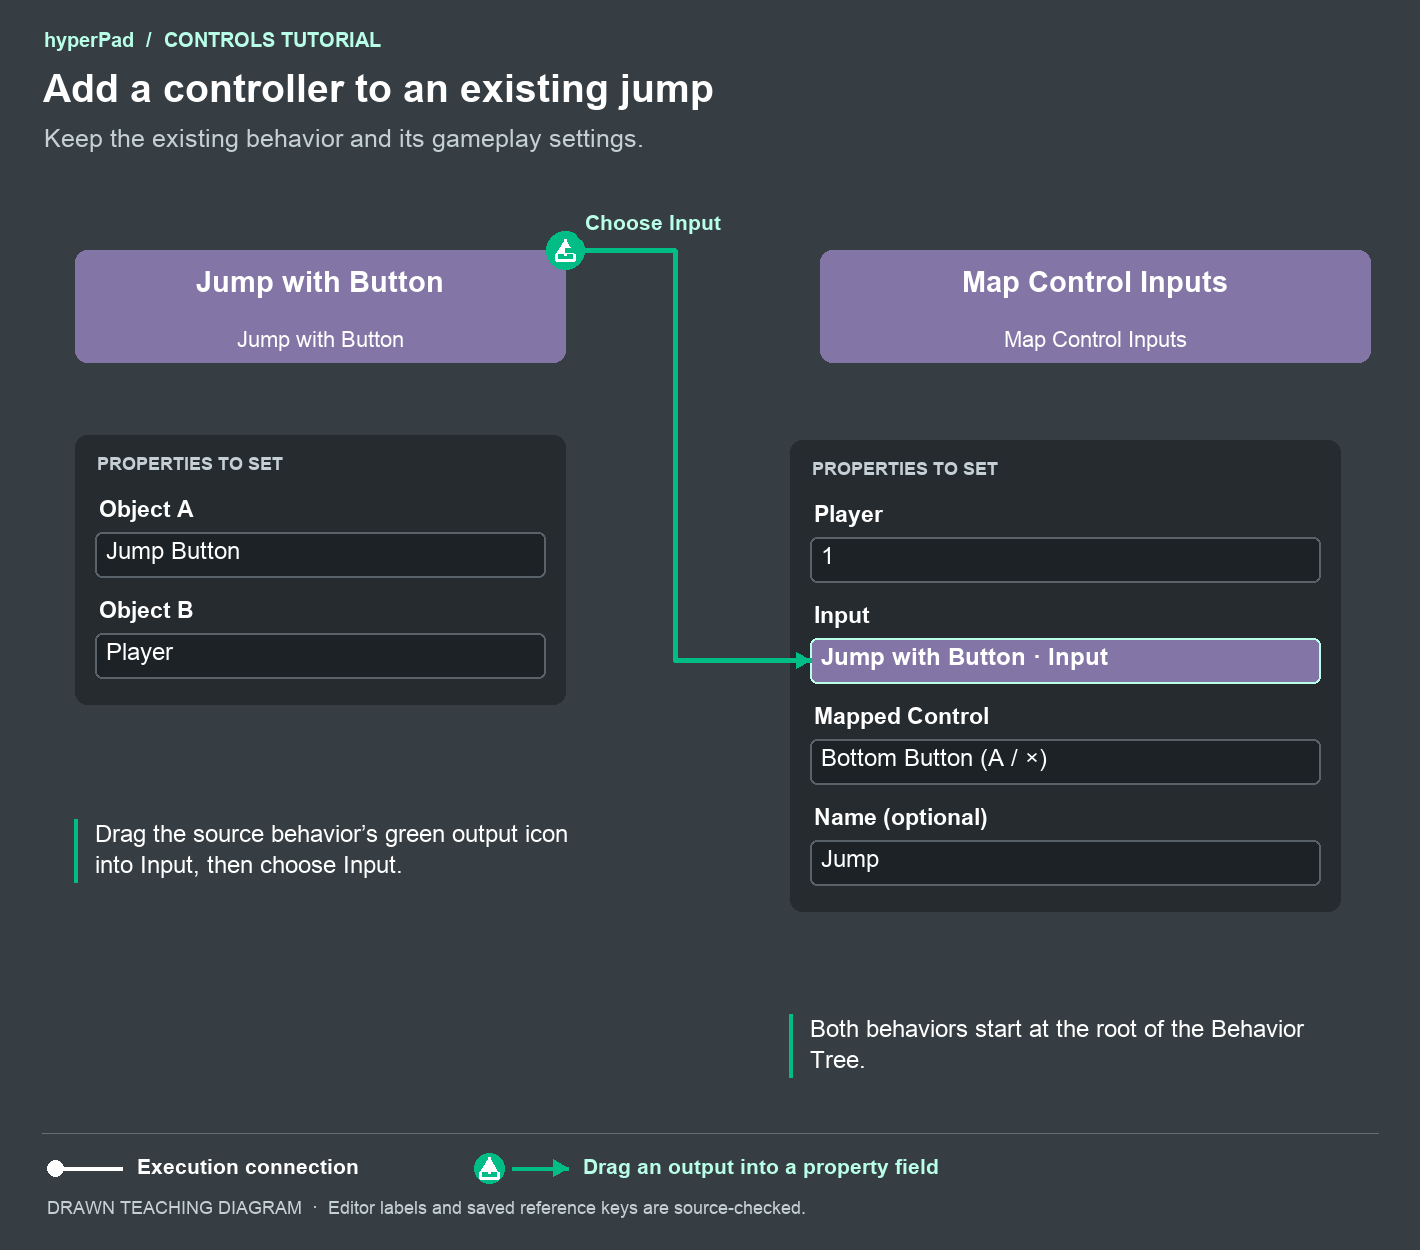
The bottom face button now supplies the Jump Button's input. Your jump count, force, and other jump settings continue to come from Jump with Button.
11. Map the shooting button
Add another input row. Drag Shoot with Button.Input into Input. Choose Right Shoulder and name the row Shoot.
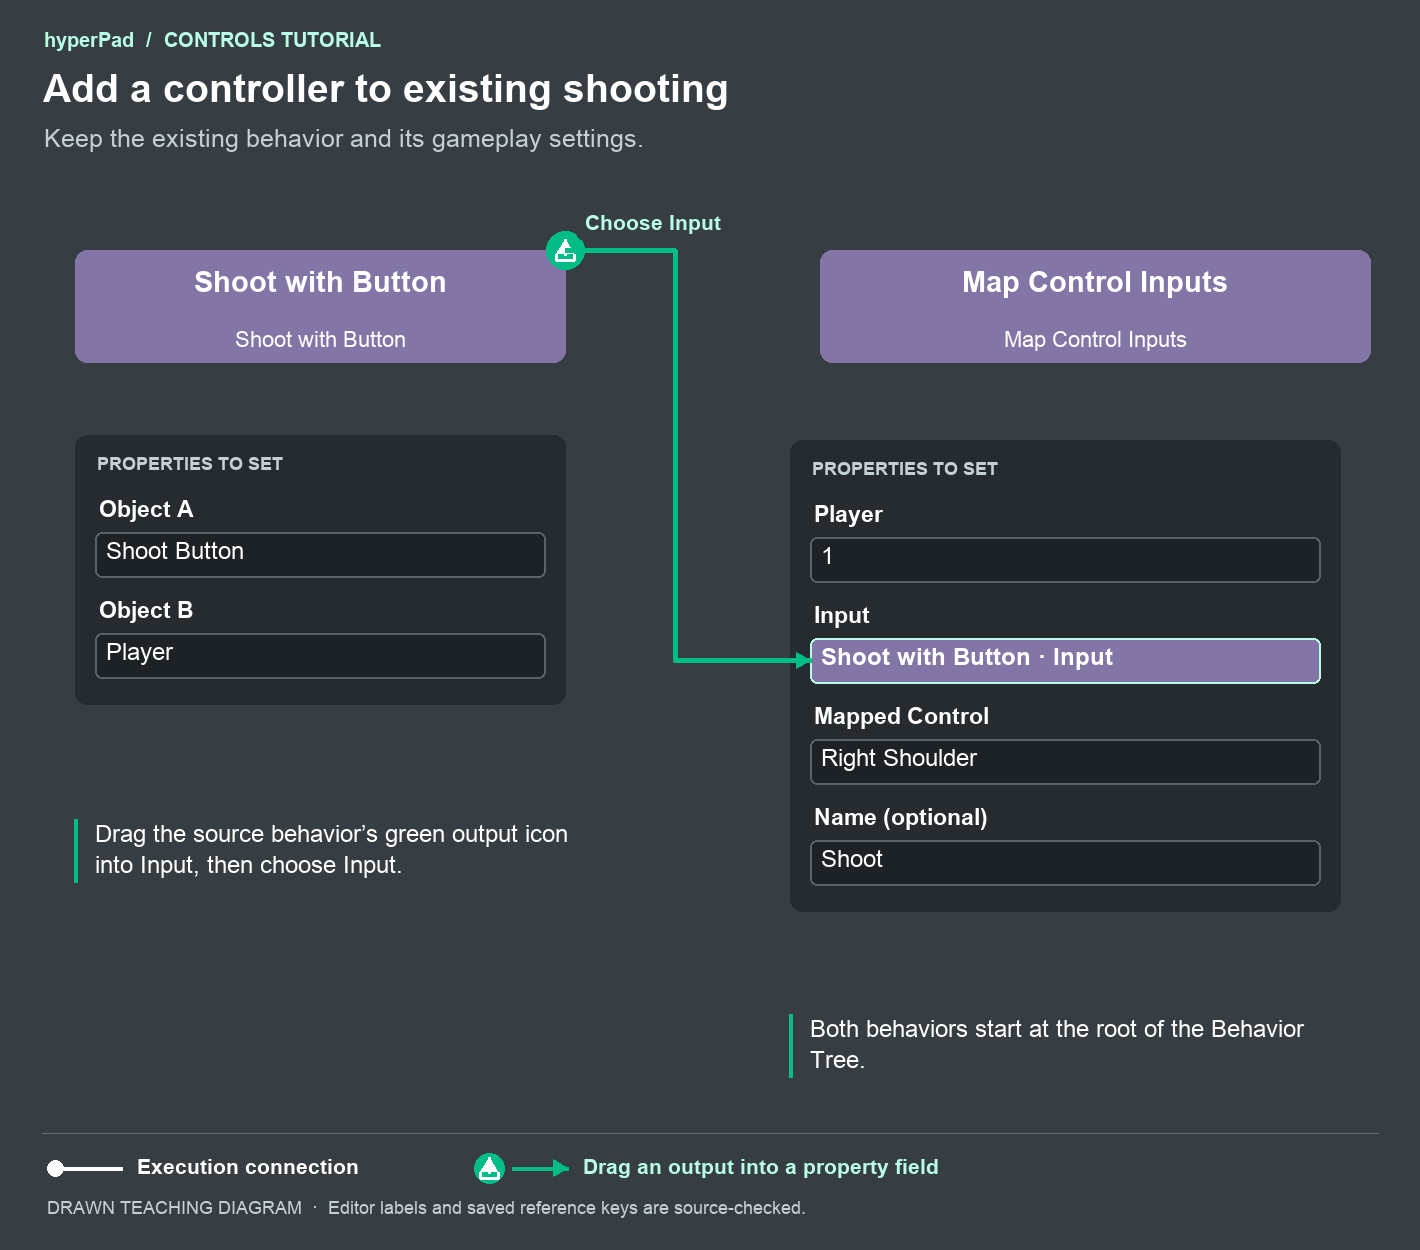
You now have three controller rows in one Map Control Inputs behavior. Keep the original gameplay connections on your movement, jump, and shooting behaviors.
12. Add keyboard alternatives
Use + Add Input three more times. Reuse each original behavior's Input output. Give each alternative the same action name:
| Name | Input output to drag | Mapped Control |
|---|---|---|
| Move | Joystick Controlled.Input | Arrow Keys |
| Jump | Jump with Button.Input | Space |
| Shoot | Shoot with Button.Input | Key F |
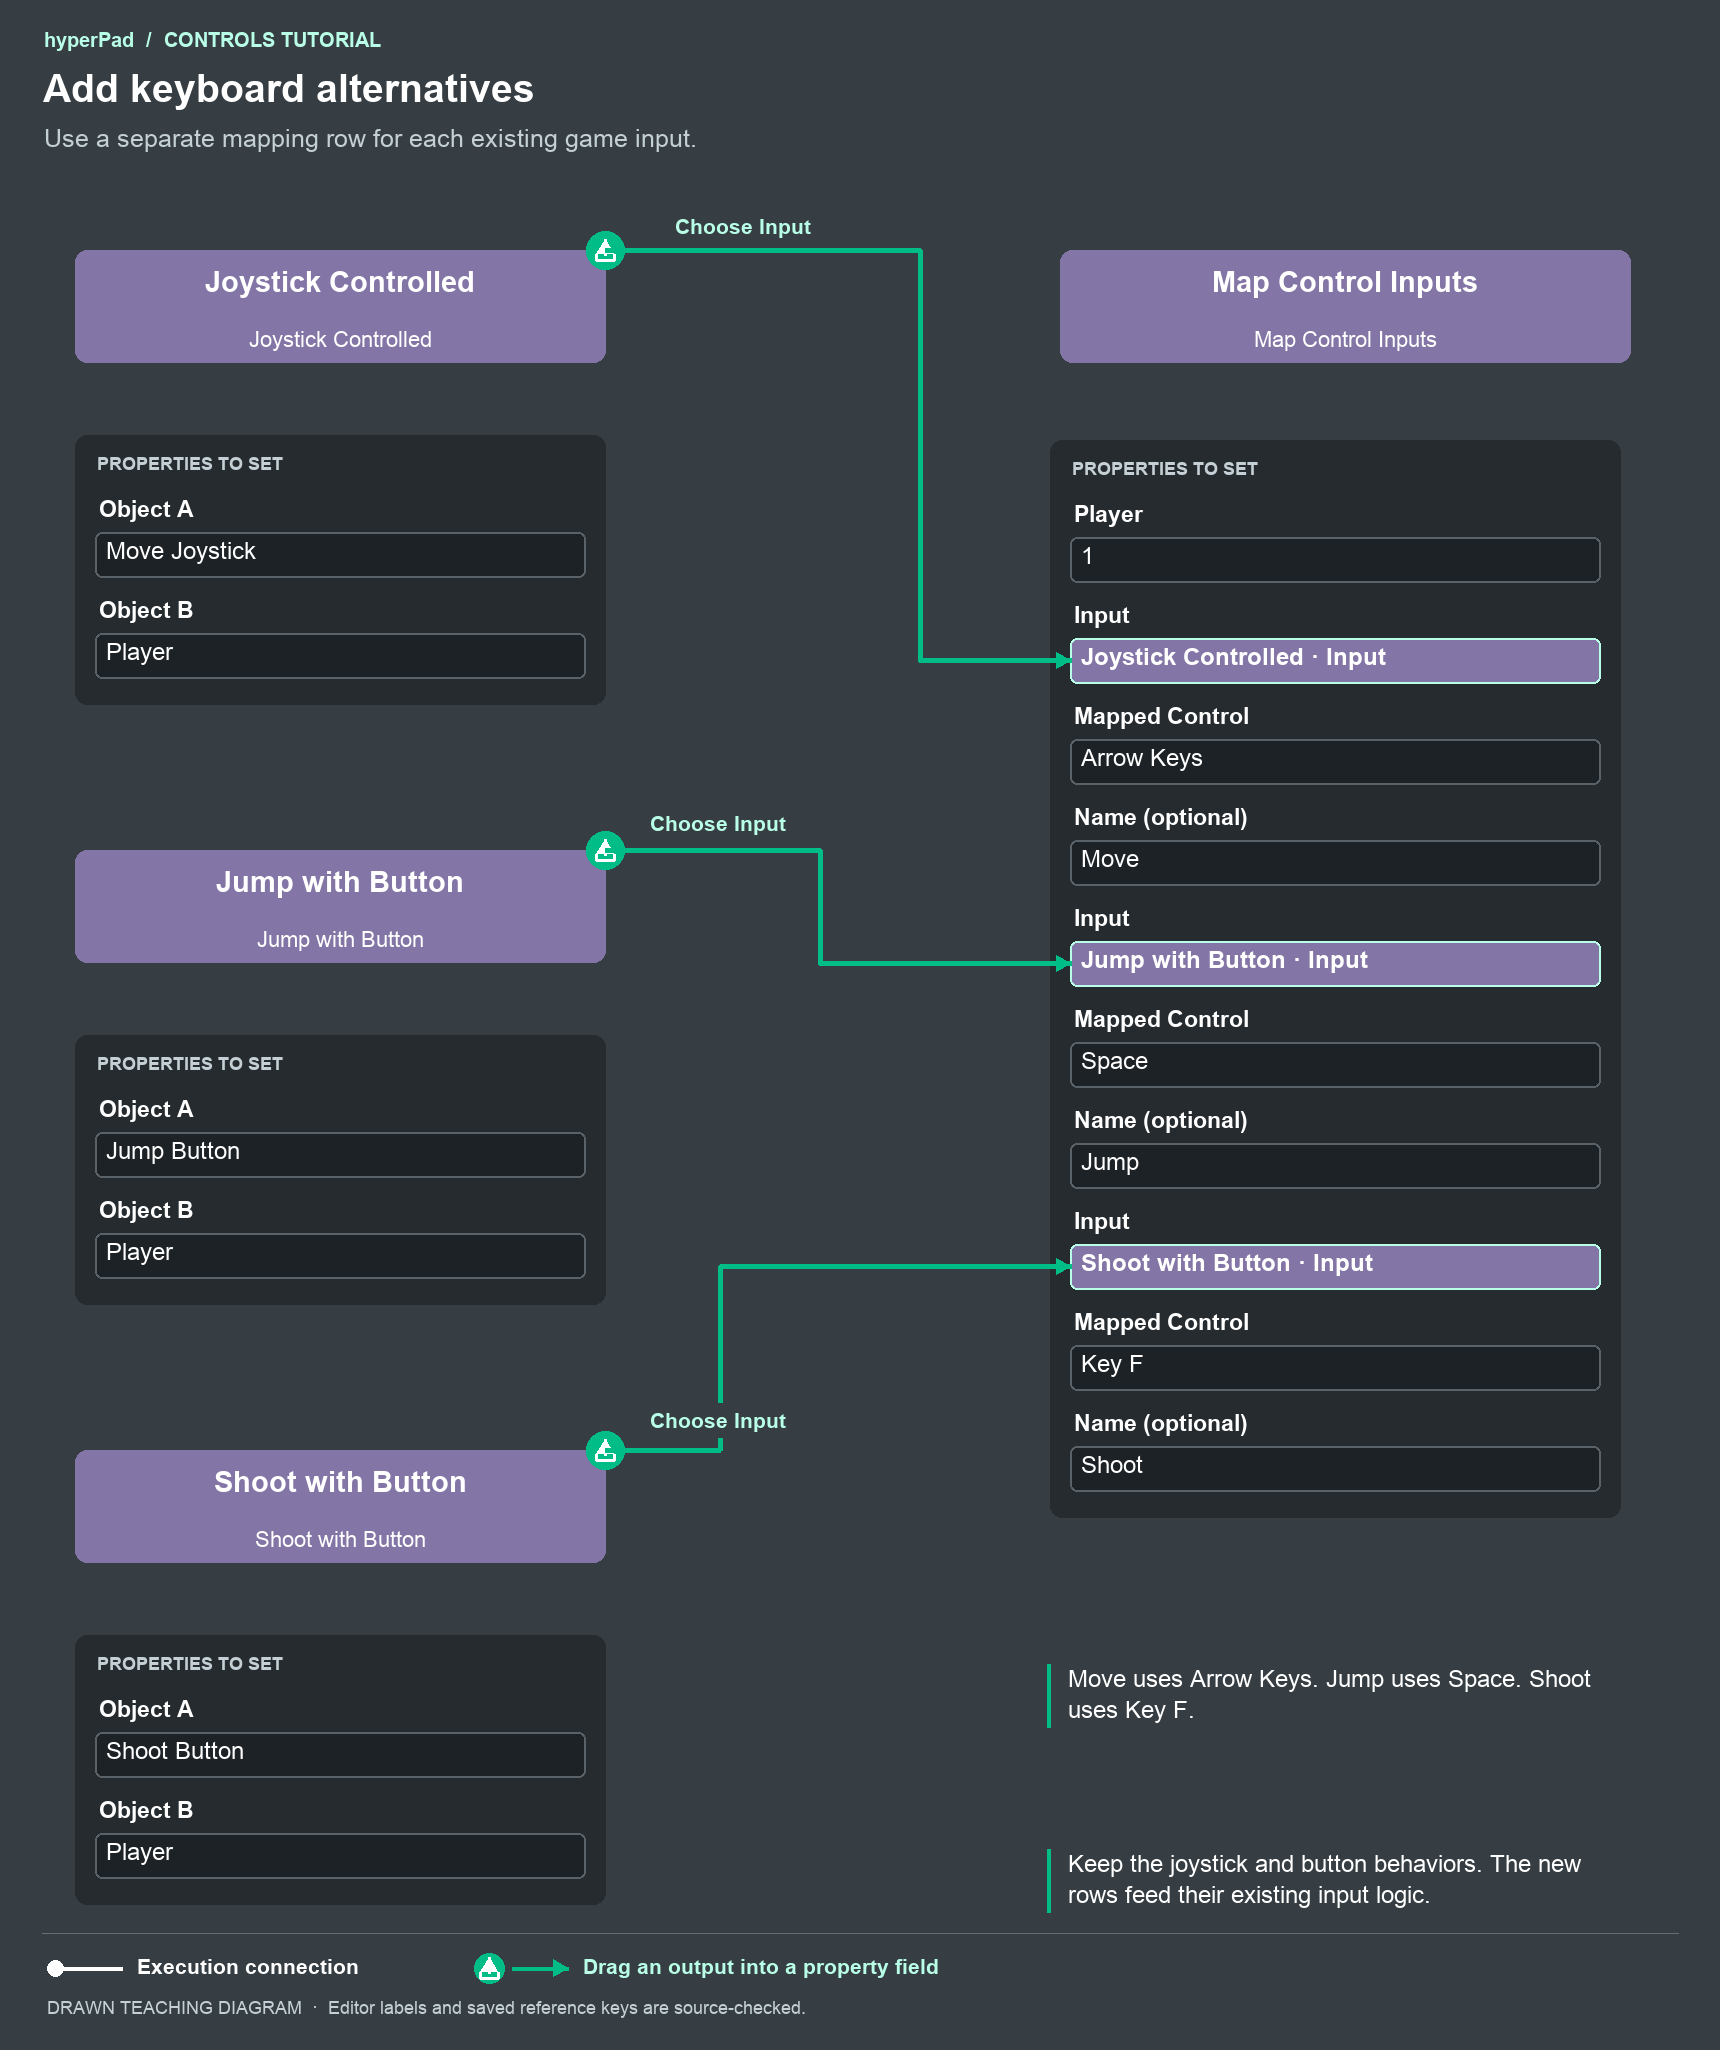
The earlier controller rows stay in the same Map. You should now have six rows: three controller choices and three keyboard choices.
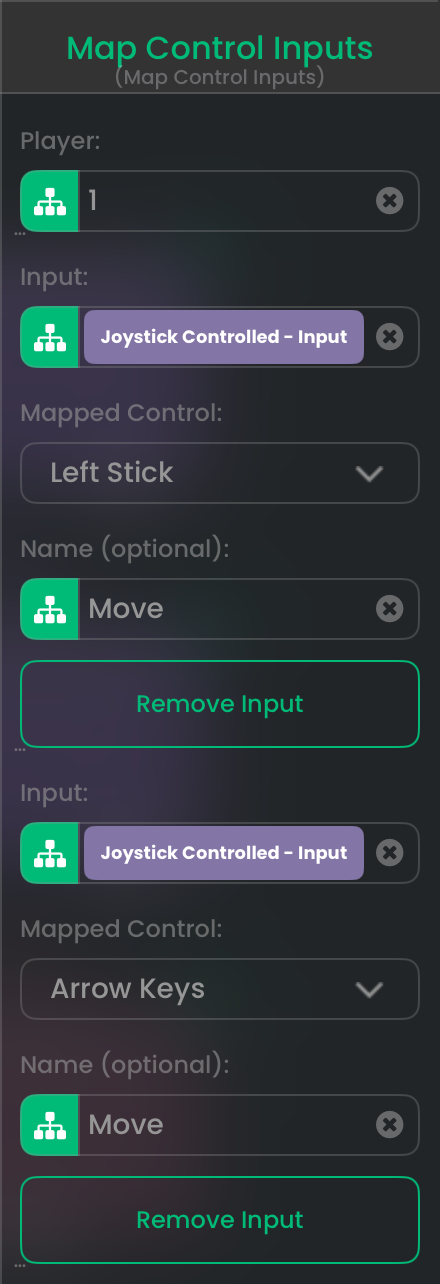
This capture focuses on the two Move rows. Add the Jump and Shoot rows with the values above.
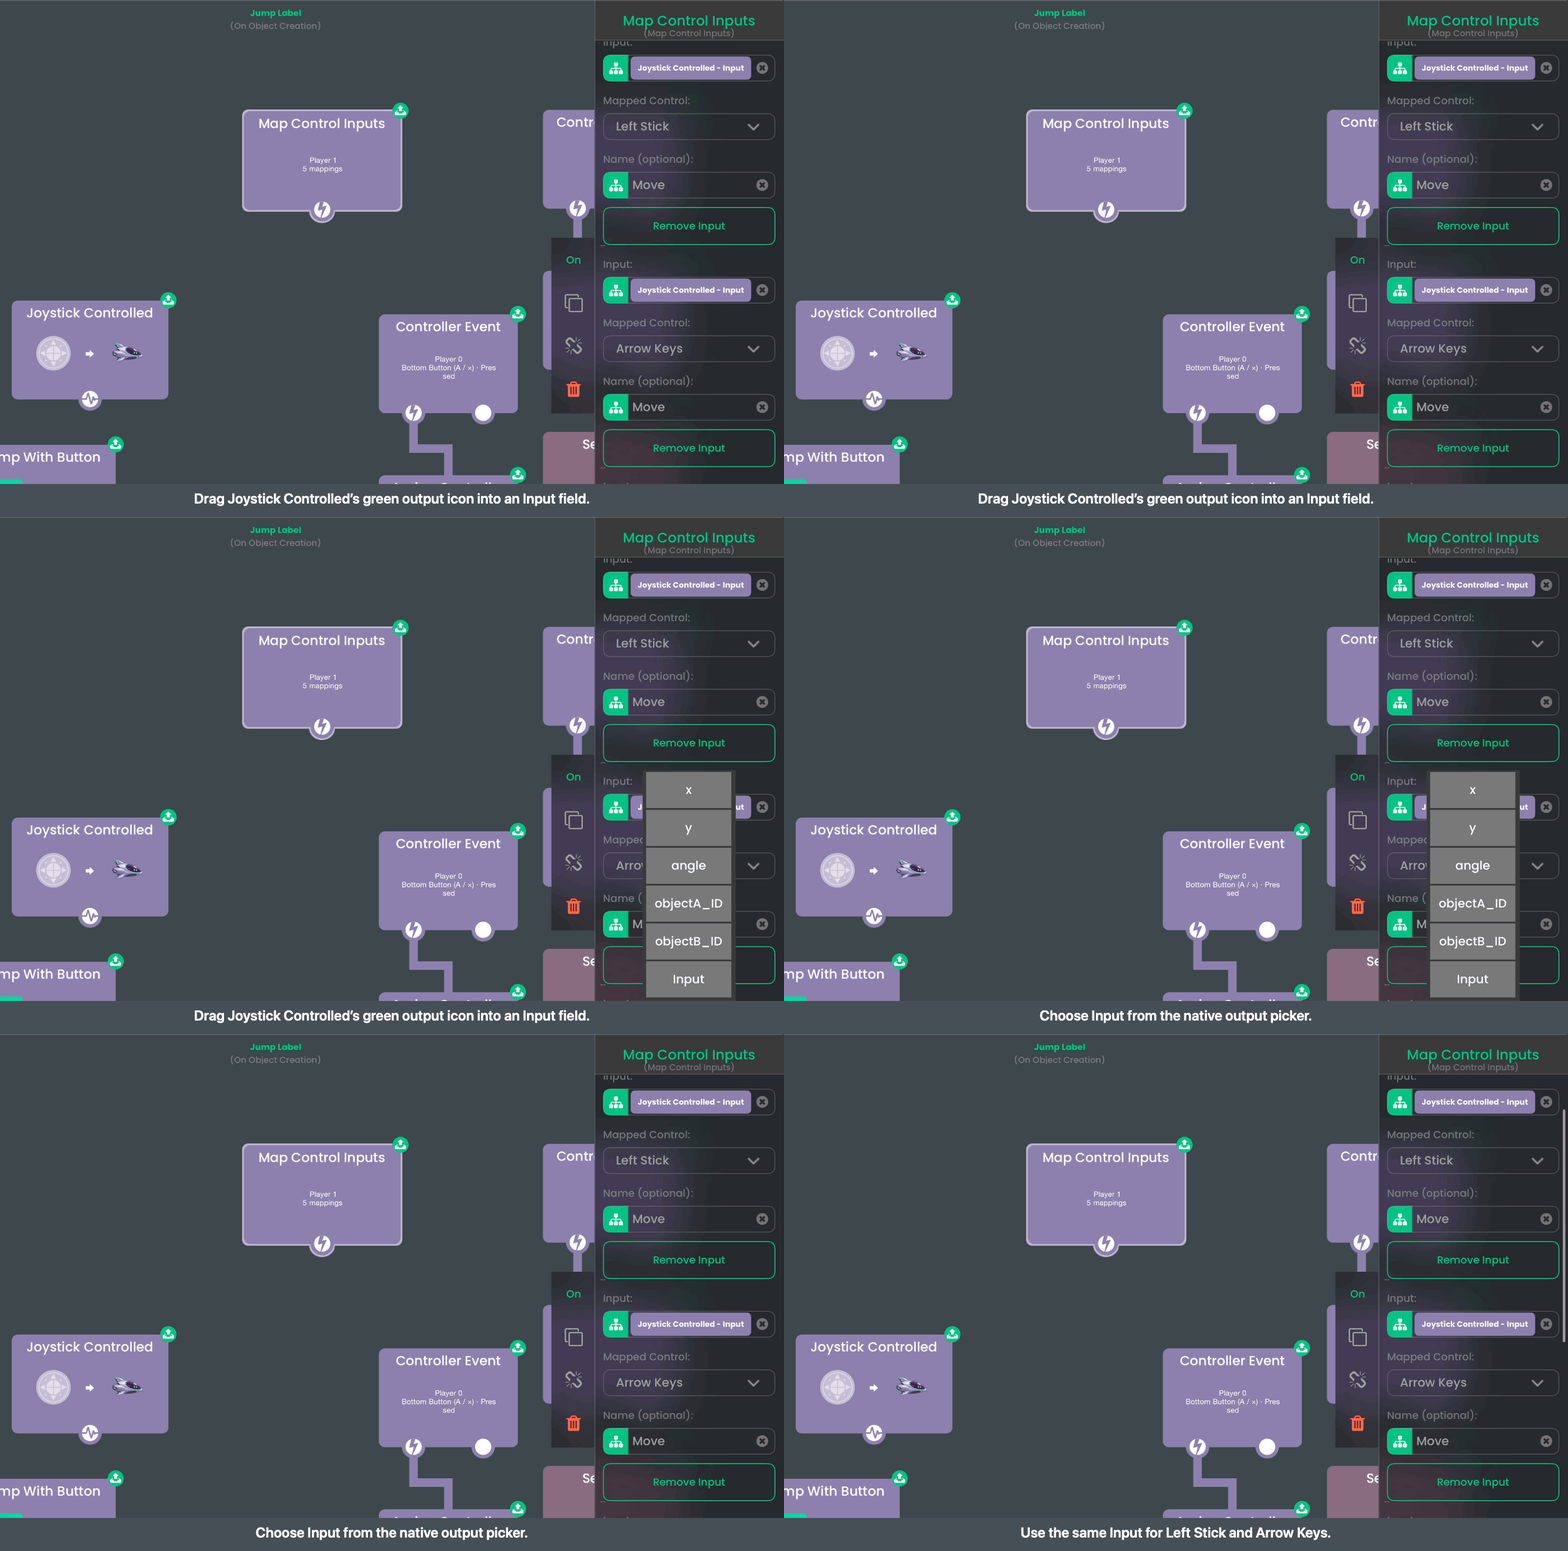
The GIF demonstrates the drag in the second Move row. You use the same gesture for each new row.
13. Check the original and added controls
Run your game. Test the original touch controls, then Left Stick, Bottom Button, and Right Shoulder. With a keyboard, test the arrow keys, Space, and F.
Try holding a touch button and its physical alternative together. Release one, then the other. The input remains held until its held sources release.
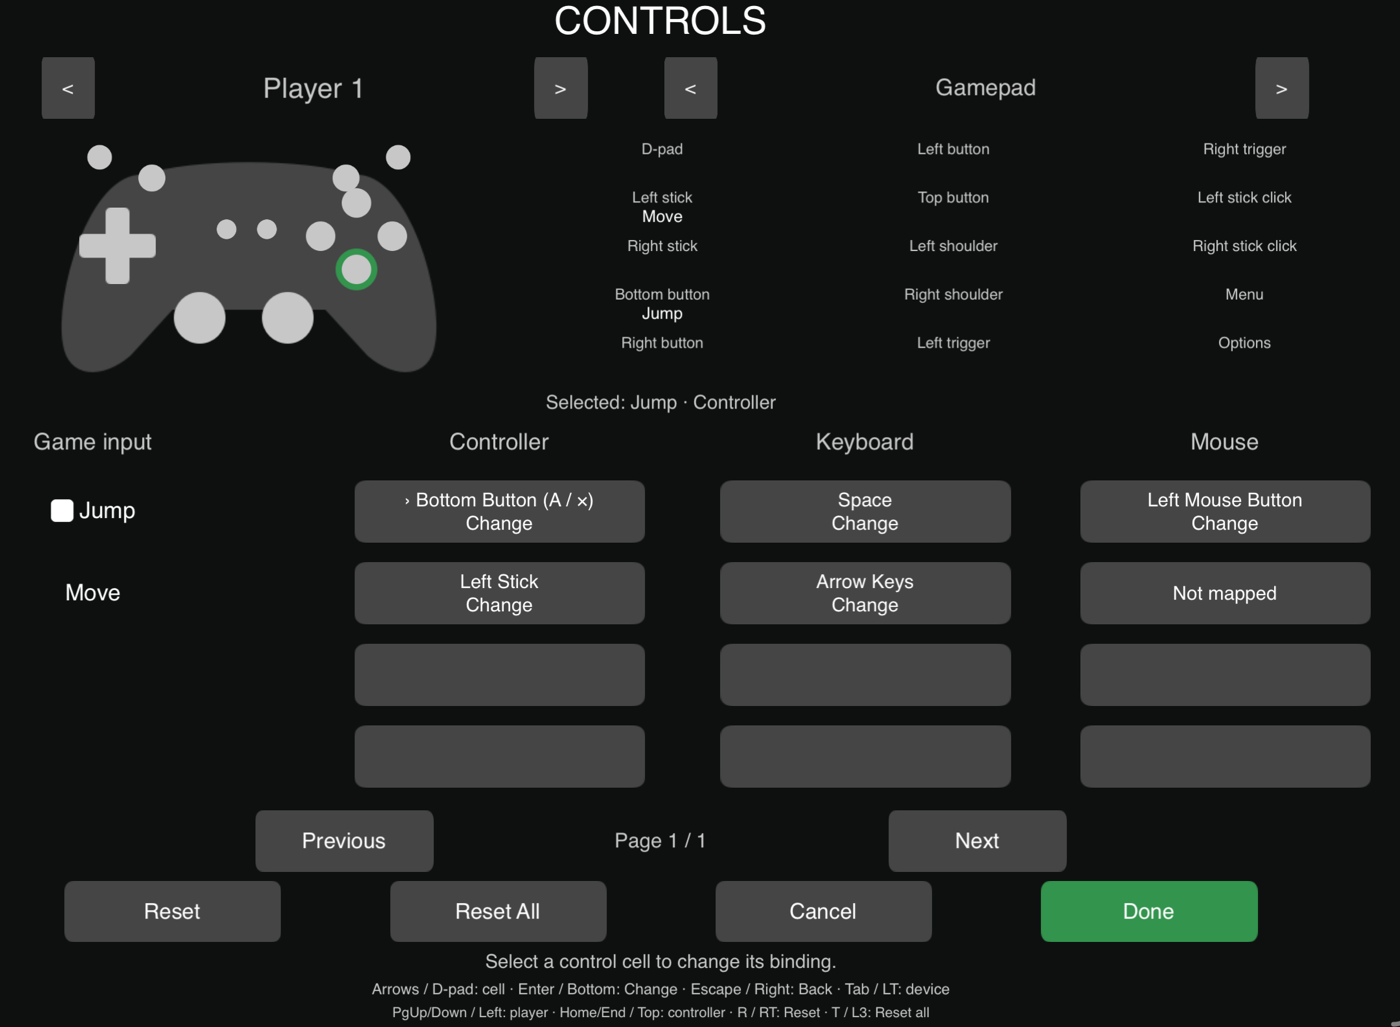
You will add this menu below. Its running table is also a useful place to check your action names and current bindings.
Map custom touch and keyboard inputs
14. Keep your custom touch action
For a small example, create an on-screen Object named Interact Button and a Label named ActionLabel. In one Behavior Tree, add Started Touching, select Interact Button as Object A, and keep Absorbs Touch on. Connect it to Set Label targeting ActionLabel, with Text Interacted!.
If your game already has a custom button, use its existing touch action instead. Keep its white gameplay connections.
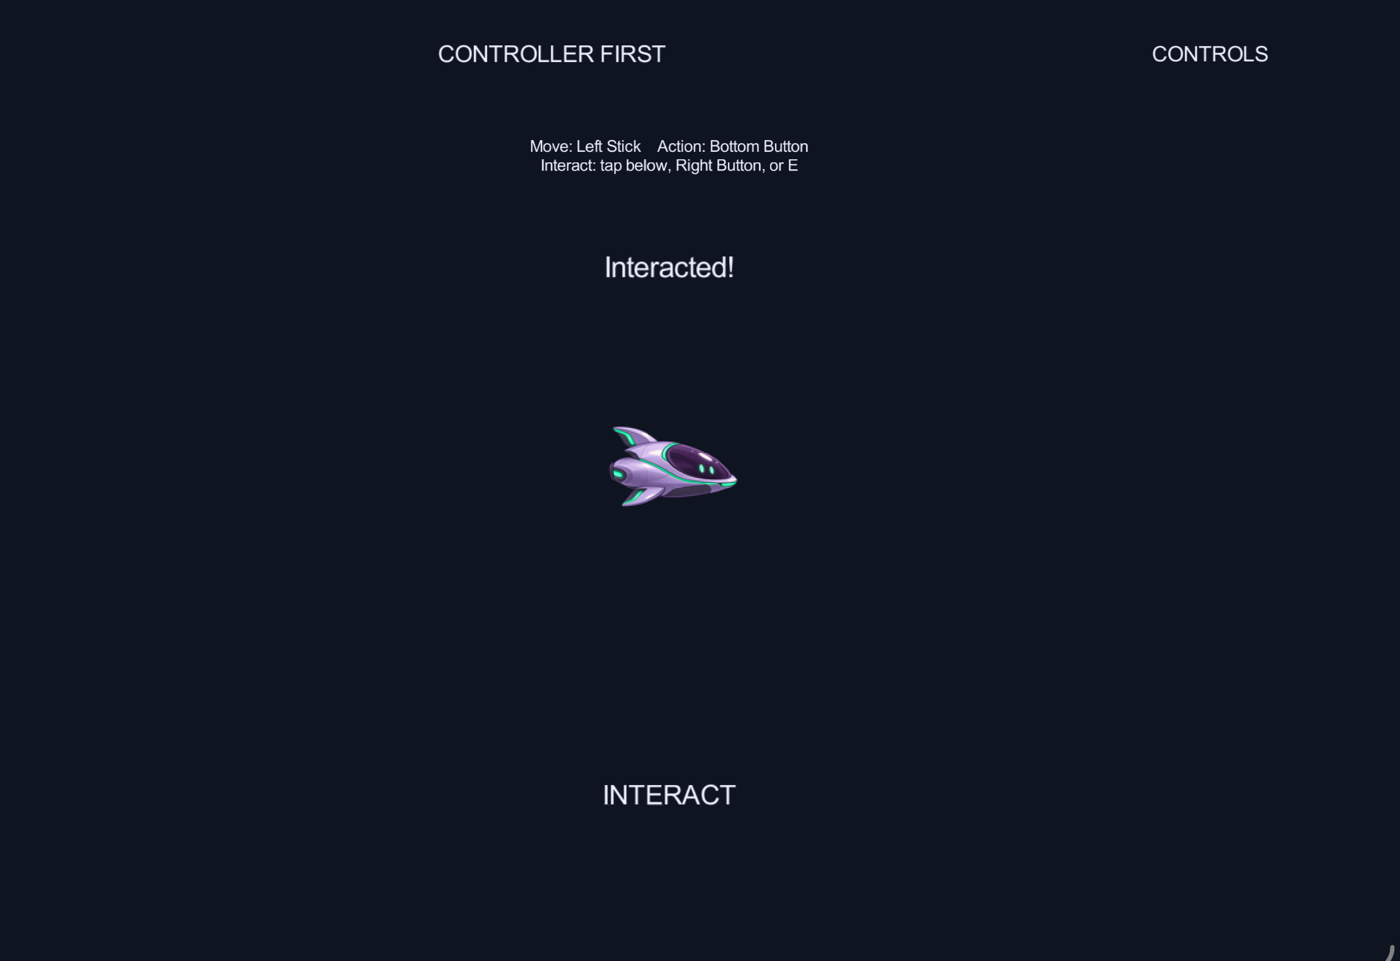
Tap the Object and confirm the action works before adding a mapping.
15. Add alternatives to that custom button
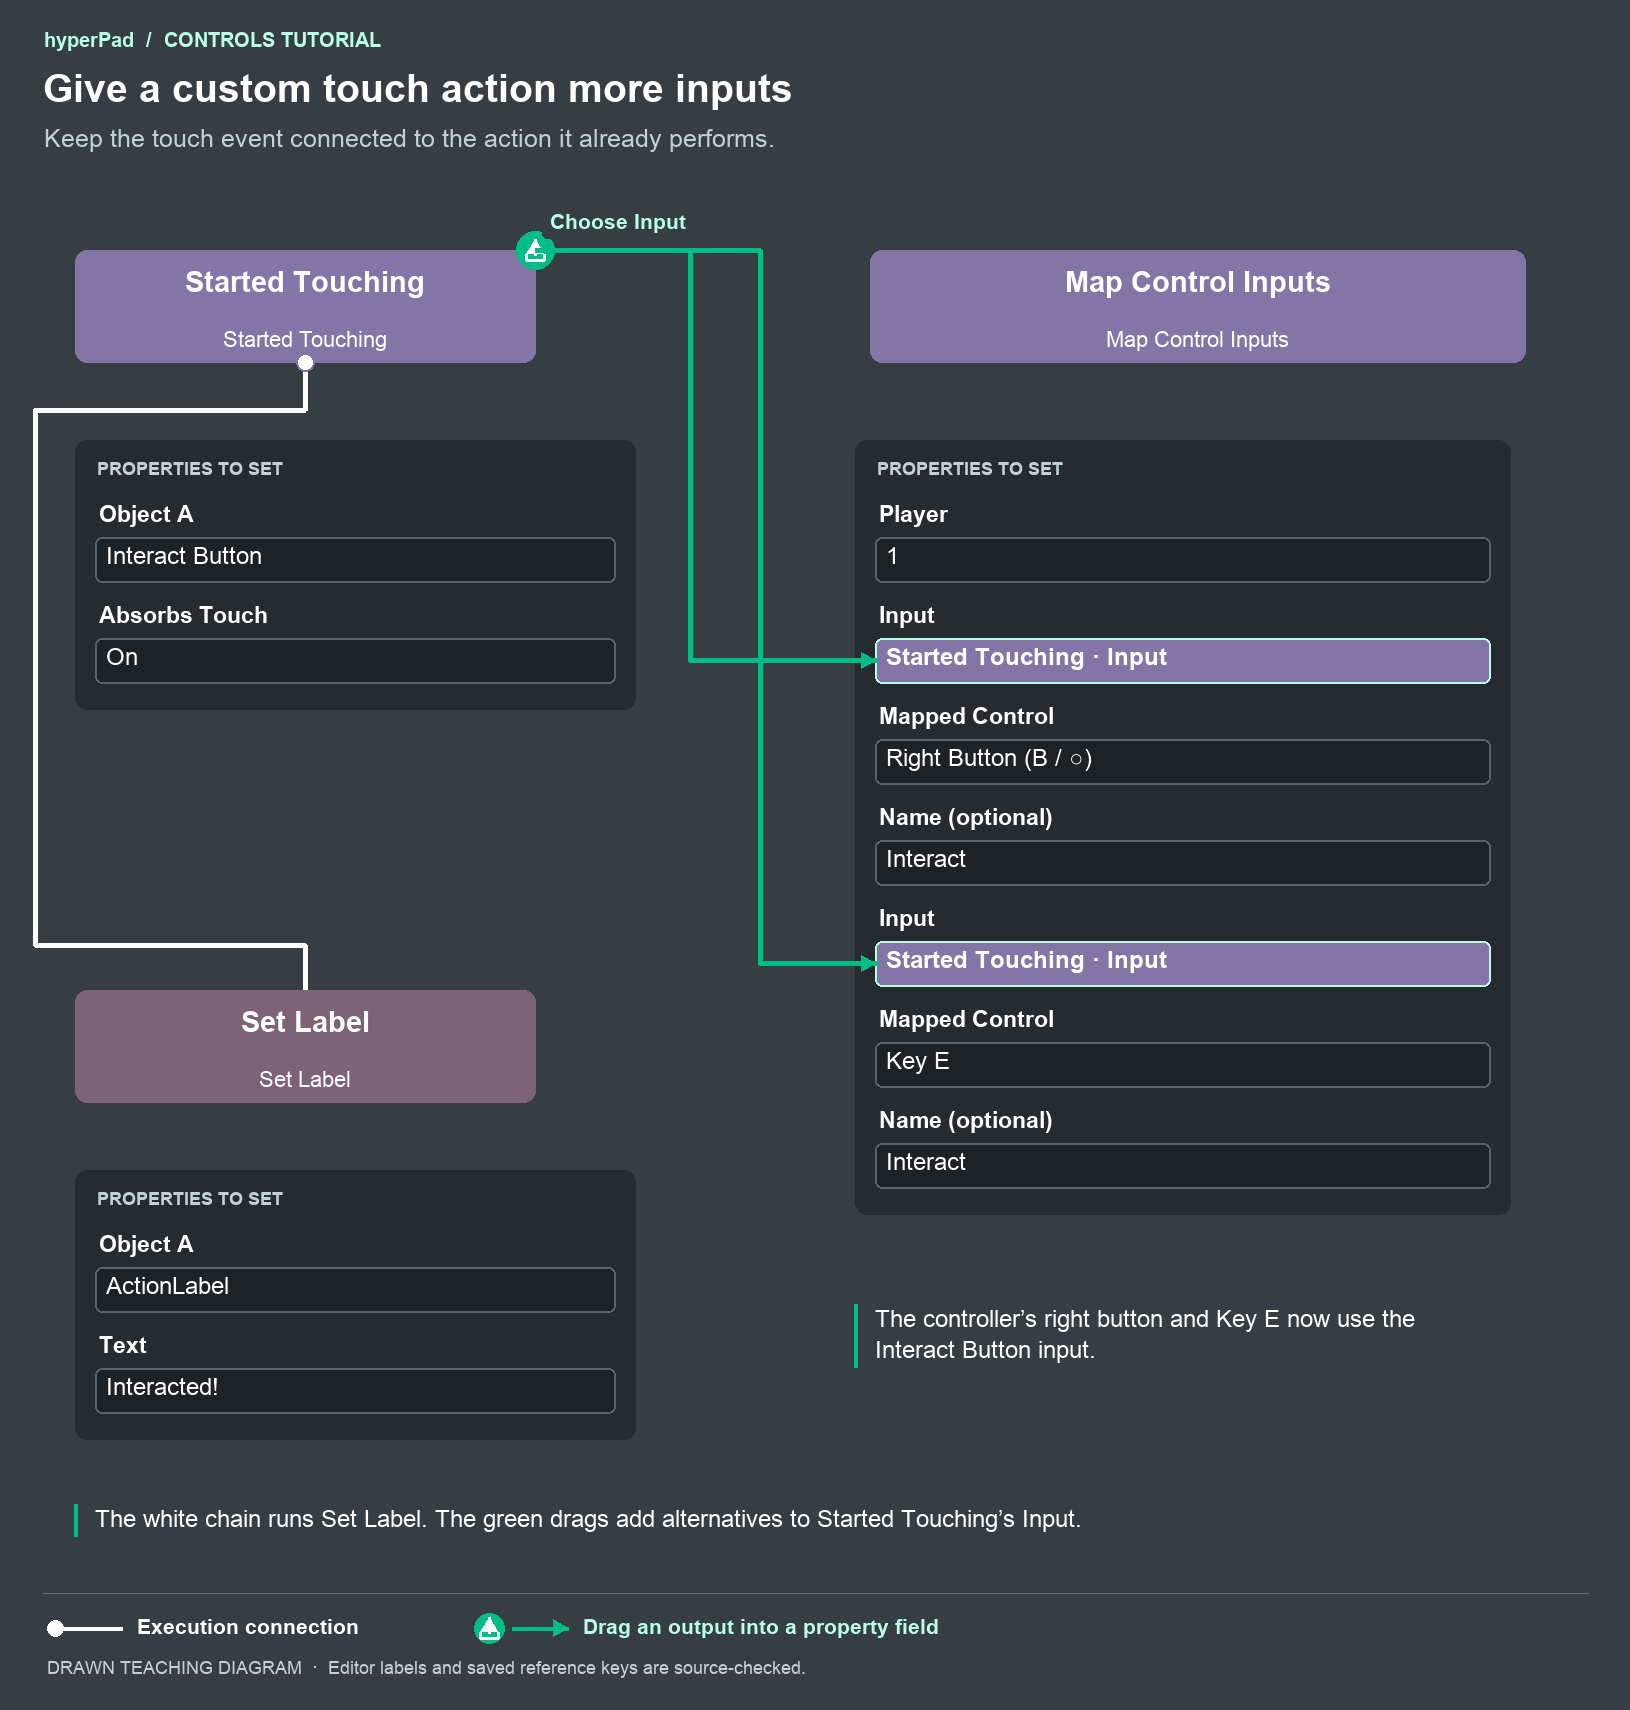
Add a separate root Map Control Inputs with Player 1. Drag Started Touching.Input into a row. Choose Right Button (B / ○) and name it Interact. Add a second row from the same Input, with Key E and the same Interact name.
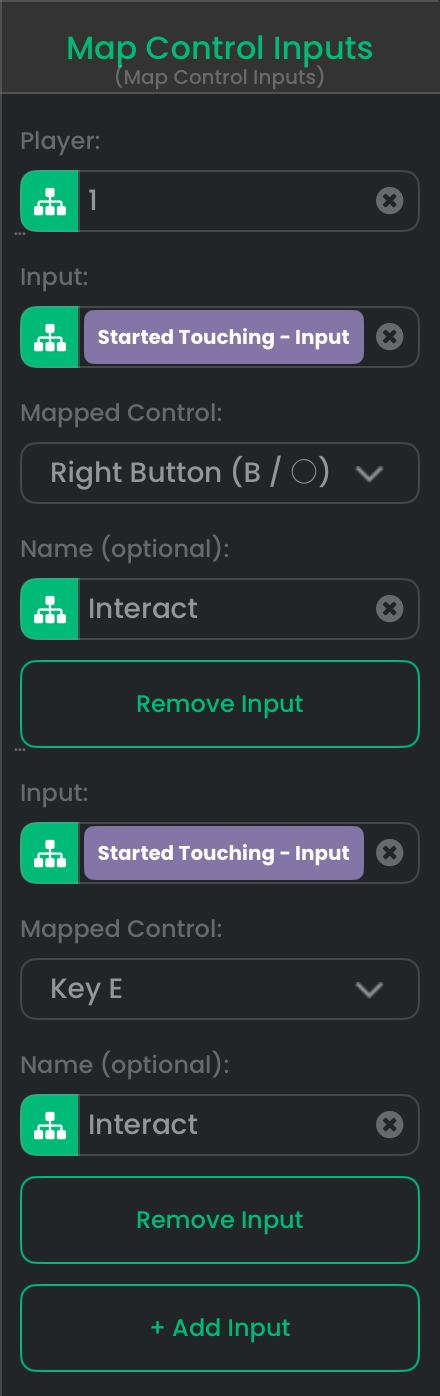
You can also tap Input and select Interact Button directly. That is useful when its touch behaviors live in a different Behavior Tree. Select the button that receives the input.
Run and try touch, the right face button, and E. Each should run the same existing action. If you also use While Touching and Stopped Touching on that Object, the mapped button supplies held and release state too.
Use compatible mappings for the input you selected. A button press maps to a button or key. A swipe's path or a multi-finger gesture needs gameplay you author for a controller.
Optional mouse alternative: add another row from Interact Button's Input and choose Left Mouse Button. This supplies the same button state. Keep pointer-position and drag gameplay in the behaviors that need those values.
16. Map a concrete Keyboard Event
If your custom action already starts with Keyboard Event, keep that behavior and its children. For this example, set Keyboard Event to Event On Press and Key Spacebar, then connect it to Set Label with Action!.
Add Map Control Inputs for Player 1. Drag Keyboard Event.Input into a row and choose Bottom Button (A / ×). Name the row Action.
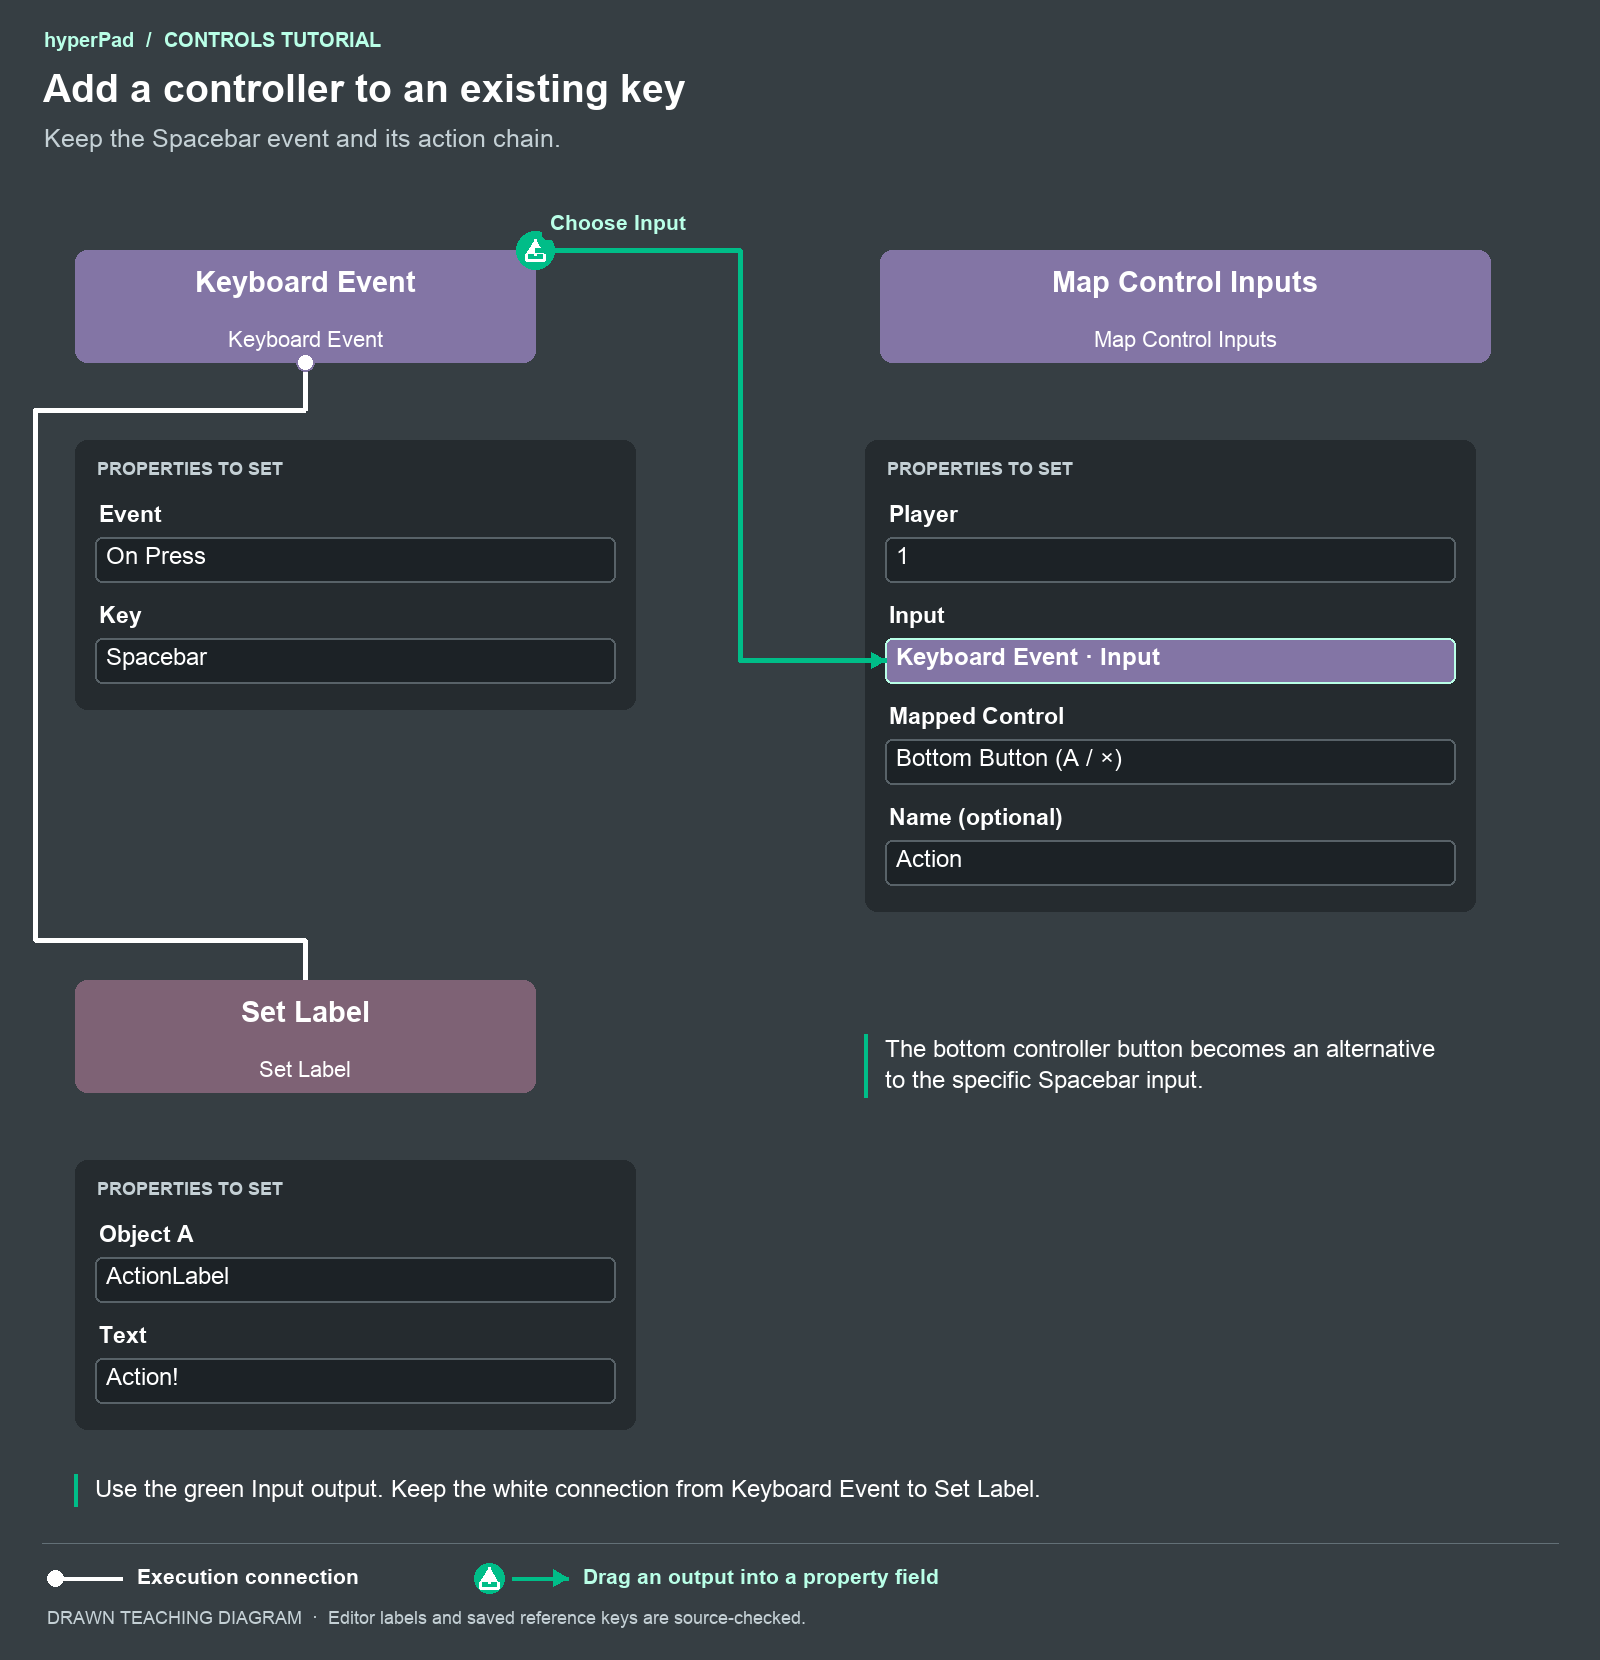
Spacebar and the controller button now enter the same action. Use a single concrete key for this recipe. Any key and key-sequence events do not identify one key to map. The Keyboard Event picker calls the key Spacebar; the Map picker calls the same key Space.
Show connected devices
17. Read the initial controller count
Add a Label Object named Controller Count to your active menu or overlay UI. Open its Behavior Tree. Add Get Controllers as a root and connect it to Set Label. Set Object A to Controller Count. Drag Get Controllers' count output into Text.
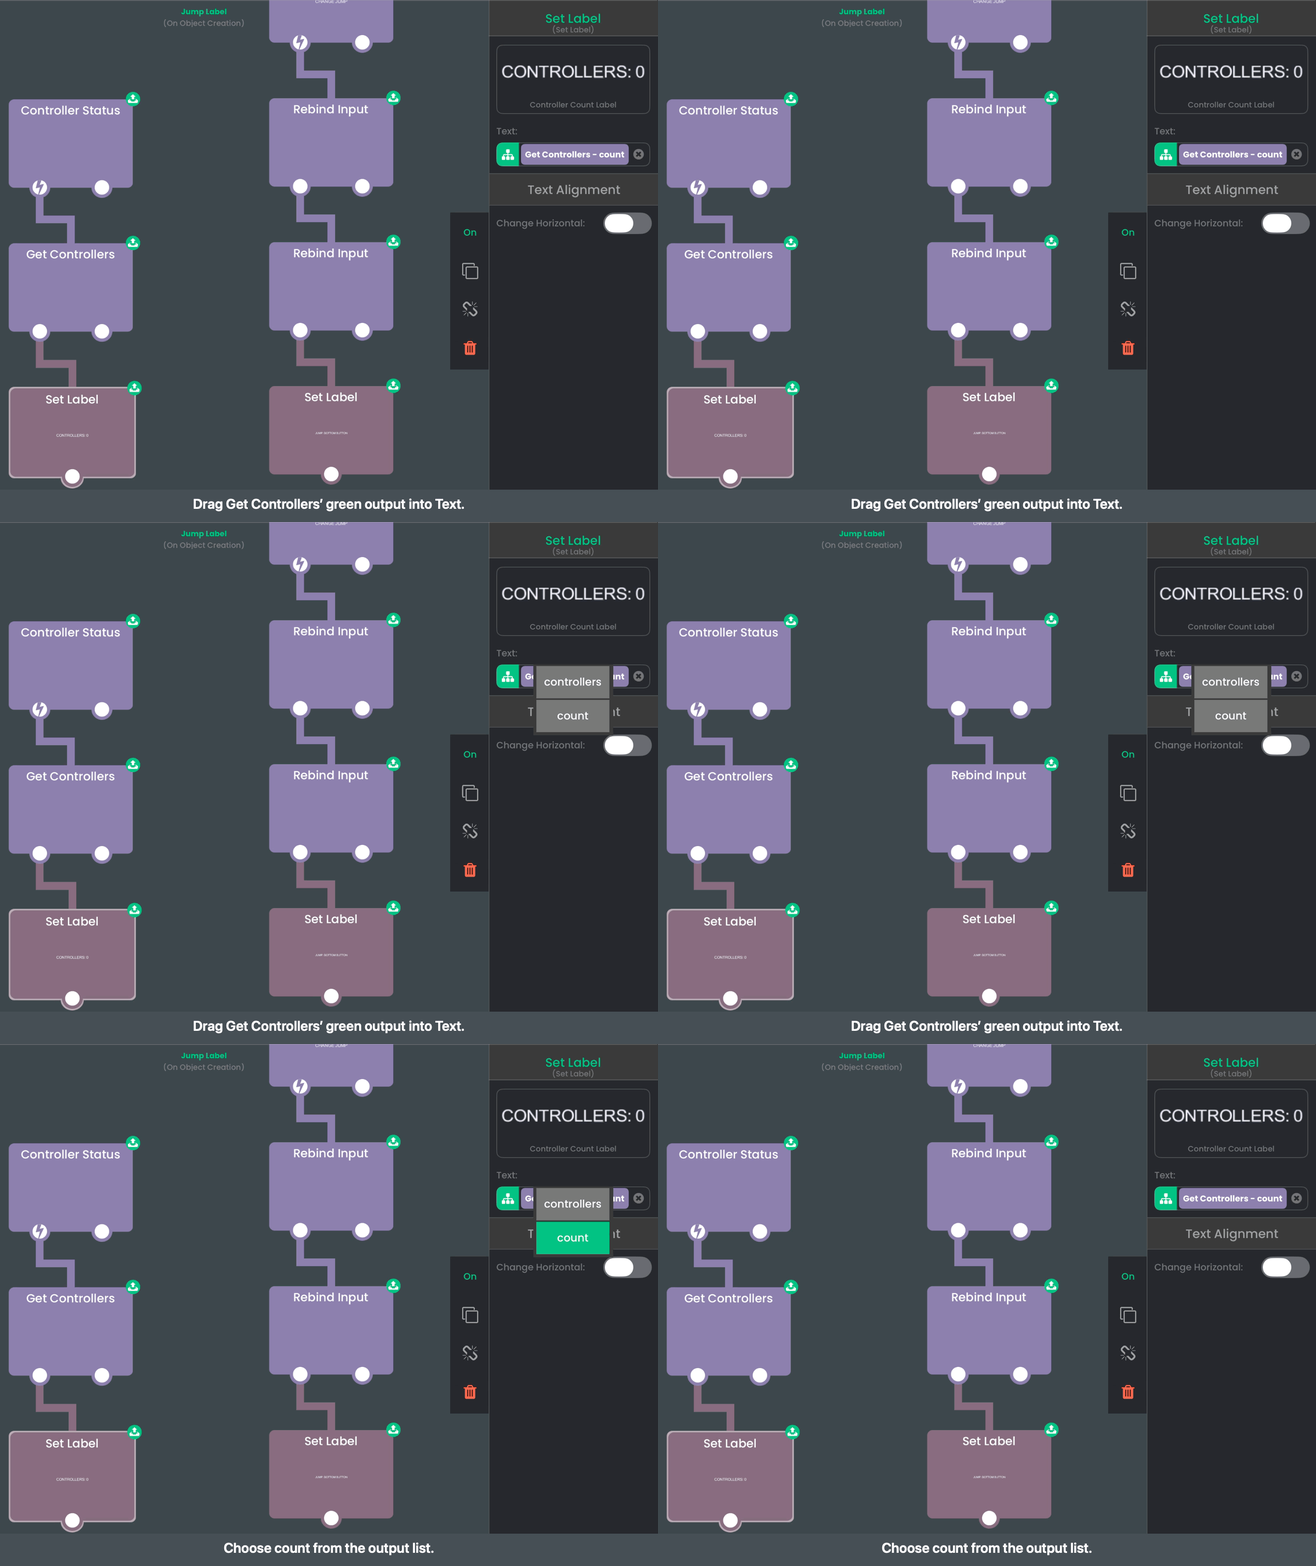
The label shows a number, such as 0. Add a separate static heading if you want words around it. This count includes controllers. Keyboard and mouse are separate input devices.
18. Refresh the count after a change
In the same Behavior Tree, add Controller Status with Player 0 and Event Changed. Connect it to a second Get Controllers, then a second Set Label targeting Controller Count. Drag the second getter's count into the second label behavior's Text.
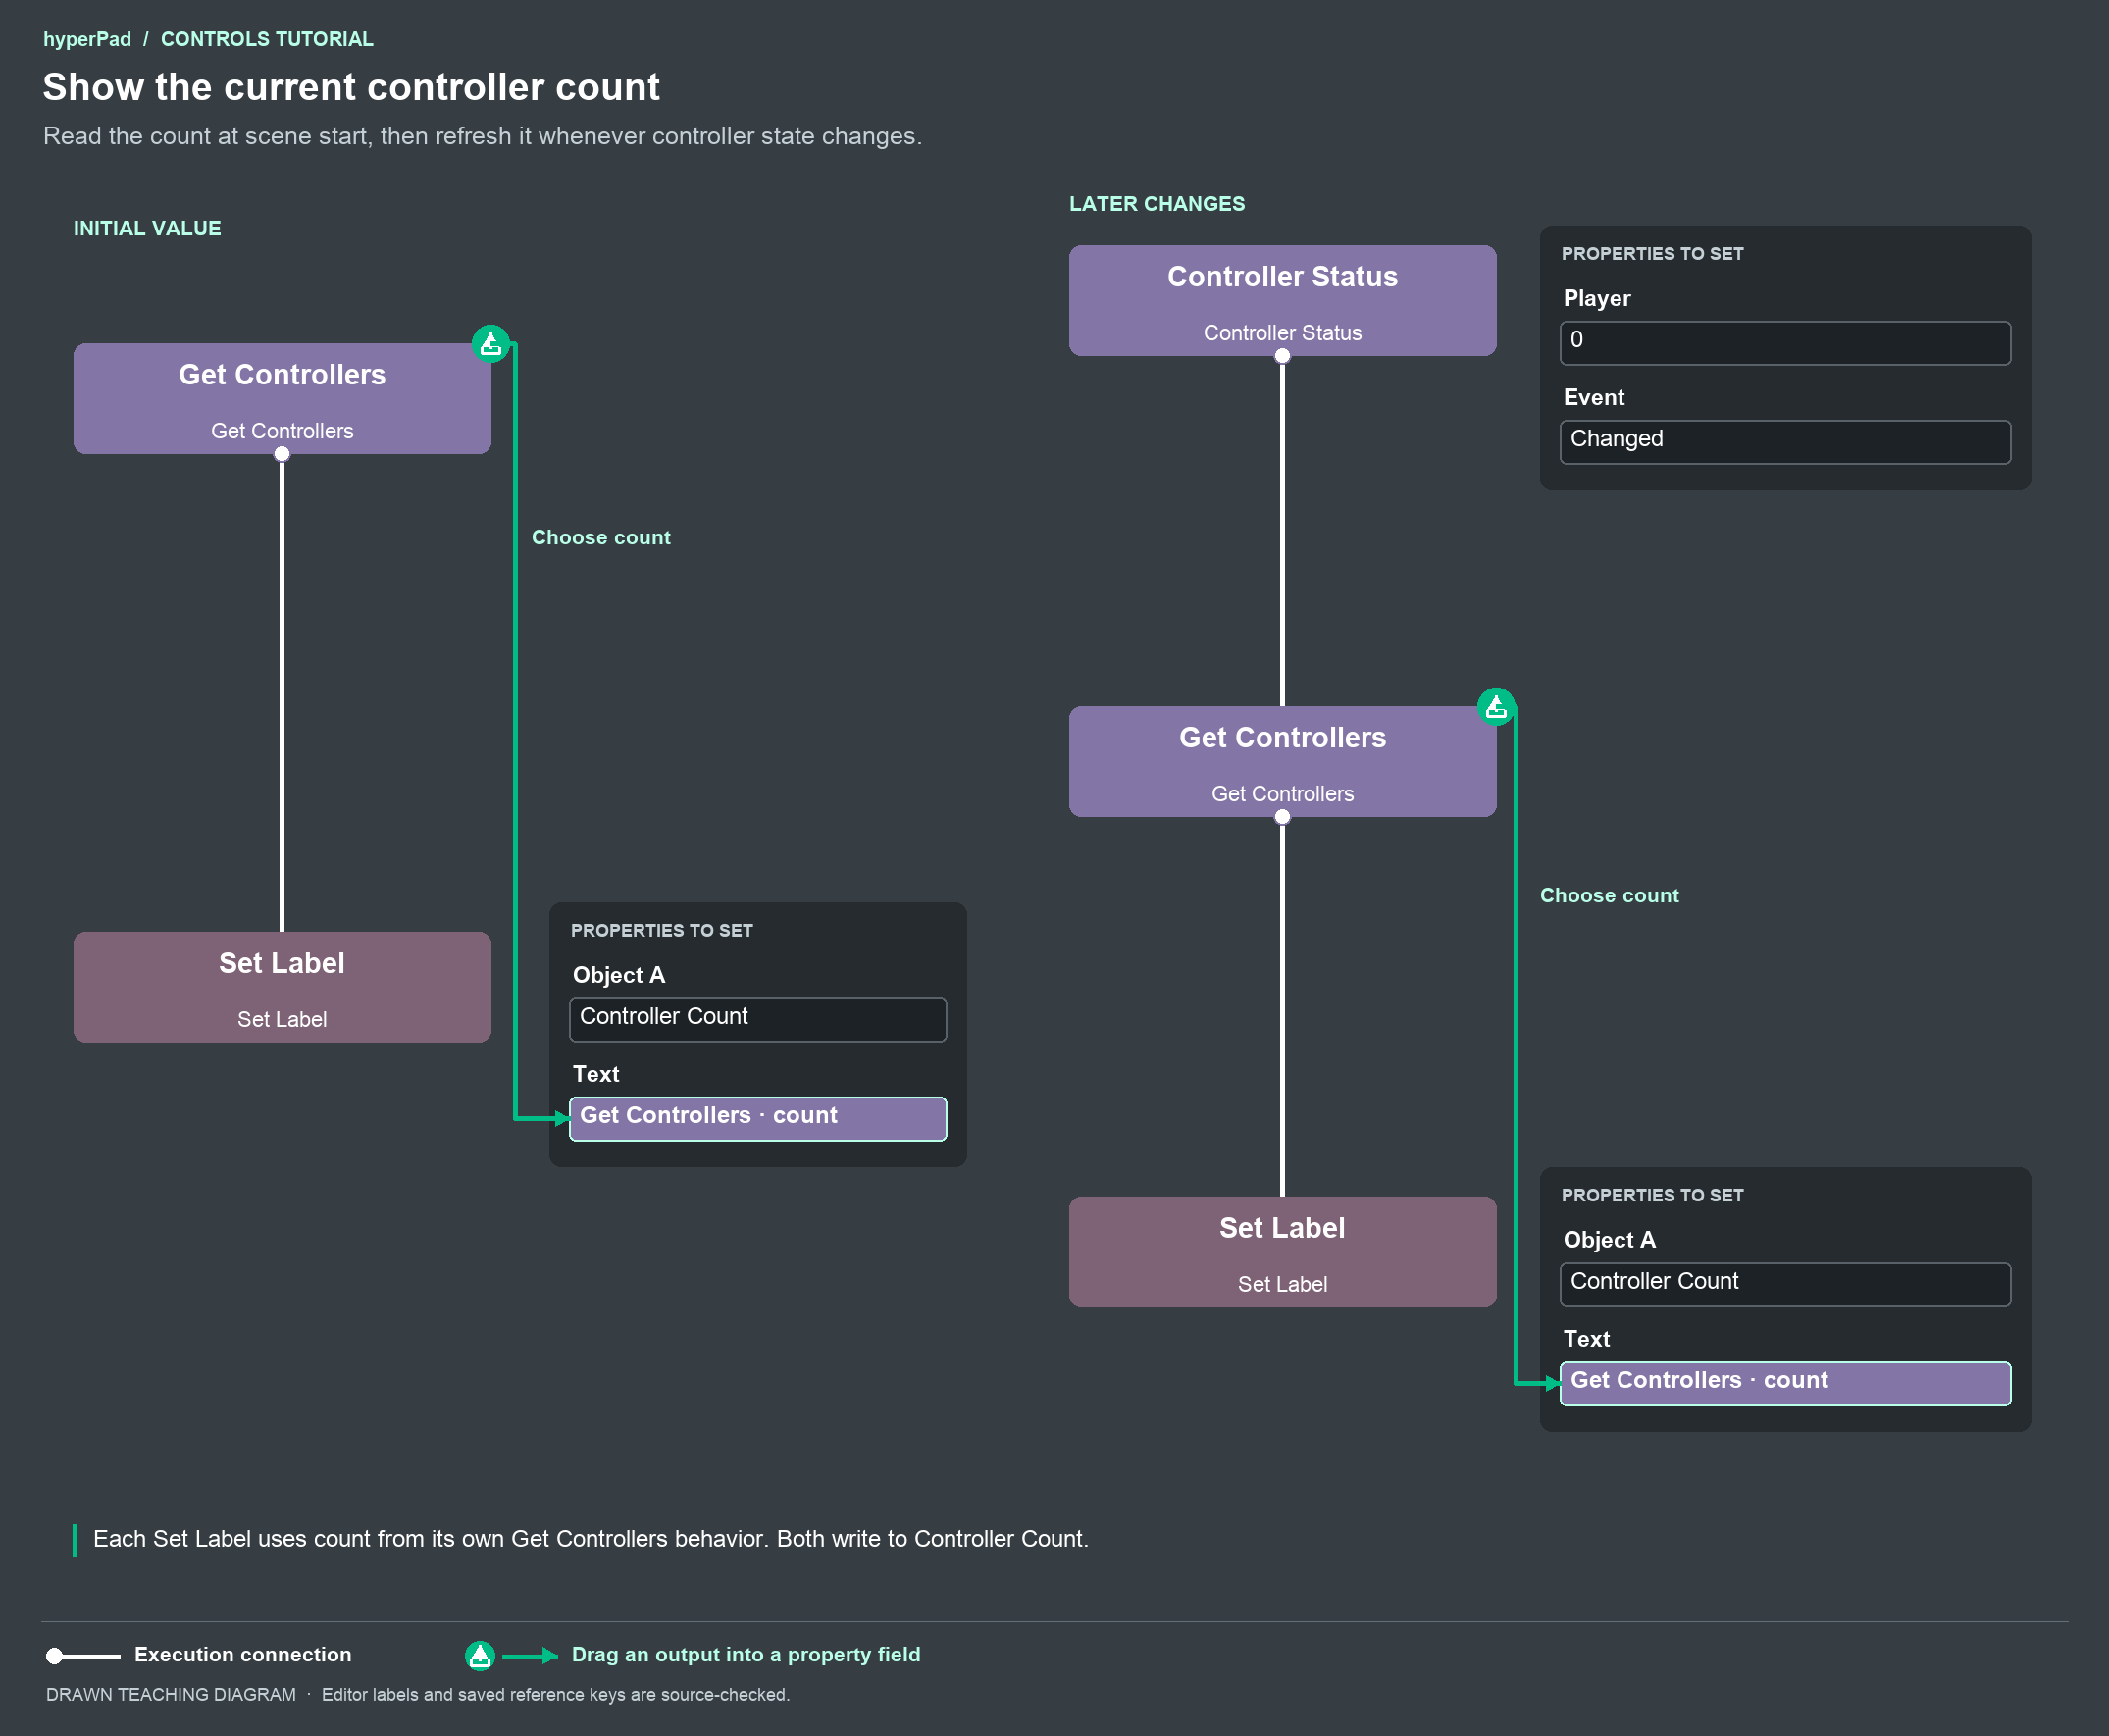
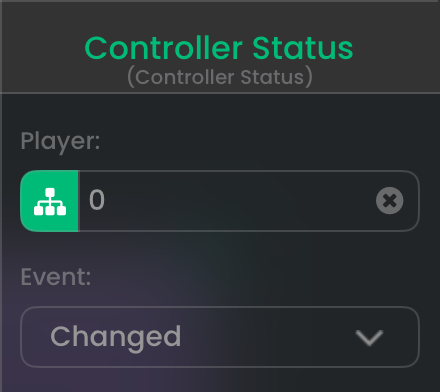
Keep both branches in the active UI. Get Controllers supplies the first value when the UI starts. Controller Status reports later connection and assignment changes. If no controller is connected, the count stays 0. A paused gameplay Scene does not receive these callbacks. Refresh its count when returning, or keep this display in the active overlay.
For a full device chooser, use the generated Controls overlay in the next section. Get Controllers also exposes the device list if you want to build your own UI.
Add the Controls overlay and rebinding
19. Open your Controls menu
When you add a mapping, hyperPad adds an editable Controls overlay. Open it from the editor's Overlays list. Its Objects form the controller drawing, action rows, device chooser, and rebinding buttons.
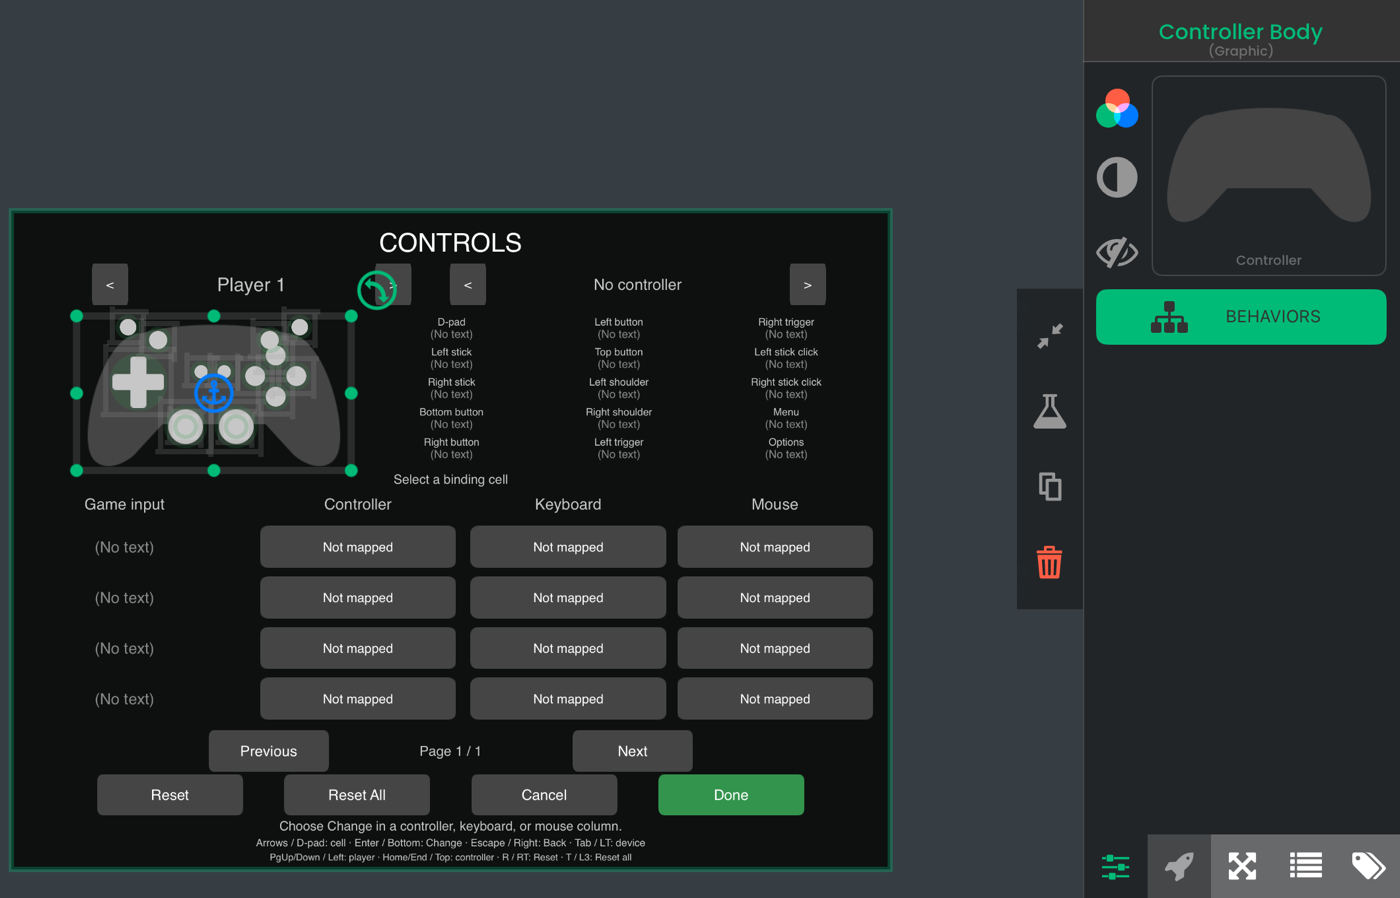
In your game or pause menu, add a Controls Button. Add Started Touching for that Object and connect it to Load Overlay. Select Controls, choose Transition None, and keep Pause on. The overlay remains interactive while the underlying Scene waits.
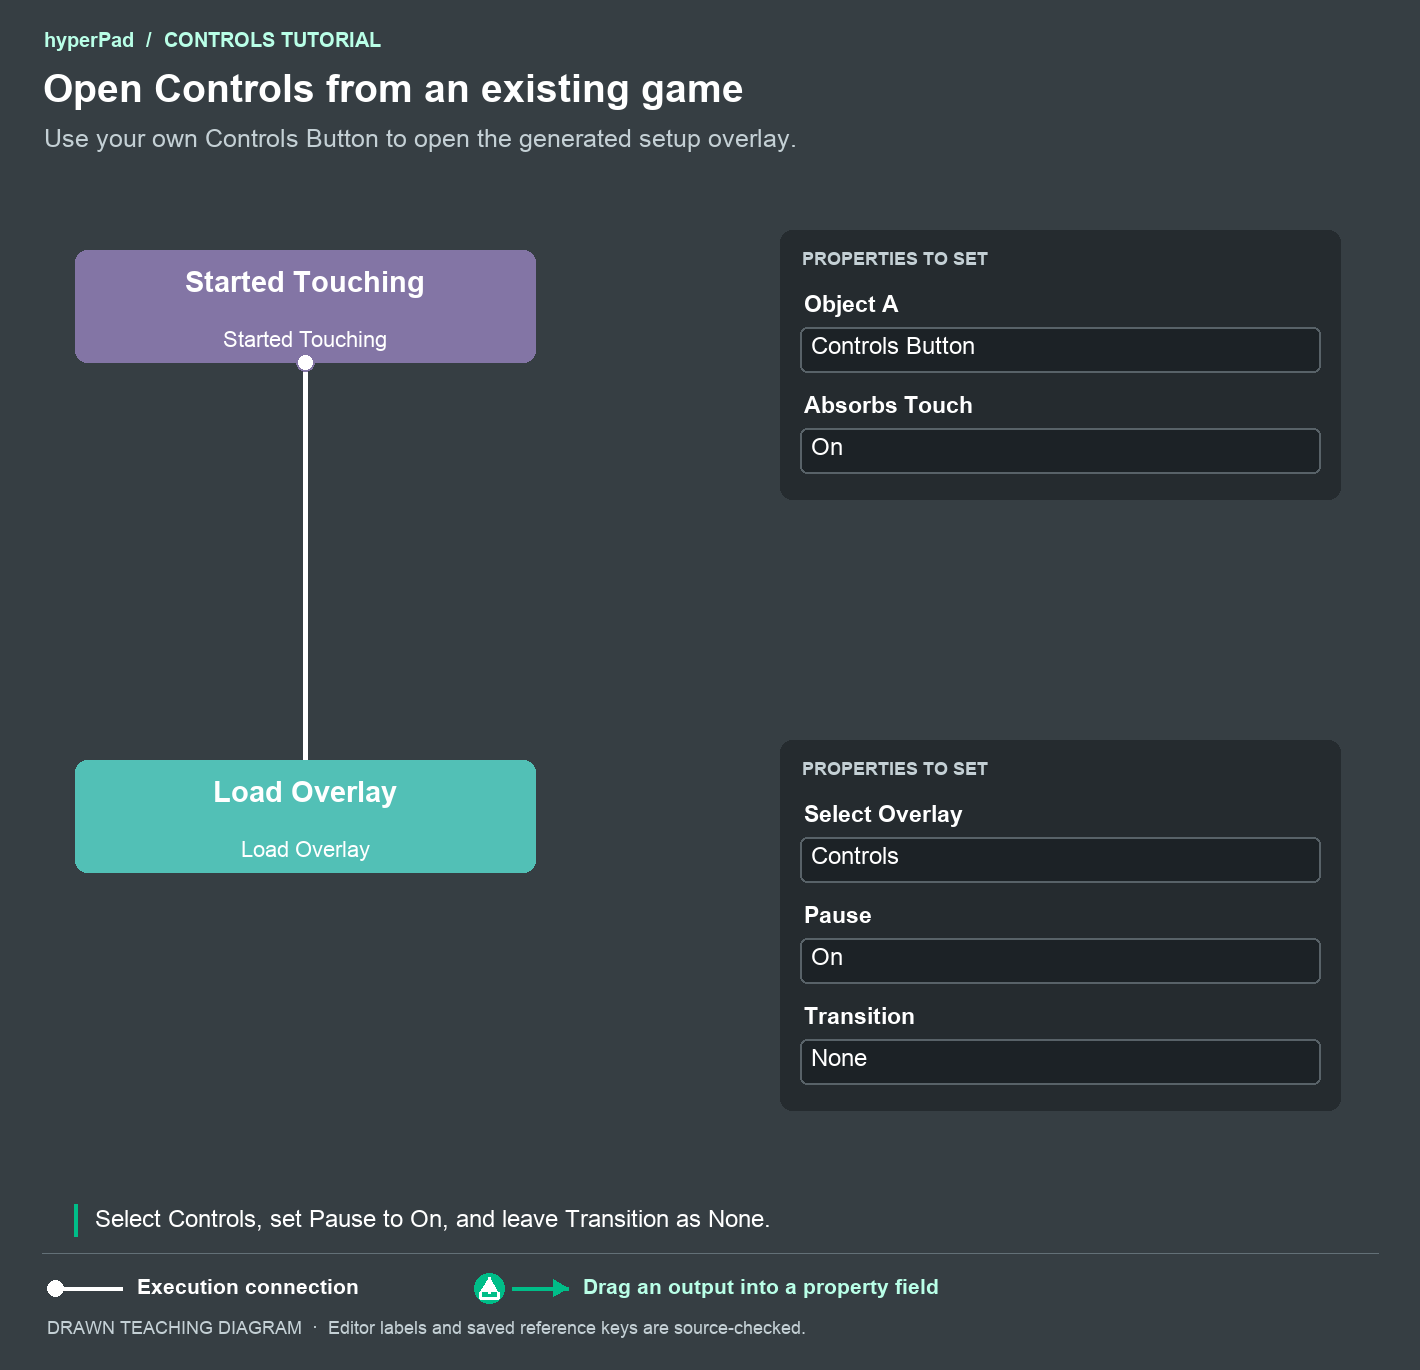
If you built the custom velocity example in steps 1–7, insert Set Velocity before Load Overlay. Target Player, turn both Keep Velocity switches off, and set x and y to 0:
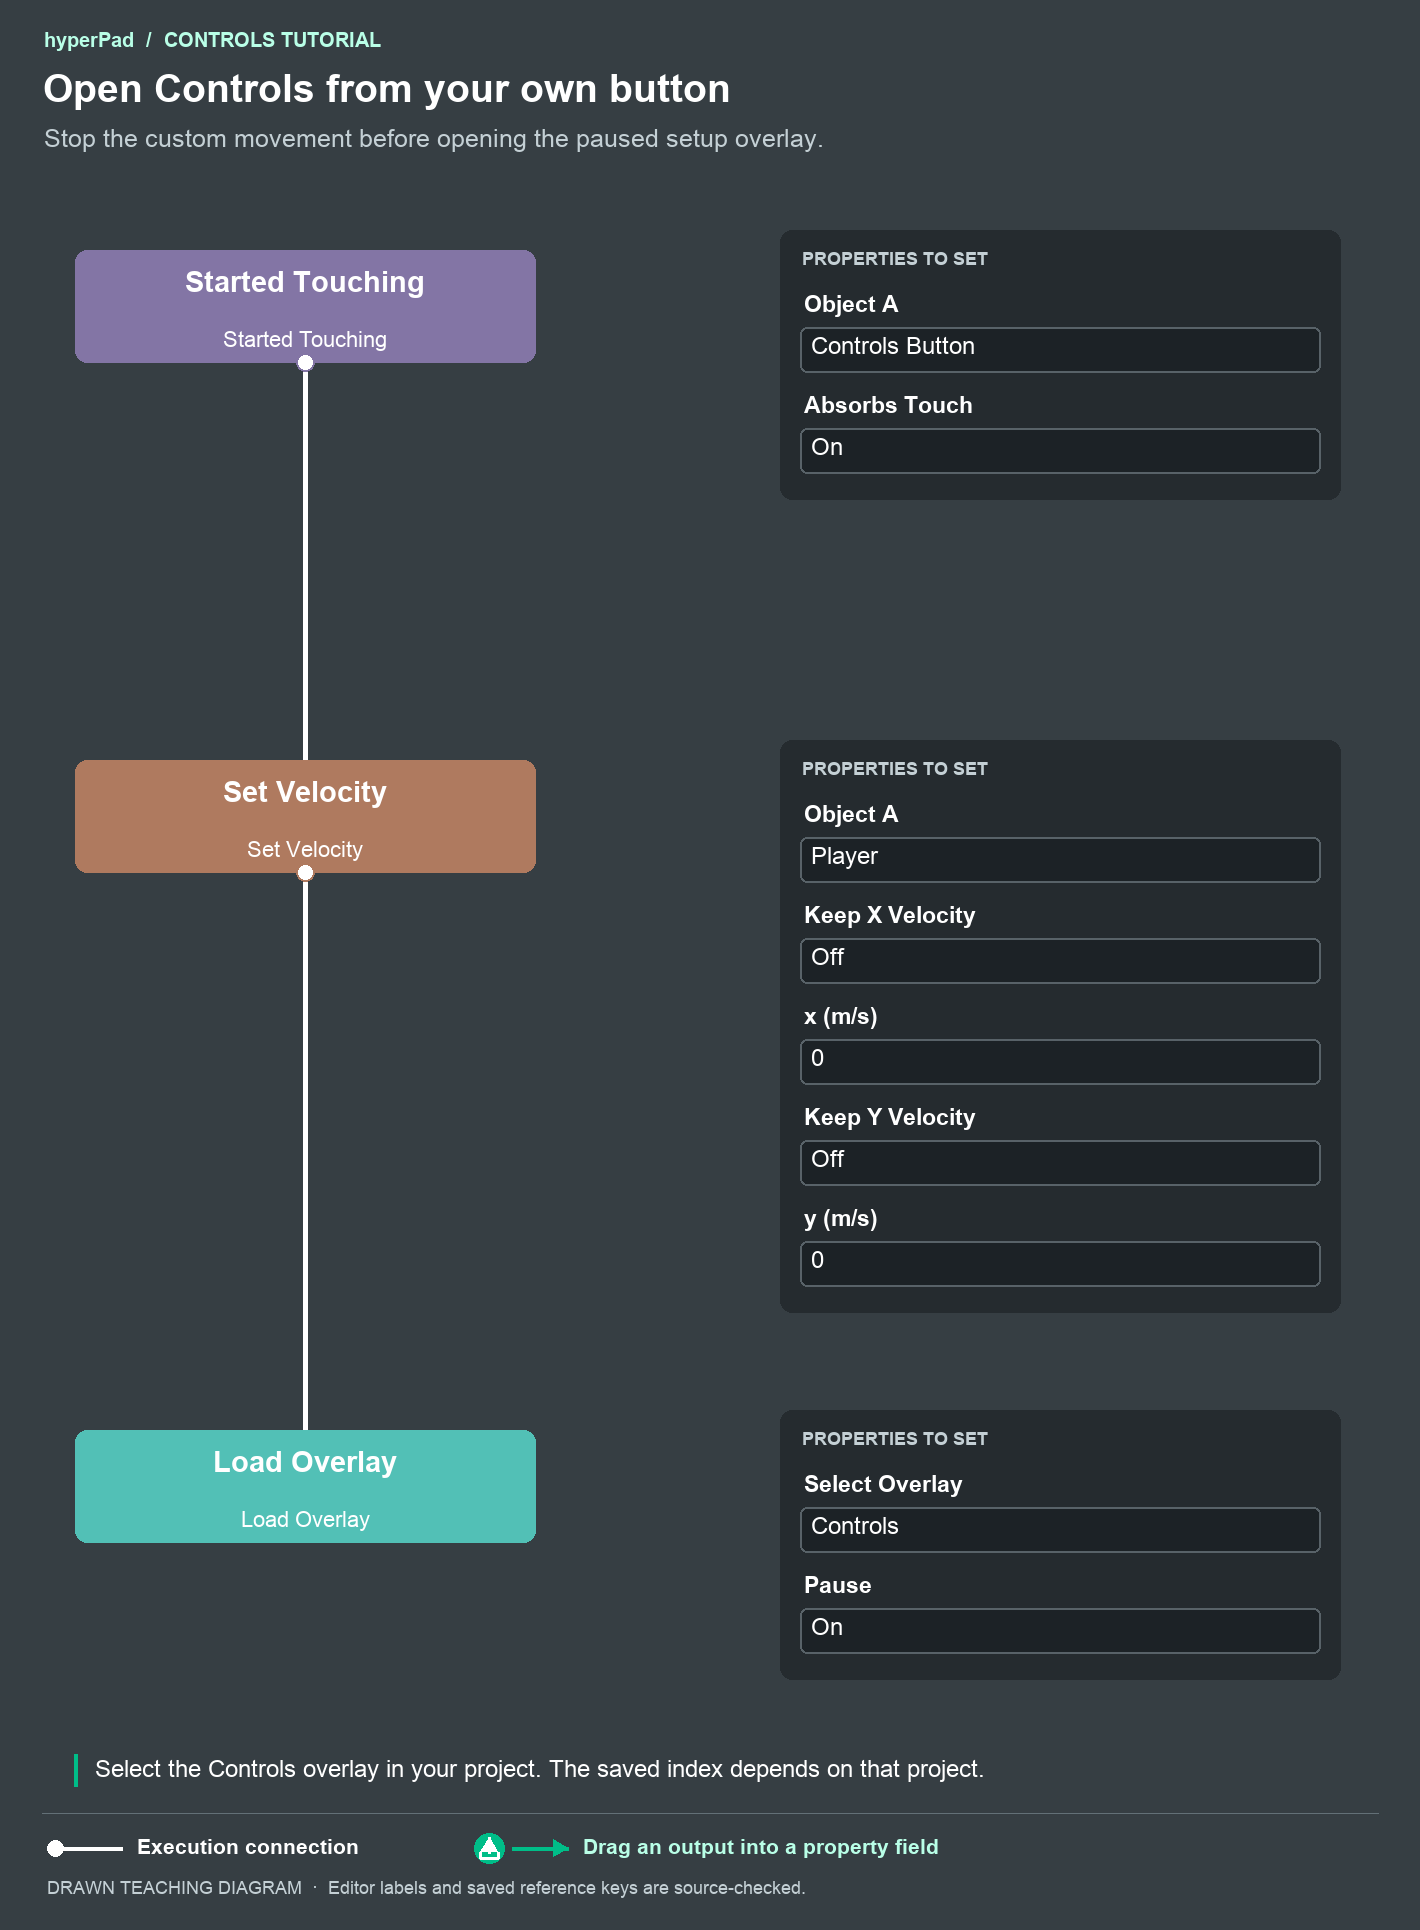
Stopping first prevents that example from keeping its last velocity when the menu closes after the stick has returned to neutral. For this custom movement, route every pause opener through the same zero-velocity action. This includes the generated Menu and Escape shortcuts, your pause button, and the Player 2 Selection opener below. Keep the template's existing event settings and Load Overlay selections when inserting it.
20. Match the overlay to your game
Select an overlay Object, such as Controller Body, and open its Graphic properties. Use the color picker to tint it. The template's Graphics use white source artwork with authored tints, so you can change their colors in the editor. You can replace the artwork with your own too.
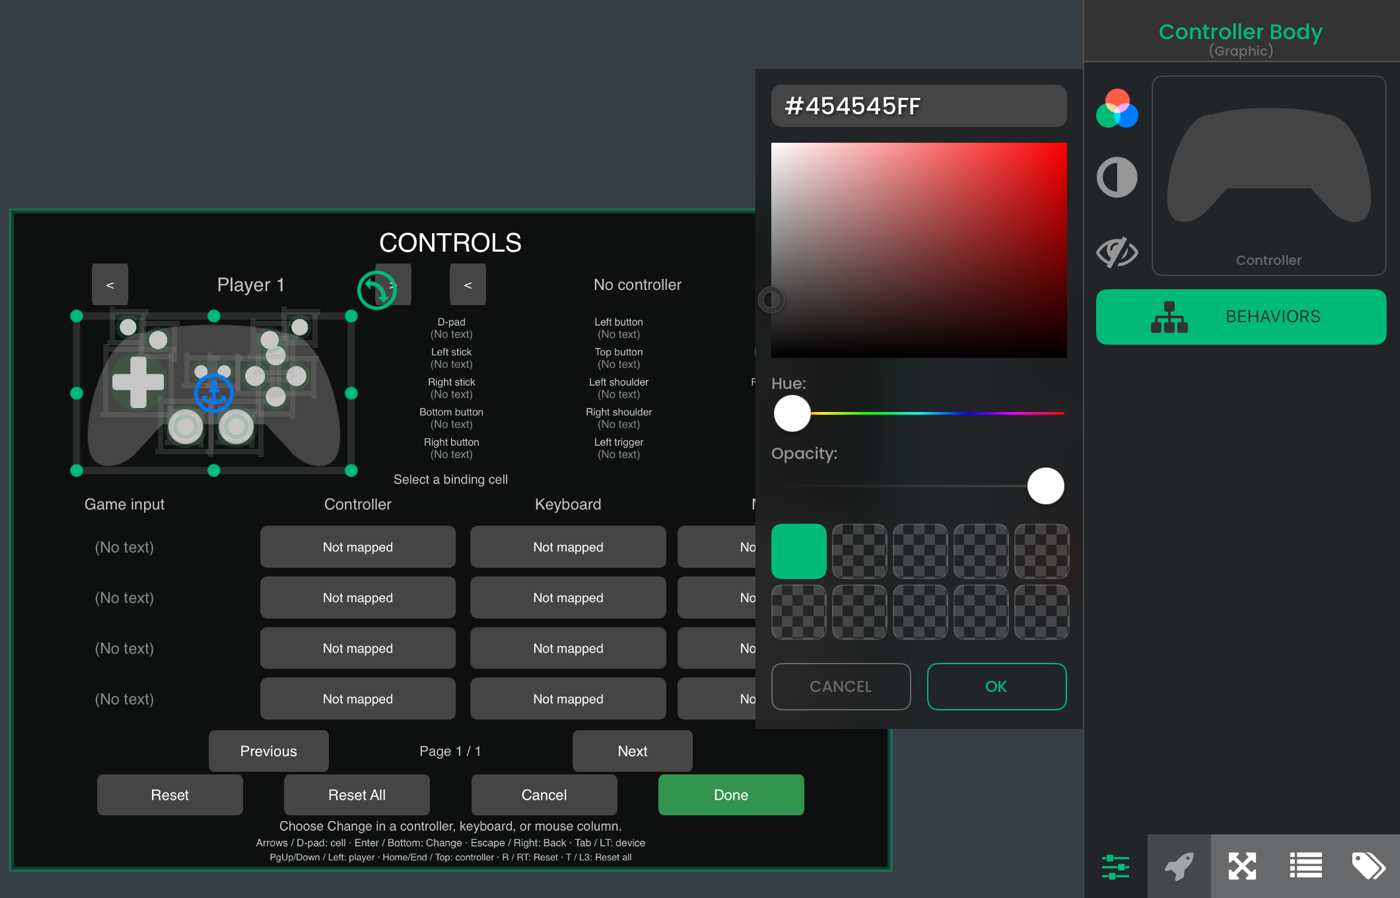
Keep the generated behavior references and the Done/Cancel connections when changing the layout. Editor labels are placeholders. The action names and current bindings fill in when the overlay runs.
21. Choose a player and connected device
Run your game and open Controls. Choose Player 1. The Move and Jump names in steps 21–23 come from the mapped-game example. Controller Event bindings use their behavior titles, so give your from-scratch events clear titles if you want different names in this menu. Use the device chooser to inspect connected controllers and choose the one for that player.
Your menu reports the devices actually connected to your runtime. Use the platform's Bluetooth or USB setup to connect another device. Choosing a device here assigns it inside your game.
The table groups alternatives that use the same input and action name. The six-row example shows Move, Jump, and Shoot with a controller choice and a keyboard choice for each. A Not mapped cell means you have not authored an alternative for that family. Add a Map row in the editor to provide one.
22. Let your players rebind an action
With a connected controller assigned to Player 1, select Change in Jump's Controller cell. Press the controller button you want to use for Jump. The menu listens for a compatible input and updates that cell.
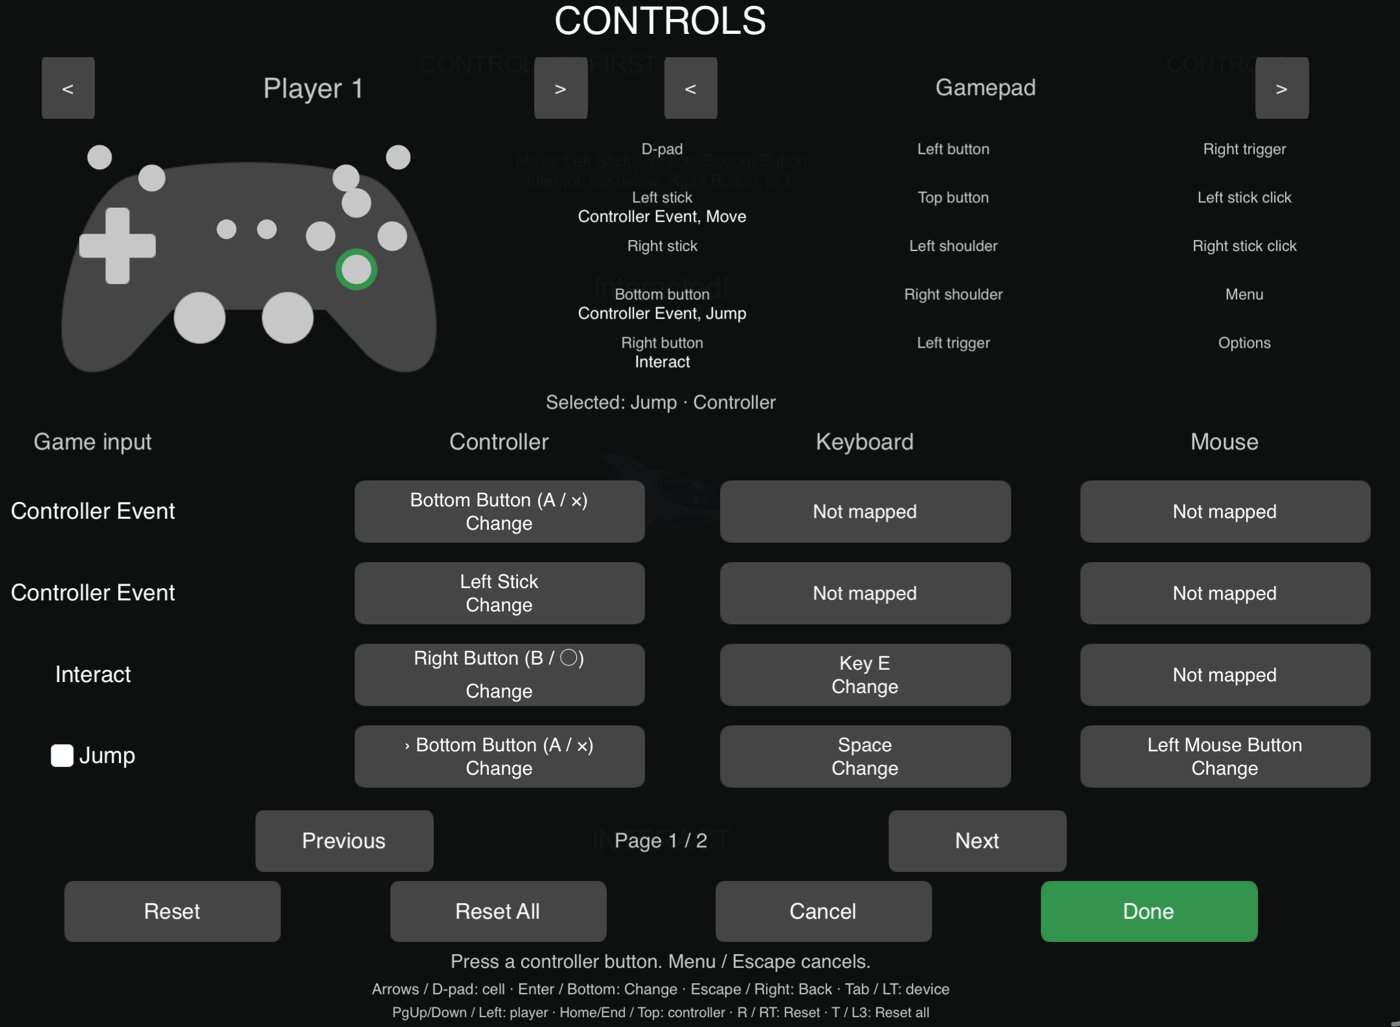
To change keyboard movement, select Change in Move's Keyboard cell. Press four different keys in the prompted order: Up, Right, Down, Left. For WASD movement, press W, D, S, A in that order.
Changing Jump's controller choice keeps its keyboard choice. A button binding listens for another button. A movement binding listens for compatible movement input.
23. Cancel, reset, and resume
Select Cancel during listening to keep the previous binding. Escape or the controller Menu button also cancels capture. Use Reset on a selected cell to restore its authored choice. Reset All removes saved overrides and restores the authored defaults for the selected player.
Select Done, release the input you just captured, then press it again in your game. Captured input is held out of gameplay until it returns to neutral. Binding choices are saved for this Project and player. Controller assignments last for the current session.
24. Build a custom rebinding widget when you need one
The generated overlay already supplies rebinding UI. If you want your own Change Jump button, use Rebind Input.
For this optional practice variant, split the mixed Map into two Map Control Inputs behaviors. Name their titles Controller Inputs and Keyboard Inputs. Keep one Move, Jump, and Shoot row in each, with the same sources and physical choices. Replace the original mixed Map so its rows do not run as another copy.
Create two button Objects named Change Jump and Cancel Change, plus a Label named Jump Binding. In the same Behavior Tree as the two Maps, create these separate branches:
- Started Touching for Change Jump → Rebind Input (Listen) → Rebind Input (Get Binding) → Set Label for Jump Binding.
- A separate root Rebind Input (Get Binding) → another Set Label for Jump Binding, to fill the label when the UI starts.
- Started Touching for Cancel Change → Rebind Input (Cancel).
For Listen and both Get Binding behaviors, set Player 1, select the actual Controller Inputs behavior using Input Behavior, and choose Binding Jump. The Cancel operation needs no target. Each Set Label's Text takes label from the Get Binding immediately before it.
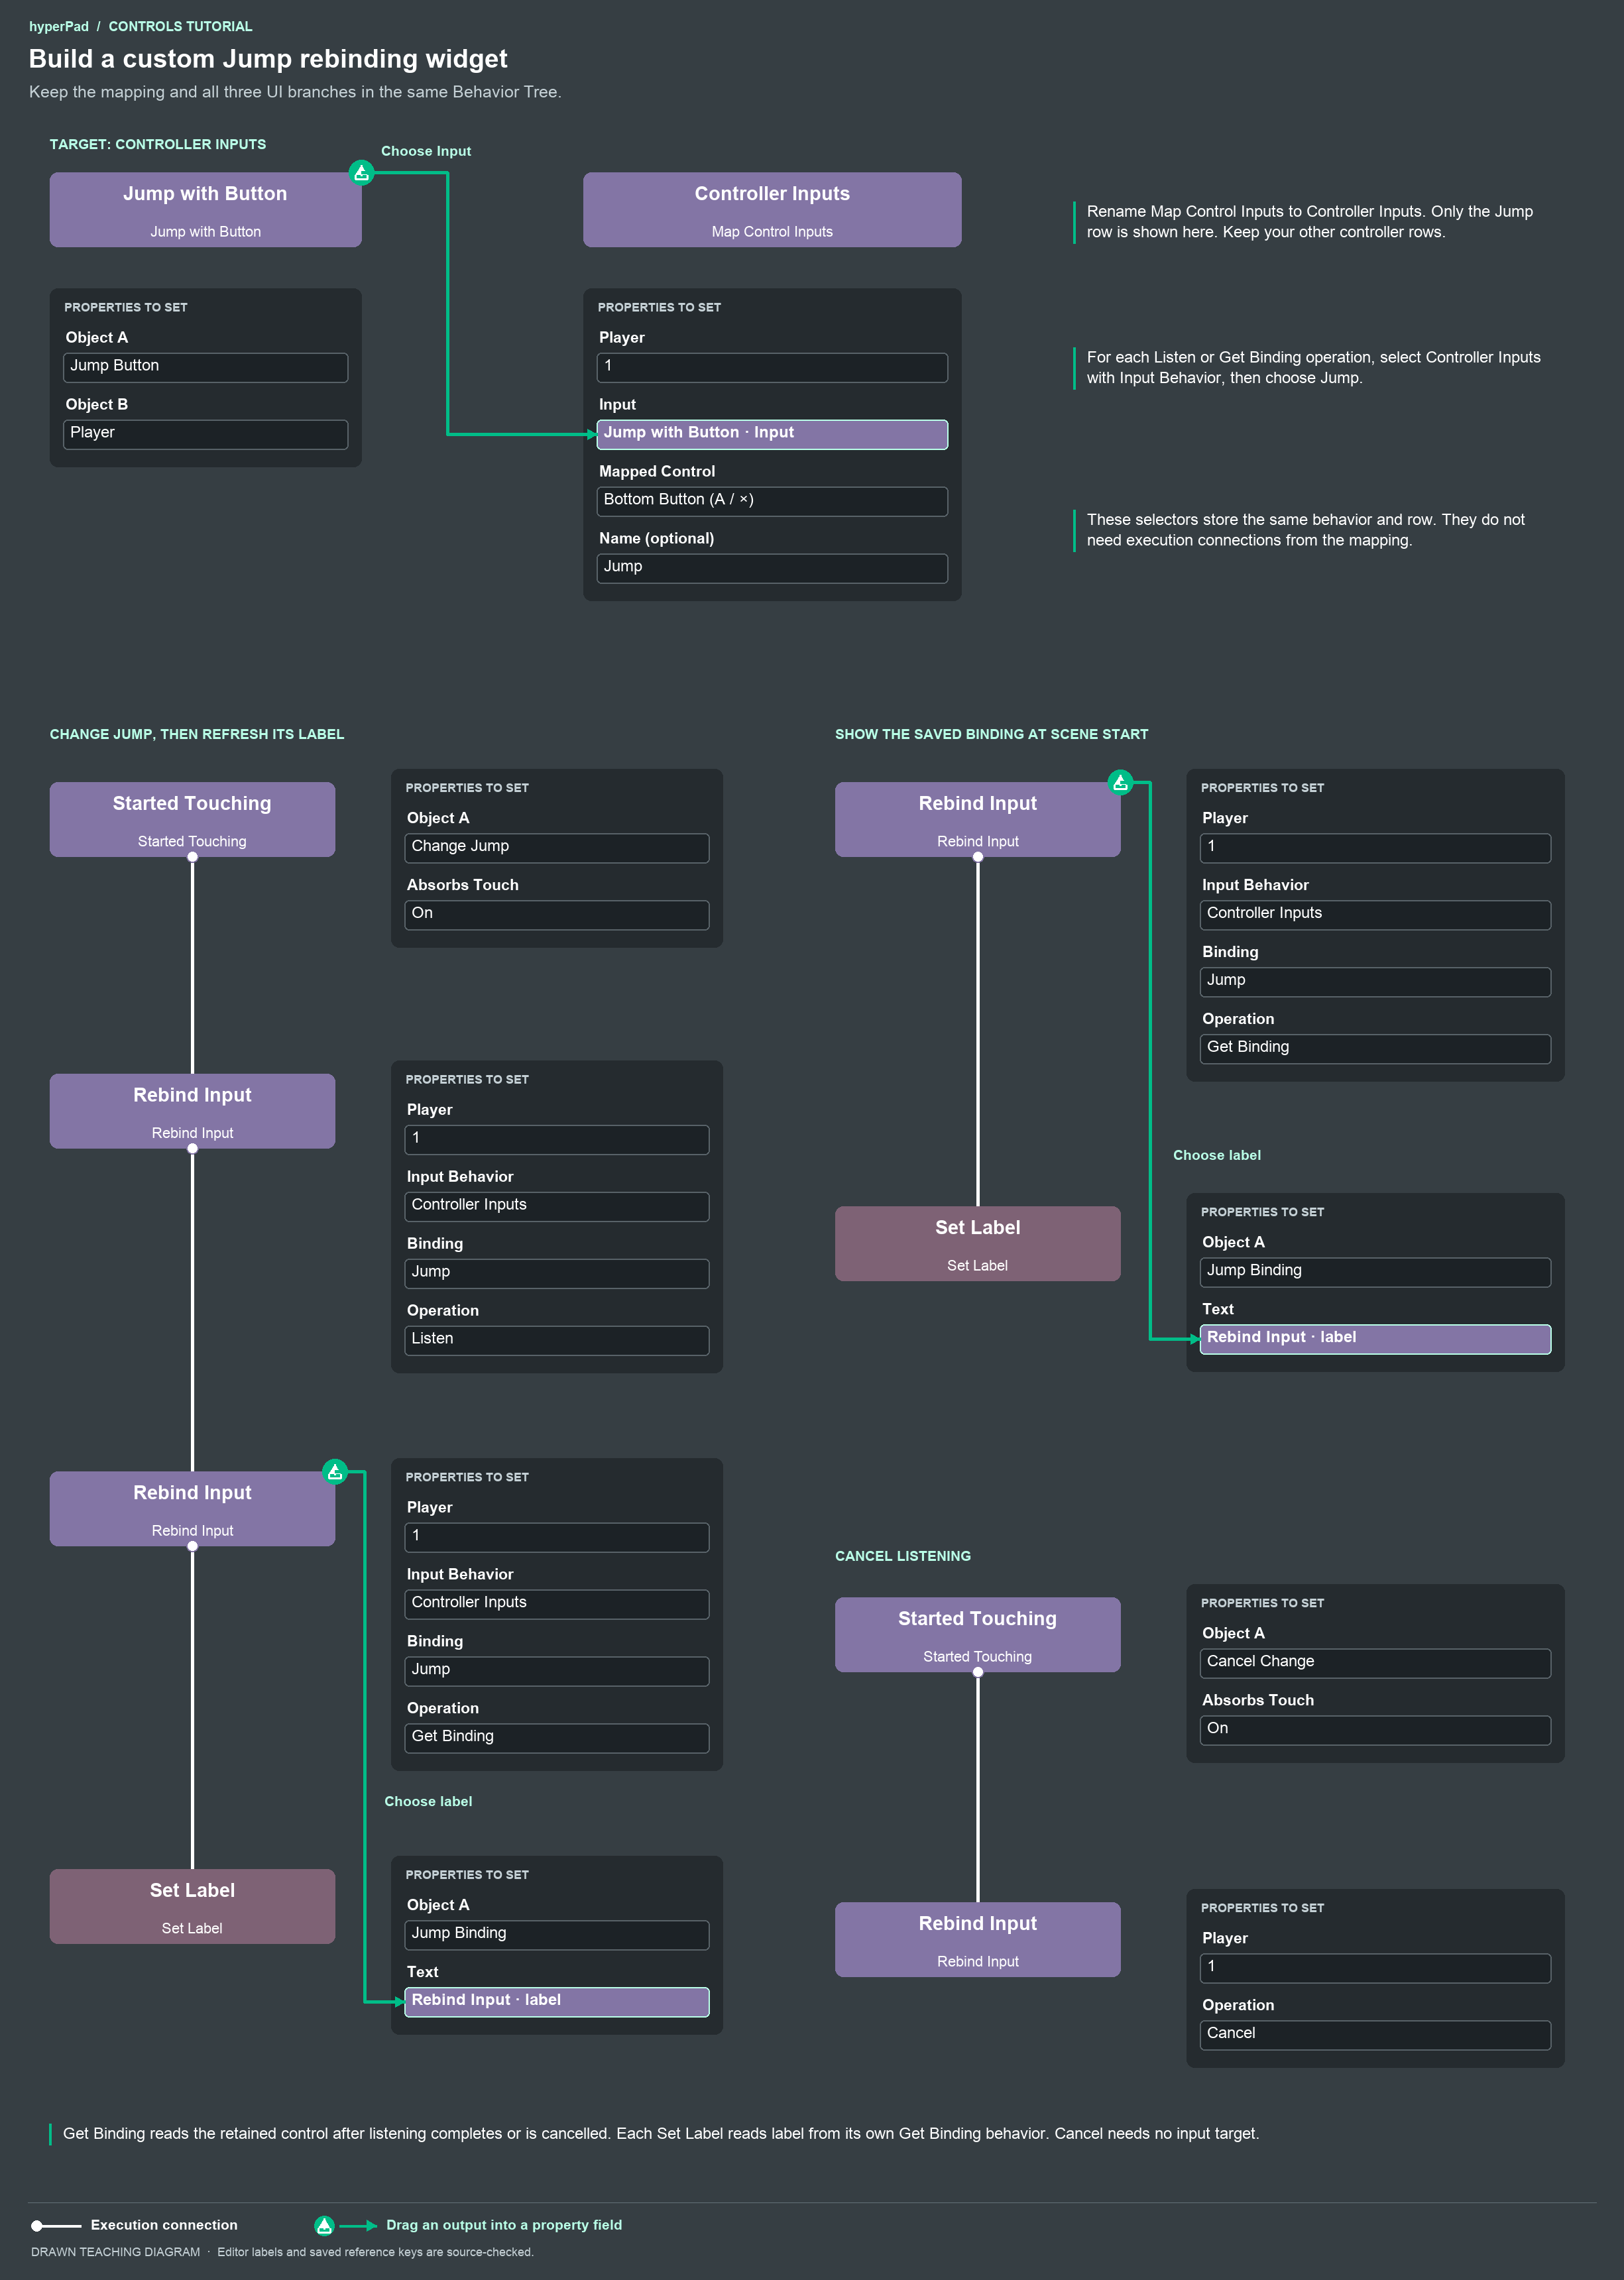
Select your Controller Inputs instance using the behavior picker. Keeping one Jump row in that target makes the choice clear in the Binding picker. The diagram focuses on that Jump row; keep your Move and Shoot rows in the controller Map too.
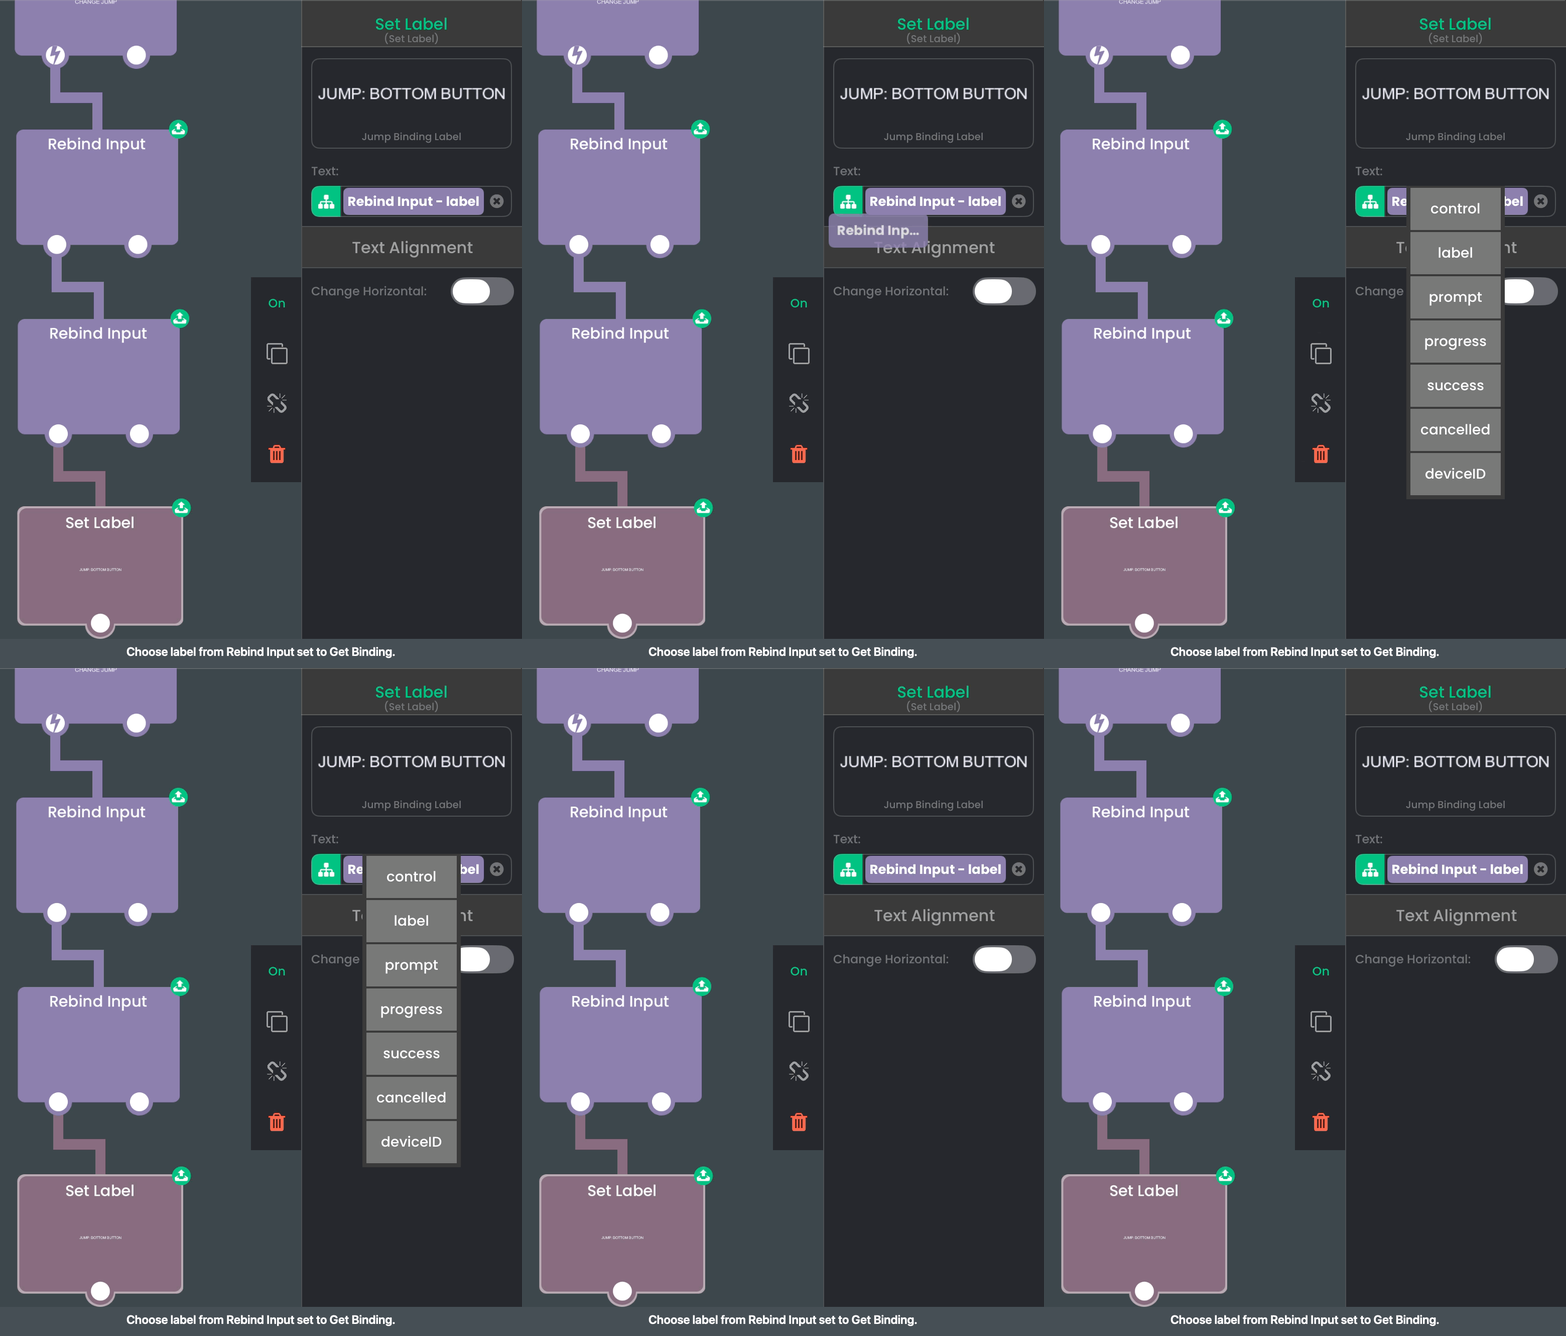
Listen completes after a new input or cancellation. Its connected getter then reads the current saved choice. Use the Rebind Input reference for success, cancelled, prompt, and progress outputs when you add more UI feedback.
Give each player a controller
25. Give each player separate input Objects
Create Player 1 Character and Player 2 Character. Each needs its own joystick and jump button Objects. Check both Object selections if you duplicate an existing setup.
On Player 1's gameplay behaviors, Object A selects Player 1's input Object and Object B selects Player 1 Character. On Player 2's behaviors, select the corresponding Player 2 Objects.
Add a separate Map Control Inputs for each player's controls. Set one to Player 1 and the other to Player 2. Both can map Move to Left Stick and Jump to Bottom Button.
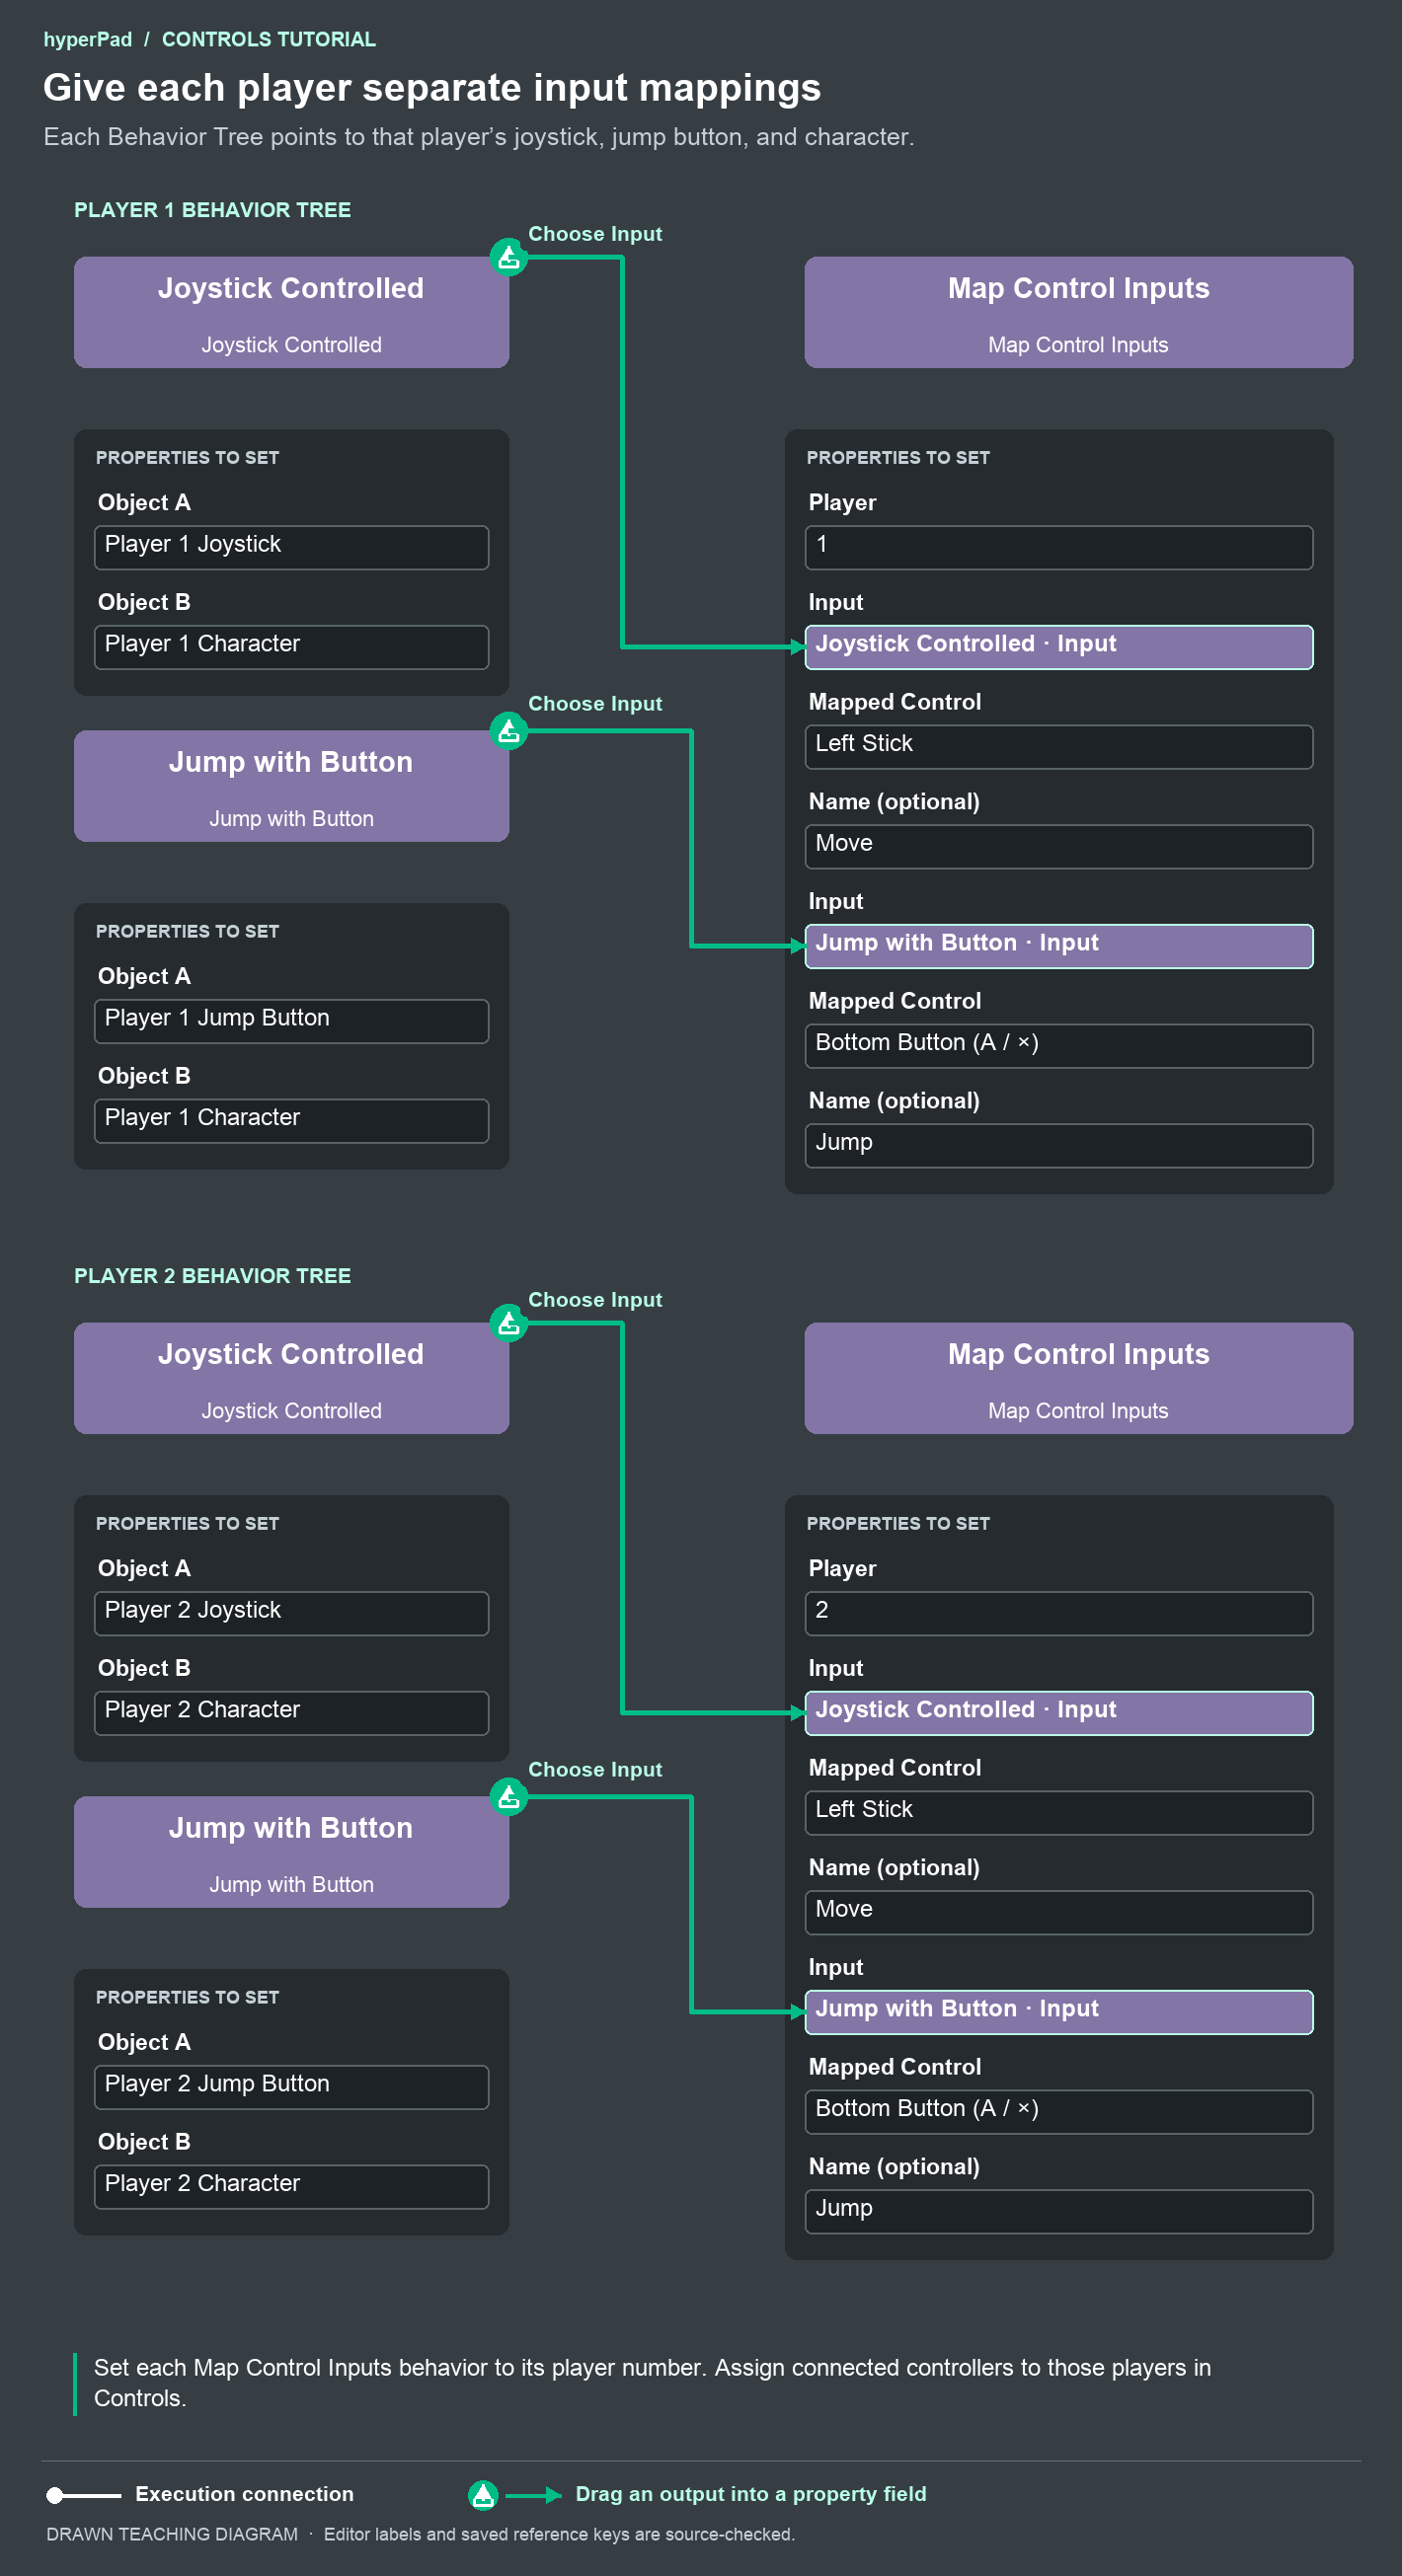
The player slot decides which assigned controller feeds that Map. The selected input Object decides which character's gameplay receives it. Add another Map when another player needs a different set of input Objects.
If both players use one keyboard, give them different keys. Keyboard keys are shared across player slots.
26. Open a controller-selection overlay
You can use the generated Controls overlay's player and device selectors. For a custom “press a button to join” screen, create an overlay named Player 2 Selection. Add a Label telling Player 2 to press the bottom controller button.
Add a Choose Player 2 Controller button to your menu. Connect its Started Touching to Load Overlay. Select Player 2 Selection, choose Transition None, and keep Pause on.
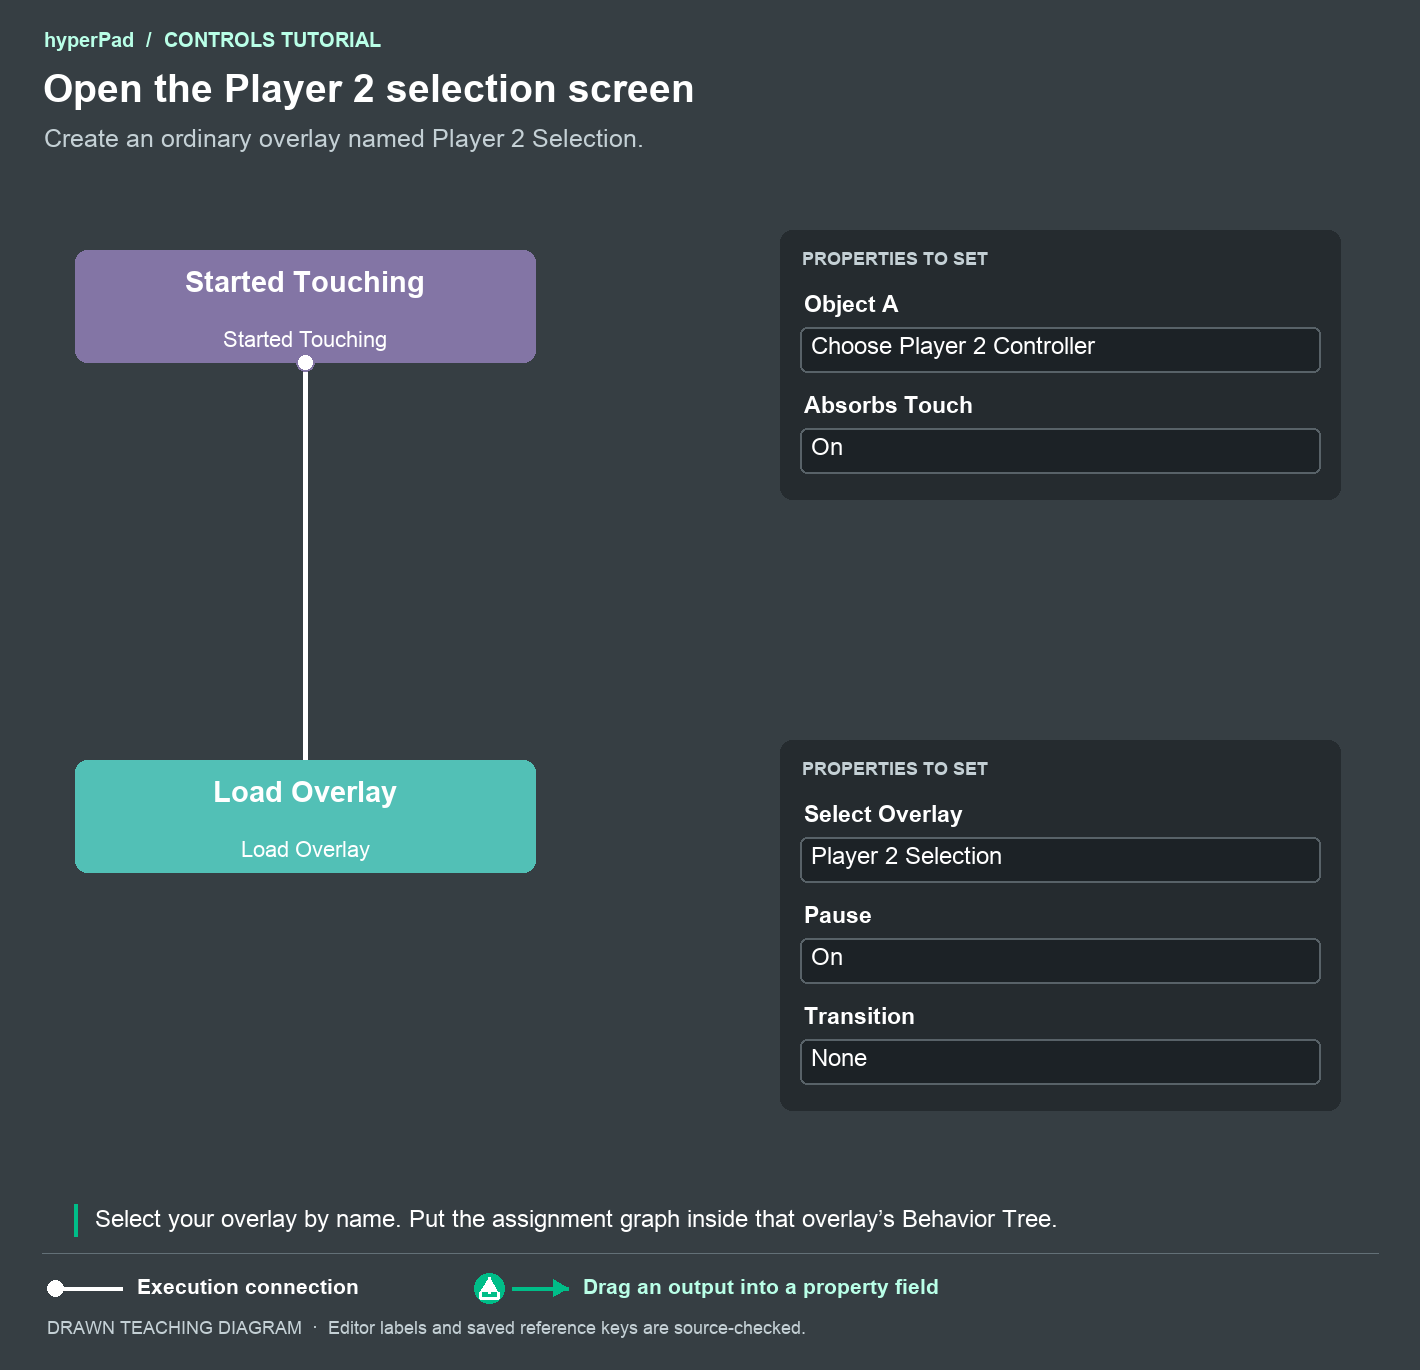
Put the selection behaviors from the next steps on the instruction Label inside this overlay. They should run only while that selection UI is open.
27. Assign the controller that pressed
Inside Player 2 Selection, add Controller Event with Player 0, Bottom Button (A / ×), and Pressed. Connect it to Assign Controller with Player 2.
Open Assign Controller's properties. Drag Controller Event's deviceID output into Controller ID. Use this live output to identify the device that pressed the button.
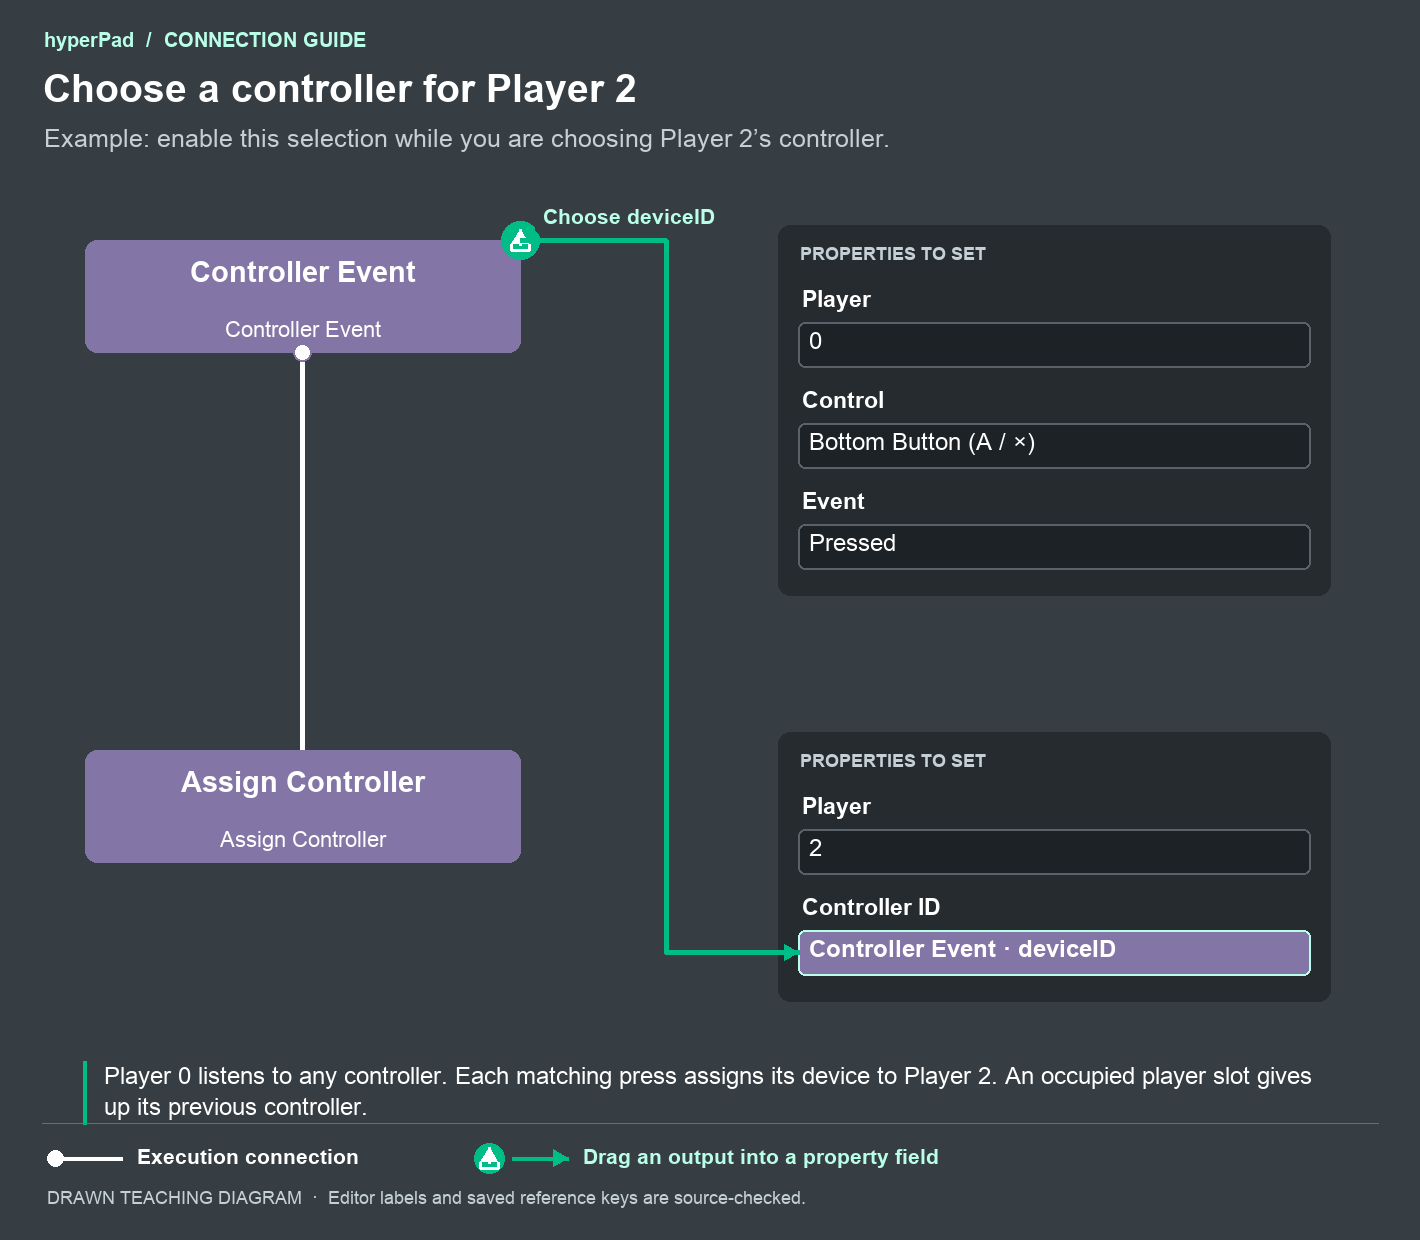
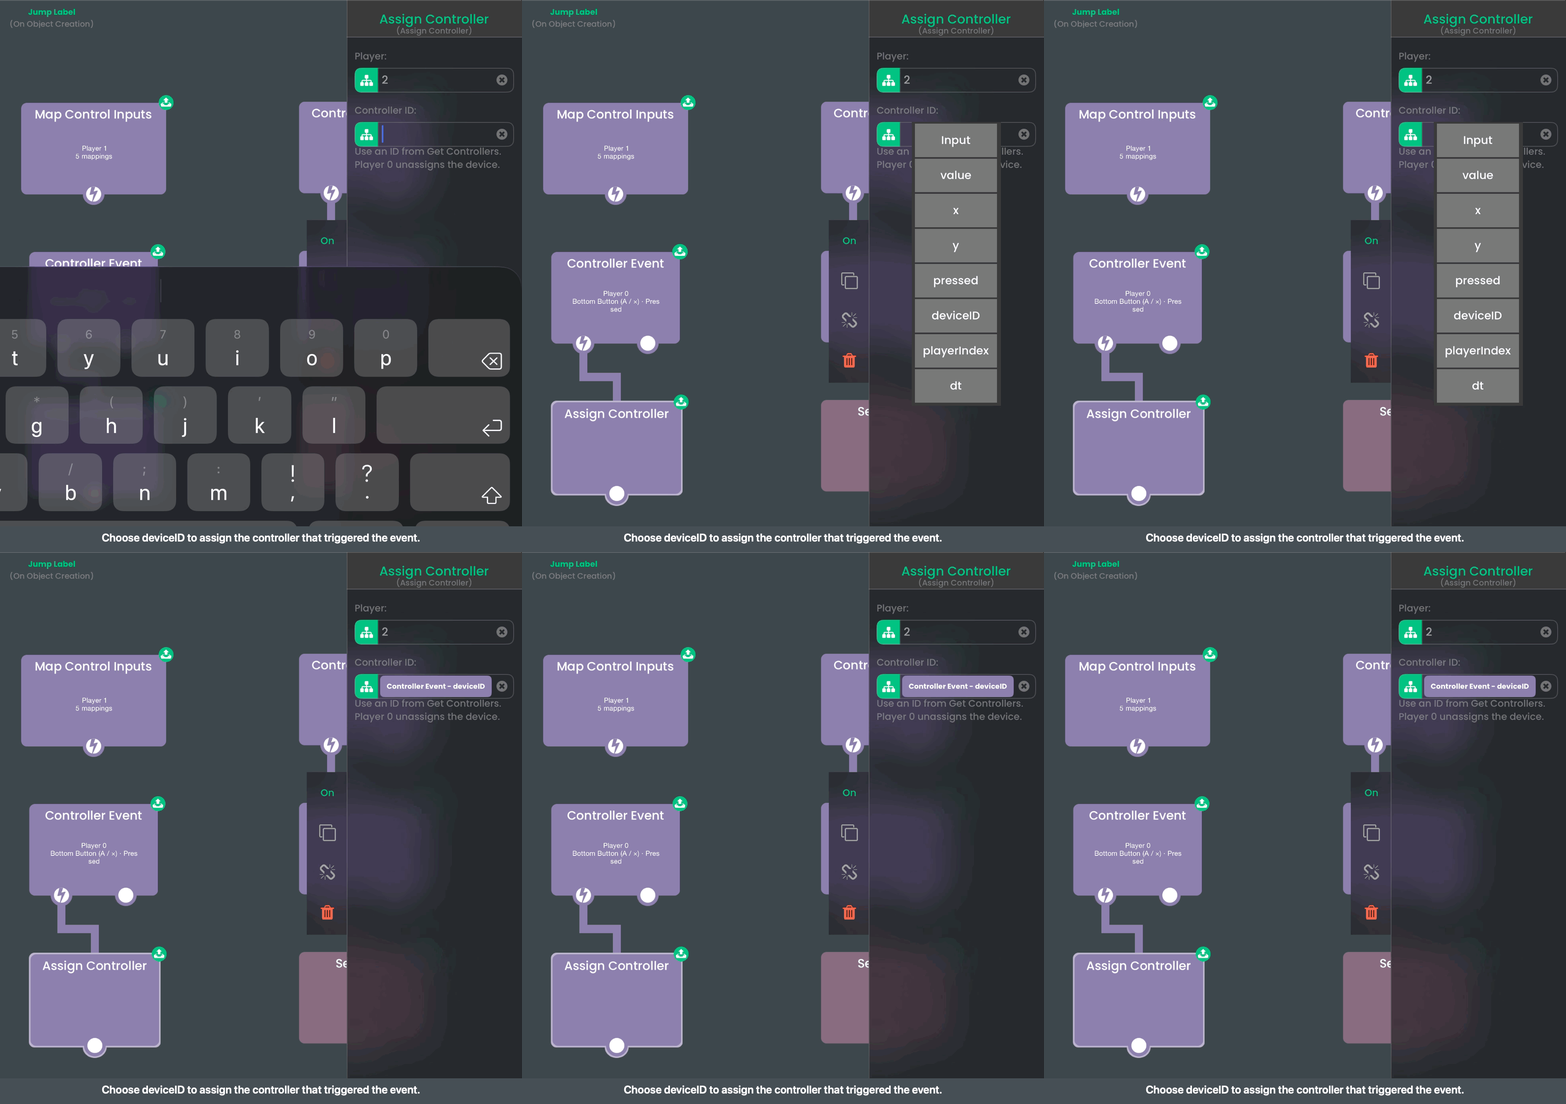
Player 0 listens to assigned and unassigned controllers. Assign Controller changes the selected device's slot to Player 2. It replaces the device previously assigned to that slot.
28. Close the selector after success
Connect Assign Controller to If. Drag Assign Controller's success into Value A. Choose Is Equal To and enter 1 in Value B.
Connect If's bottom match output to Close Overlay. Choose Transition None, set Unload on, and keep Resume All off. Leave If's right non-match output empty for this small example.
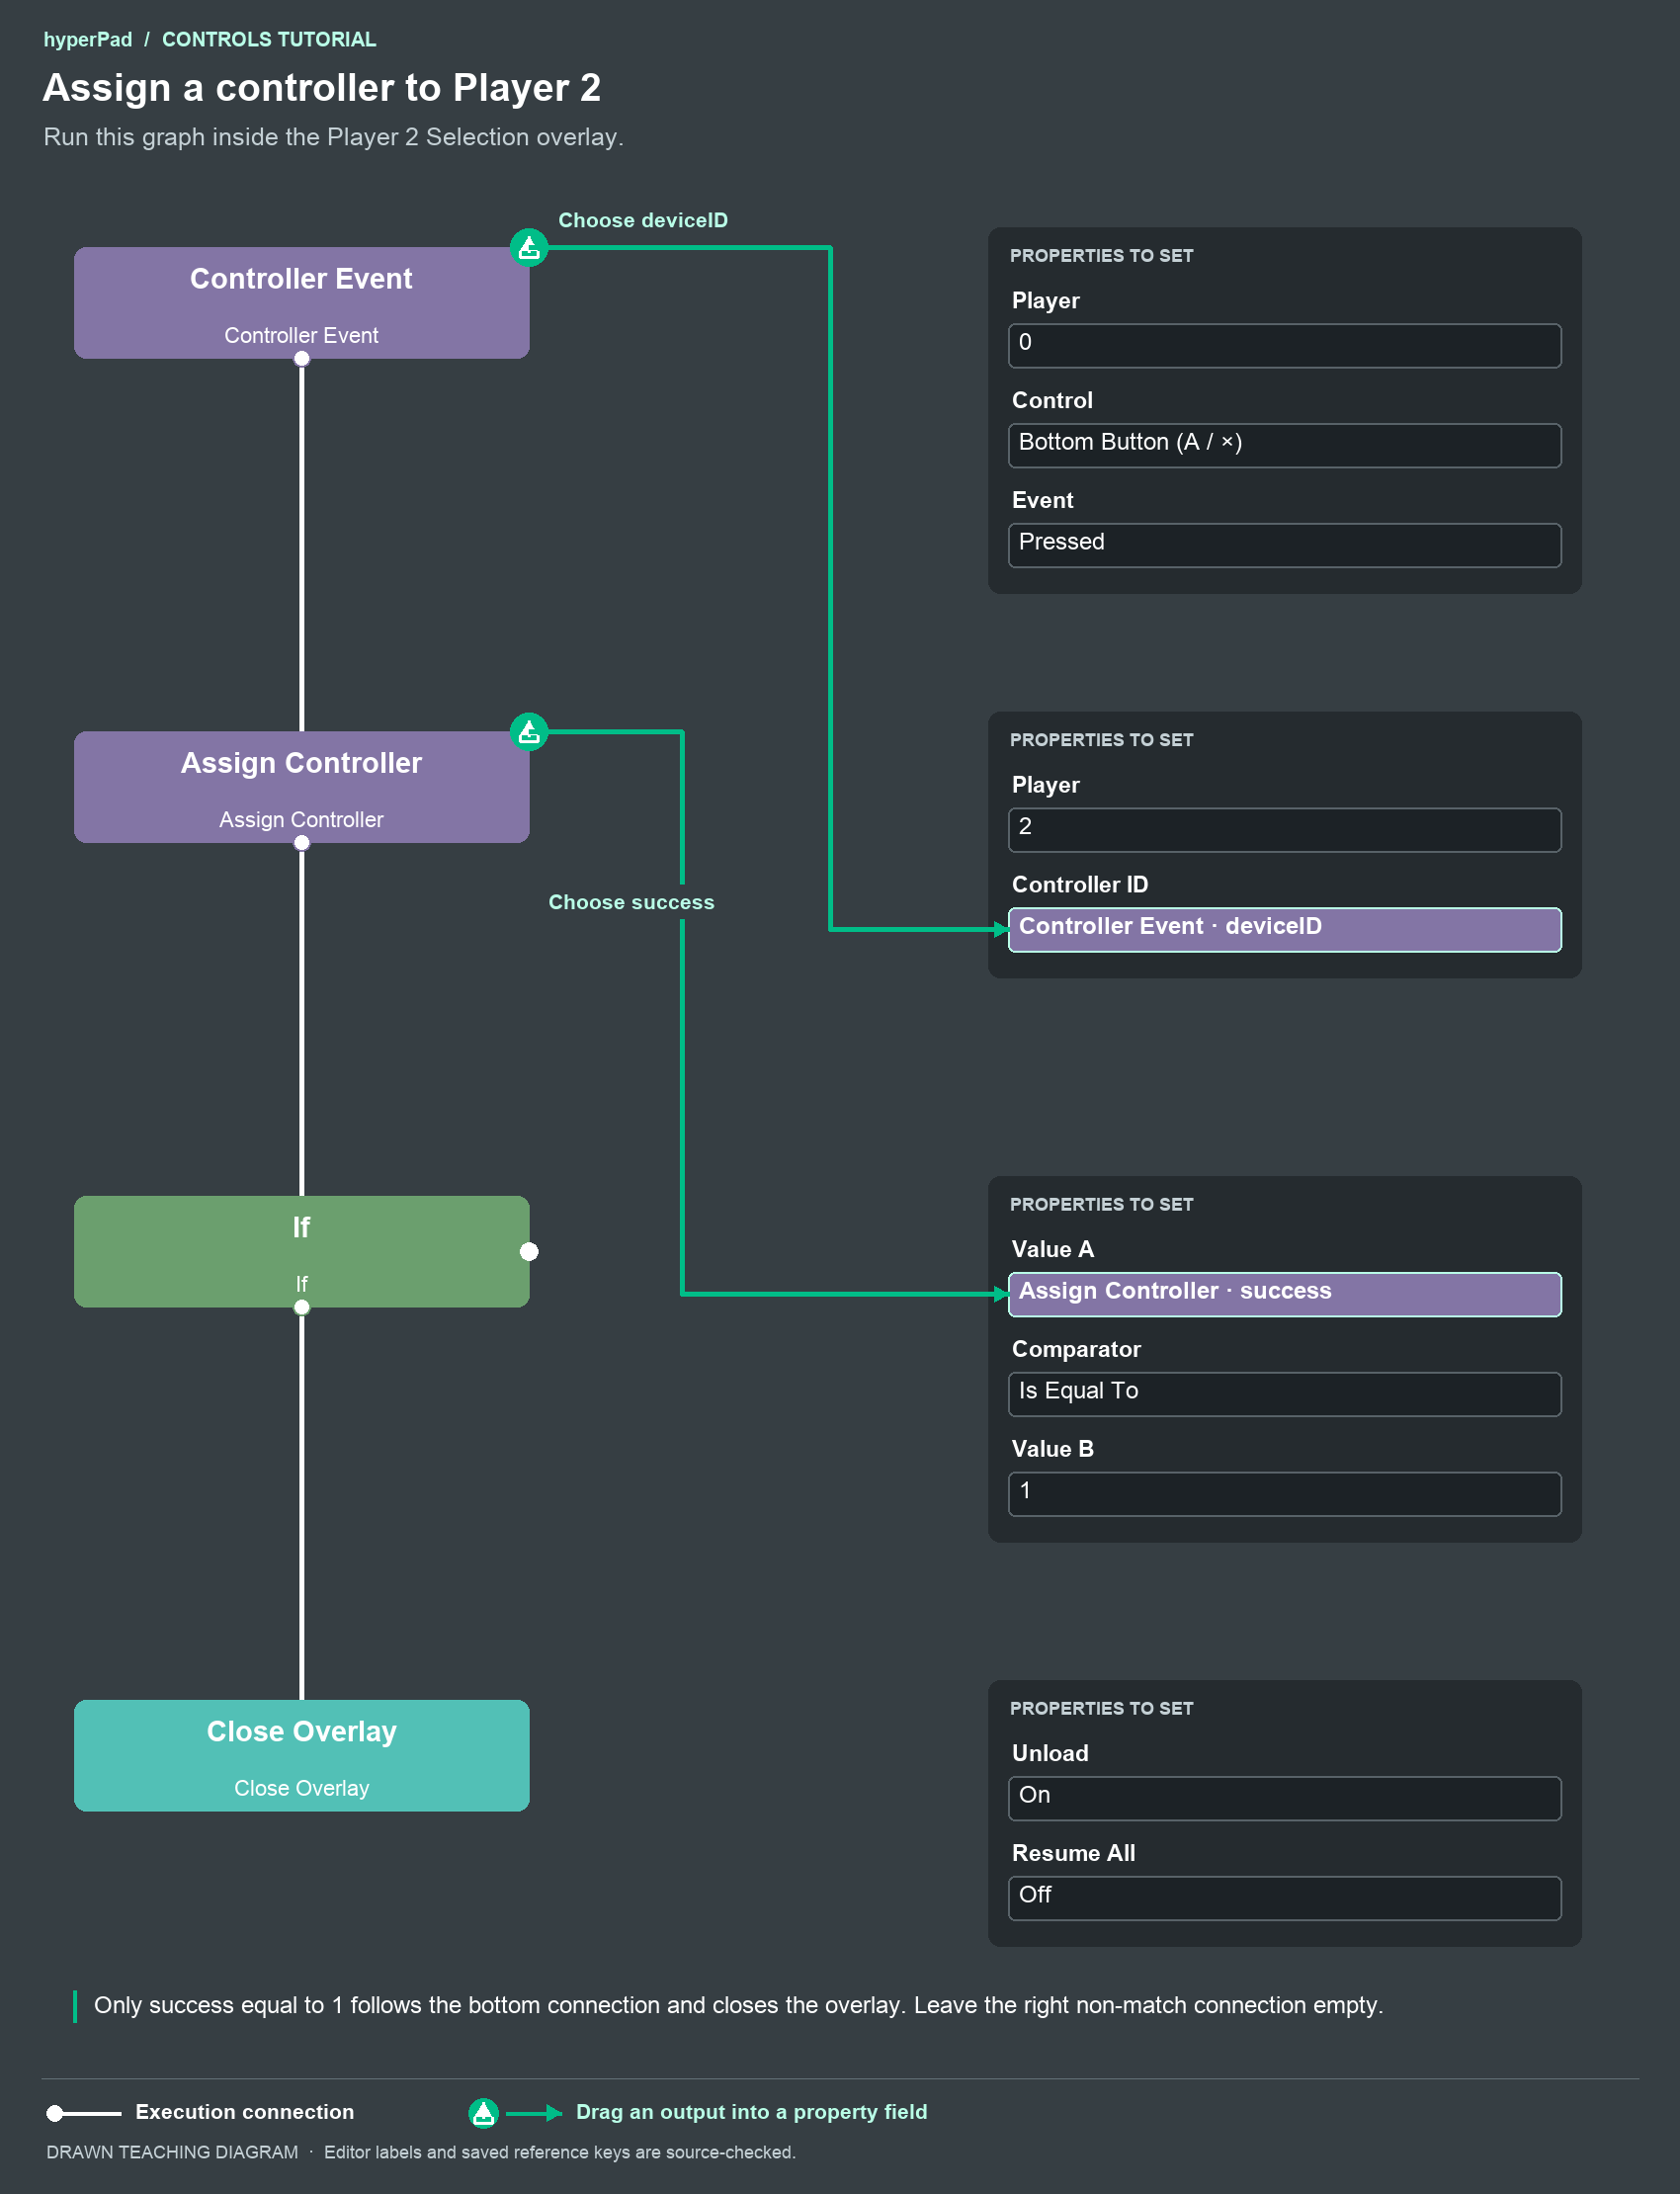
A successful assignment closes and unloads the selection overlay. A failed assignment leaves it open. Unloading removes the Player 0 selection listener, so ordinary gameplay presses do not reassign controllers.
29. Check both players
Open the selector. Press the bottom button on the controller intended for Player 2, then release it after the menu closes. Test Player 1 and Player 2 separately.
Use two actual controllers to check independent multiplayer. With one controller, you can check reassignment. Add slots and mappings for more players as your game needs them. The number of devices you can connect depends on the platform and hardware.
Newly connected controllers receive the first free positive slot. Your selector lets players change that choice. Device IDs describe the current session, so use the event's deviceID instead of saving a typed ID for later sessions.
Check your finished game
| Try this | What to check |
|---|---|
| Restart before touching the screen | Mapped controller and keyboard inputs already work. |
| Use the original touch UI | Movement, jump, shooting, and custom actions still use your authored rules. |
| Release the stick and buttons | Held actions stop. The custom velocity example returns both axes to 0. |
| Disconnect or reassign a controller | Your status UI refreshes. Custom movement stops through its Status branch. |
| Change a binding, then cancel another change | The saved choice works. Cancel keeps the previous choice. |
| Reset and reopen the Project | Defaults restore when requested. Saved choices persist for the Project and player. |
| Open and close Controls | The overlay stays interactive while gameplay pauses. Gameplay resumes after Done. |
| Play with two controllers | Each controller operates its assigned player's Objects. |
For every property and output, see Map Control Inputs, Controller Event, Controller Status, Get Controllers, Assign Controller, Rebind Input, and Controls Overlay.