

Build OrbitRun with Smart Shape — Part 1: Your first launch
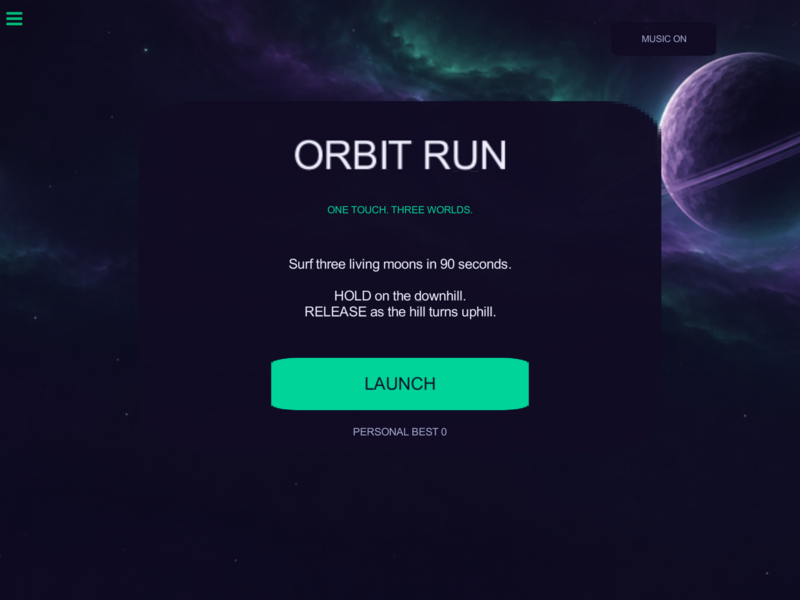
Make a one-touch moon surfer: hold to dive down the hills, release as the hill turns uphill, and collect valley batteries to extend your flight. Start with a 90-second prototype and develop it into a faster, camera-responsive game. Smart Shape builds the course as you fly.
This is a build-along, starting with a new project. Every editor screenshot was captured from the project as this tutorial was rebuilt; the gameplay footage comes from that rebuild too. The artwork is the same artwork used in the OrbitRun sample.
Tap a screenshot or diagram to open its full-size image and inspect the details.
Reading the diagrams: white connectors run the next behaviour; the green output icon supplies a value to a field. If uses the bottom for true and right side for false. REUSE means keep the existing behaviour. The animated guides add teaching highlights; the editor recordings show the real gestures.
Your route through the series
- This page — steps 1–5: create the project, add the ship and interface, and generate your first course.
- Part 2 — Dive, glide, and score: controls, momentum, distance, and the countdown.
- Part 3 — Three worlds and replay: change terrain artwork, finish the run, and save a personal best.
- Part 4 — Sound, polish, and recovery: music, trails, particles, and a loading fallback.
- Part 5 — Find the flow: stronger flight, a soaring camera, and progressive pace.
- Part 6 — Batteries and longer flights: reusable pickups and an extendable energy timer.
New to hyperPad? Follow the numbered instructions and stop at each Try it. Already comfortable with behaviours? Look for Why it works and the experiments at the end of each part.
Get the same assets
- Download OrbitRun assets — PNG artwork, audio, and particle files.
- Download the assets-only starter project. This is a blank project with the assets already imported.
- Download all 20 editable checkpoints. The number on each
.tapfile is the last completed step. - Download the rebuilt finished project, with spaced, named behaviour groups.
On iPad, download a ZIP in Safari, find it in Files → Downloads, and tap it to unzip. For a .tap project, use Files' Share menu and open it in hyperPad. Keep your own build and a checkpoint as separate projects. Use the checkpoints to compare settings without losing your work. The raw particle folders are provided for reuse; the starter project is the simplest way to get the ready-made particle effects into your asset library.
You need a hyperPad version that offers Generate Smart Shape with Terrain, Endless mode, and the Ready trigger. If that behaviour is missing, use a build that includes Smart Shape before continuing.
1. Make a blank landscape project
- From My Projects, create a new blank project named OrbitRun Build Along.
- Choose a landscape iPad layout, 4:3. This tutorial uses a world scale of 32 pixels per metre.
- Open the world settings (the globe in the editor toolbar). Set world gravity to X 0, Y 0. We will give the ship its own gravity later.
- Keep a world layer for the ship. Use Scene UI for menus, buttons, and score labels; those objects should stay on screen when the camera moves.
- Familiarize yourself with Play, the object properties panel, and the asset library button at the lower right.
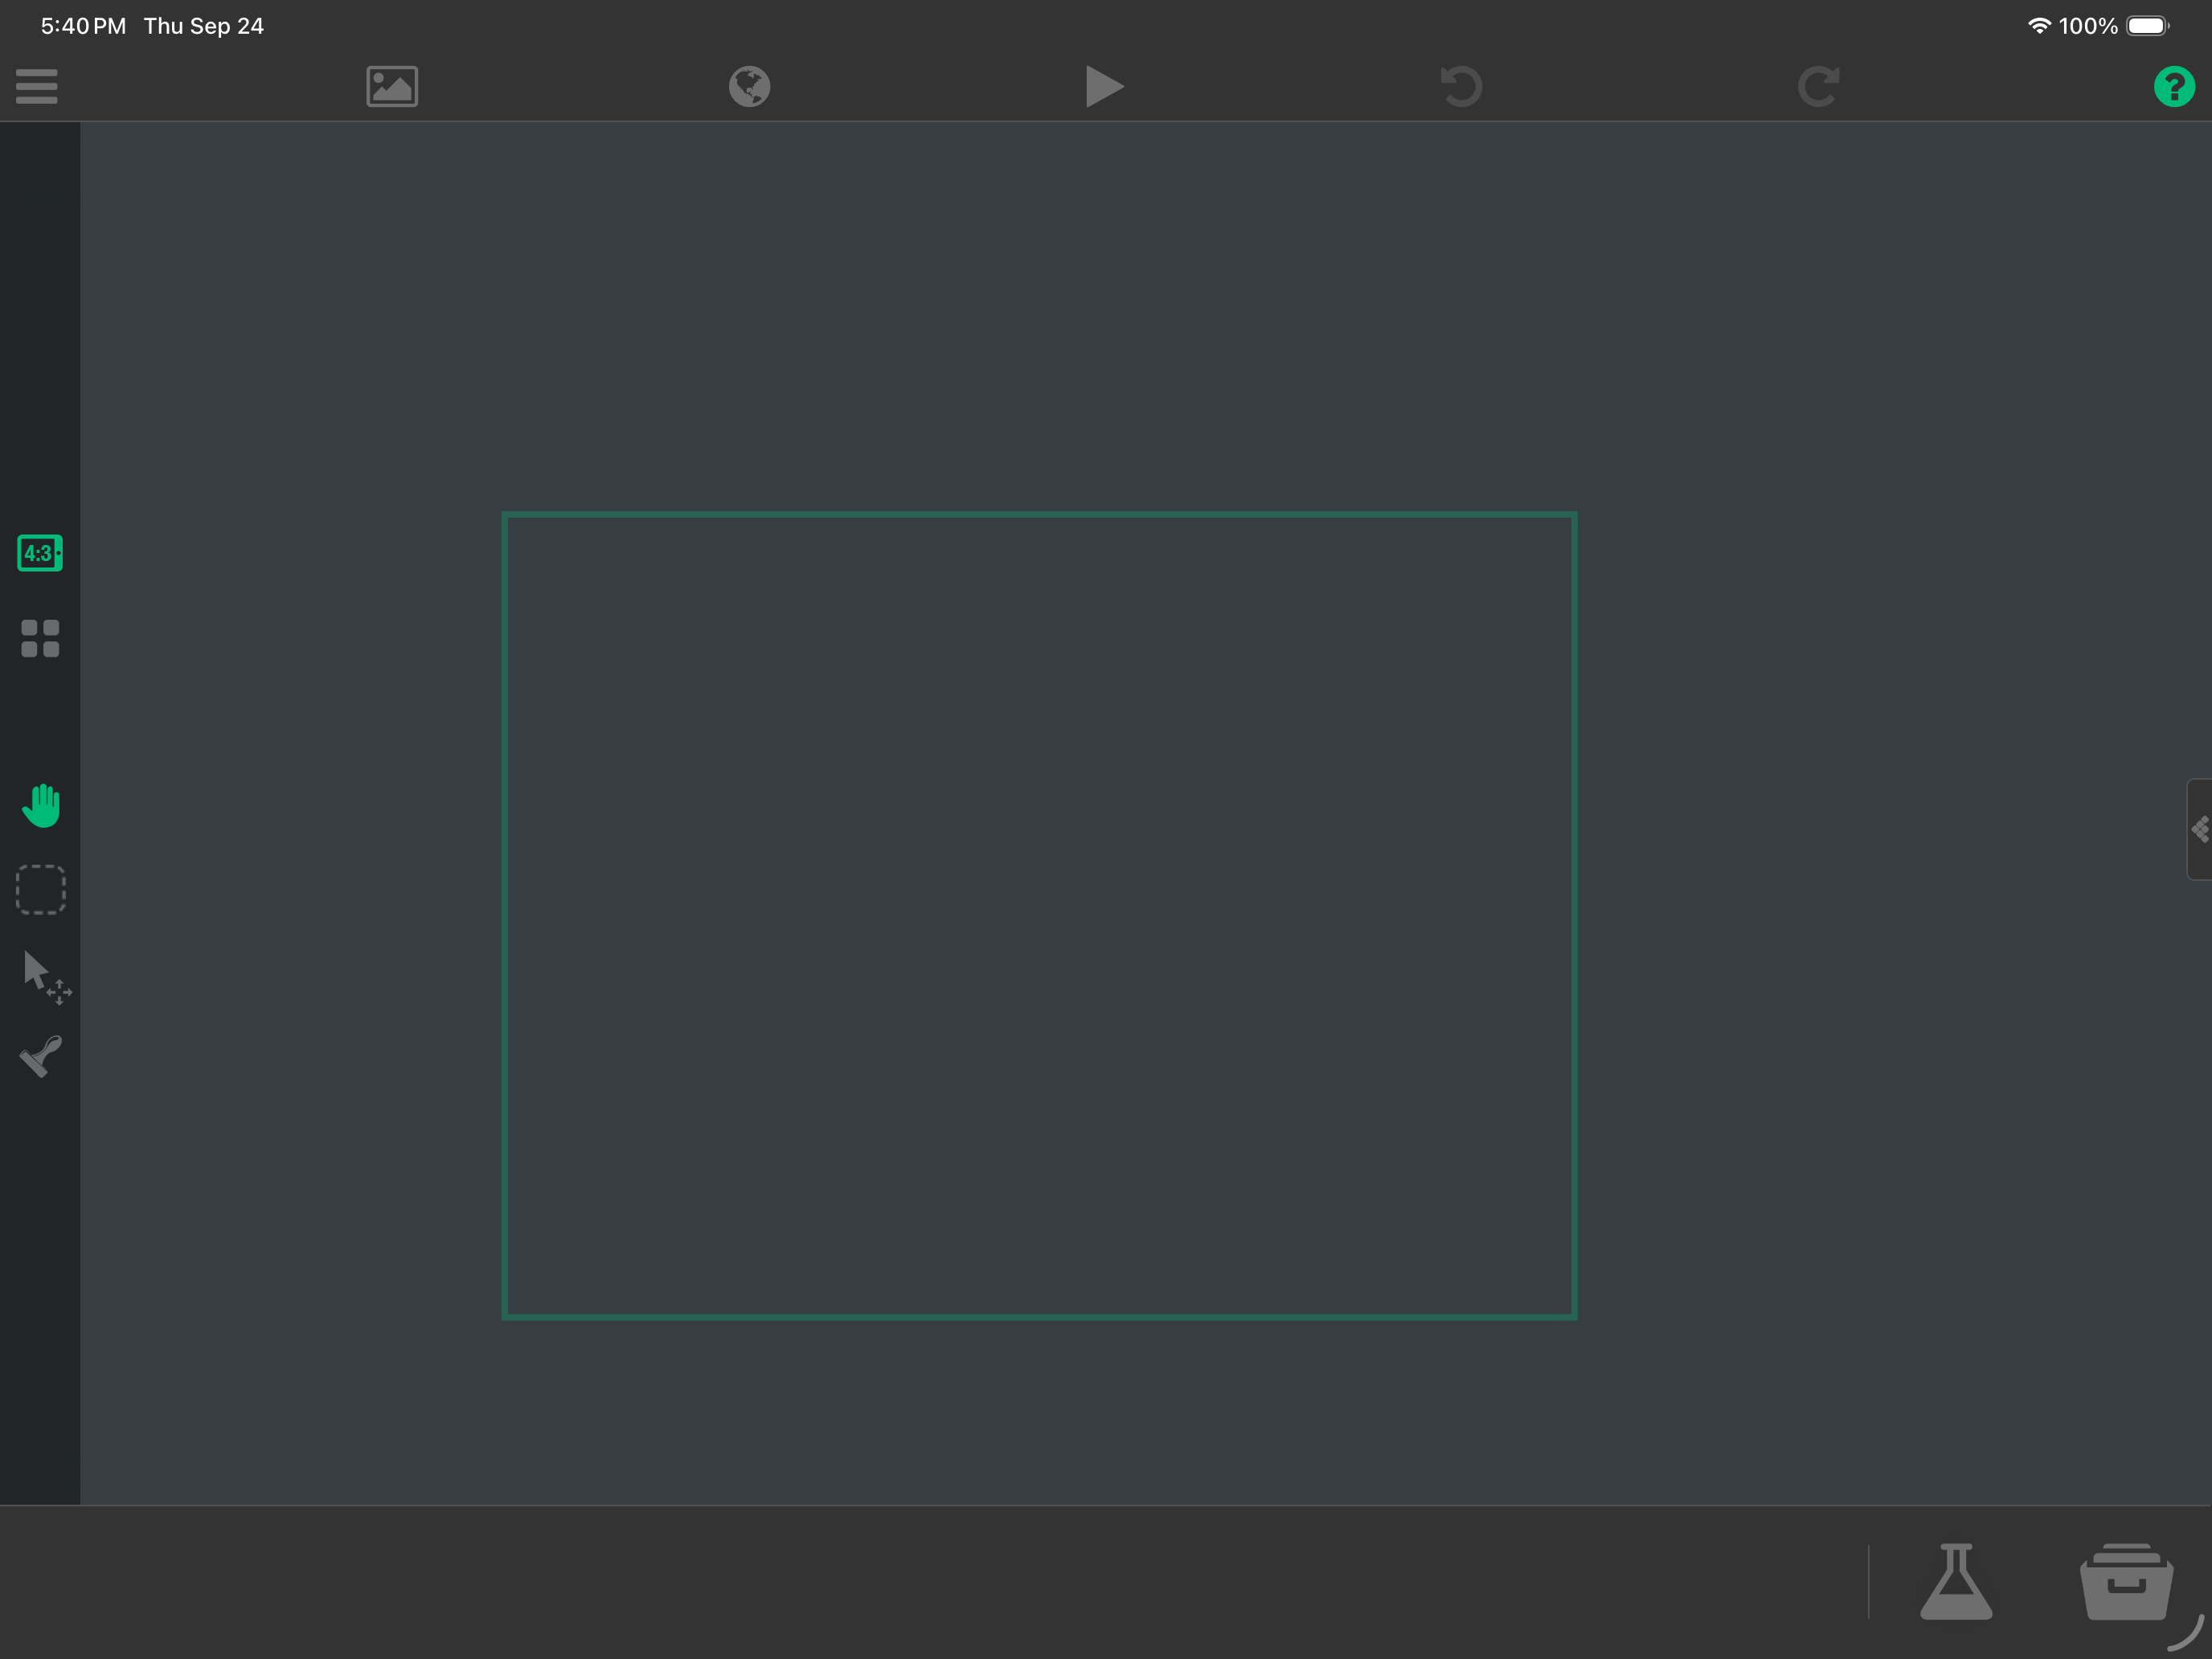
Try it: tap Play. You should see an empty scene. Return to the editor using the player menu.
Why it works: world objects live in the course; Scene UI objects live on the player's screen. Keeping those jobs separate makes camera movement much easier to manage.
2. Import the artwork
- Unzip the assets download in Files.
- Open the editor's Asset Library. In Graphics, use Import to bring in the PNGs. Import the
.m4afiles through the audio library. If you opened the assets-only starter, they are already there. - Check the names against this list. Keeping the names makes later behaviour settings easy to recognize.
orbit-skimmer— The player shiporbit-space— The scene backgroundluna-top,luna-fill— Purple starting terrainaurora-top,aurora-fill— Green second worldember-top,ember-fill— Warm red third worldorbit-panel— Menu cards and buttonsorbit-pixel— A stretchable solid rectangleorbit-trail— The ship's trail
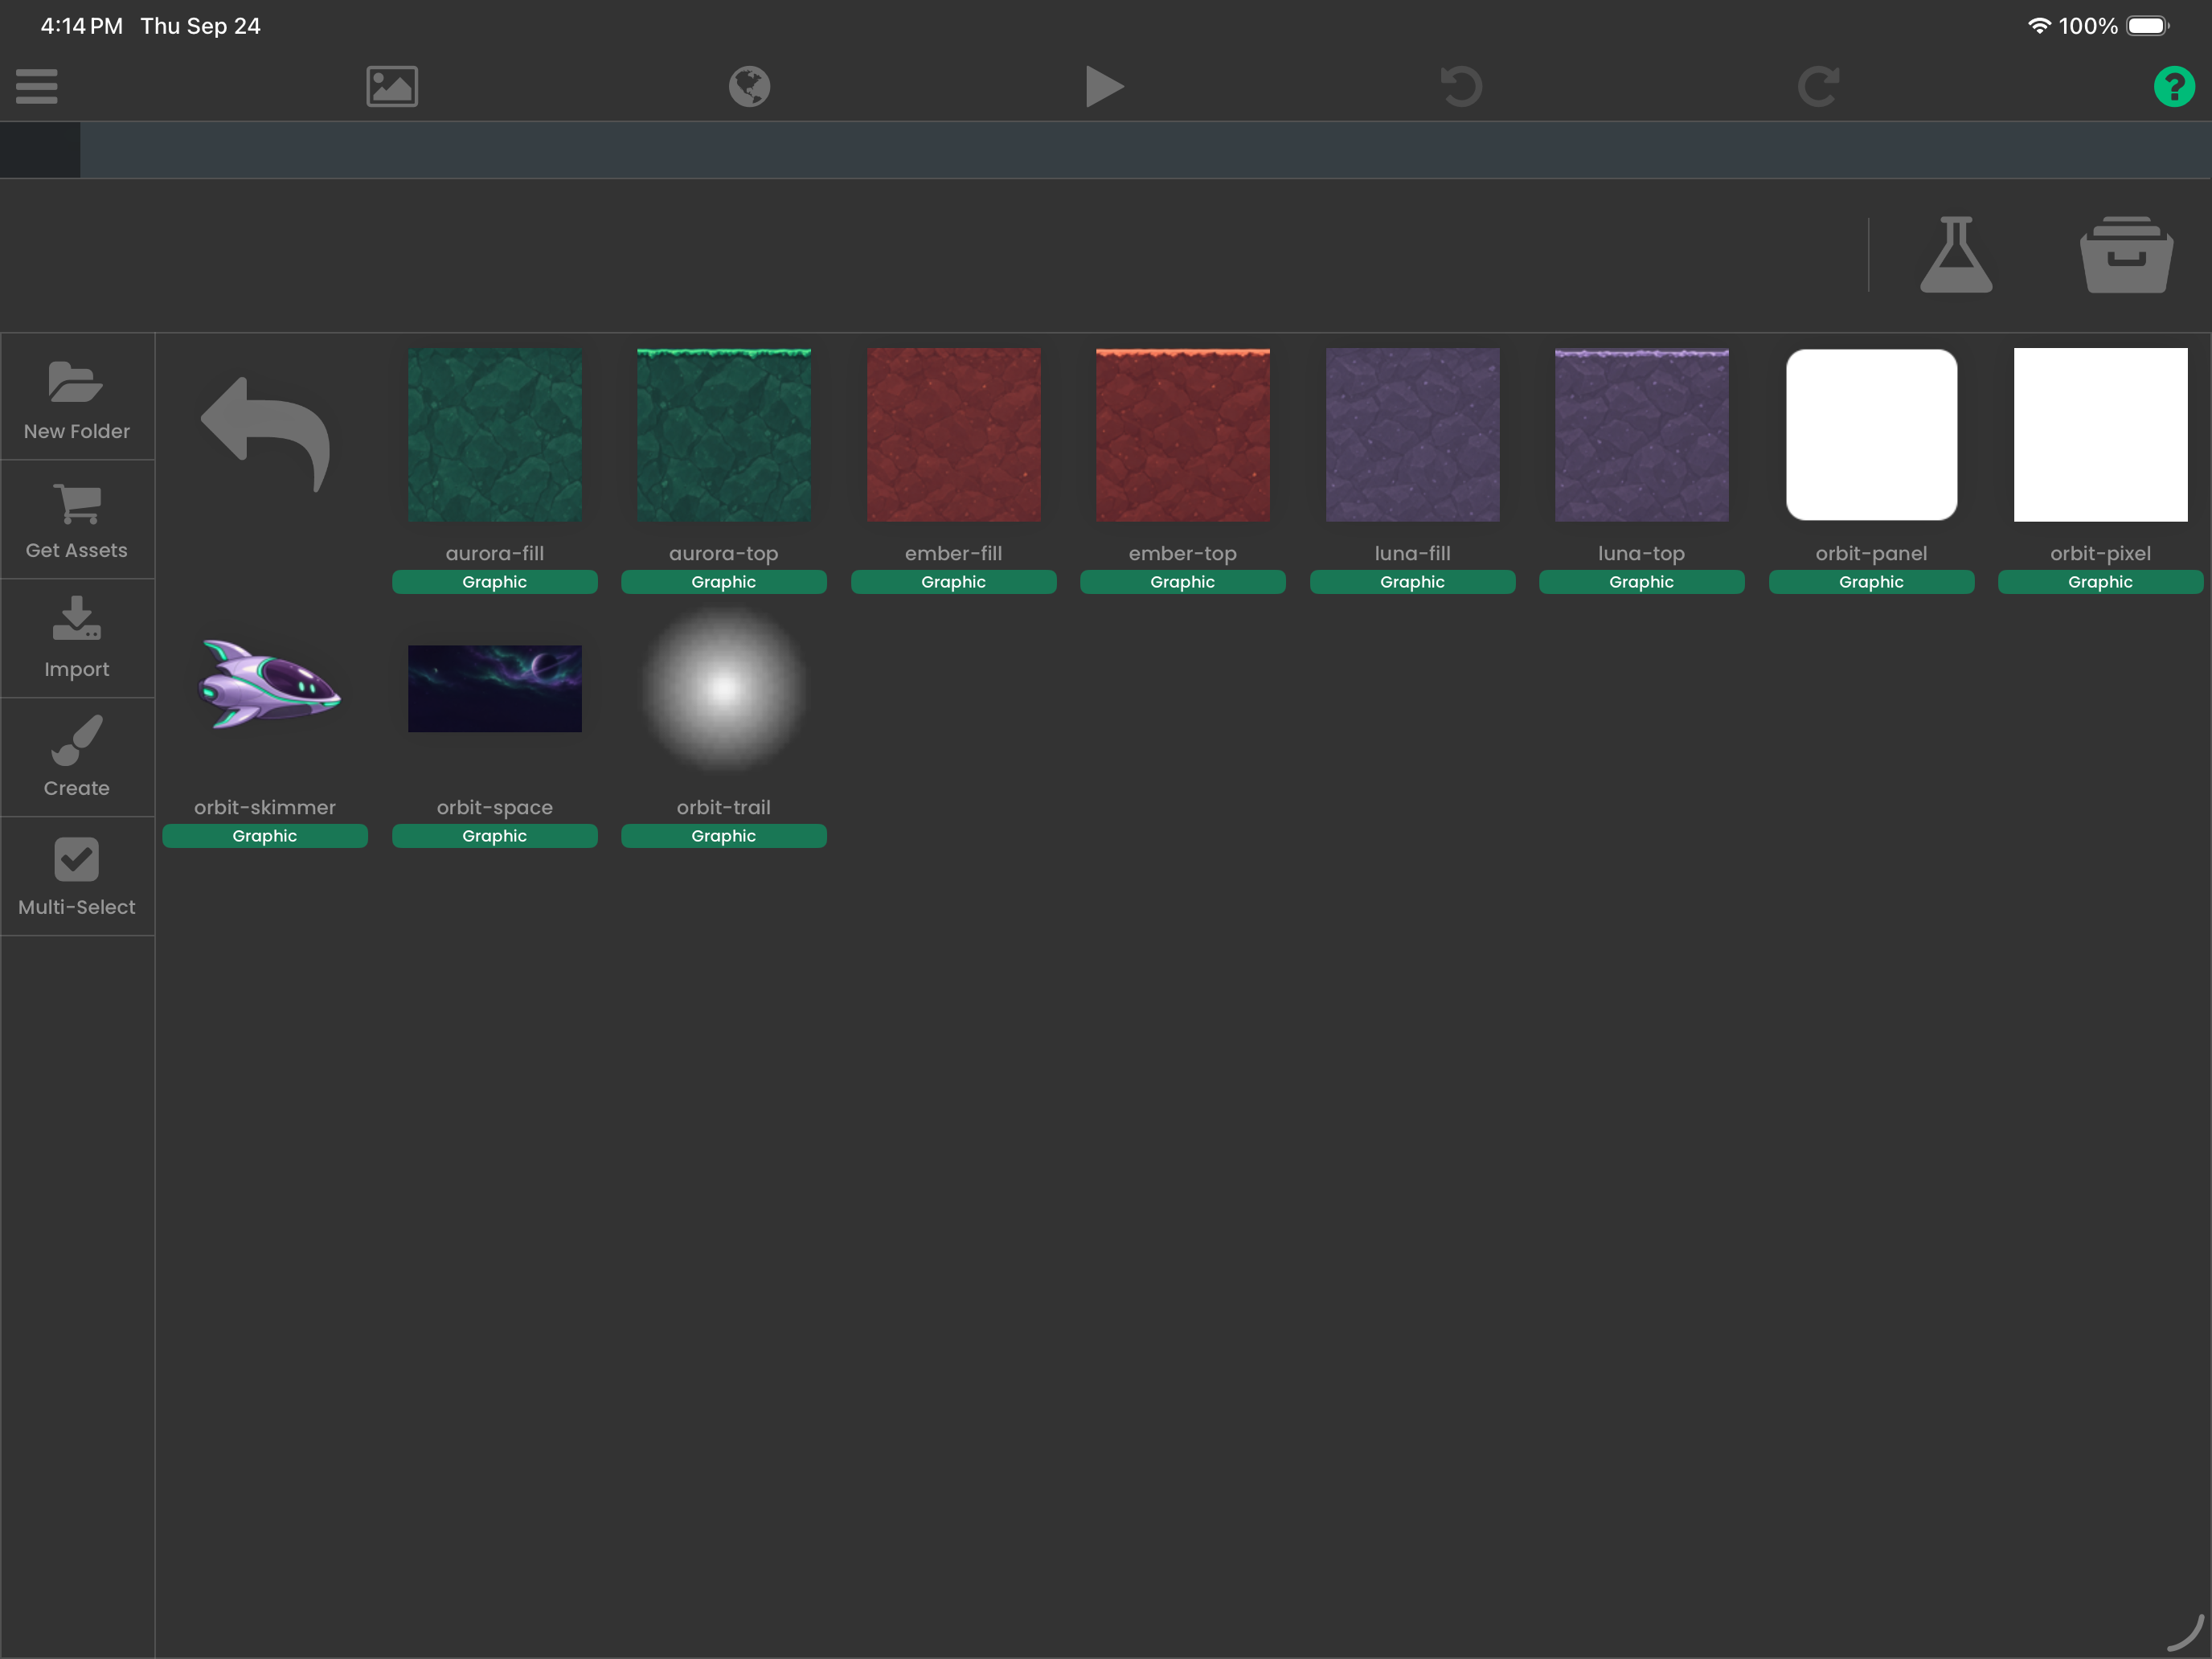
- In Scene Settings, select
orbit-spaceas the background. Keep it filling the screen.
Try it: open the imported assets and check that the ship has a transparent background and each terrain world has both a top and a fill graphic.
Why it works: Smart Shape separates the surface artwork from the middle fill. A thin top graphic traces the hills while the fill covers the ground below.
3. Give the Skimmer a small, round body
Add, select, and open Collision Editor
- Tap
orbit-skimmerin Asset Library → Graphics to add it to the bottom dock. - Select the Main world layer, then drag the ship from the dock into the scene.
- Tap the placed ship. In Object Properties, tap Collision Editor in the narrow tool strip beside the properties panel. The mint rings in this recording show the taps; the moving ring follows the drag.
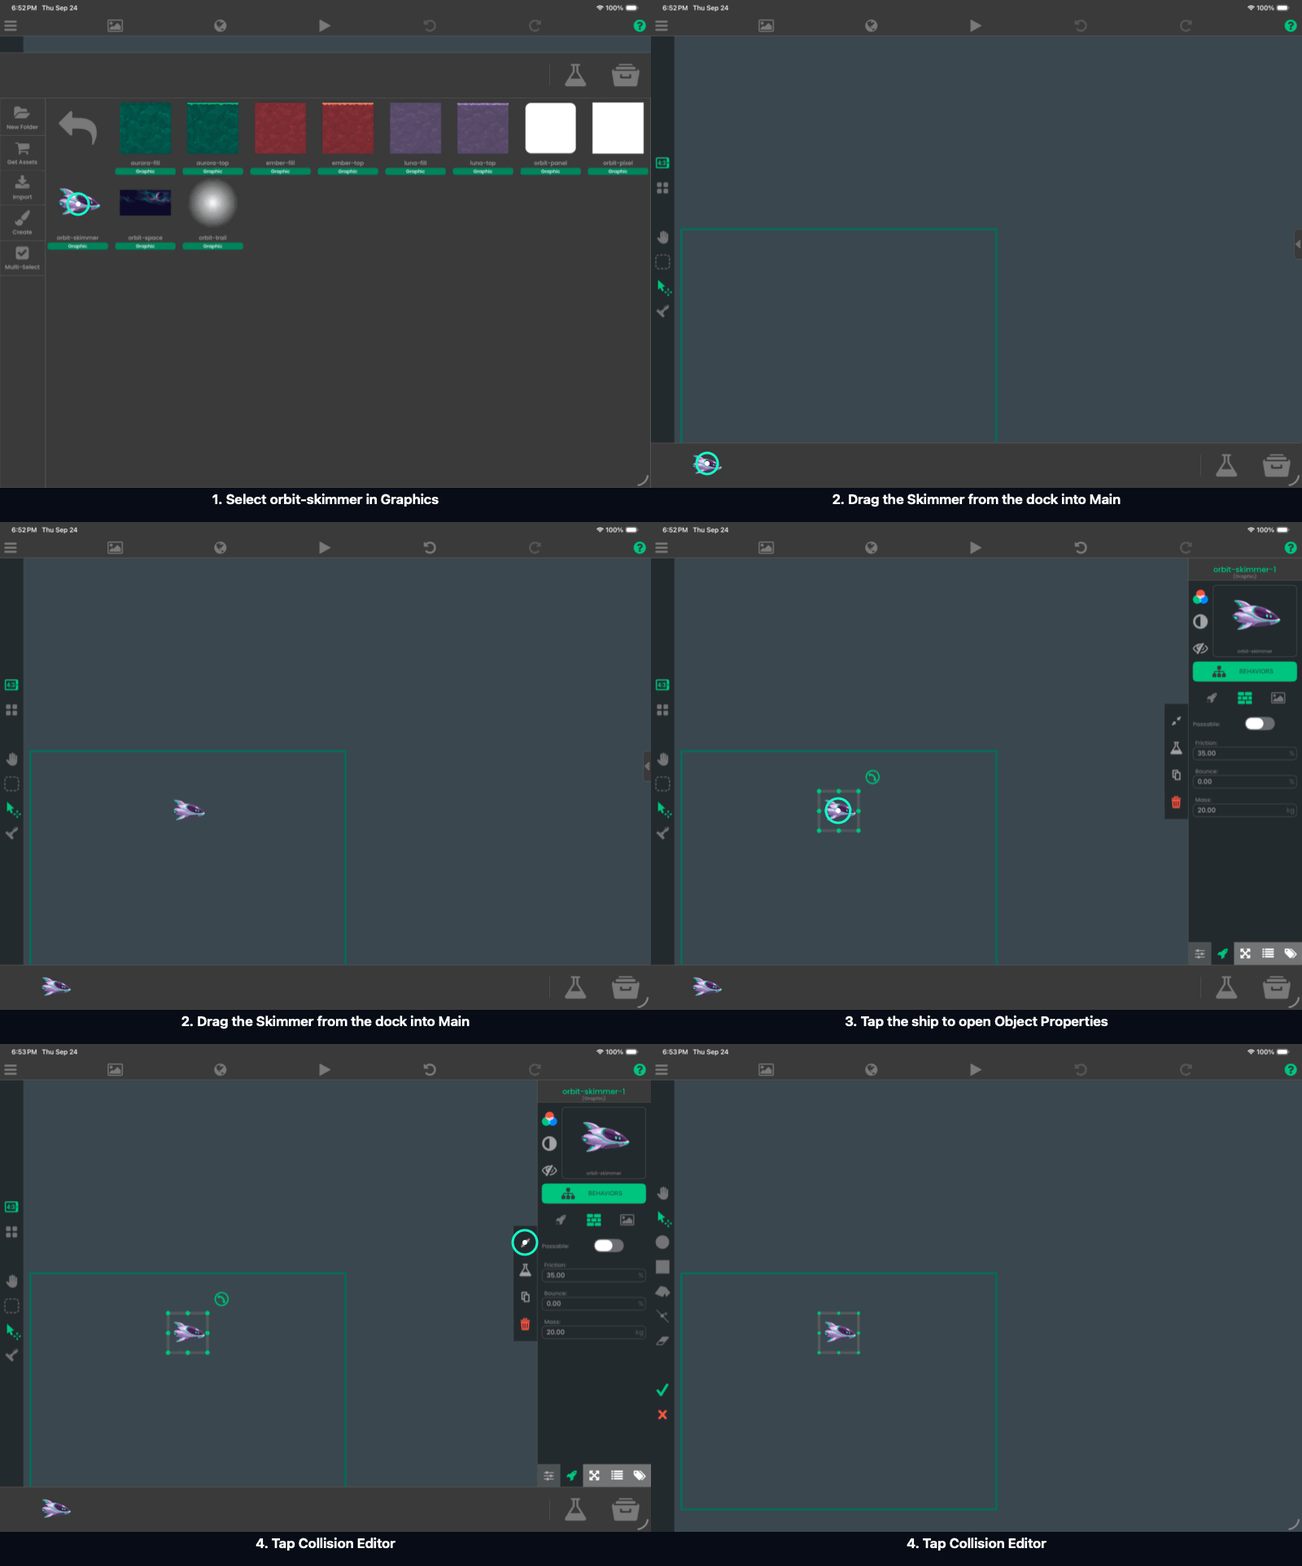
Make the collision body round
- In Collision Editor, tap the circle tool on the left. Center the circle on the ship and keep its diameter approximately the width of the ship image. Tap the green check to apply it.
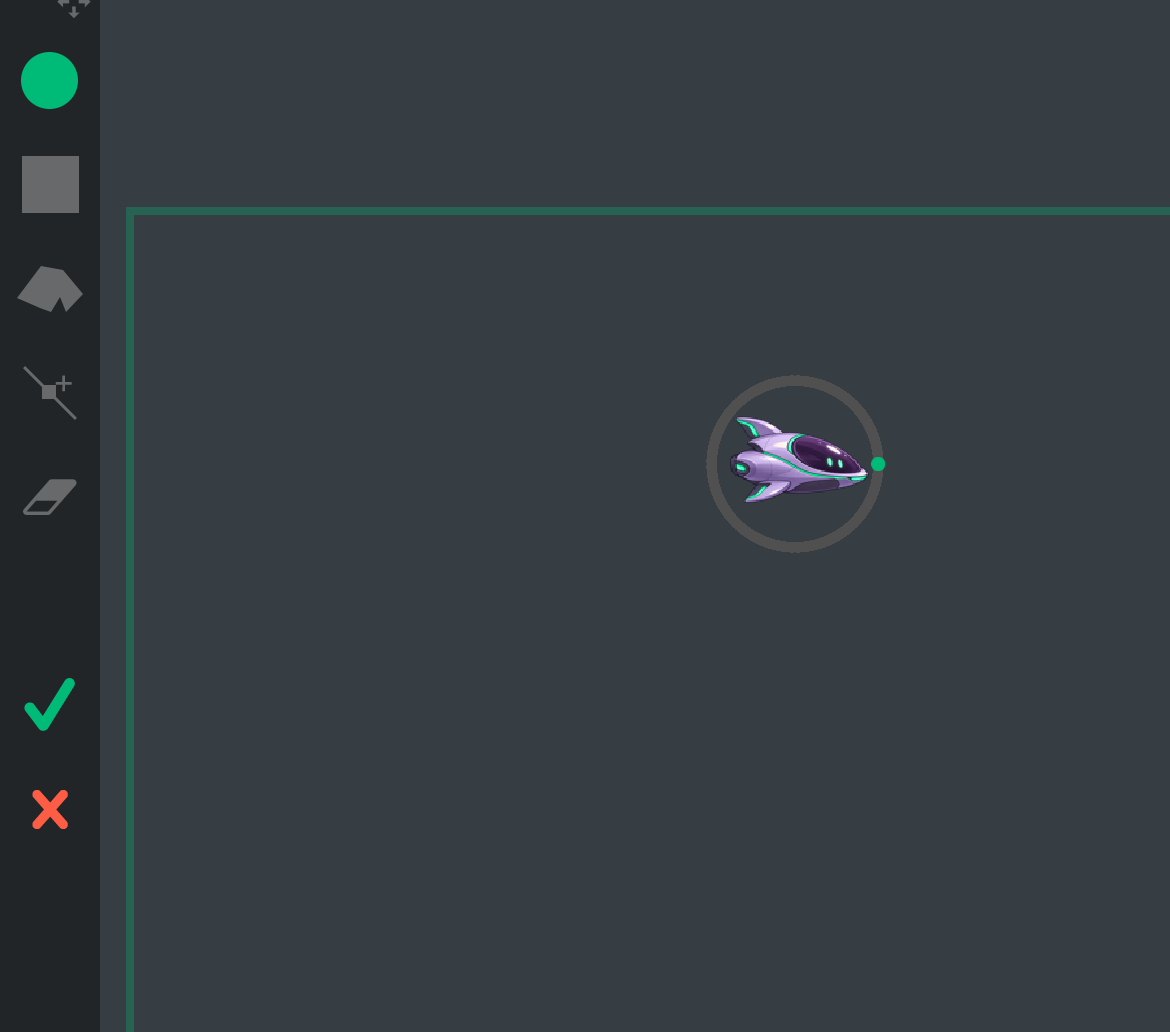
Rename the object Skimmer. Use X 8 m, Y 21.5 m, a centered anchor, and 85% scale. These values matter: the score later subtracts the starting X, and the ship’s size and height affect its first landing. In Physics, choose Dynamic, Mass 1 kg, Friction 0%, and Bounce 0%. Keep collisions enabled.
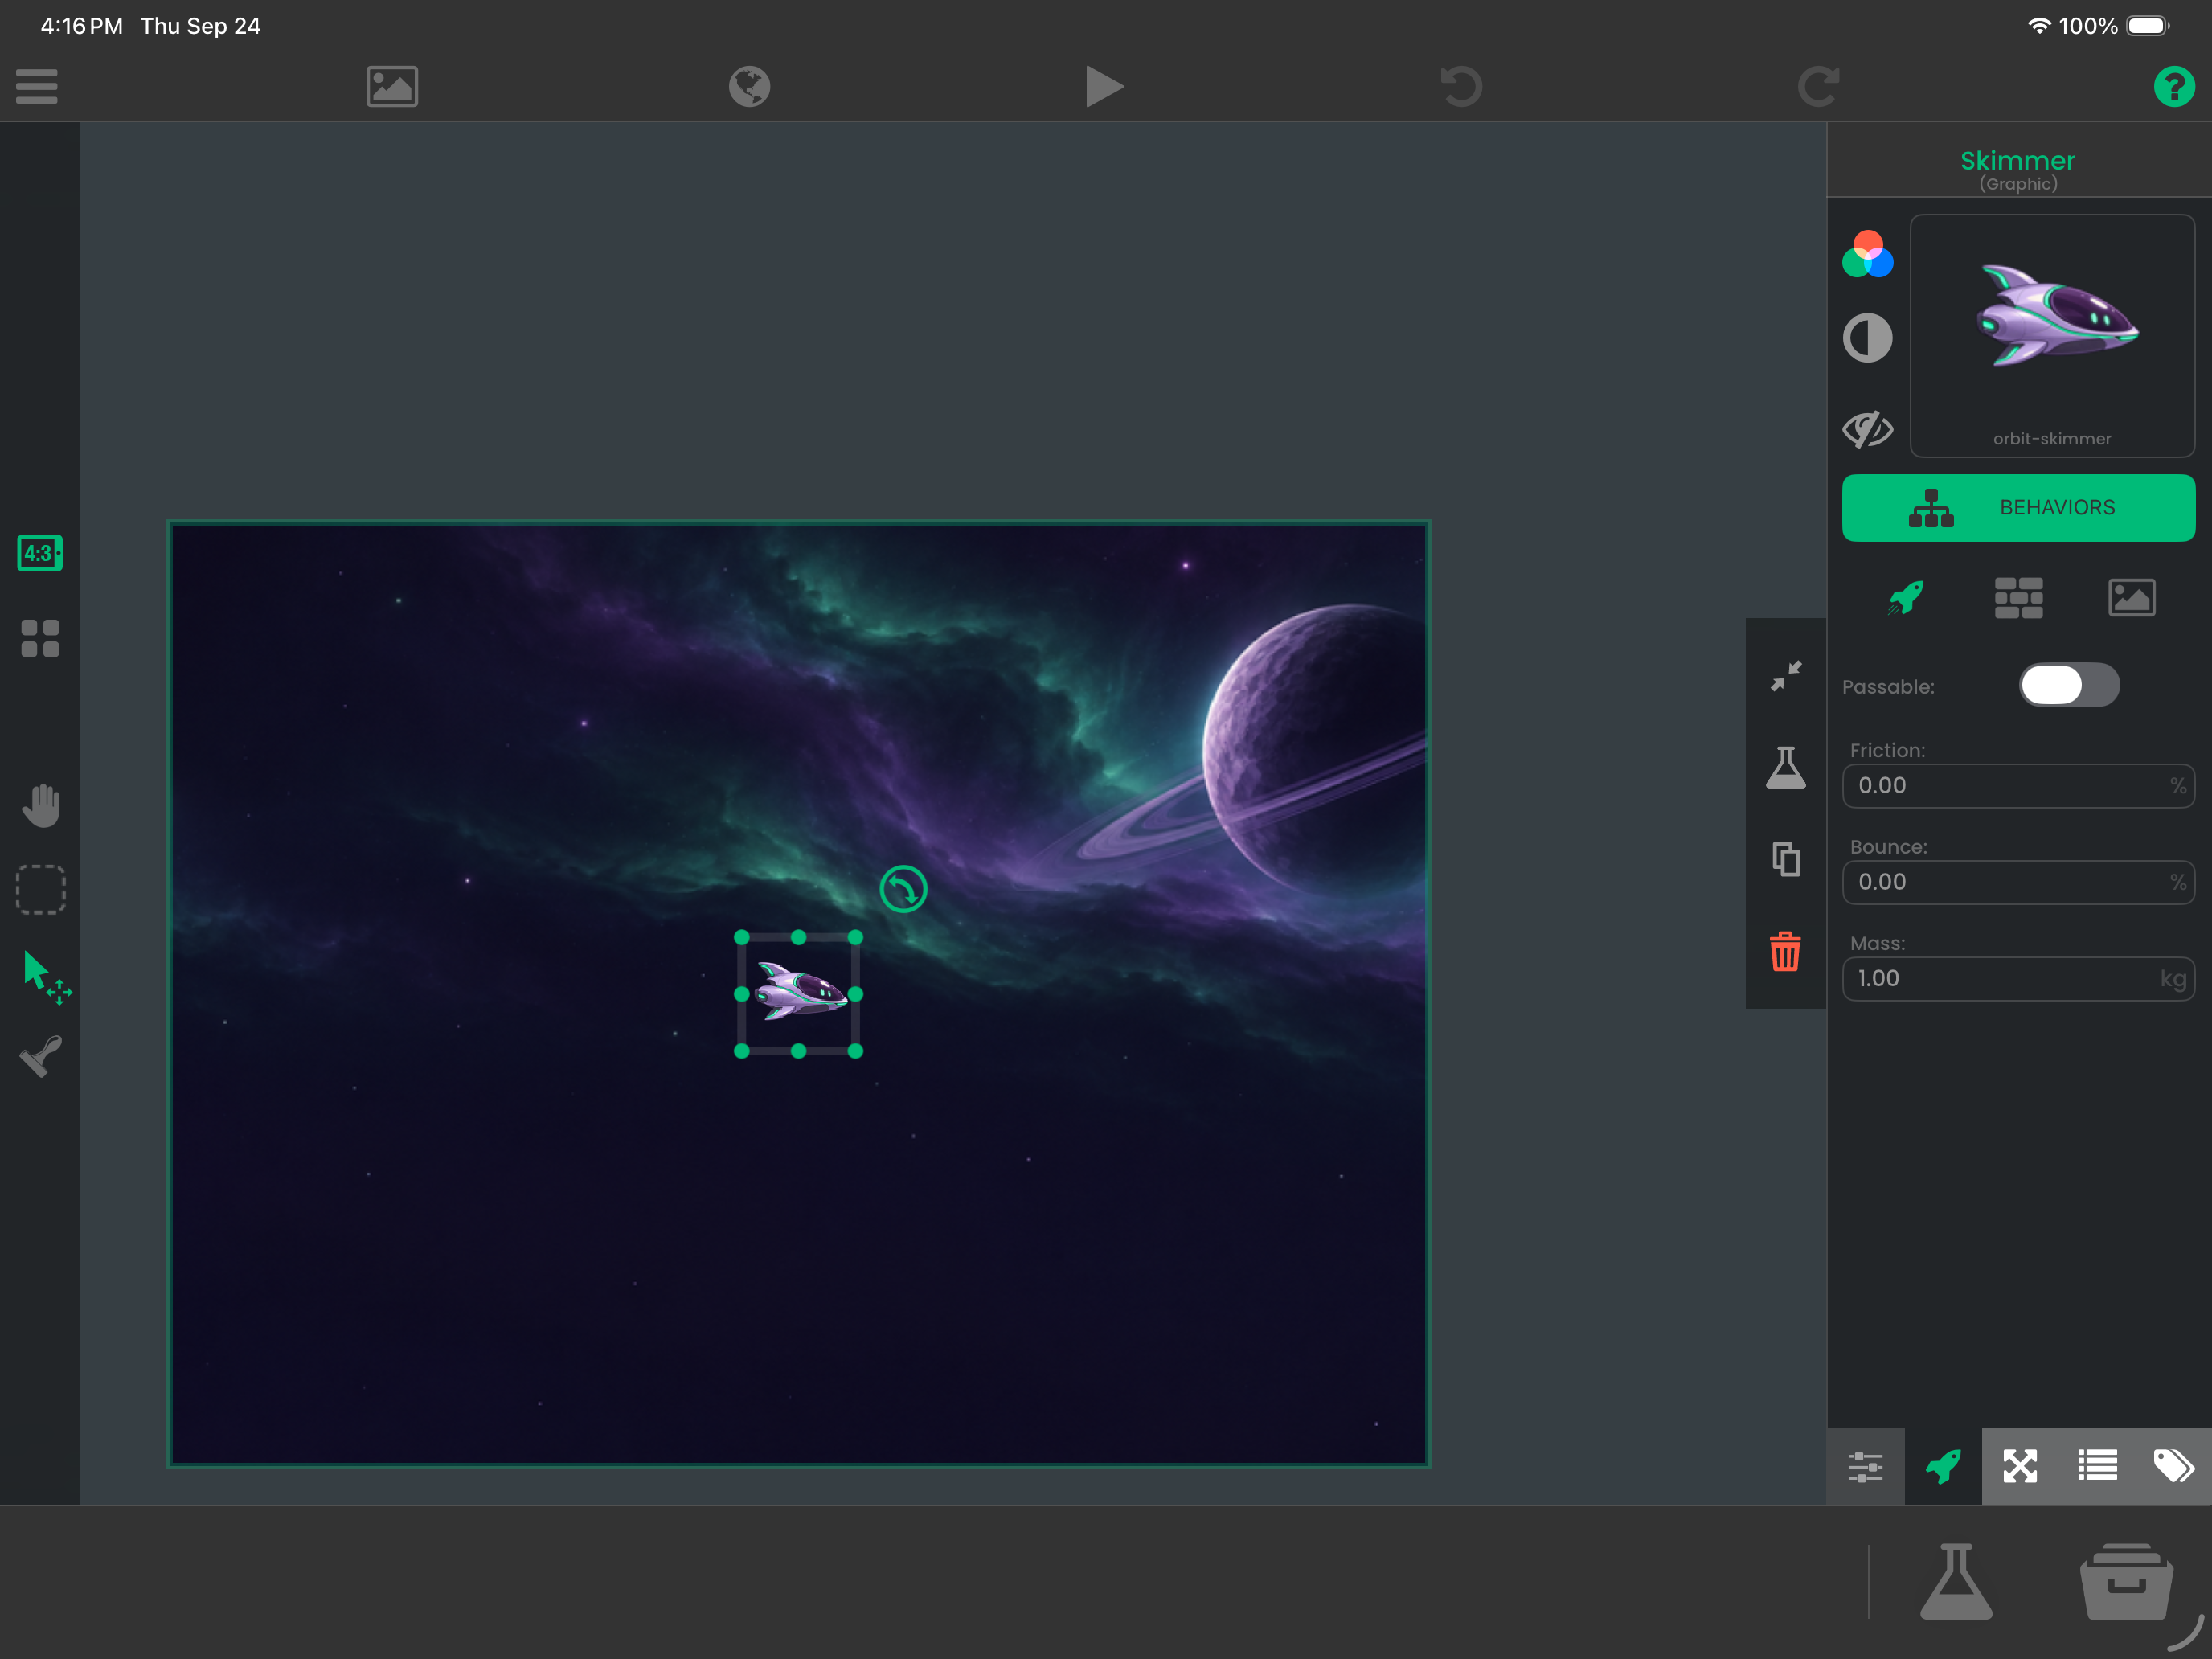
Add the two starting attributes
- Open the Attributes tab in Object Properties. Tap +, name the attribute
runState, and set its value tomenu. Add another namedmusicwith value1. These are text keys: keep the capitalization exactly as shown.
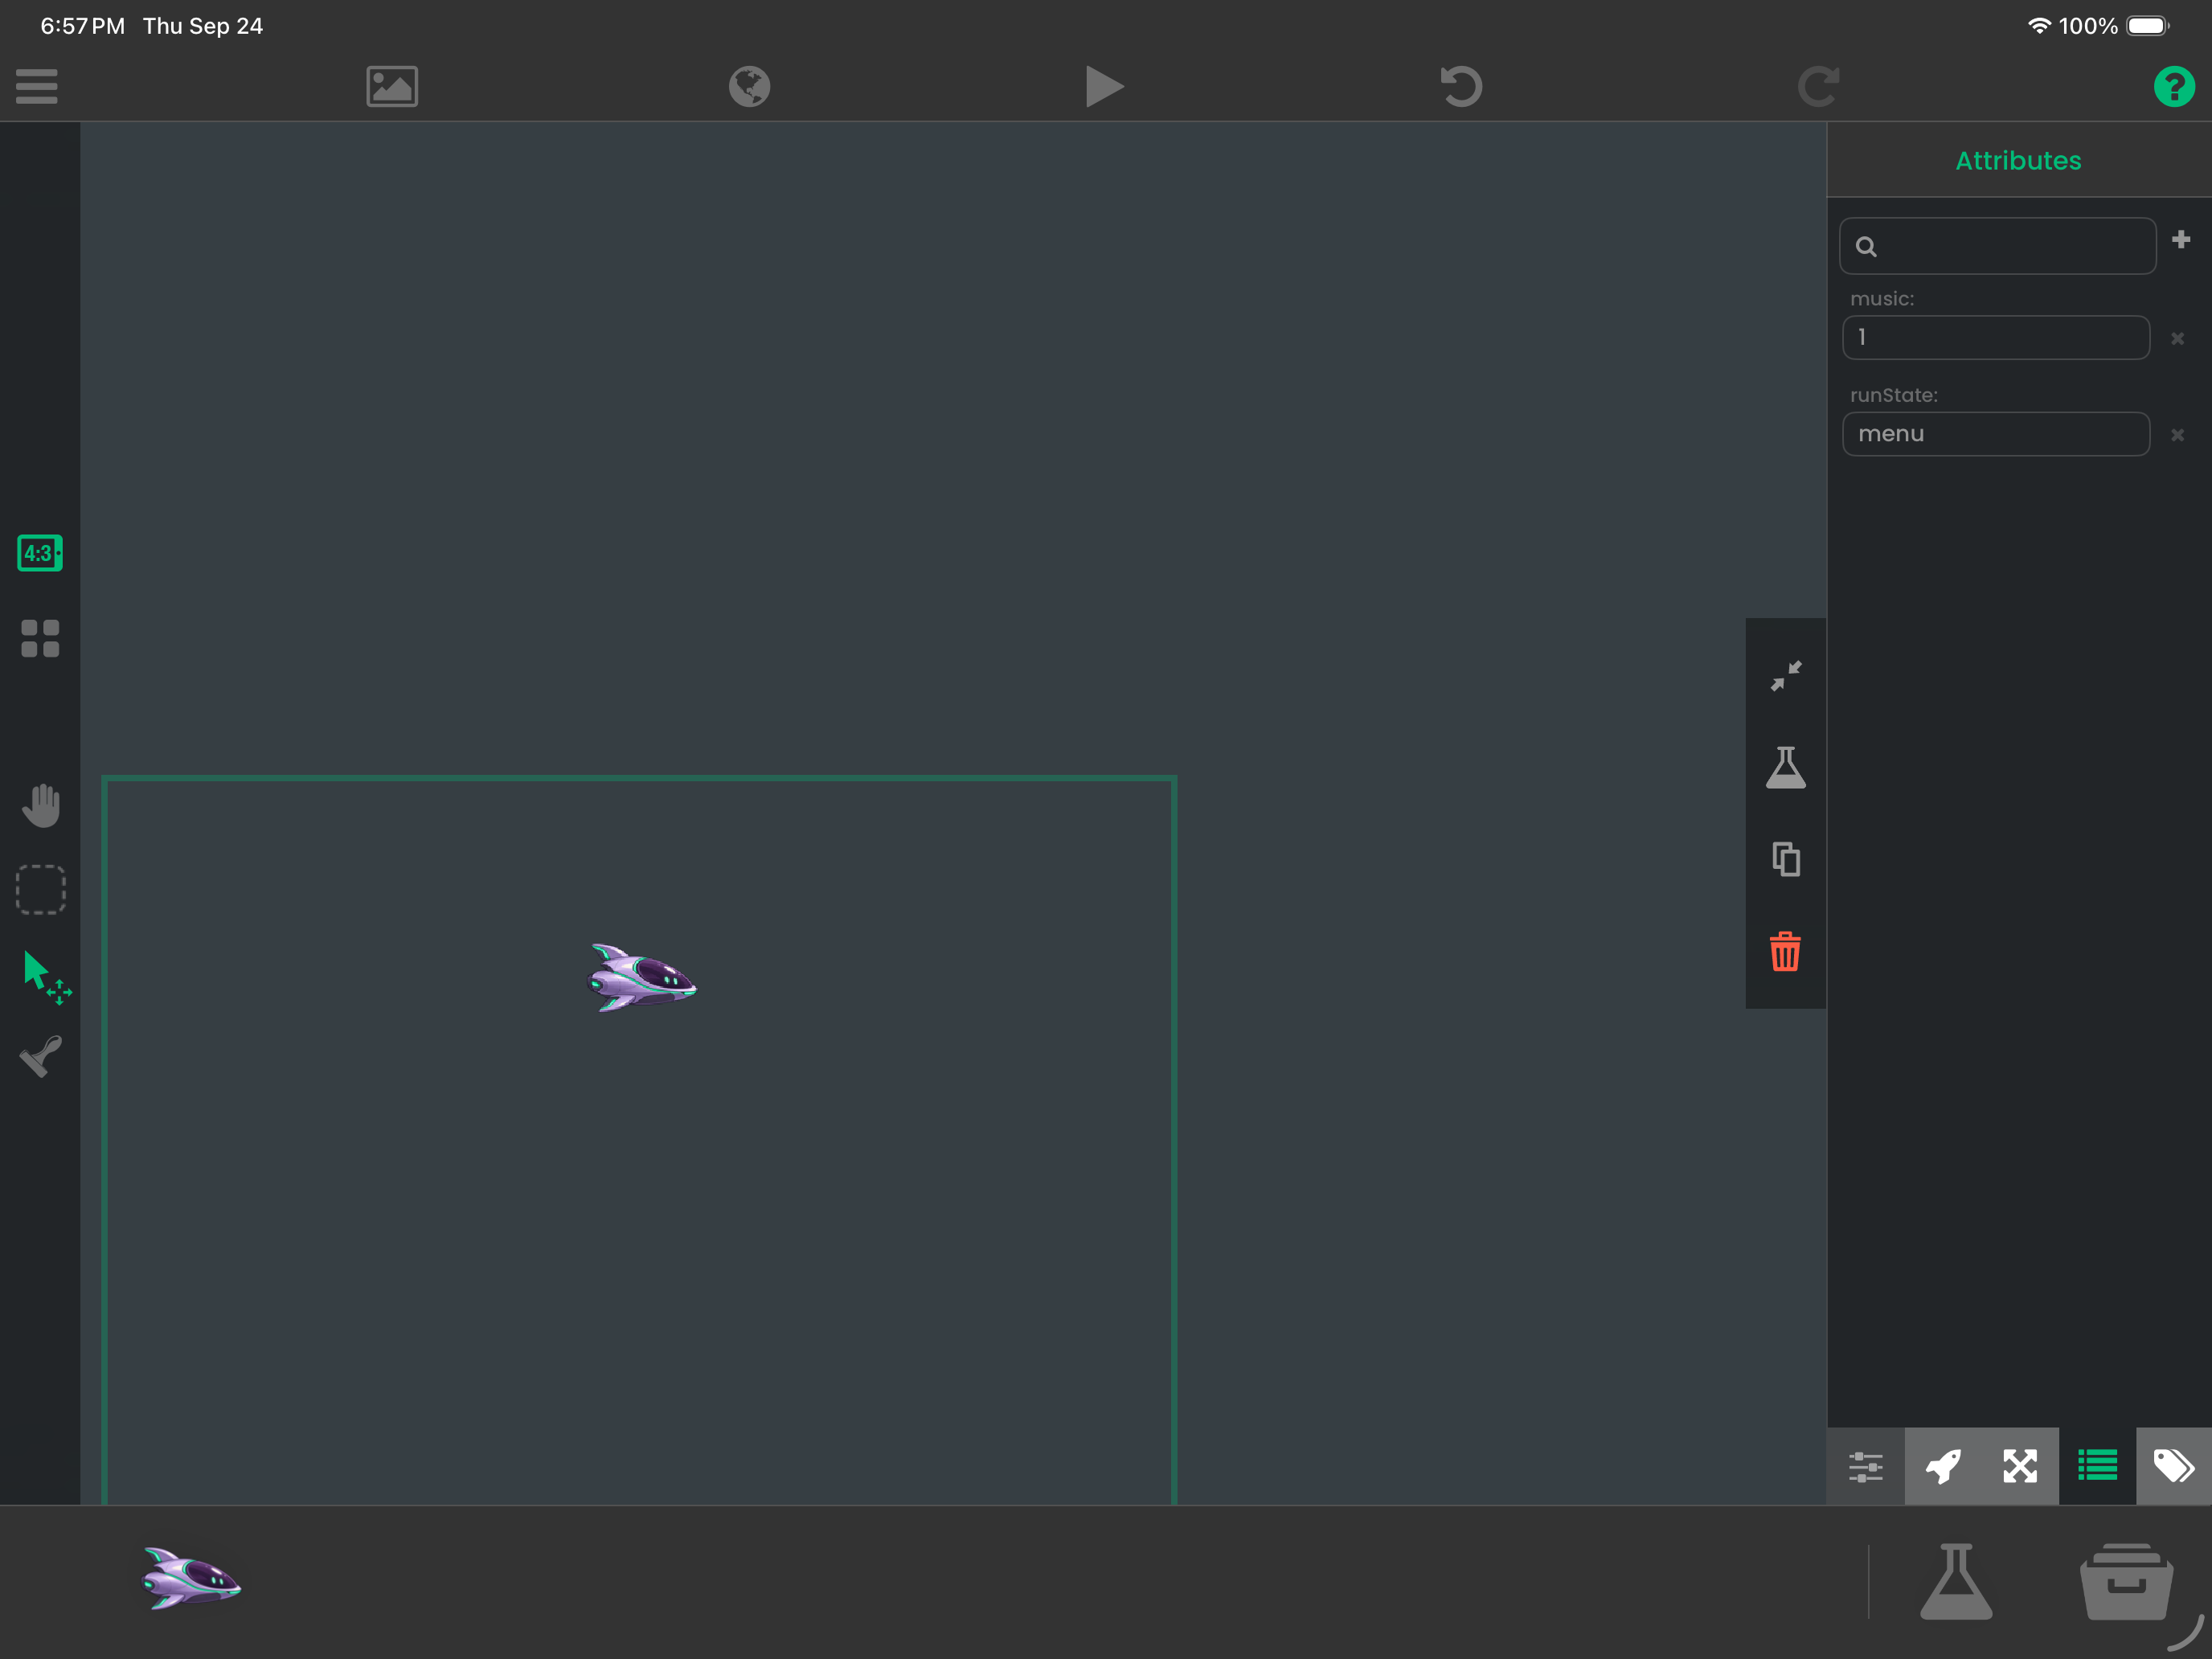
Attributes are values stored on an object. Our behaviours will read and change them while the game runs. Read Object Attributes for the full editor workflow and Object Physics Properties for the physics controls.
Make room to work: editor framing
- Choose the Hand tool on the left, then drag empty space until the green screen rectangle and Skimmer are comfortably visible. This moves your editor view; it does not move the ship in the game. Switch back to the arrow tool when you want to select an object.
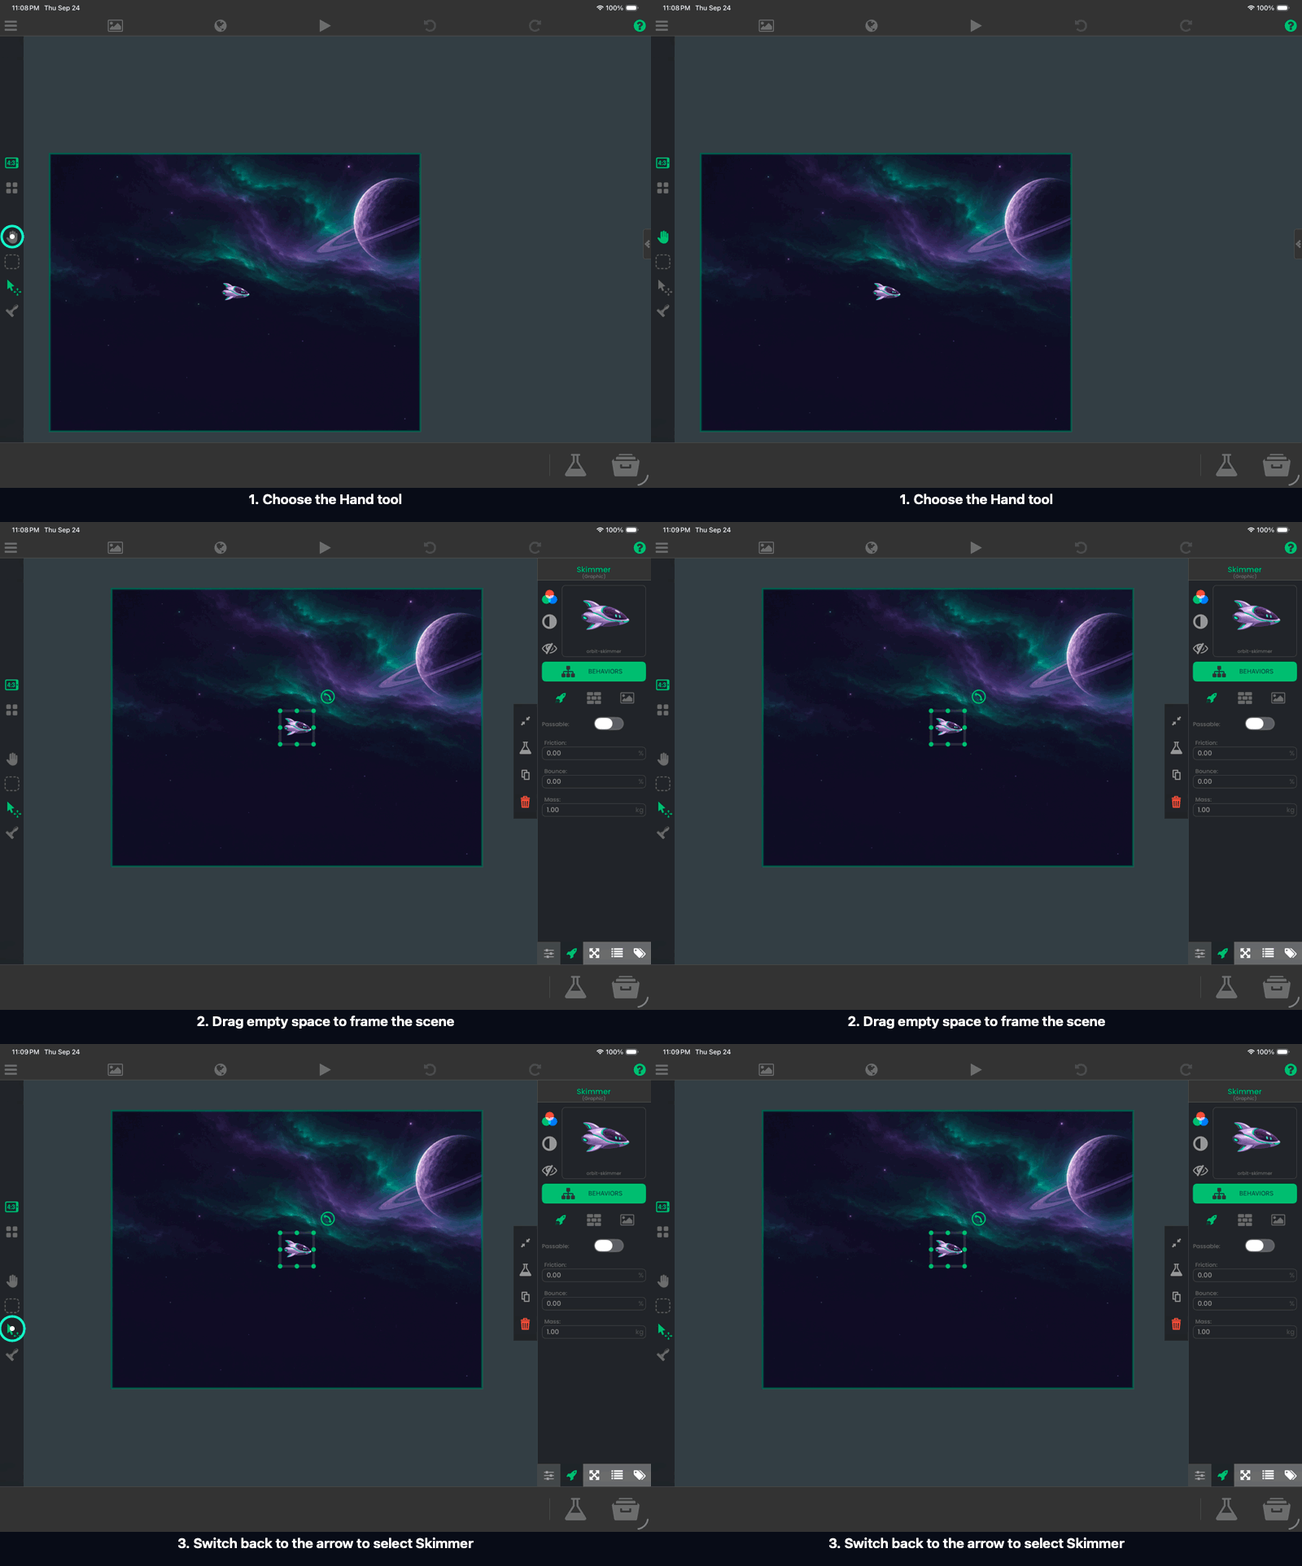
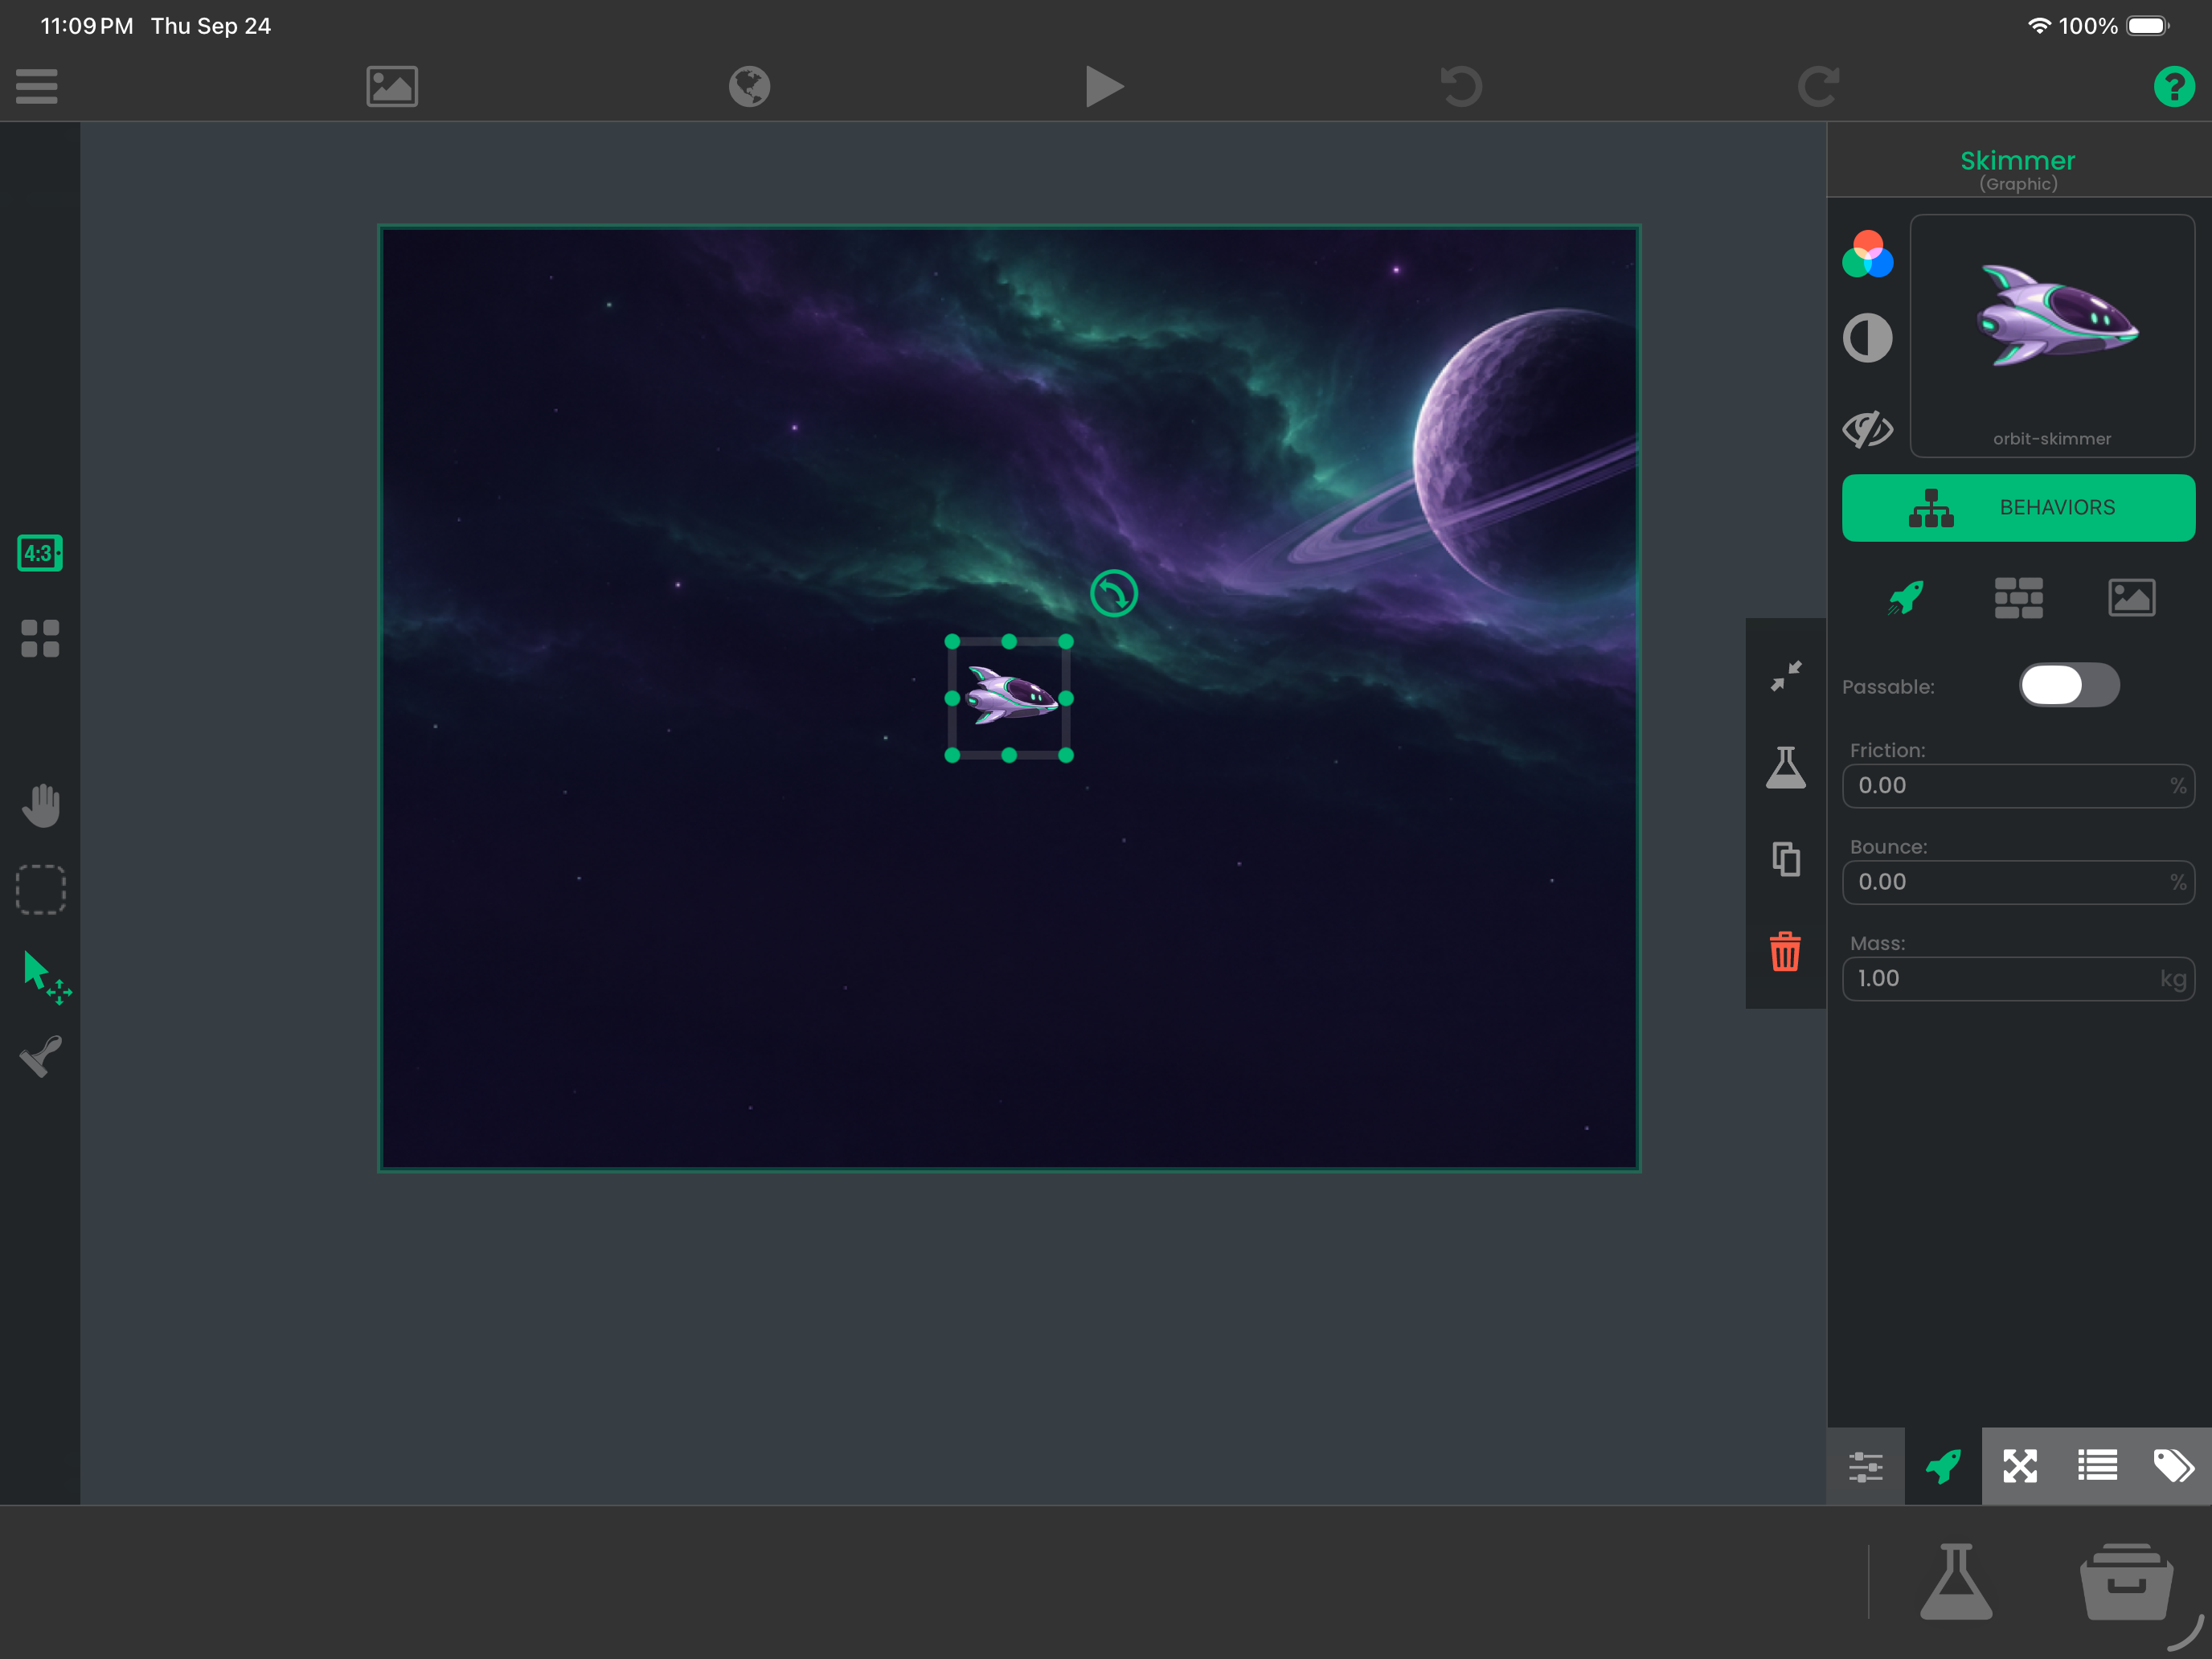
The green rectangle previews the screen area. Do not reposition the ship just to center it in your editor window. Step 5 sets the game camera using Screen to Object, Screen Follow, and Zoom Screen; Part 5 later adds the soaring zoom. See Interface Overview for the editor tools.
Try it: Play. The ship should stay still because gravity is zero. A moving or falling ship means a gravity setting needs another look.
Why it works: the round collision body slides across the terrain without catching a wingtip. The artwork can pitch toward the direction of travel while its circular physics shape stays predictable.
4. Build the flight deck in Scene UI
Build three simple views: a title card, an in-game HUD, and a results card. Use the pictures as your layout guide. Arrange and size the artwork by eye; choose colours and fonts you like.
Open Layers and select Scene UI so the interface stays on screen when the camera moves. Give these objects Scenery physics and no collisions. See Layers if this is your first UI layer.
Place the card, then add a label
Here is the finished title screen to aim for:
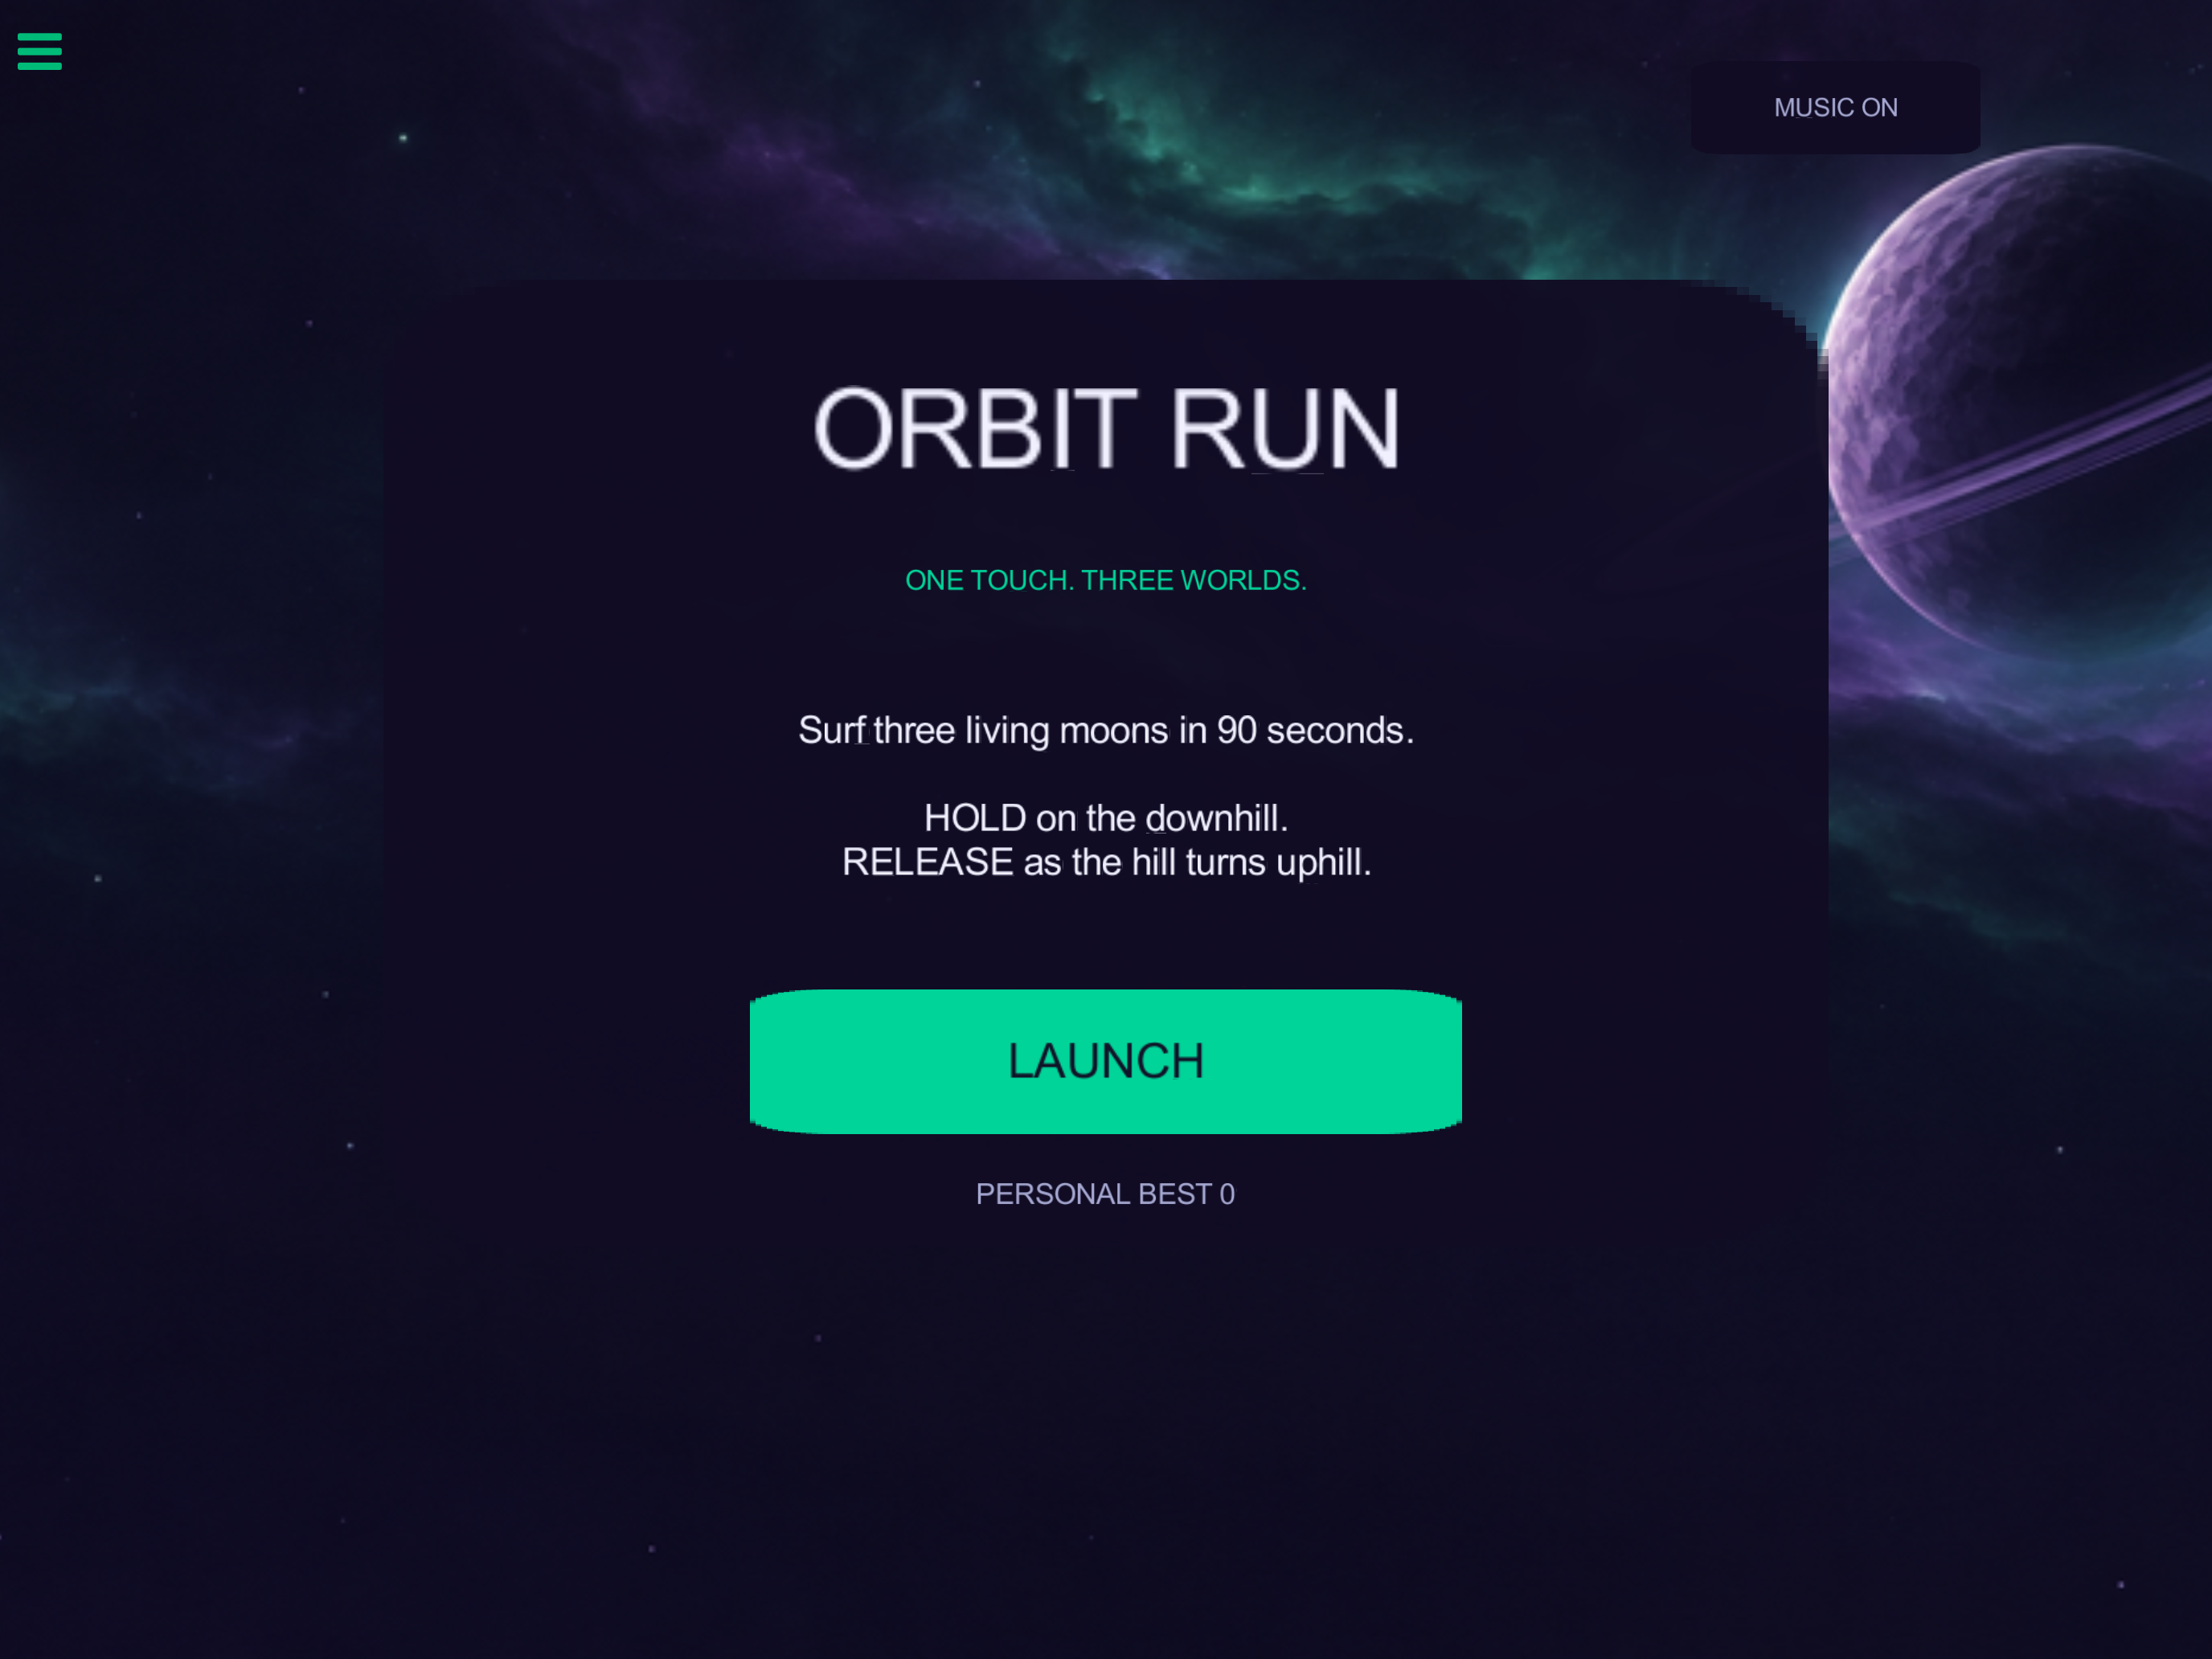
- Drag
orbit-panelonto Scene UI and resize it into a card. Add a smaller panel for the Launch button. - Choose a font in Asset Library → UI → Fonts, drag a label onto the card, and edit its text. The GIF shows the whole gesture.
- Repeat for the other labels and the music button. Make the title easy to read and leave generous space around the buttons.
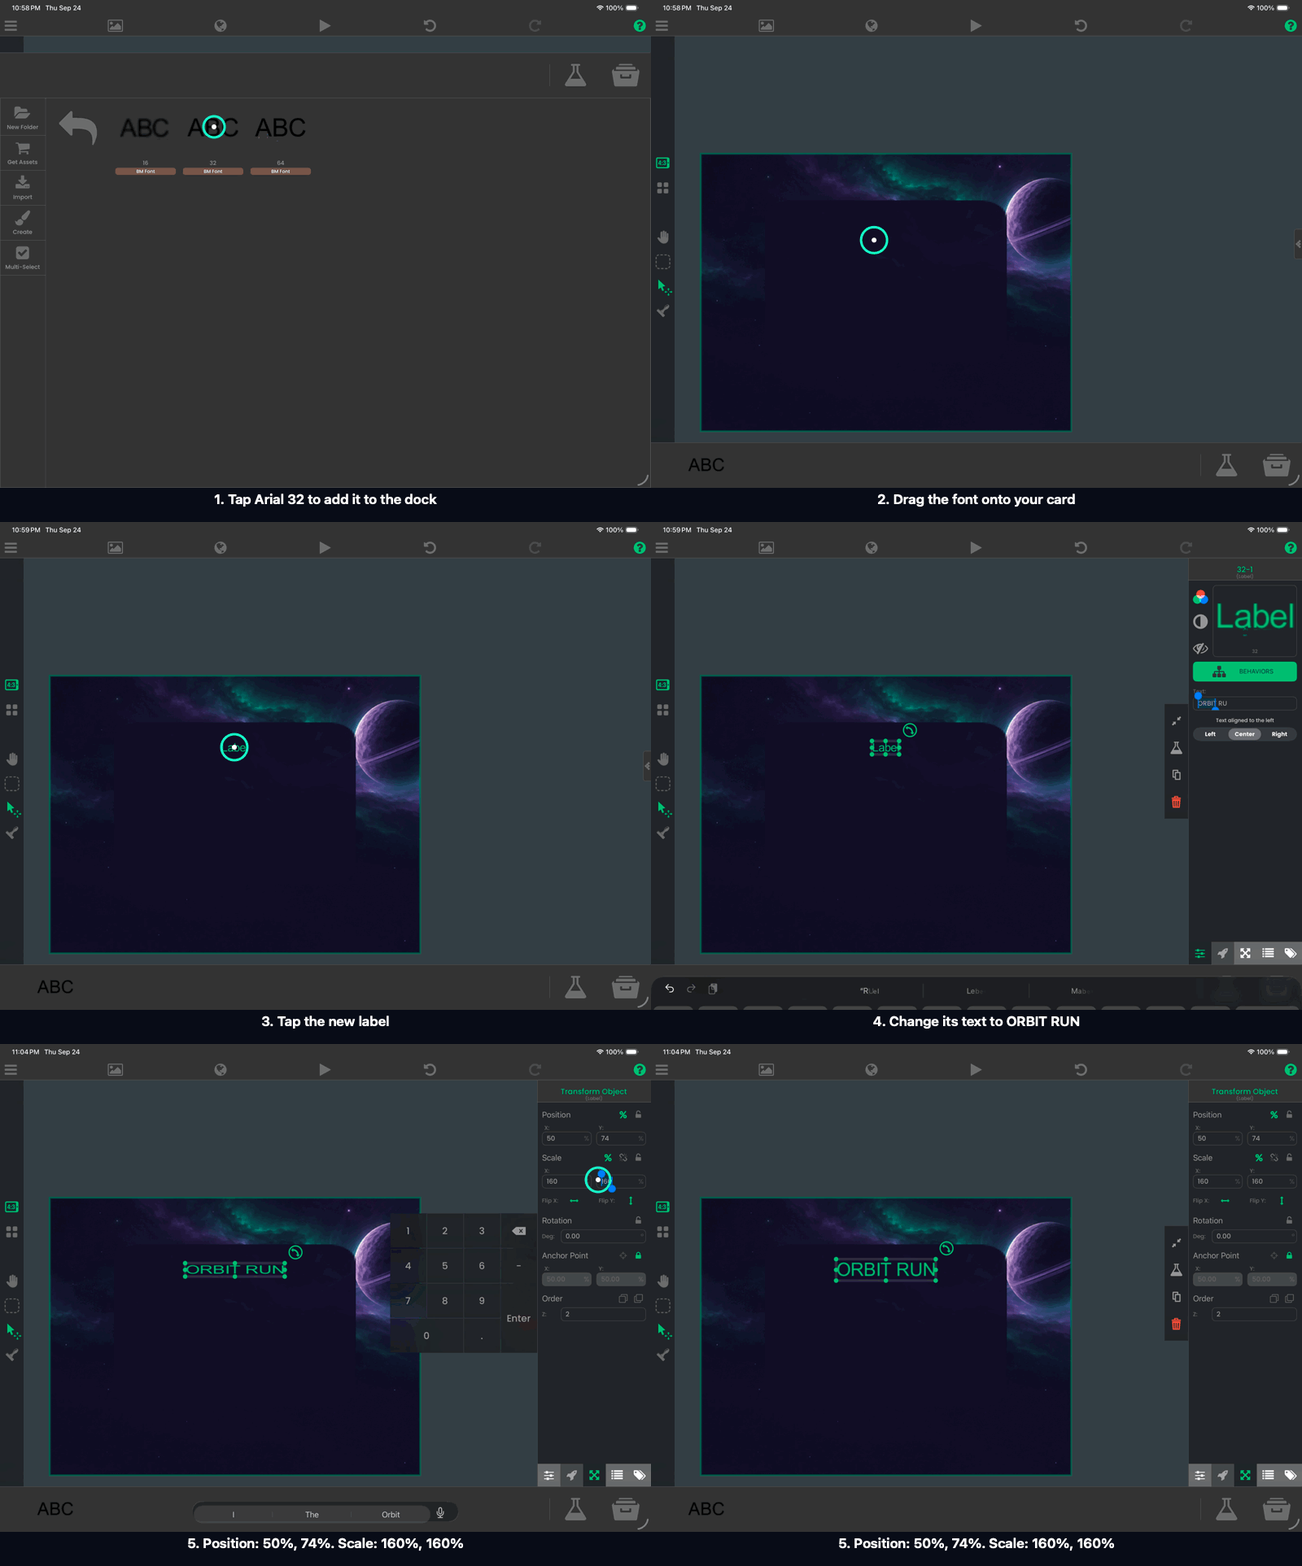
Names used later: call the card Menu Card, its title Wordmark, the small subtitle Subtitle, and the instructions Howto. Name the Launch graphic Start and its label Start Label. Add Menu Best below it, plus a Music Button and Music Label in a corner. Put each label in front of its button graphic.
HUD and results objects
The HUD leaves the middle of the screen clear for flying:
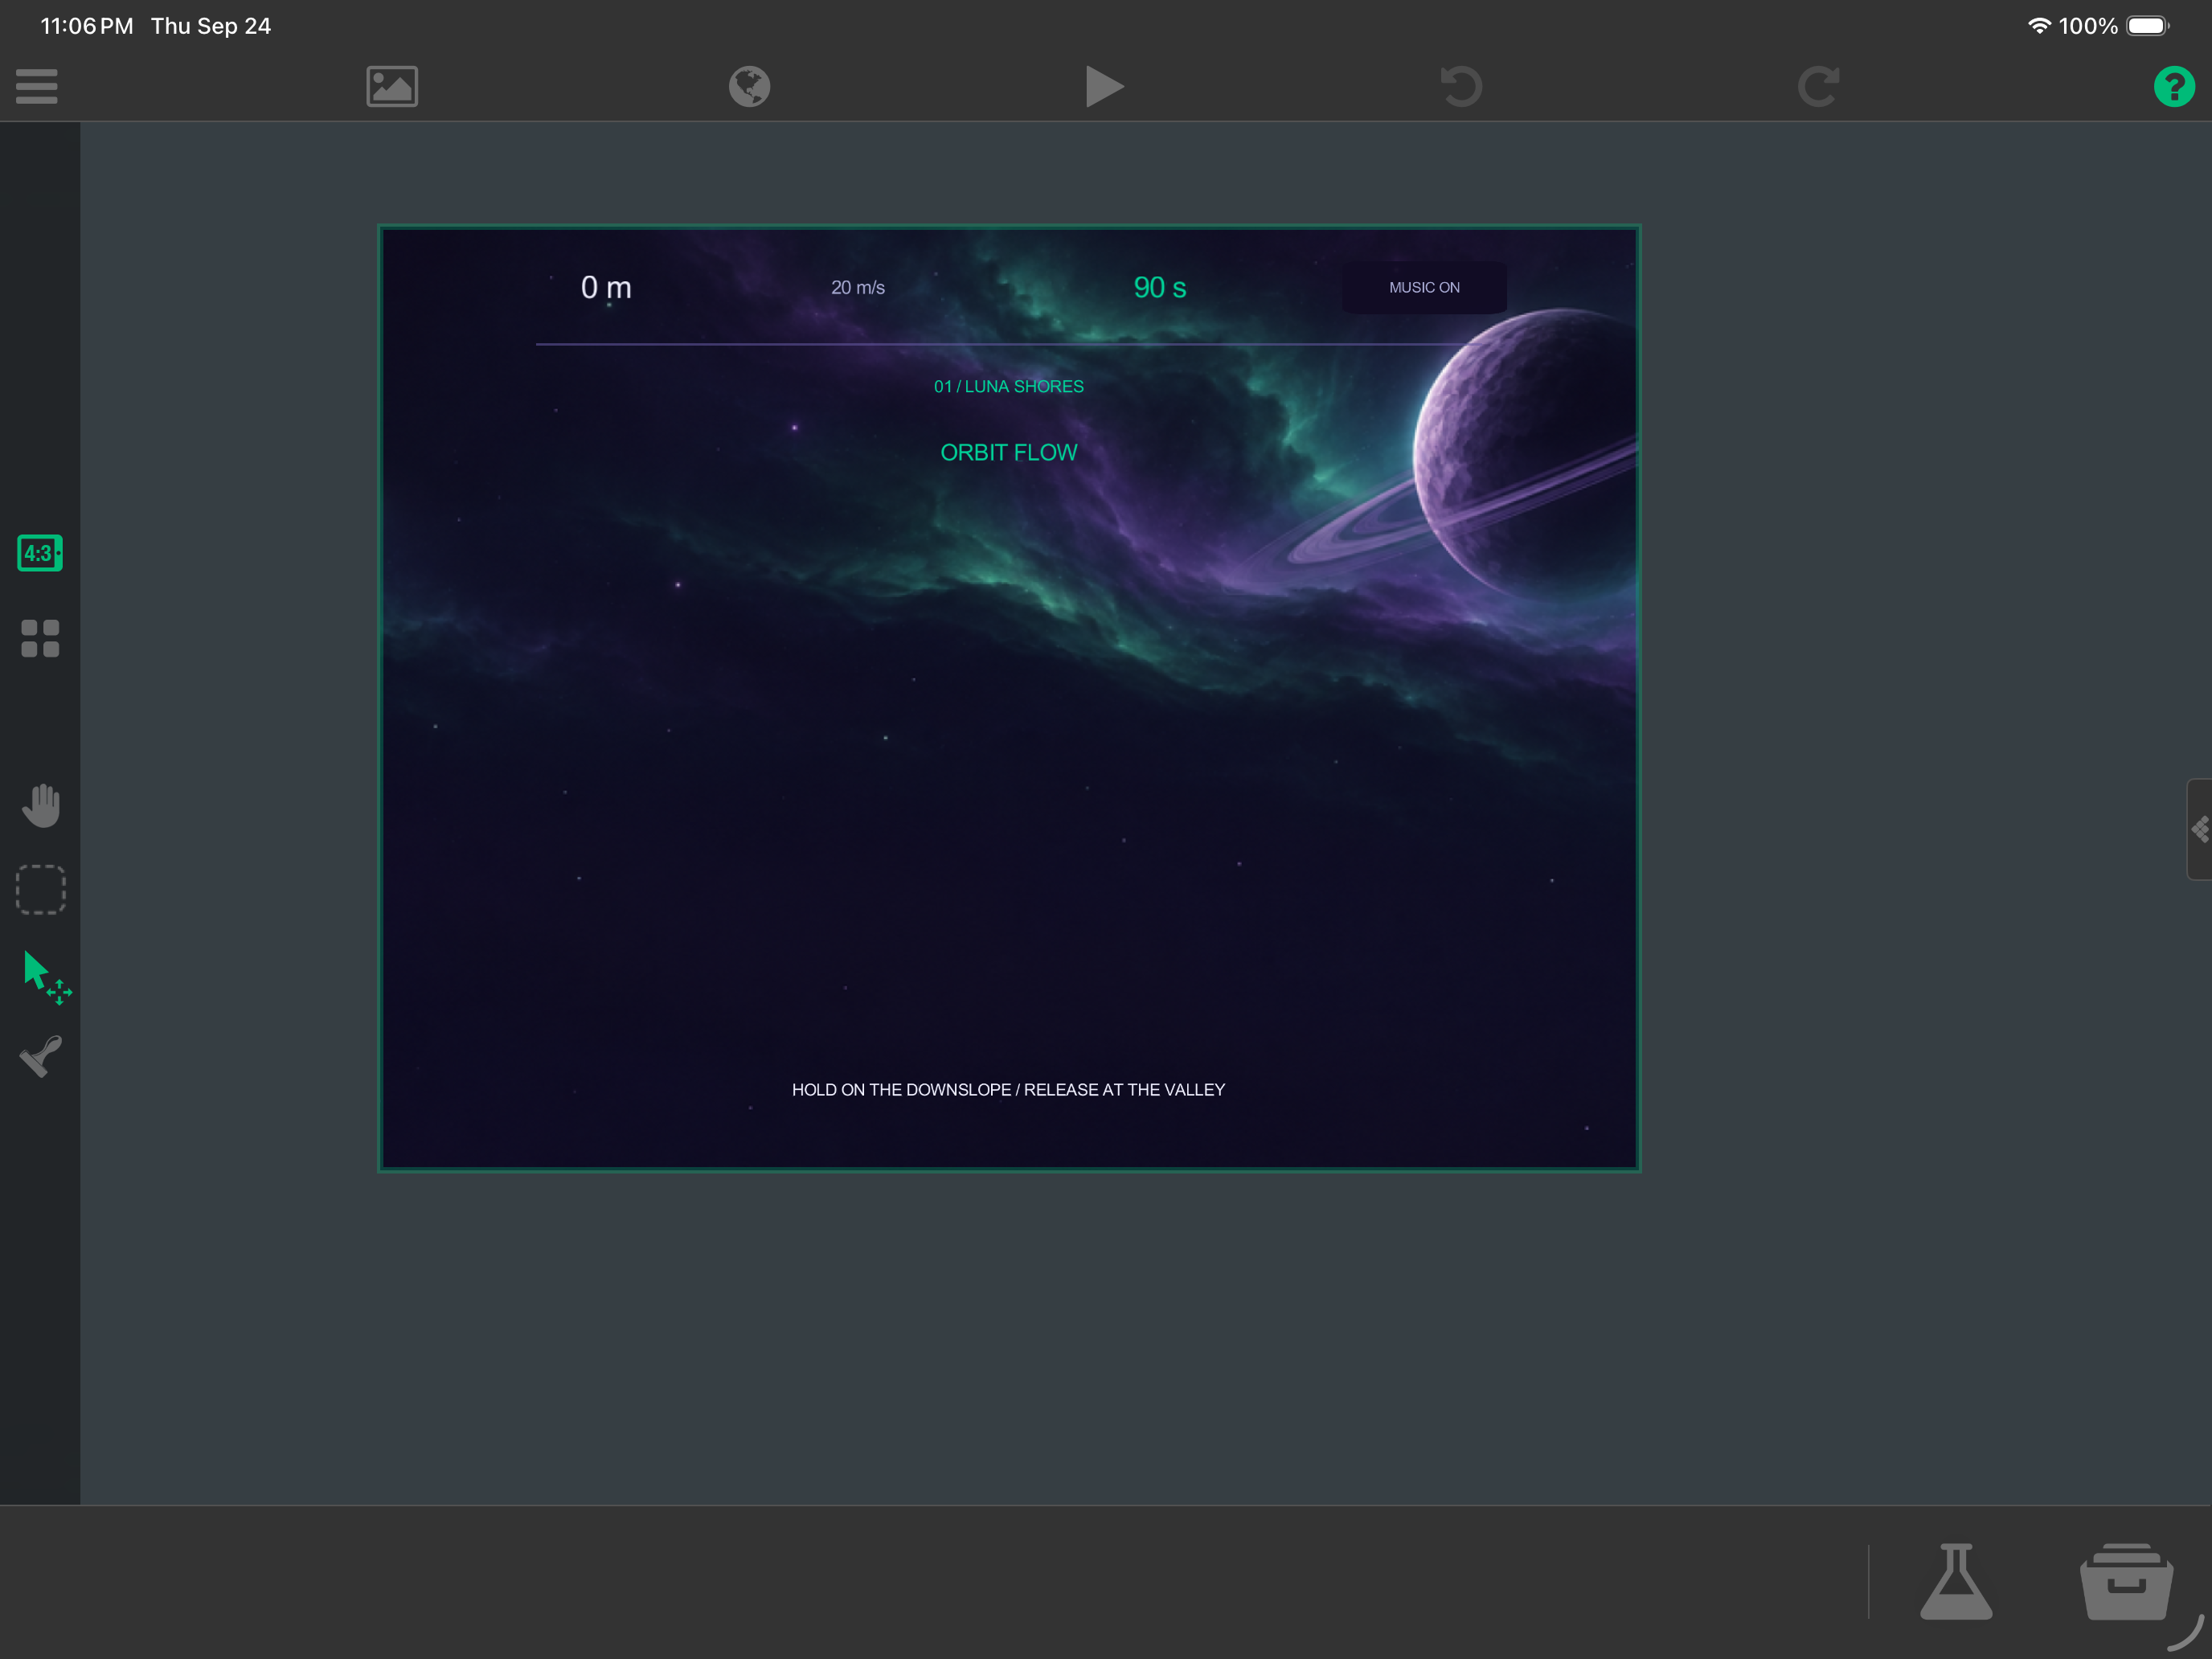
Add labels named Distance, Speed, and Clock across the top. Put Stage underneath and Cue near the bottom. Add Flow Label for short reward messages and a thin orbit-pixel divider named Hud Rule. Copy the placeholder text from the picture; its exact size and spacing are up to you.
Build the results card the same way:
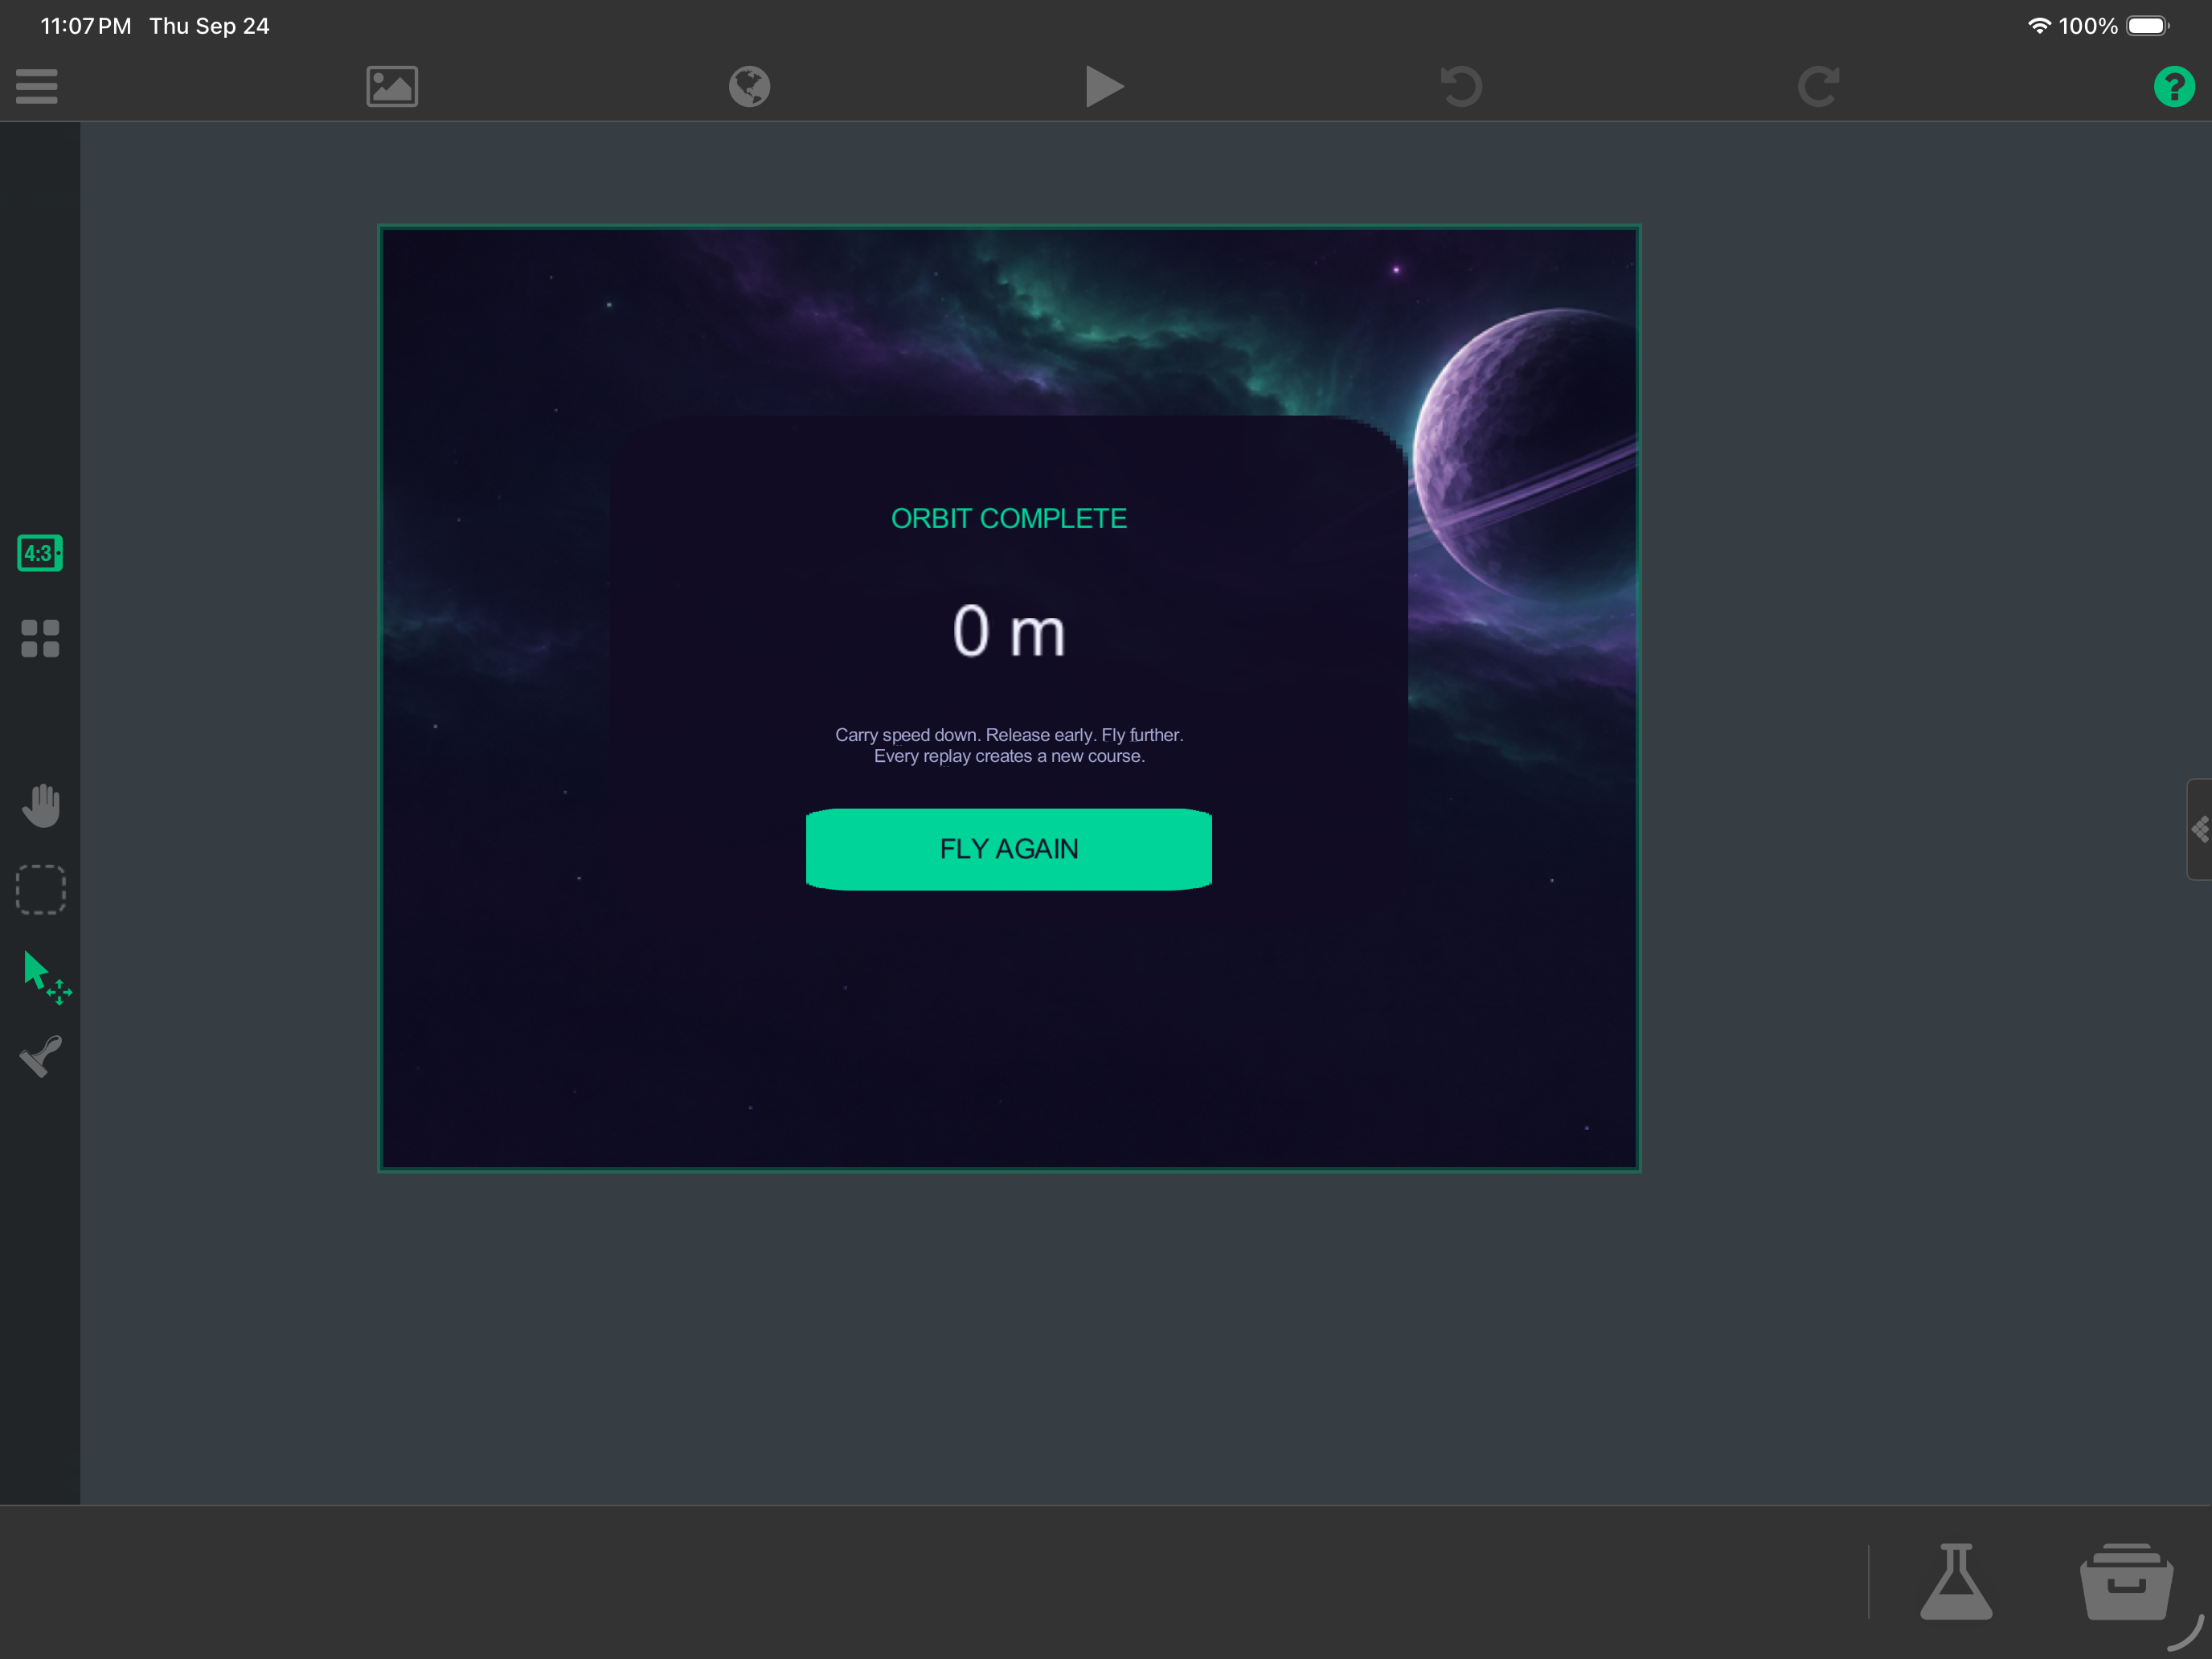
Use another panel named Results Card, with Results Title, a large Results Score, and Results Tip. Add a button graphic named Replay and a label named Replay Label, reading FLY AGAIN. These names let you find the right objects in later behaviour steps.
Add the touch surface
Place an orbit-pixel graphic named Input Plane behind the other Scene UI objects and stretch it to cover the whole screen. Set its colour opacity to 0%, but keep Visible on so it can receive touches.
Hide the HUD and results objects with their Visible setting until the behaviours reveal them. Keep the title screen and music button visible.
Try it: press Play. Check that the title is readable, the buttons are easy to tap, and the HUD and results are hidden. LAUNCH will start working in the next step.
5. Generate the course, then launch
If the menu covers Skimmer, open Layers and tap Scene UI’s eye to hide that layer while editing. Select Main, tap Skimmer, then Behaviours. Turn the Scene UI eye back on before pressing Play so the menu and touch controls are available.
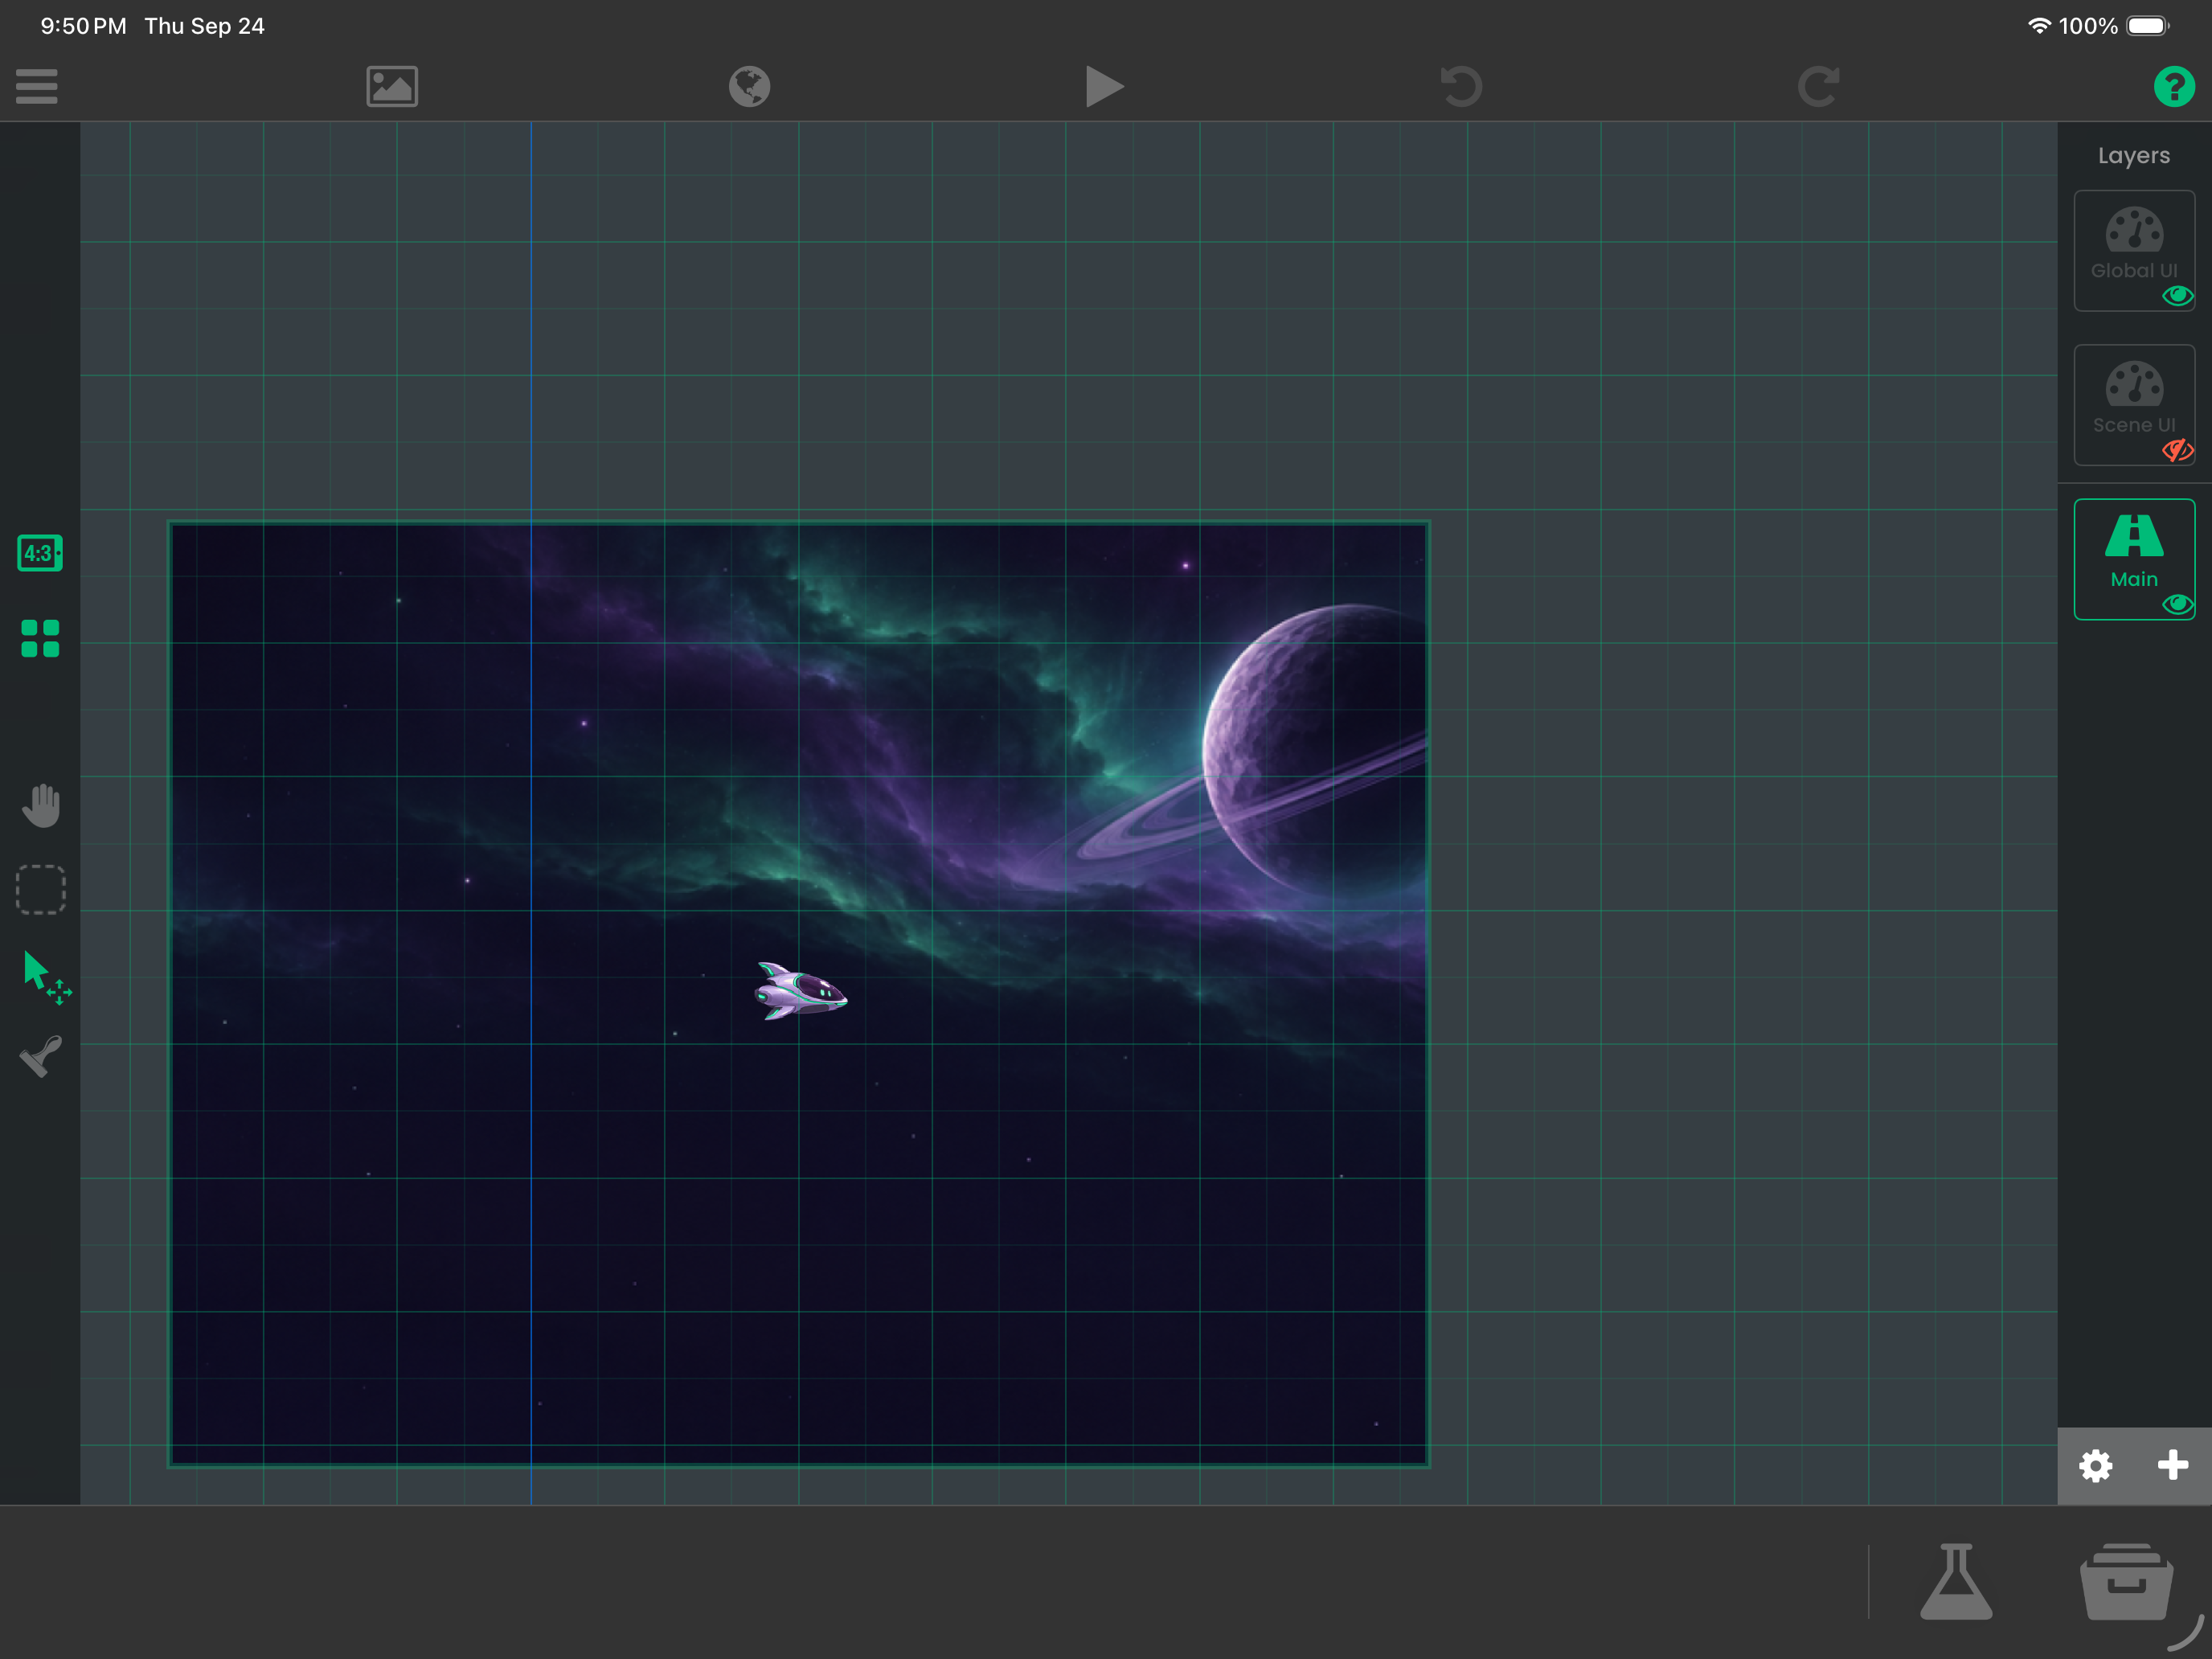
Select Skimmer → Behaviours. All game logic in this series goes on Skimmer, even when a behaviour targets a UI object. This gives you one place to inspect the game.
A quick guide to connecting behaviours
For a tour of the editor controls, see Behavior Editor Rundown. Keep this walkthrough open while building the first two nodes.
Search for a behaviour in the left panel. Double-tap a search result to add it in the middle of the canvas, then drag the placed node into position. Dragging a result out of the palette is another option.
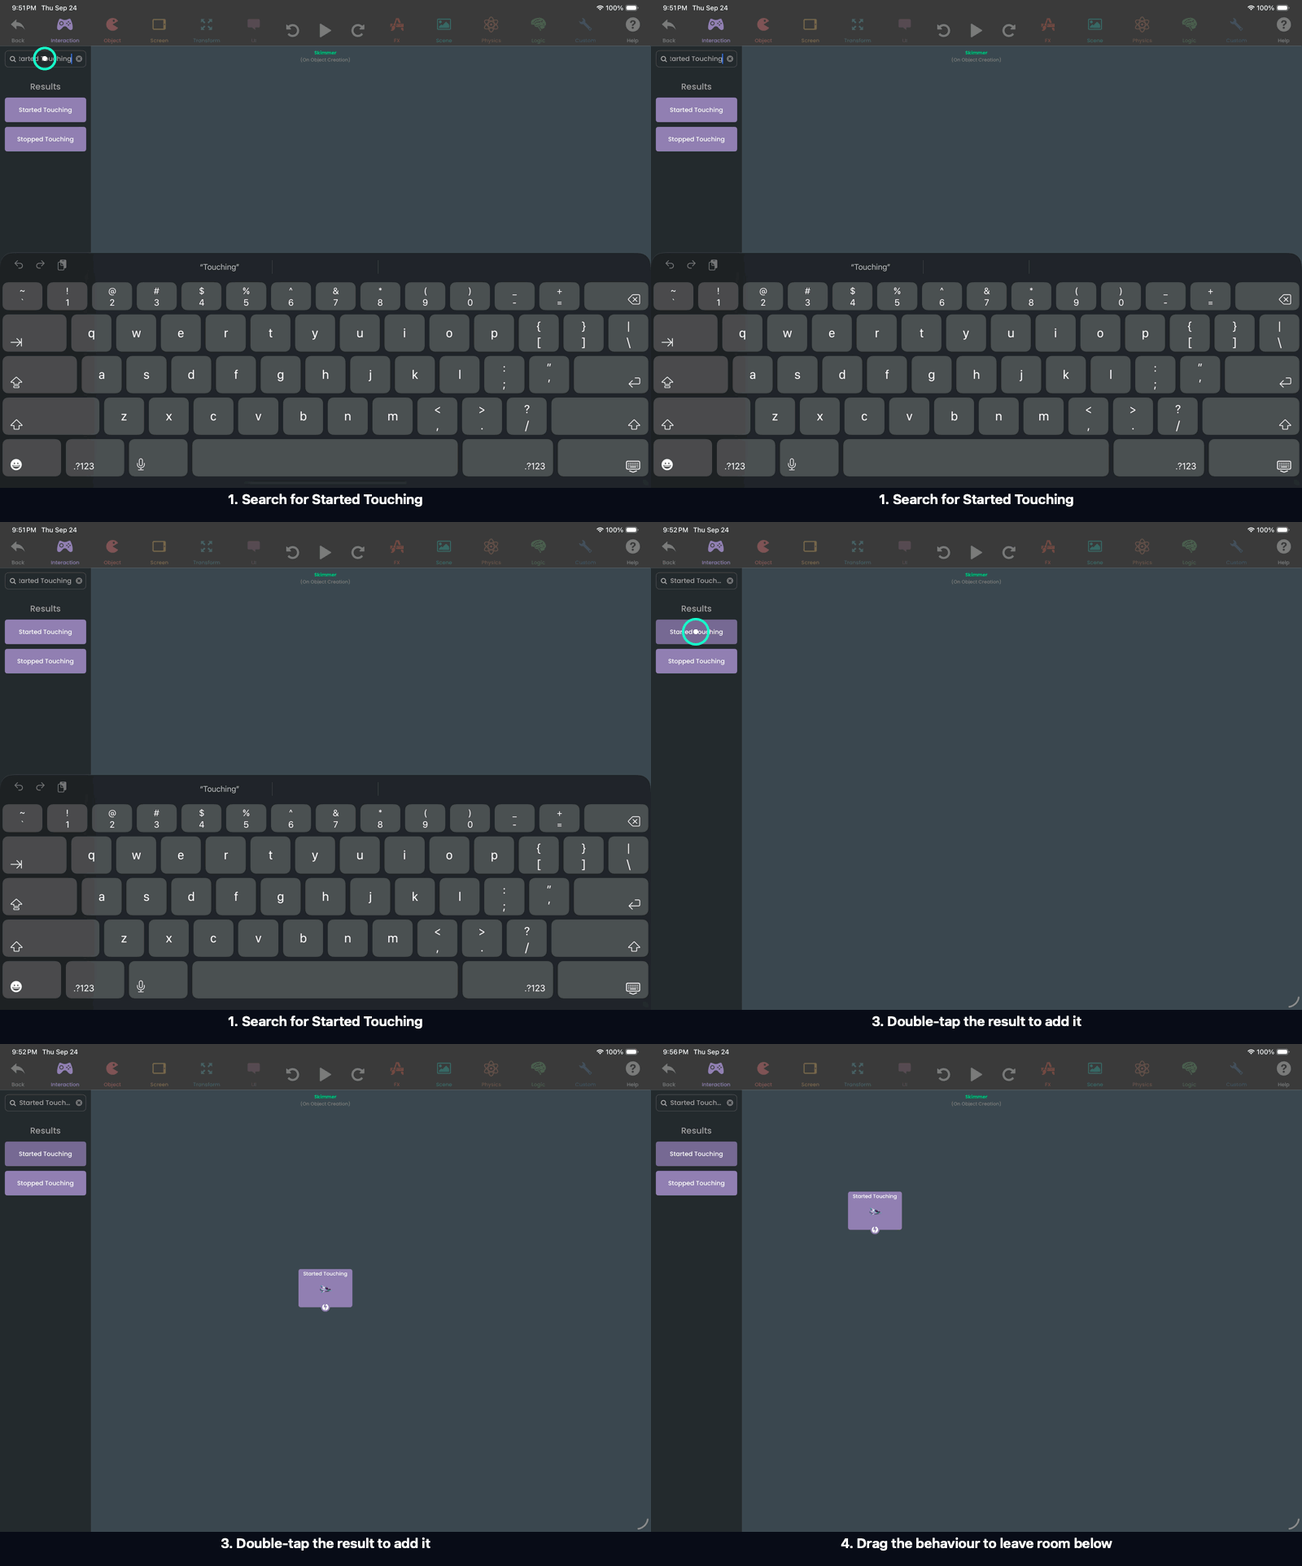
Now search for Set Behavior State, add it, and drag the bottom output of Started Touching onto it. Watch the connecting line appear and the second node snap beneath the first.
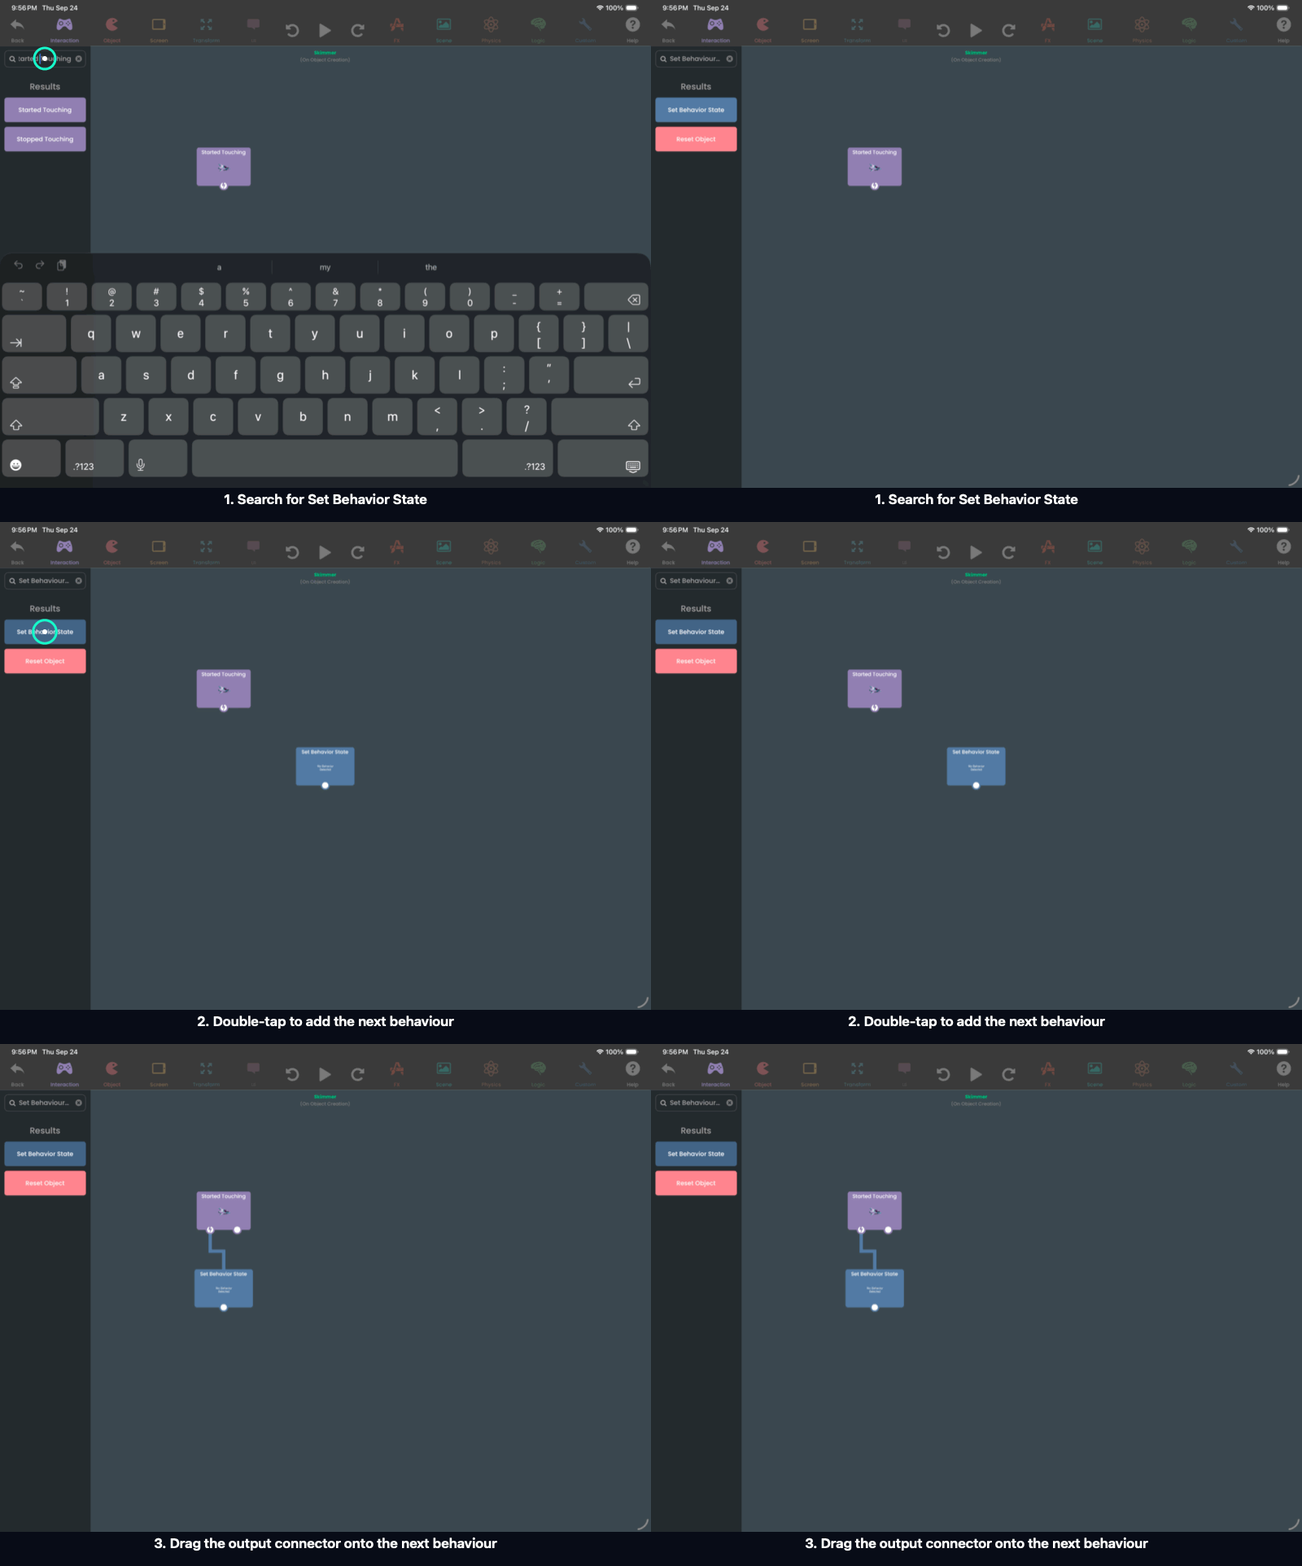
These clips show the editor gestures before configuration. Next, give the behaviours their aliases and targets. Tap a placed behaviour to edit its properties. Rename it using the name field at the top; the names below are aliases, not extra behaviour types to search for.
Drag a behaviour's bottom output connector onto another behaviour to execute it next. A line means execution; placing boxes underneath one another does not connect them. Use another unused bottom white circle to add a parallel branch. For a data input, select the receiving behaviour, then drag the earlier behaviour’s green data-output icon into the target input field. If it has several outputs, choose the required value from the list. Part 2 shows this gesture in a GIF. For example, later we will put Get Position’s X Position output into a subtraction field. A data reference does not execute that earlier behaviour for you.
Follow the diagram’s flow and leave enough room to trace each wire. Use Comments to separate systems as the graph grows.
Connect the start button
- Add Set Gravity, alias Menu Gravity. Target Skimmer, gravity type Object, X 0, Y 0. Leave this unconnected at the top level so it runs when the scene starts.
Build: Launch button
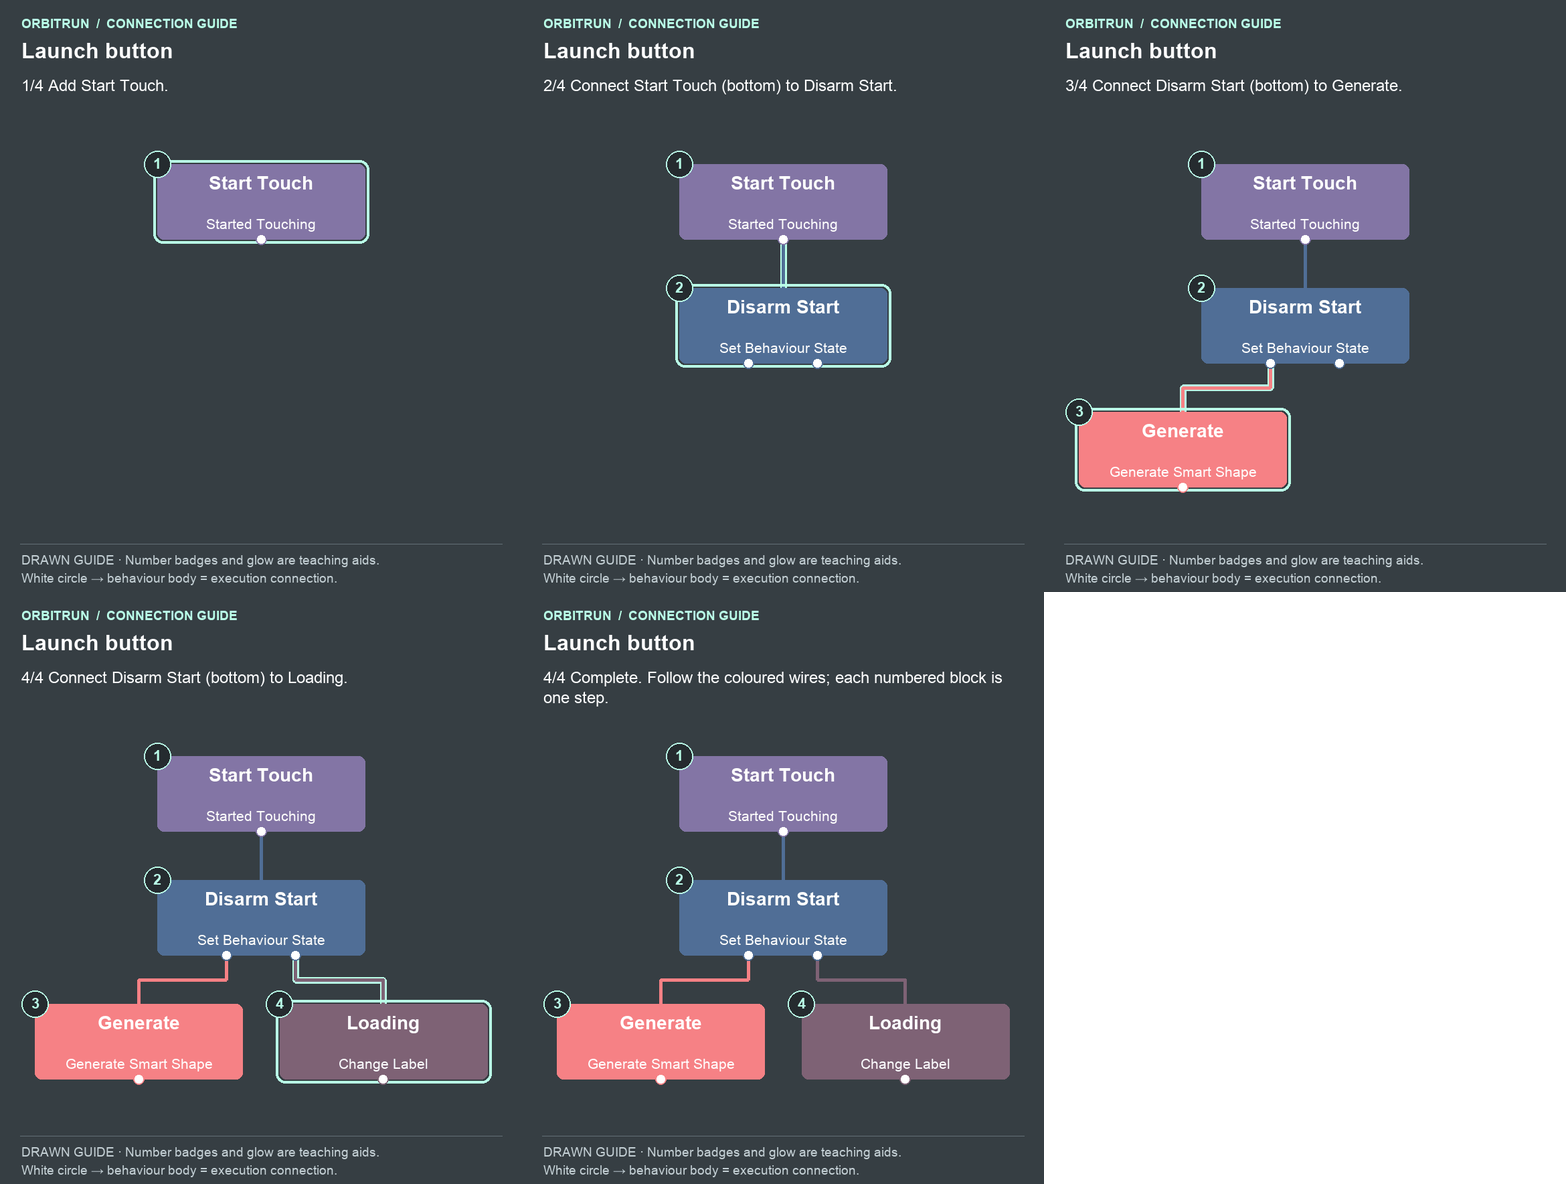
Open the completed diagram as a still image.
- Use the Started Touching behaviour from the recording above, or add it now if you only watched. Name it Start Touch.
- Use the Set Behaviour State behaviour you added beside it and name it Disarm Start. Keep the wire you made in the recording. If starting here, add this behaviour and drag Start Touch’s bottom white circle onto it.
- Add Generate Smart Shape and name it Generate. Drag an unused bottom white circle on Disarm Start onto the Generate block.
- Add Change Label and name it Loading. Drag an unused bottom white circle on Disarm Start onto the Loading block.
Set these properties: Start Touch targets Start, with Touch Anywhere Off and Absorbs Touch On. Disarm Start disables Start Touch. Loading targets Start Label, with text PREPARING ORBIT.... Configure Generate in the next section.
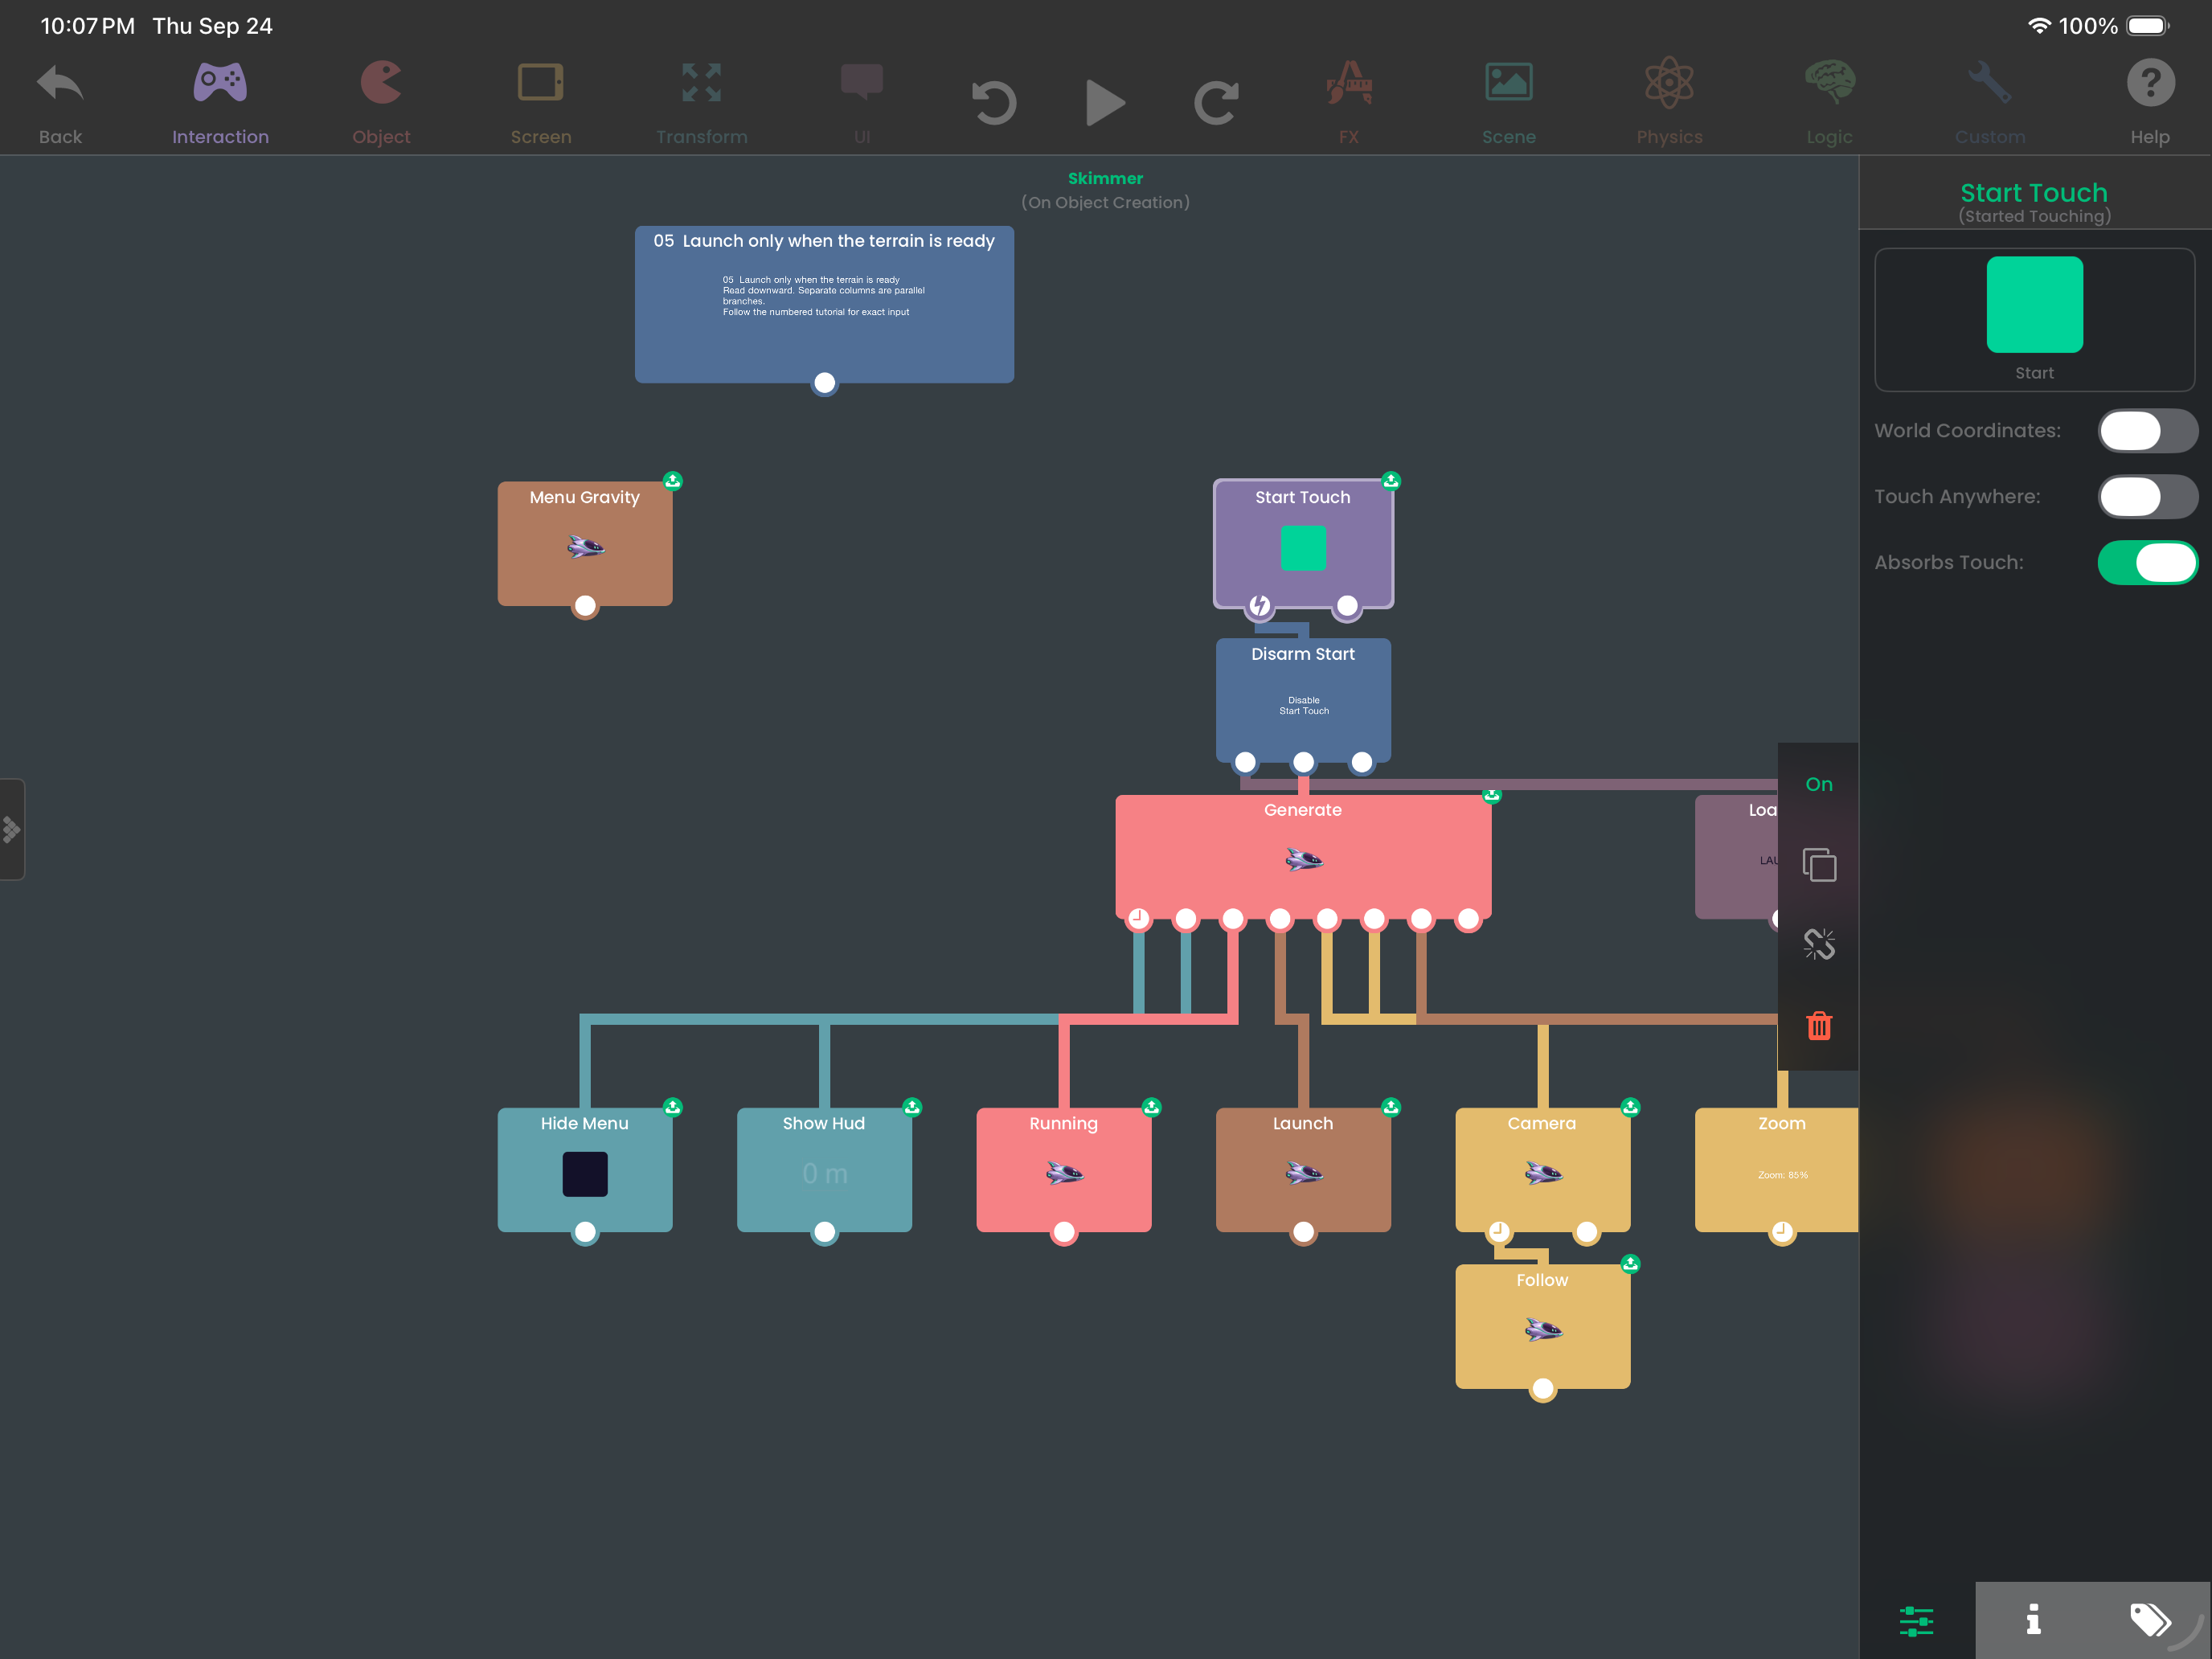
For more detail, see Sharing Values Between Behaviors. Execution wires and data inputs perform different jobs.
Configure Generate Smart Shape
- Shape type / Action — Terrain / Generate
- Generation mode / Follow object — Endless / Skimmer
- Hill height / Hill spacing — 15 m / 32 m
- Hill variation / Ground depth — 38% / 35 m
- Top / Middle —
luna-top/luna-fill - Friction / Bounce — 0.08 / 0
- Placement — X 0 m, Y 12 m, world layer
- Collision mode, if shown — Surface
- Trigger on — Ready
The Generate Smart Shape reference explains each terrain setting.
Open Position and layer to enter the placement, even if you leave that section collapsed afterward. Leave side and bottom artwork empty and use the supplied middle graphic.
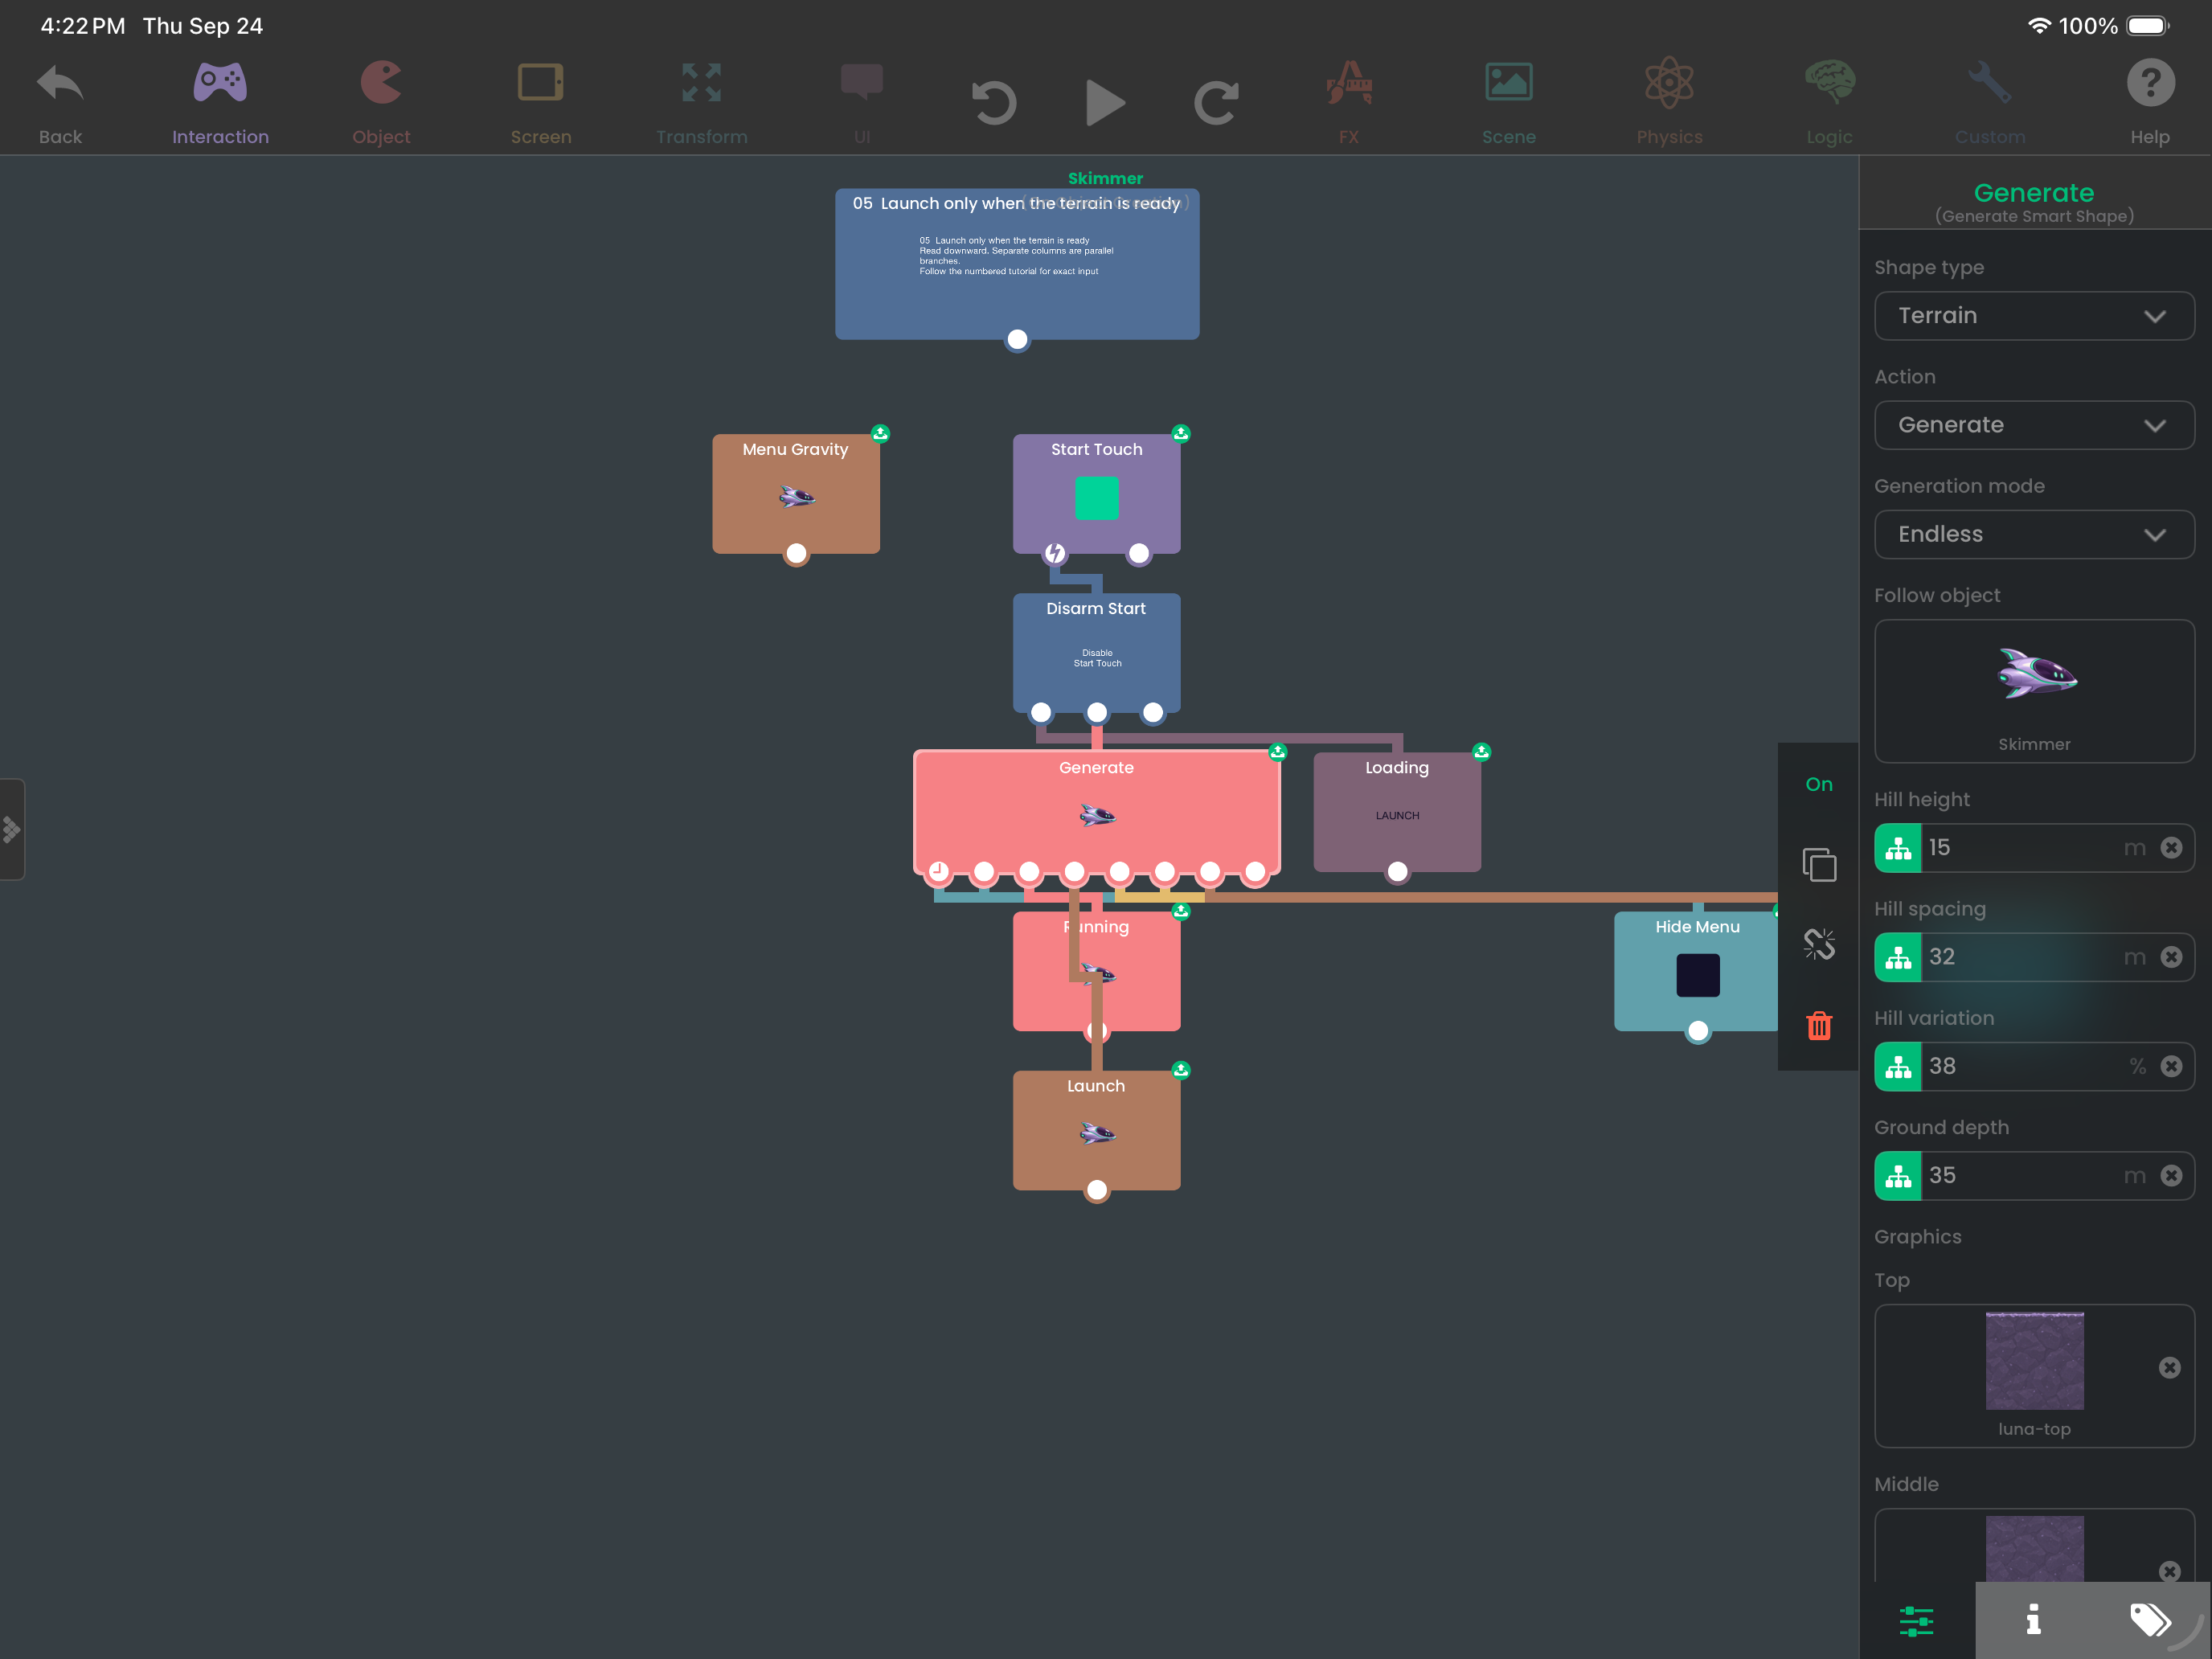
Add the Ready branches
Connect Generate's output to each action in this list. These actions start when the initial terrain is ready, not when LAUNCH is first touched.
- Hide Menu (Set Visibility) — Hide Menu Card, Wordmark, Subtitle, Howto, Start, Start Label, Menu Best
- Show Hud (Set Visibility) — Show Distance, Speed, Clock, Stage, Cue, Hud Rule
- Running (Set Attribute) — Skimmer;
runState=running - Launch (Set Velocity) — Skimmer; X 20, Y 0; both Maintain Velocity switches Off
- Camera (Screen to Object) — Skimmer; both axes; duration 0
- Zoom (Zoom Screen) — 85%, duration 0
- Release (Set Gravity) — Skimmer; Object gravity; X 0, Y −12
Follow uses Screen Follow on Skimmer, with both axes enabled. Glide Cue changes Cue to GLIDING / HOLD ON THE DOWNSLOPE.
Build: Ready: change the interface
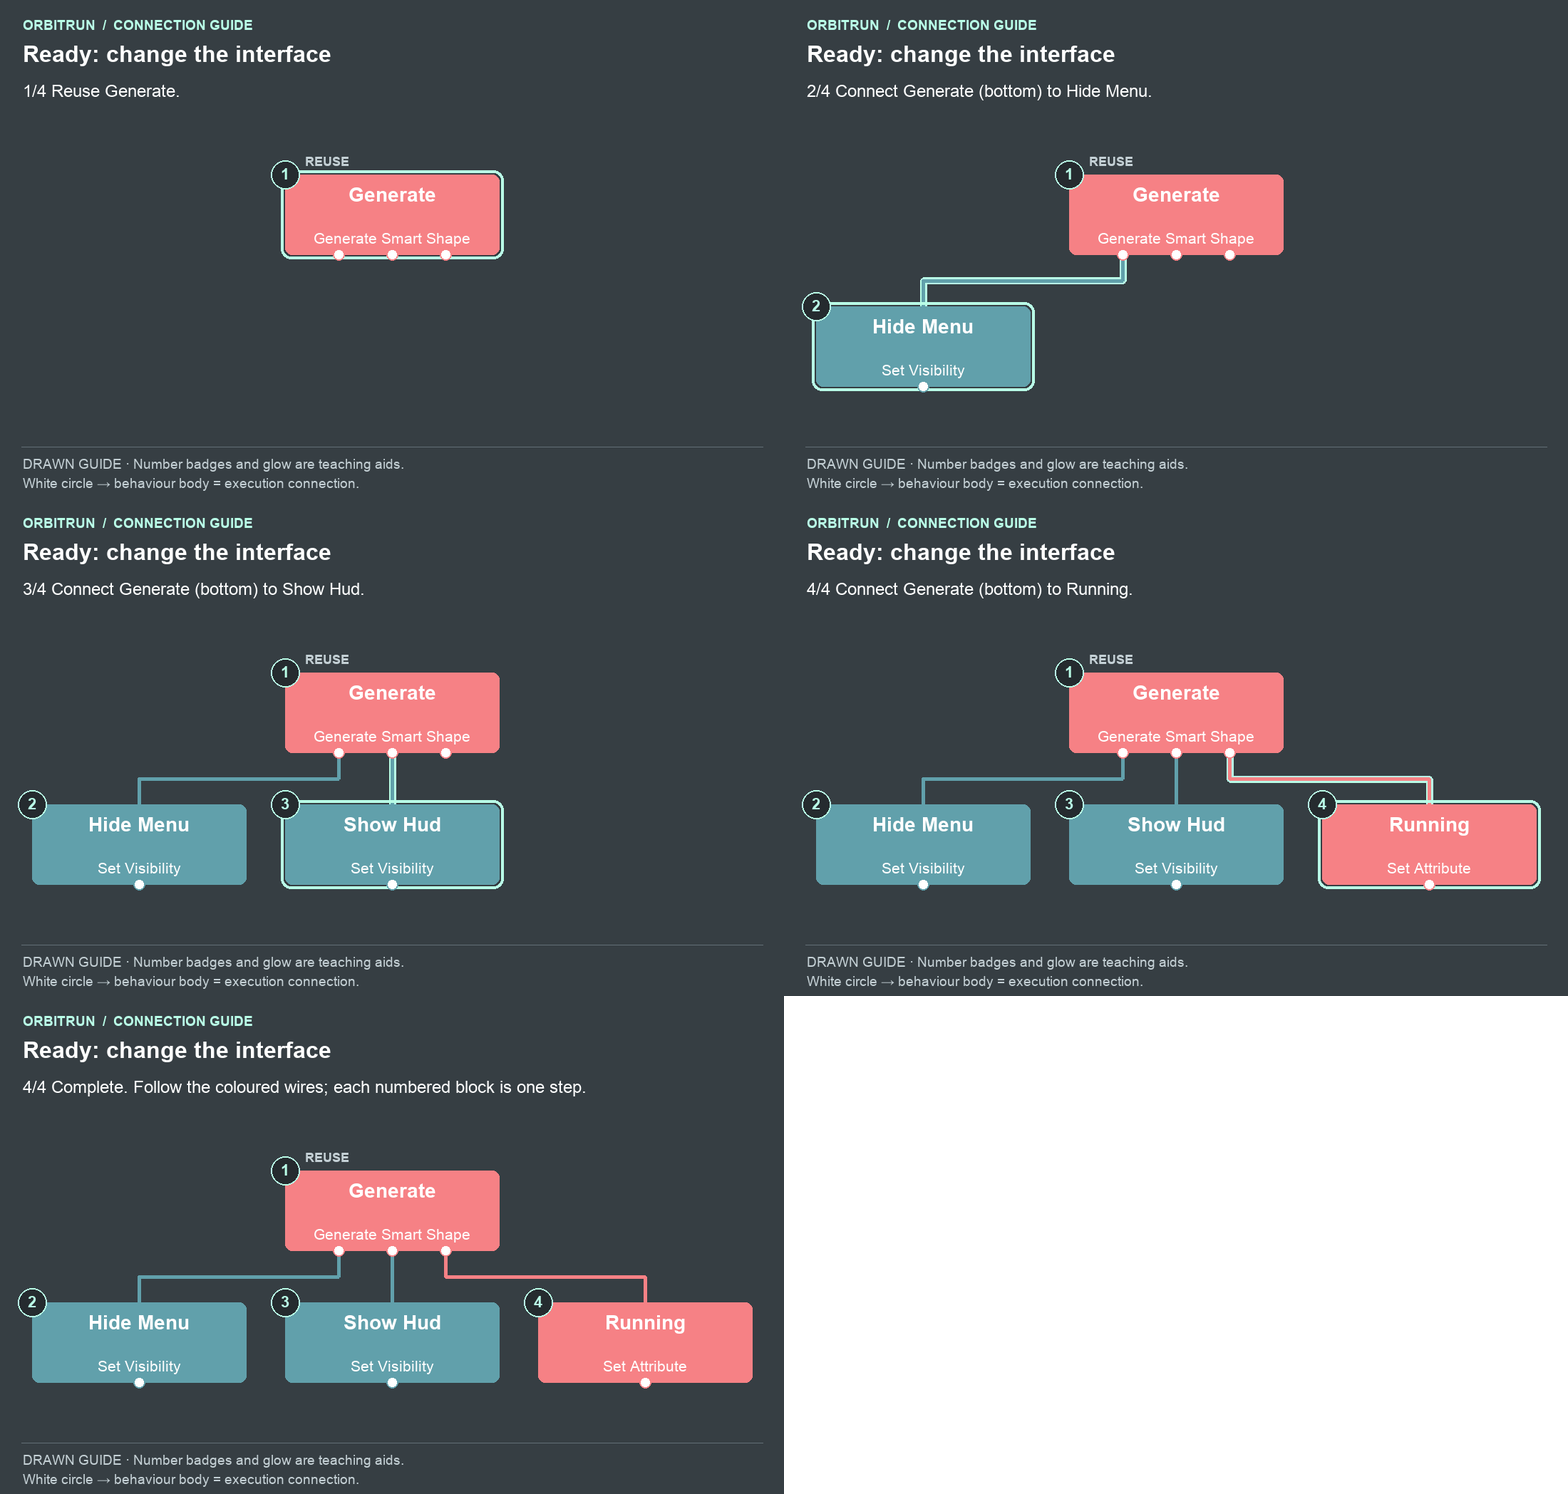
Open the completed diagram as a still image.
- Reuse Generate.
- Add Set Visibility and name it Hide Menu. Drag an unused bottom white circle on Generate onto the Hide Menu block.
- Add Set Visibility and name it Show Hud. Drag an unused bottom white circle on Generate onto the Show Hud block.
- Add Set Attribute and name it Running. Drag an unused bottom white circle on Generate onto the Running block.
Build: Ready: start moving
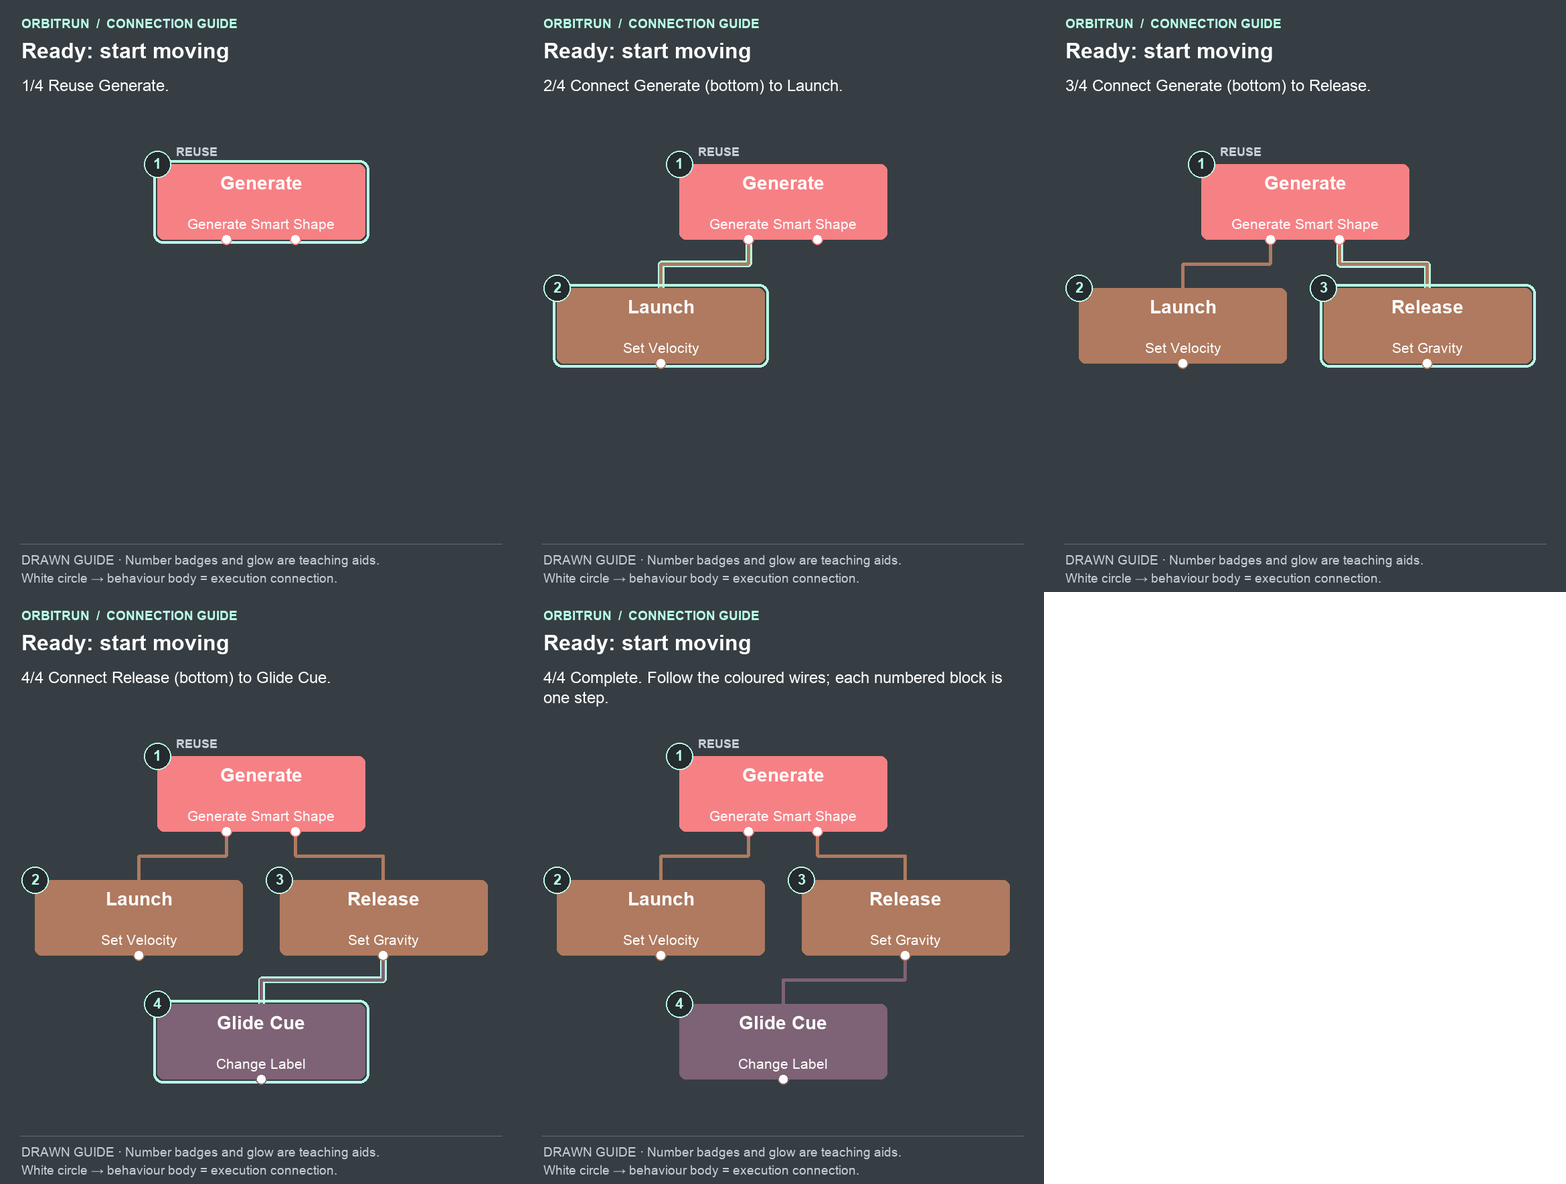
Open the completed diagram as a still image.
- Reuse Generate.
- Add Set Velocity and name it Launch. Drag an unused bottom white circle on Generate onto the Launch block.
- Add Set Gravity and name it Release. Drag an unused bottom white circle on Generate onto the Release block.
- Add Change Label and name it Glide Cue. Drag an unused bottom white circle on Release onto the Glide Cue block.
Build: Ready: frame the ship
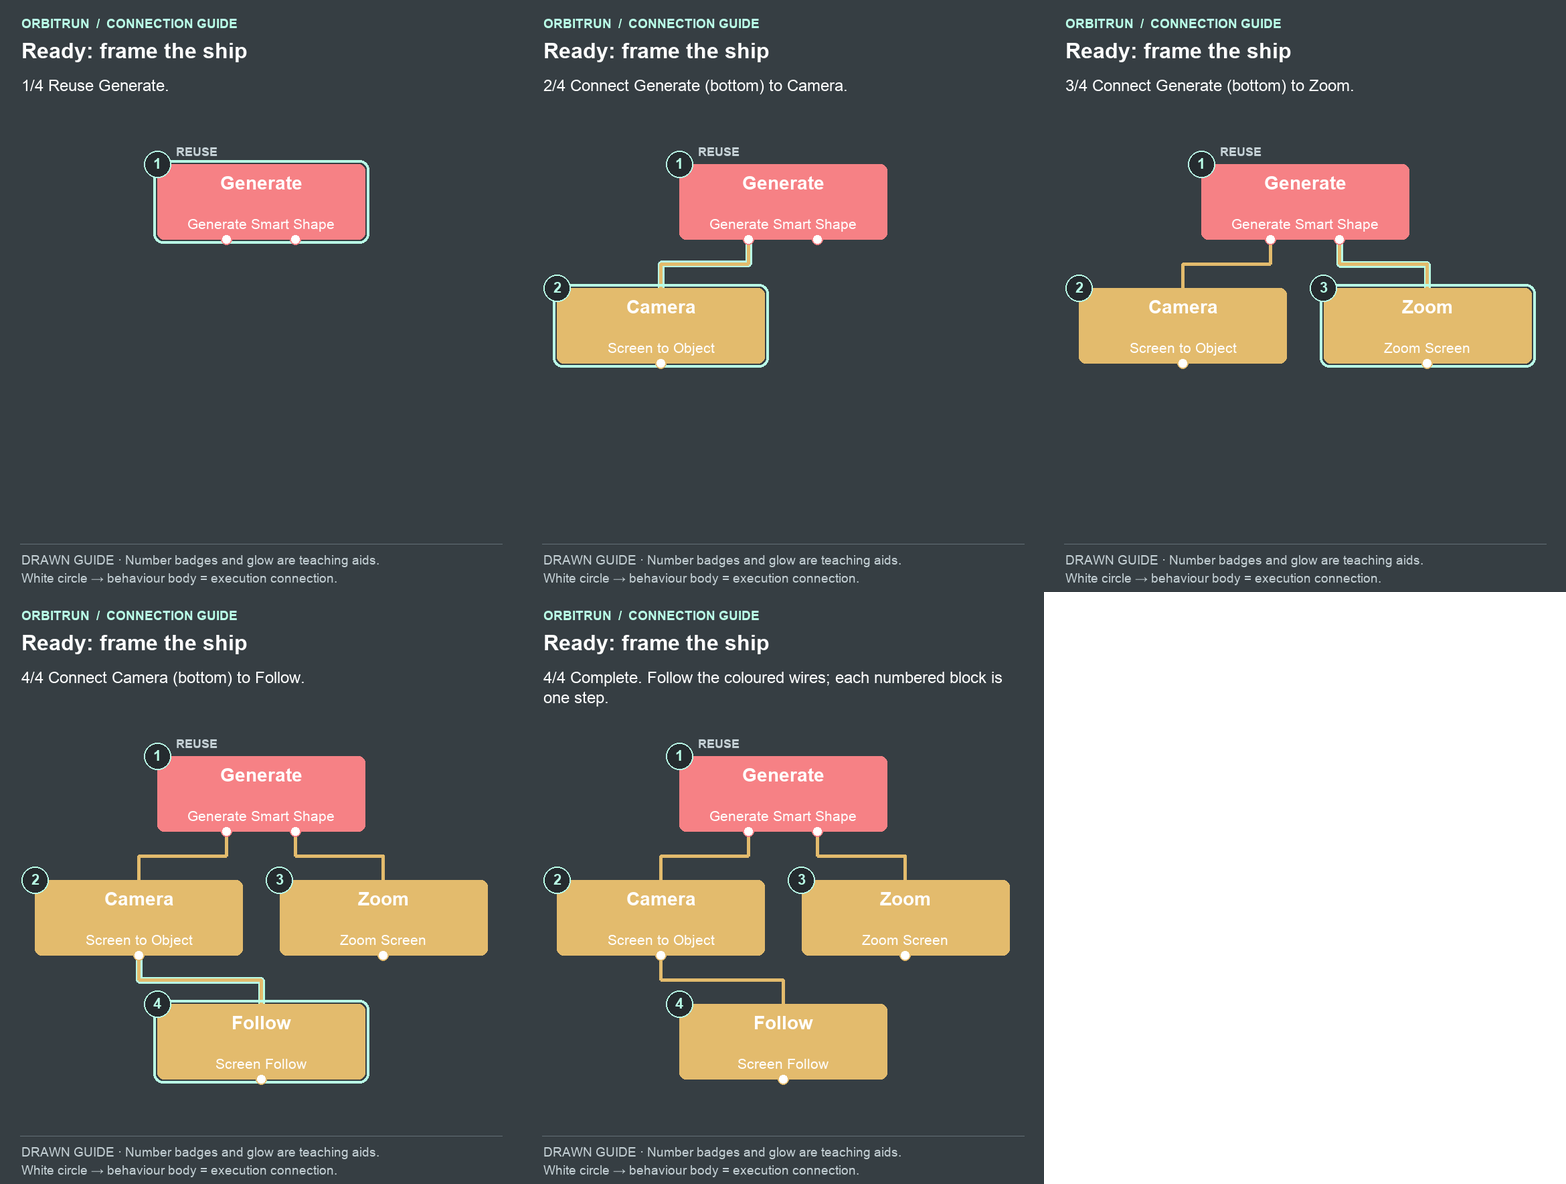
Open the completed diagram as a still image.
- Reuse Generate.
- Add Screen to Object and name it Camera. Drag an unused bottom white circle on Generate onto the Camera block.
- Add Zoom Screen and name it Zoom. Drag an unused bottom white circle on Generate onto the Zoom block.
- Add Screen Follow and name it Follow. Drag an unused bottom white circle on Camera onto the Follow block.
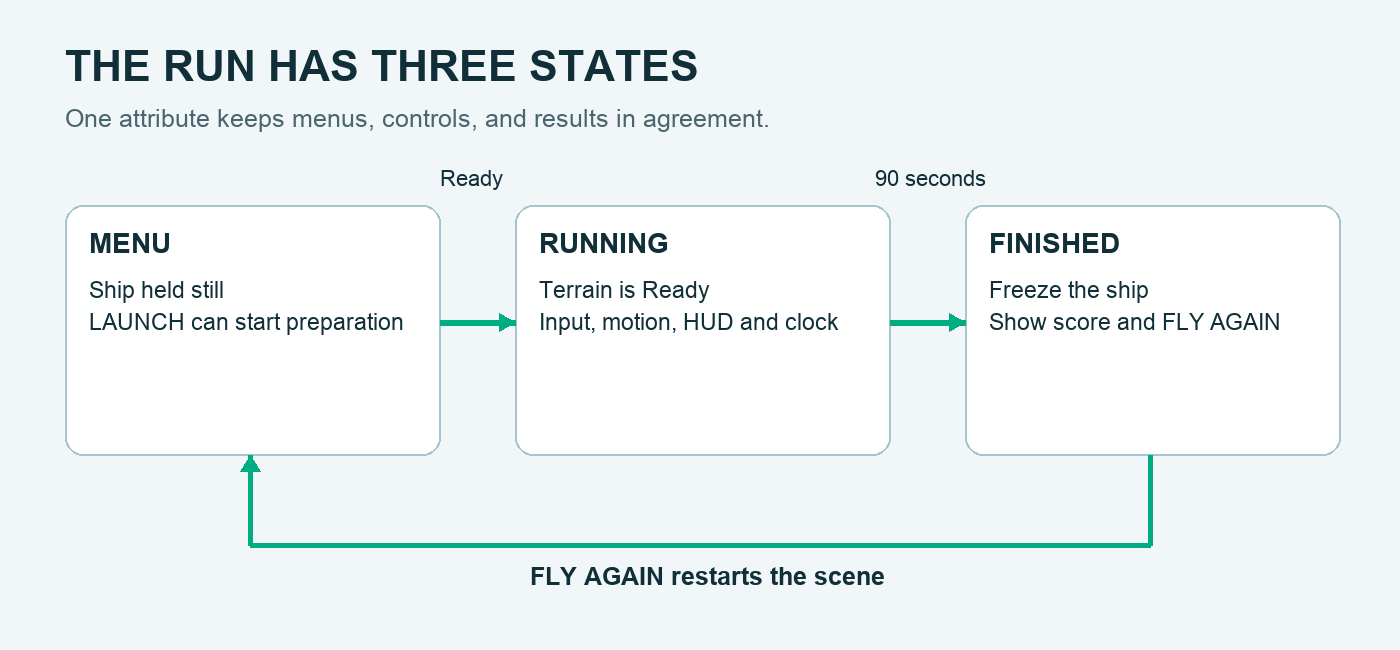
Try it: Play, tap LAUNCH once, and wait for the course. The menu should disappear, the HUD should appear, and the ship should move over purple hills. Your score and clock are still static, and diving is not connected yet. That is the expected result for checkpoint 05.
Why it works: terrain generation has a preparation phase. The Ready output is our starting signal for movement and, in the next parts, the timers. It also gives us the generated object's ID for changing its artwork later.
Experiment: change only Hill Spacing from 32 to 40, then Play again. How does a broader hill change the rhythm? Restore 32 before continuing so your build matches the next lesson.
Continue to Part 2 — Dive, glide, and score.