

Build OrbitRun with Smart Shape — Part 2: Dive, glide, and score
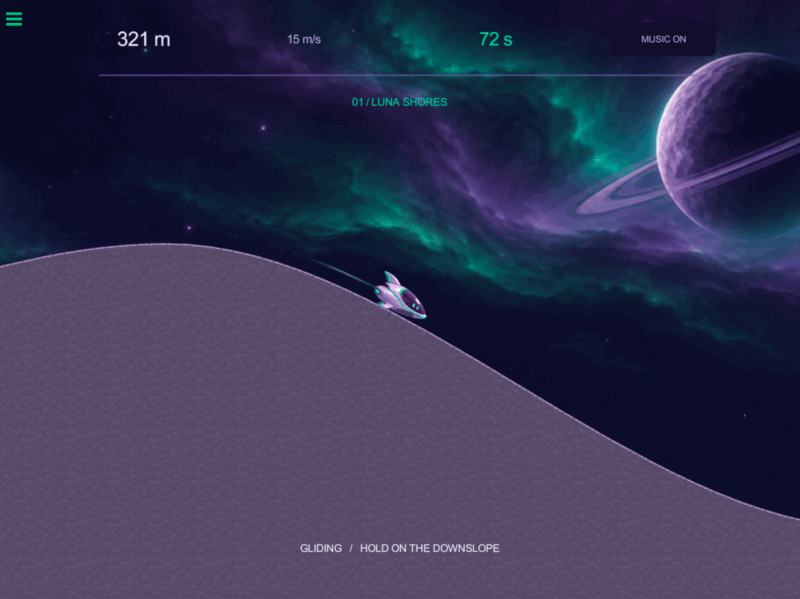
Your ship can launch onto an endless course. Now give the player a reason to keep chasing the next hill: responsive controls, readable movement, a distance score, and a ticking clock.
Start with your project from Part 1, or open OrbitRun-05-launch.tap from the checkpoint pack. All behaviours below belong to Skimmer. Keep each numbered lesson in its own commented area, with space between rows and columns.
Tap a screenshot or diagram to open its full-size image and inspect the details.
Reading the diagrams: white connectors run the next behaviour; the green output icon supplies a value to a field. If uses the bottom for true and right side for false. REUSE means keep the existing behaviour. The animated guides add teaching highlights; the editor recordings show the real gestures.
6. Hold to dive; release to glide
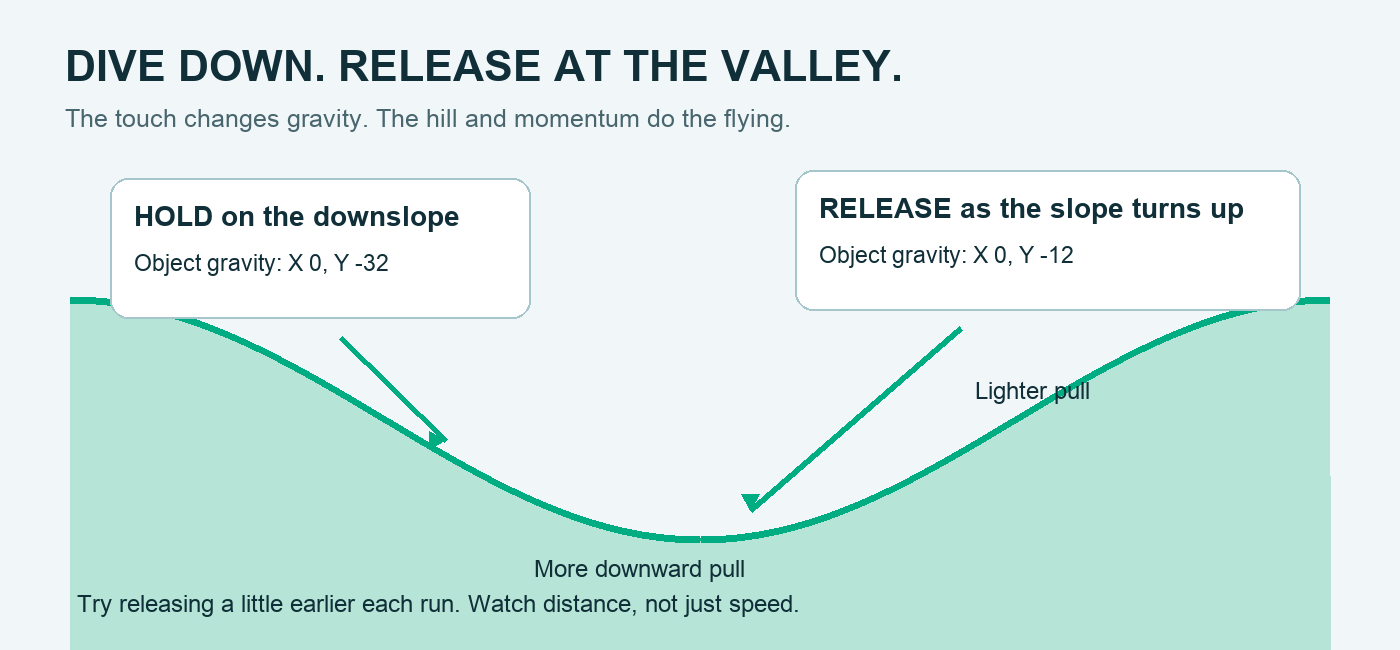
The player does not directly push the ship upward. Holding increases its downward pull; releasing reduces that pull so it can carry momentum over a crest.
Build: Hold to dive
Open the completed diagram as a still image.
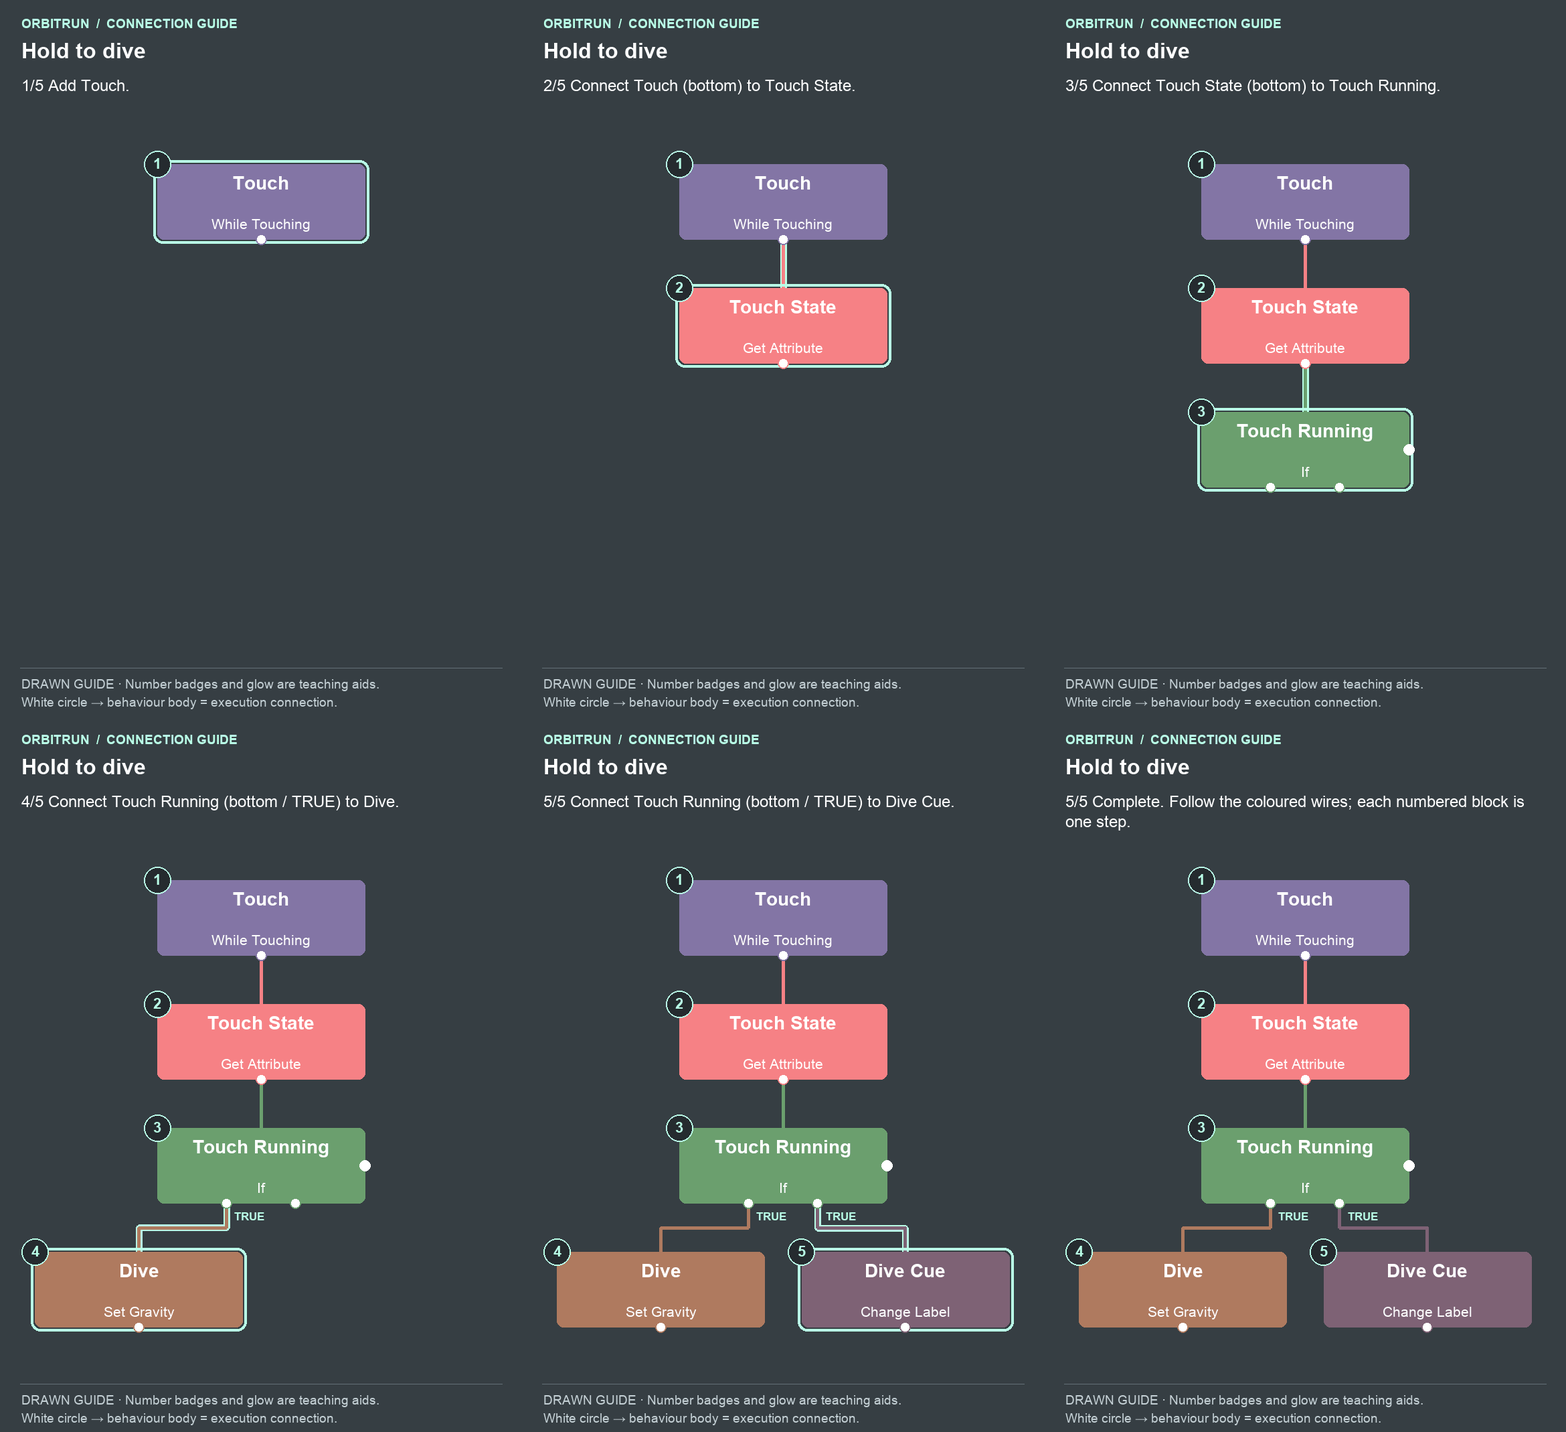
- Add While Touching and name it Touch.
- Add Get Attribute and name it Touch State. Drag an unused bottom white circle on Touch onto the Touch State block.
- Add If and name it Touch Running. Drag an unused bottom white circle on Touch State onto the Touch Running block.
- Add Set Gravity and name it Dive. Drag an unused bottom white circle (true) on Touch Running onto the Dive block.
- Add Change Label and name it Dive Cue. Drag an unused bottom white circle (true) on Touch Running onto the Dive Cue block.
Set the properties:
- Touch: Input Plane; Touch Anywhere Off; Absorbs Touch On. Leave it listening from scene start.
- Touch State: Skimmer; attribute
runState. - Touch Running: first value from Touch State’s Attribute Value; Equals; second value
running. - Dive: Skimmer; gravity type Object; X 0, Y −32.
- Dive Cue: Cue; text
DIVING / RELEASE AS THE HILL TURNS UP.
Both Dive and Dive Cue connect directly to Touch Running’s bottom connectors. Leave its right-side false connector unused.
Watch the output drag: put the state into the if
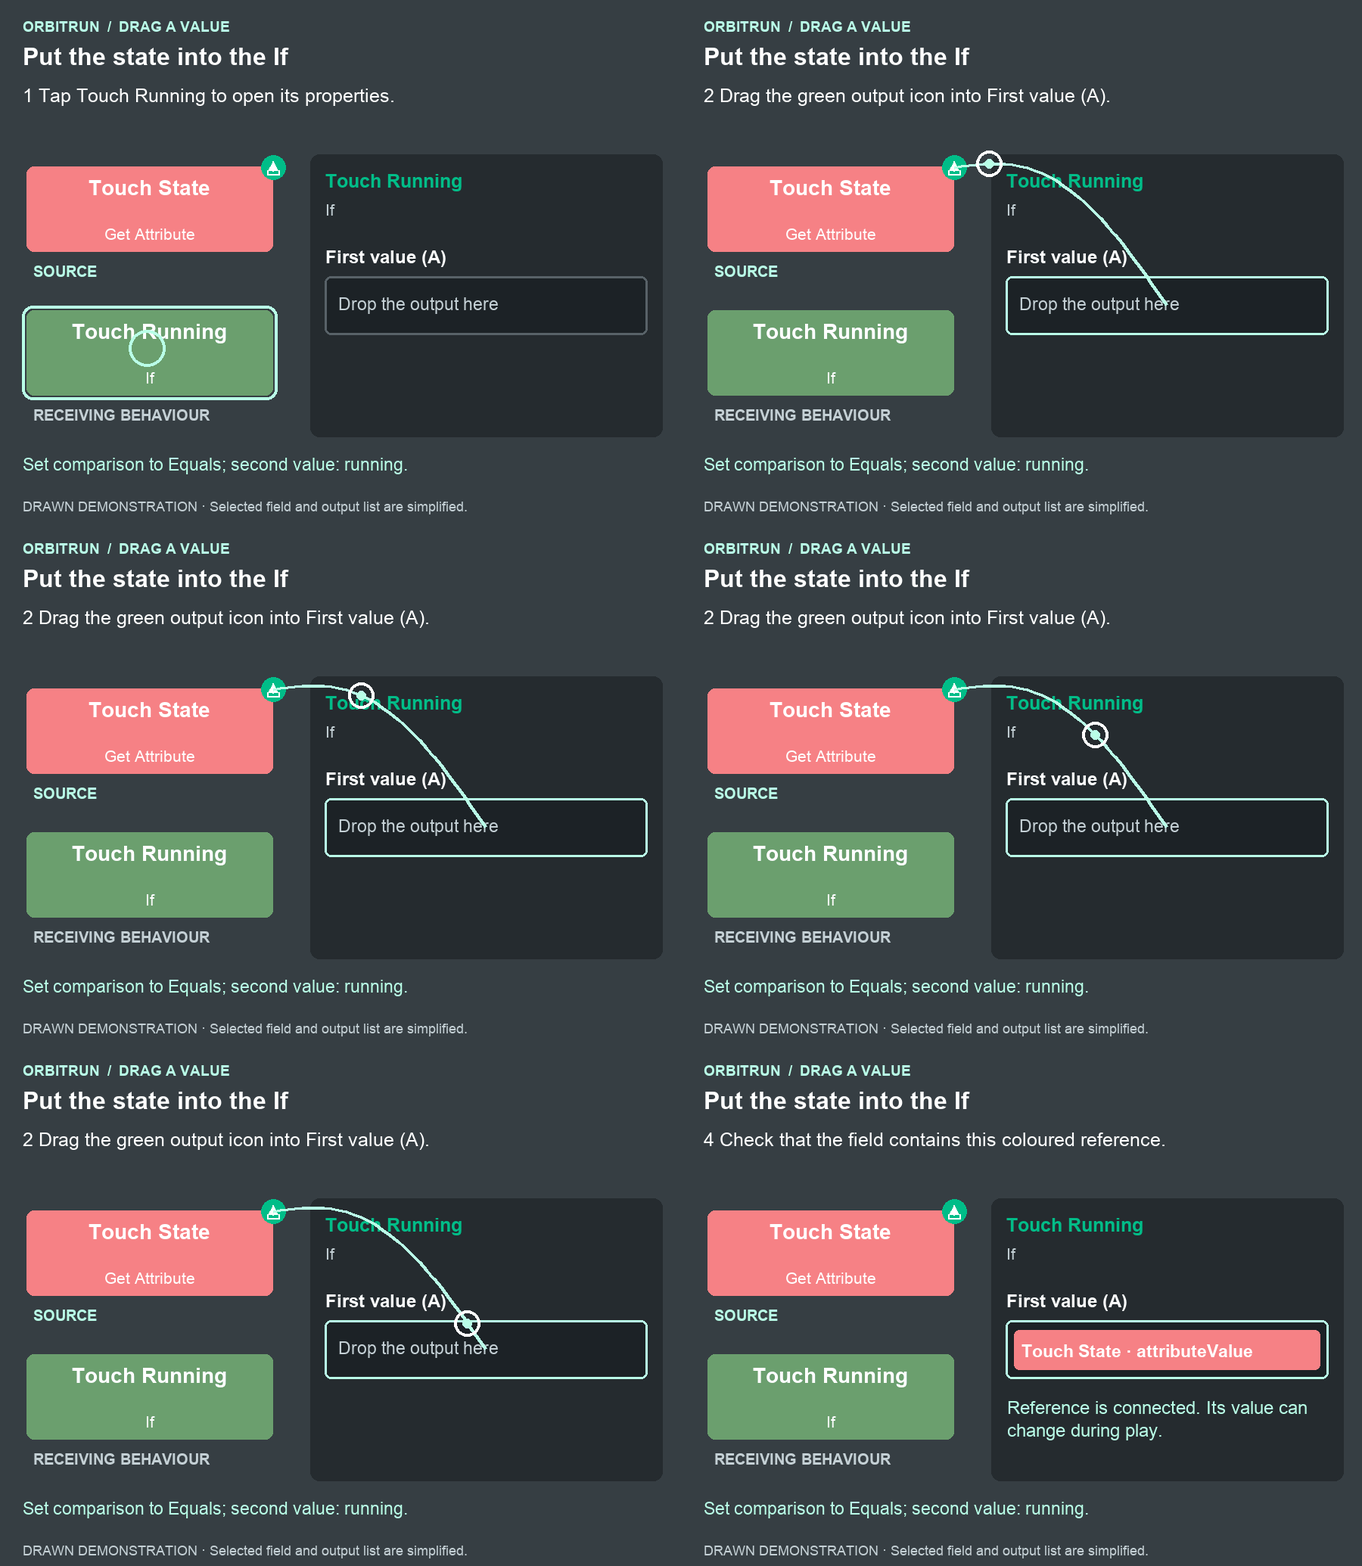
After the drop: First value (A) contains Touch State · attributeValue. Set comparison to Equals; second value: running.
Build: Release to glide
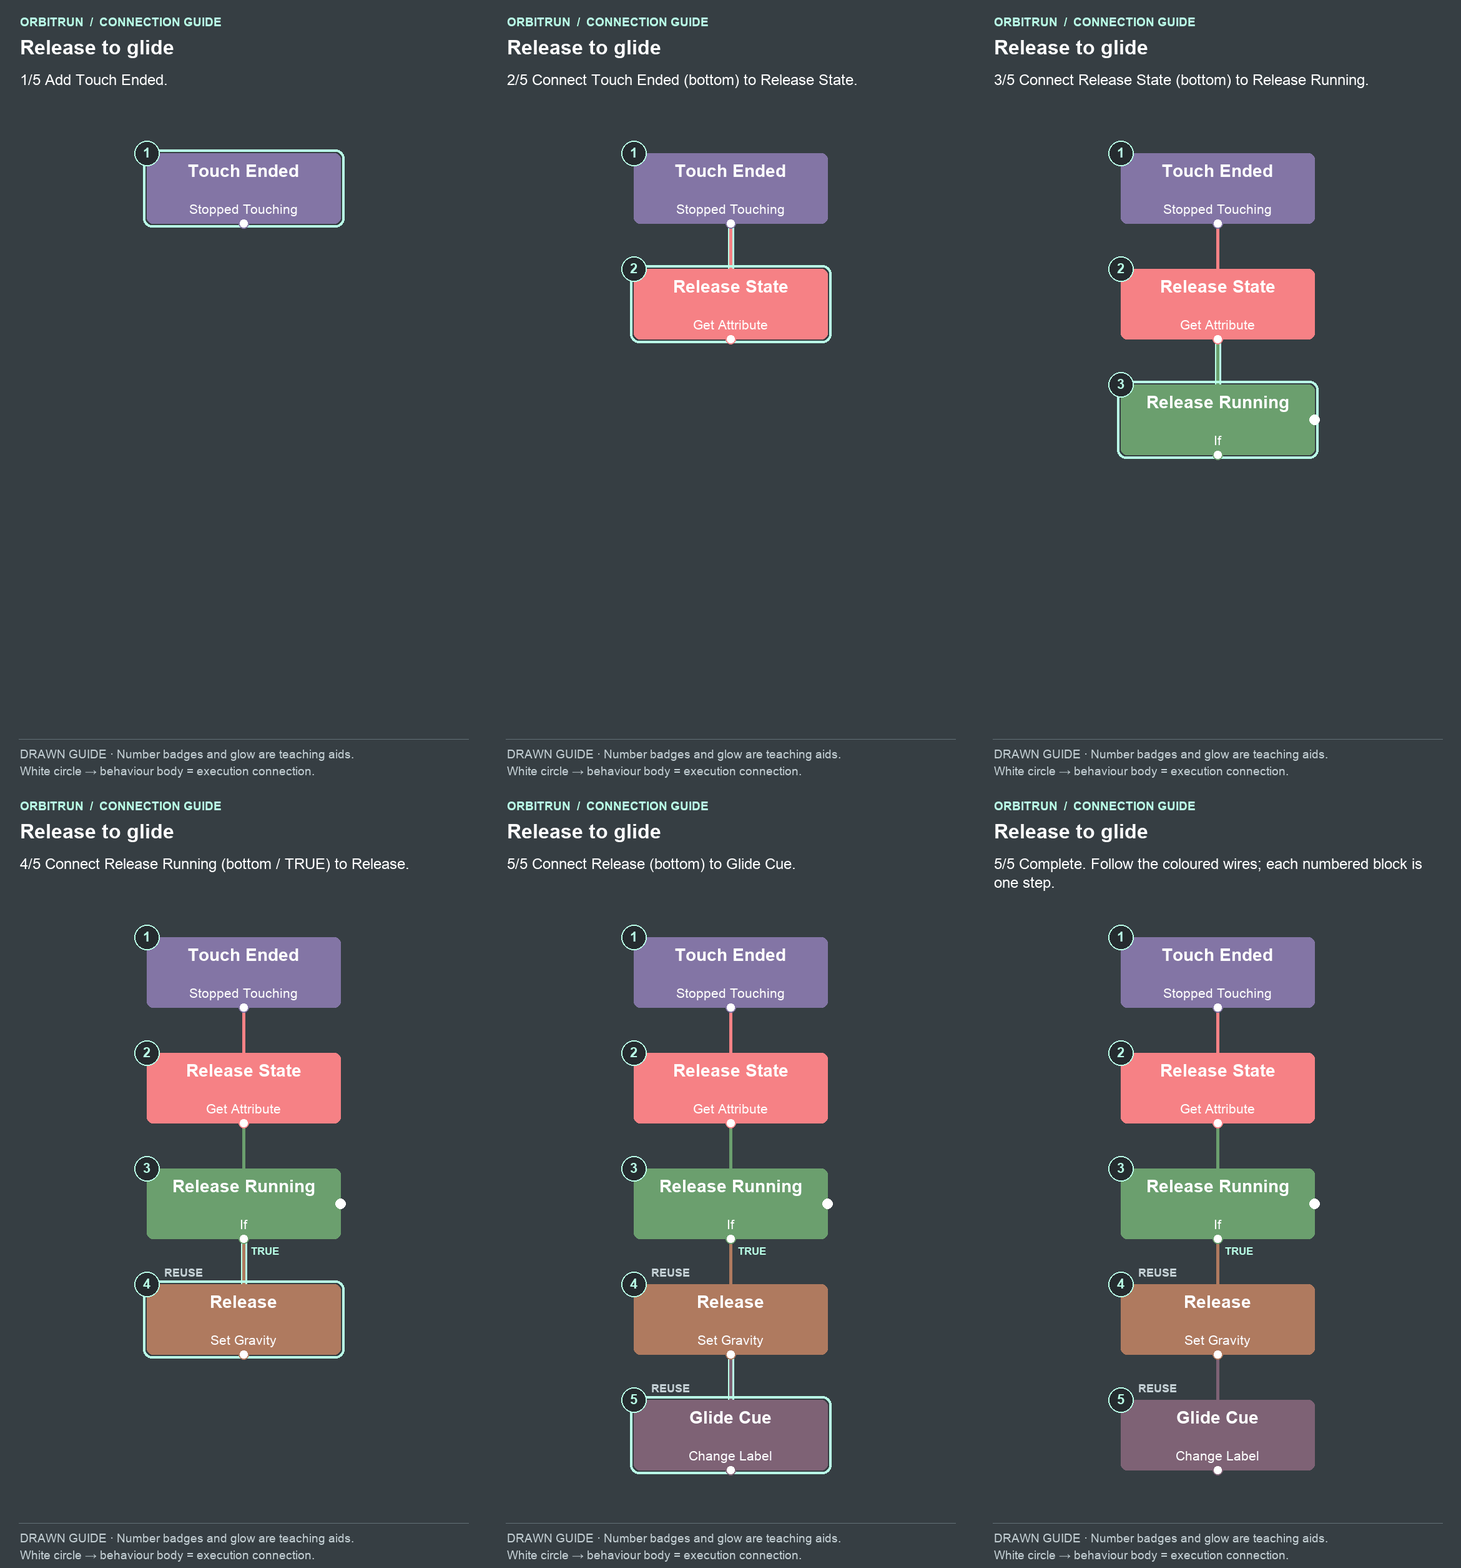
Open the completed diagram as a still image.
- Add Stopped Touching and name it Touch Ended.
- Add Get Attribute and name it Release State. Drag an unused bottom white circle on Touch Ended onto the Release State block.
- Add If and name it Release Running. Drag an unused bottom white circle on Release State onto the Release Running block.
- Reuse Release. Drag an unused bottom white circle (true) on Release Running onto the Release block.
- Reuse Glide Cue. Keep its existing execution connection from Release; the animation redraws that wire for reference. Do not add a second connection.
Set the properties: Touch Ended targets Input Plane, with Touch Anywhere Off, Absorbs Touch On, and Check Boundaries Off. Release State reads Skimmer’s runState. Release Running compares that Attribute Value to running.
Move the existing Release and Glide Cue below Release Running. Keep their existing connection and their earlier launch connection. Release still sets object gravity to X 0, Y −12; Glide Cue still displays the gliding instruction.
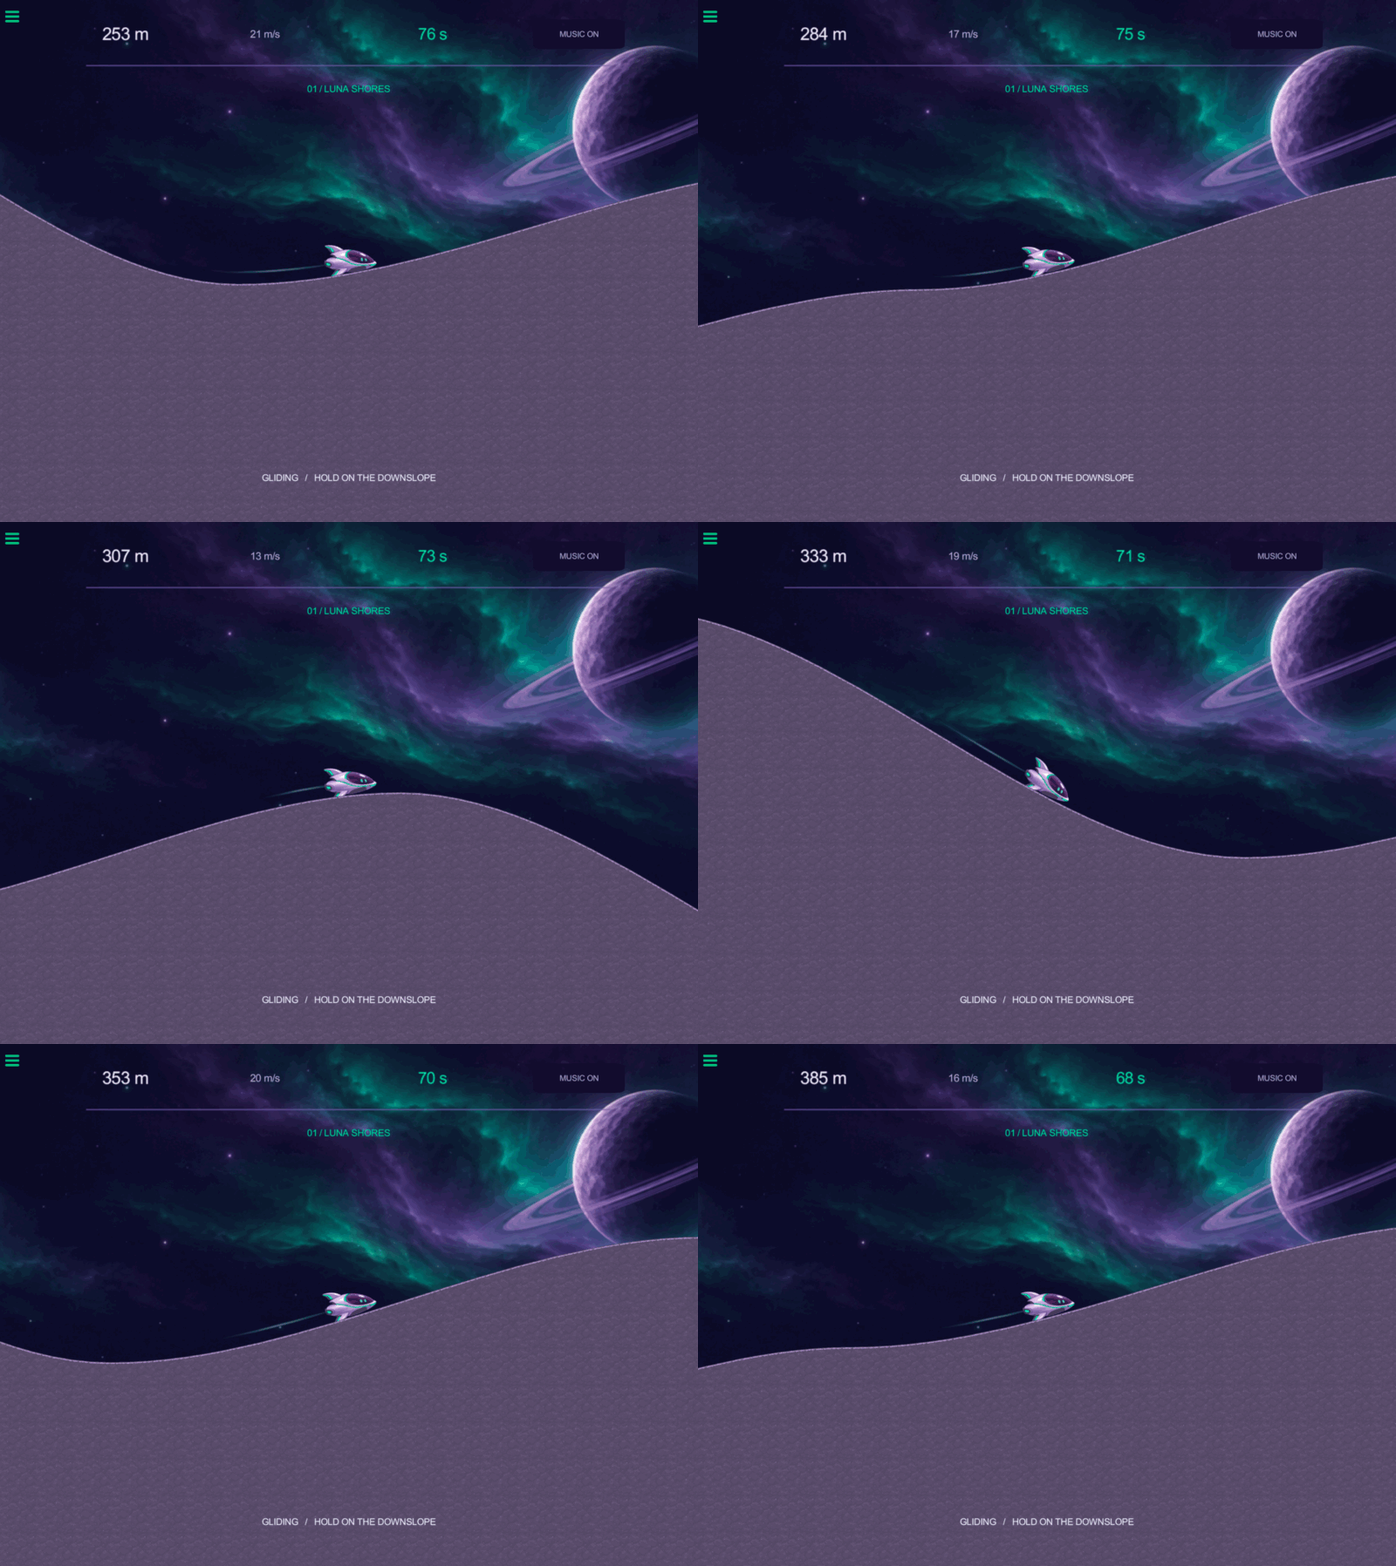
Try it: launch and hold on the open play area, then lift your finger. Cue should alternate between DIVING and GLIDING. Check this away from the music button. Holding on the title screen should not start a dive.
If touch does nothing, check that Input Plane is on Scene UI, behind the buttons, covering the screen, and visible with 0% opacity. If releasing outside its original touch point fails, check Check Boundaries Off.
Why it works: runState is a small state machine. Both input branches ask whether the game is running before changing physics. Later, the same check keeps touches from waking a finished run.
7. Point the ship along its velocity
Use a separate flight update so the art follows movement and the ship can recover from slow slopes.
Build: Check speed before changing it
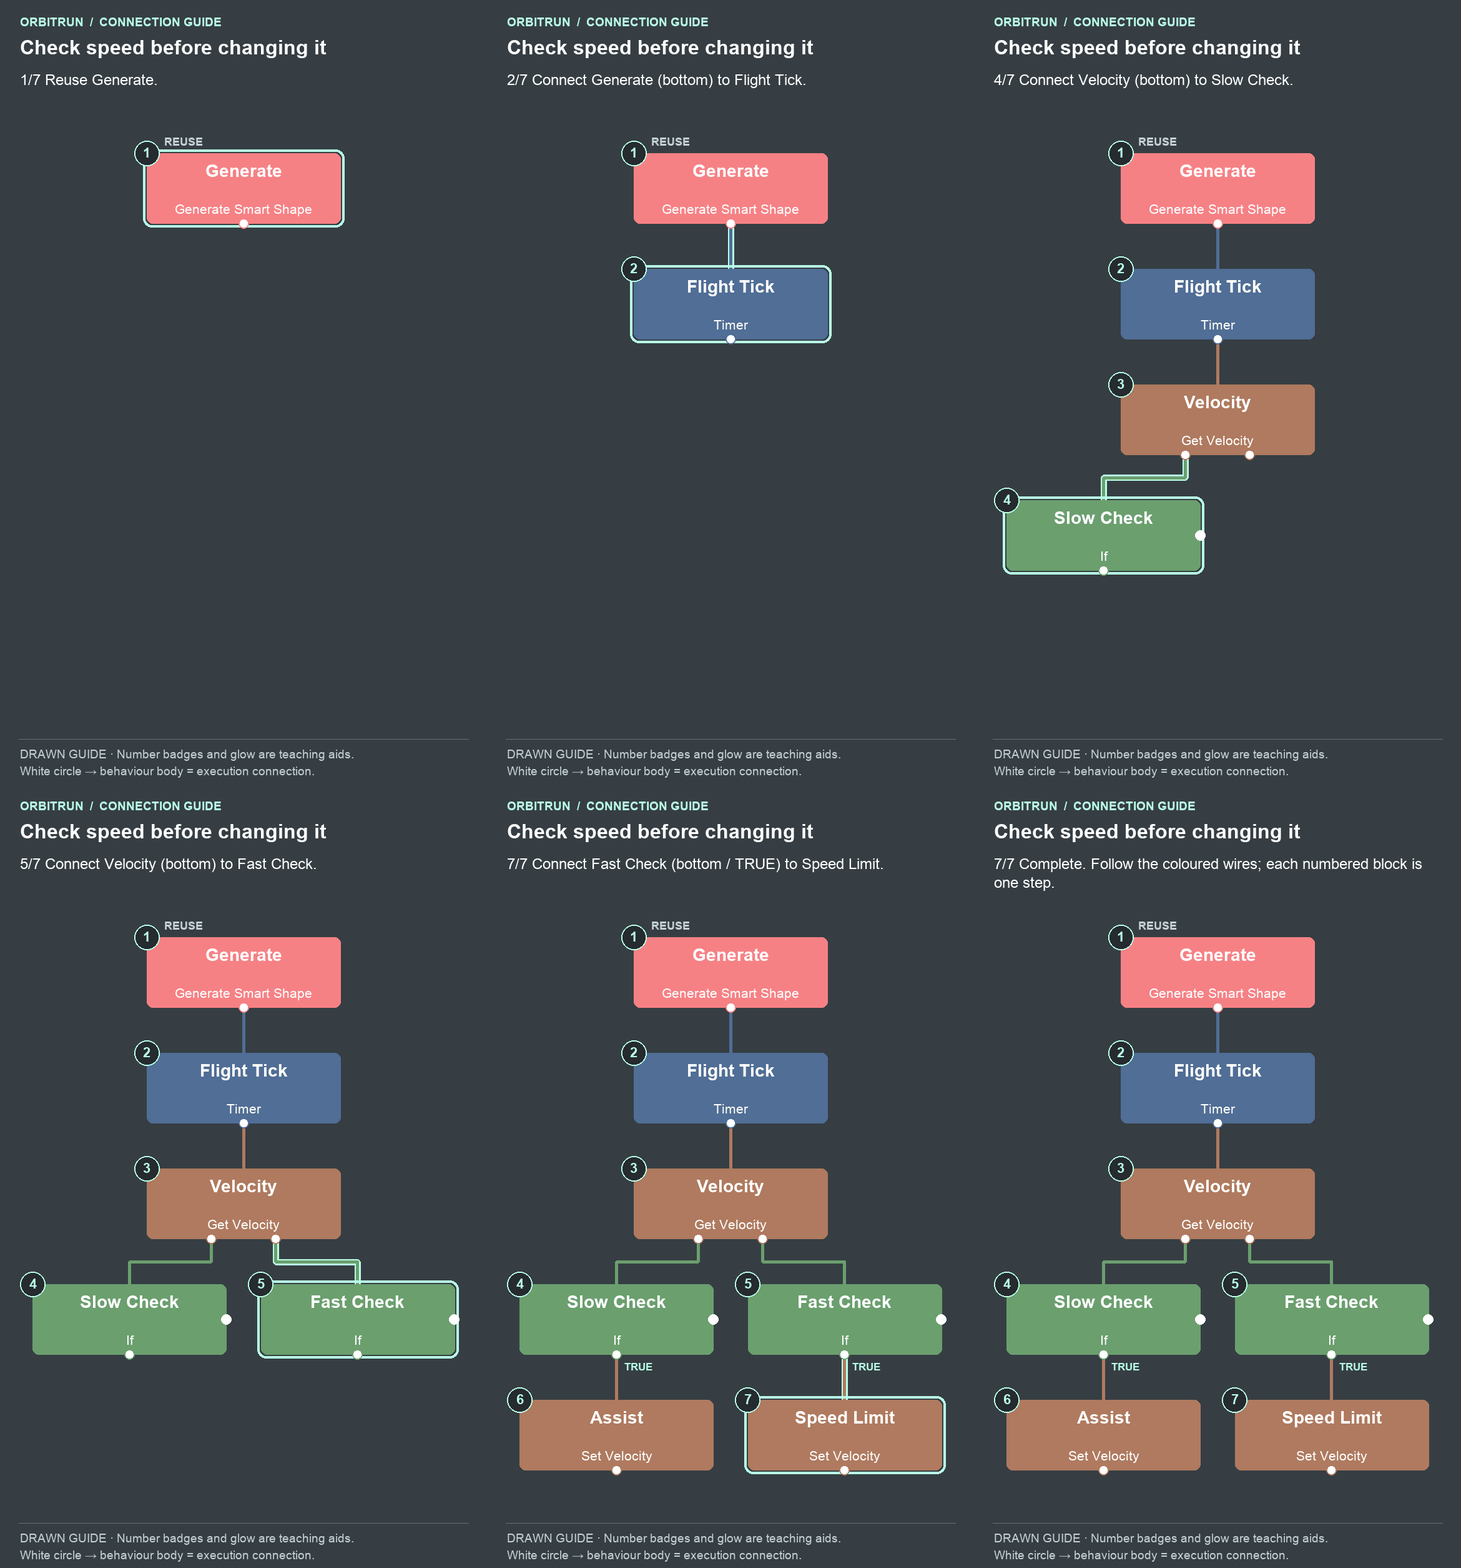
Open the completed diagram as a still image.
- Reuse Generate.
- Add Timer and name it Flight Tick. Drag an unused bottom white circle on Generate onto the Flight Tick block.
- Add Get Velocity and name it Velocity. Drag an unused bottom white circle on Flight Tick onto the Velocity block.
- Add If and name it Slow Check. Drag an unused bottom white circle on Velocity onto the Slow Check block.
- Add If and name it Fast Check. Drag an unused bottom white circle on Velocity onto the Fast Check block.
- Add Set Velocity and name it Assist. Drag an unused bottom white circle (true) on Slow Check onto the Assist block.
- Add Set Velocity and name it Speed Limit. Drag an unused bottom white circle (true) on Fast Check onto the Speed Limit block.
Set the properties:
- Flight Tick: 0.05 seconds, Repeat Forever On, Start Immediately Off. Generate’s trigger remains Ready.
- Velocity: target Skimmer.
- Slow Check: Velocity’s X Velocity < 8. Assist: X 12, Maintain X Off, Maintain Y On.
- Fast Check: Velocity’s X Velocity > 42. Speed Limit: X 42, Maintain X Off, Maintain Y On.
The checks sit above their effects. Slow Check and Fast Check are separate children of Velocity.
Watch the output drag: put x velocity into the check
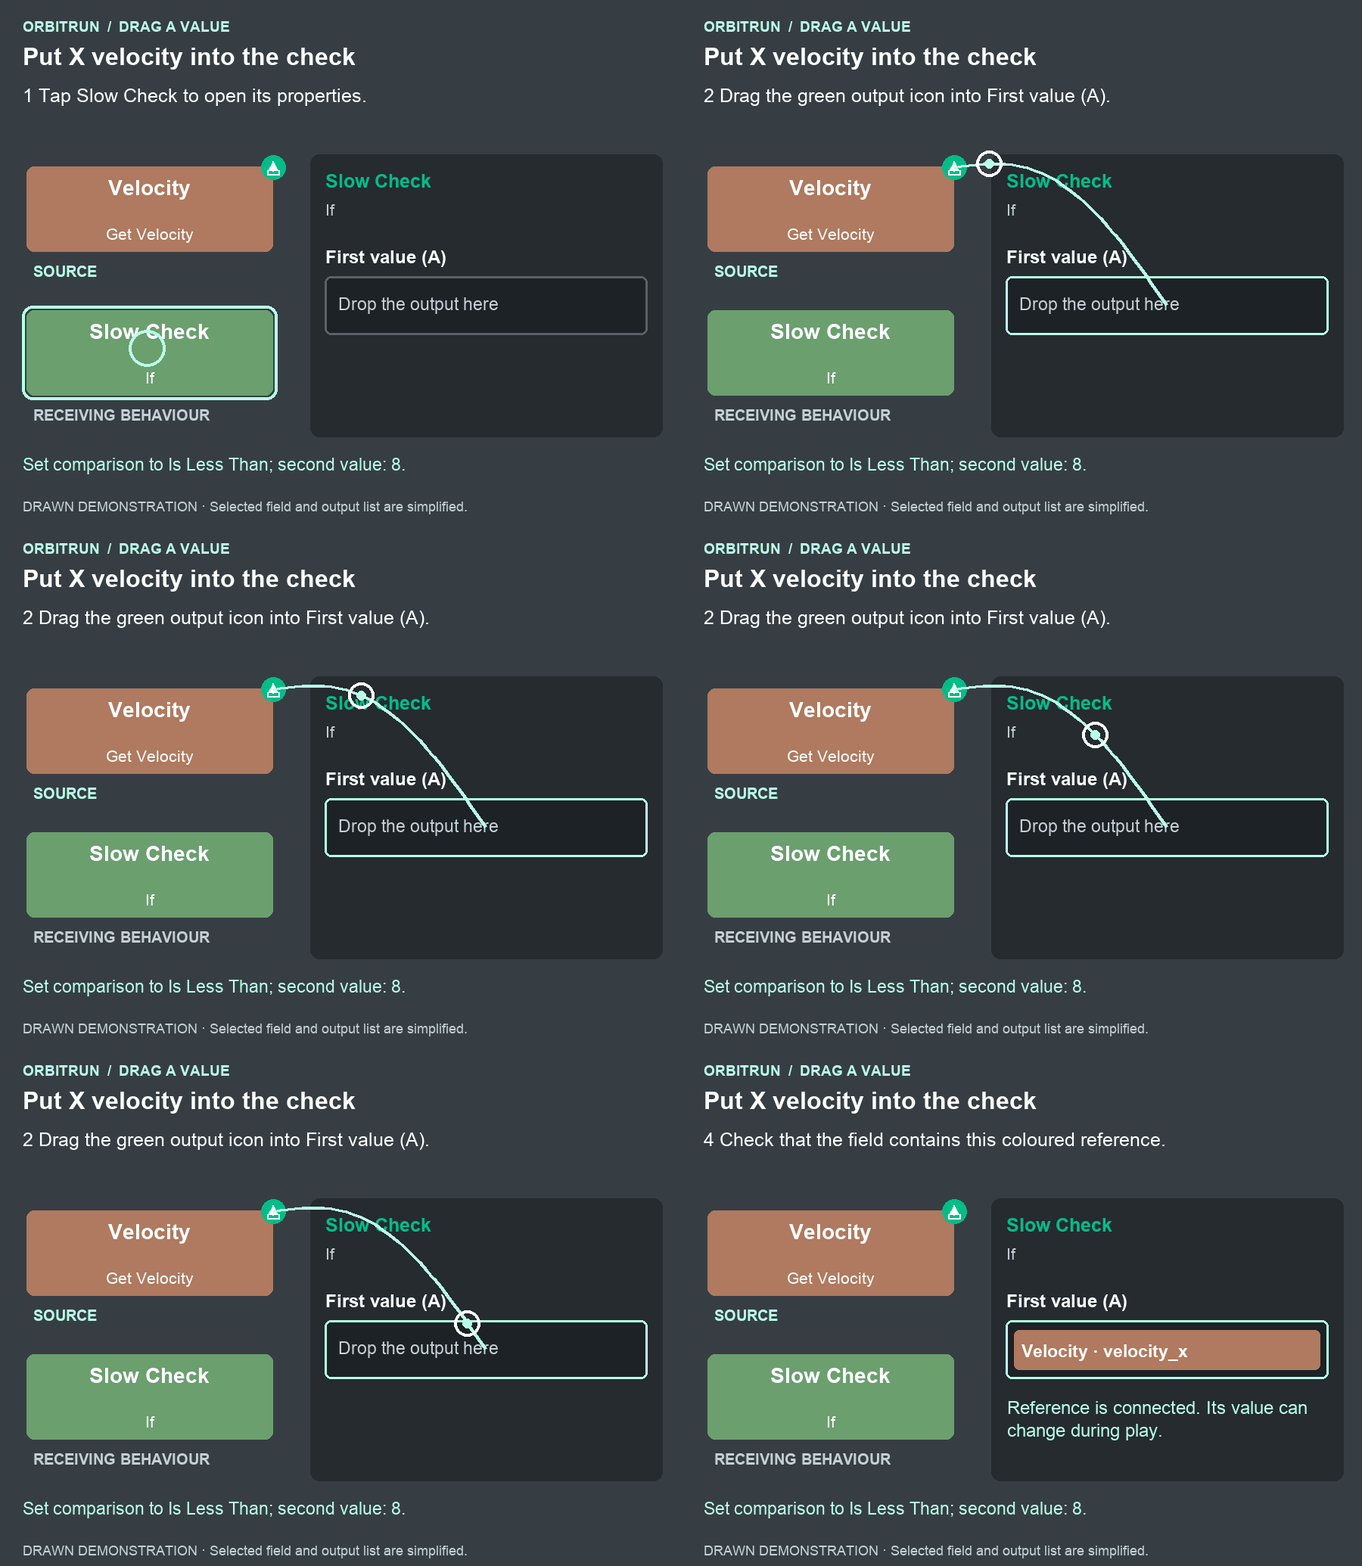
After the drop: First value (A) contains Velocity · velocity_x. Set comparison to Is Less Than; second value: 8.
Here is the same drag in the real editor. Select Slow Check first; drag Velocity’s green output icon into the first input; choose velocity_x.
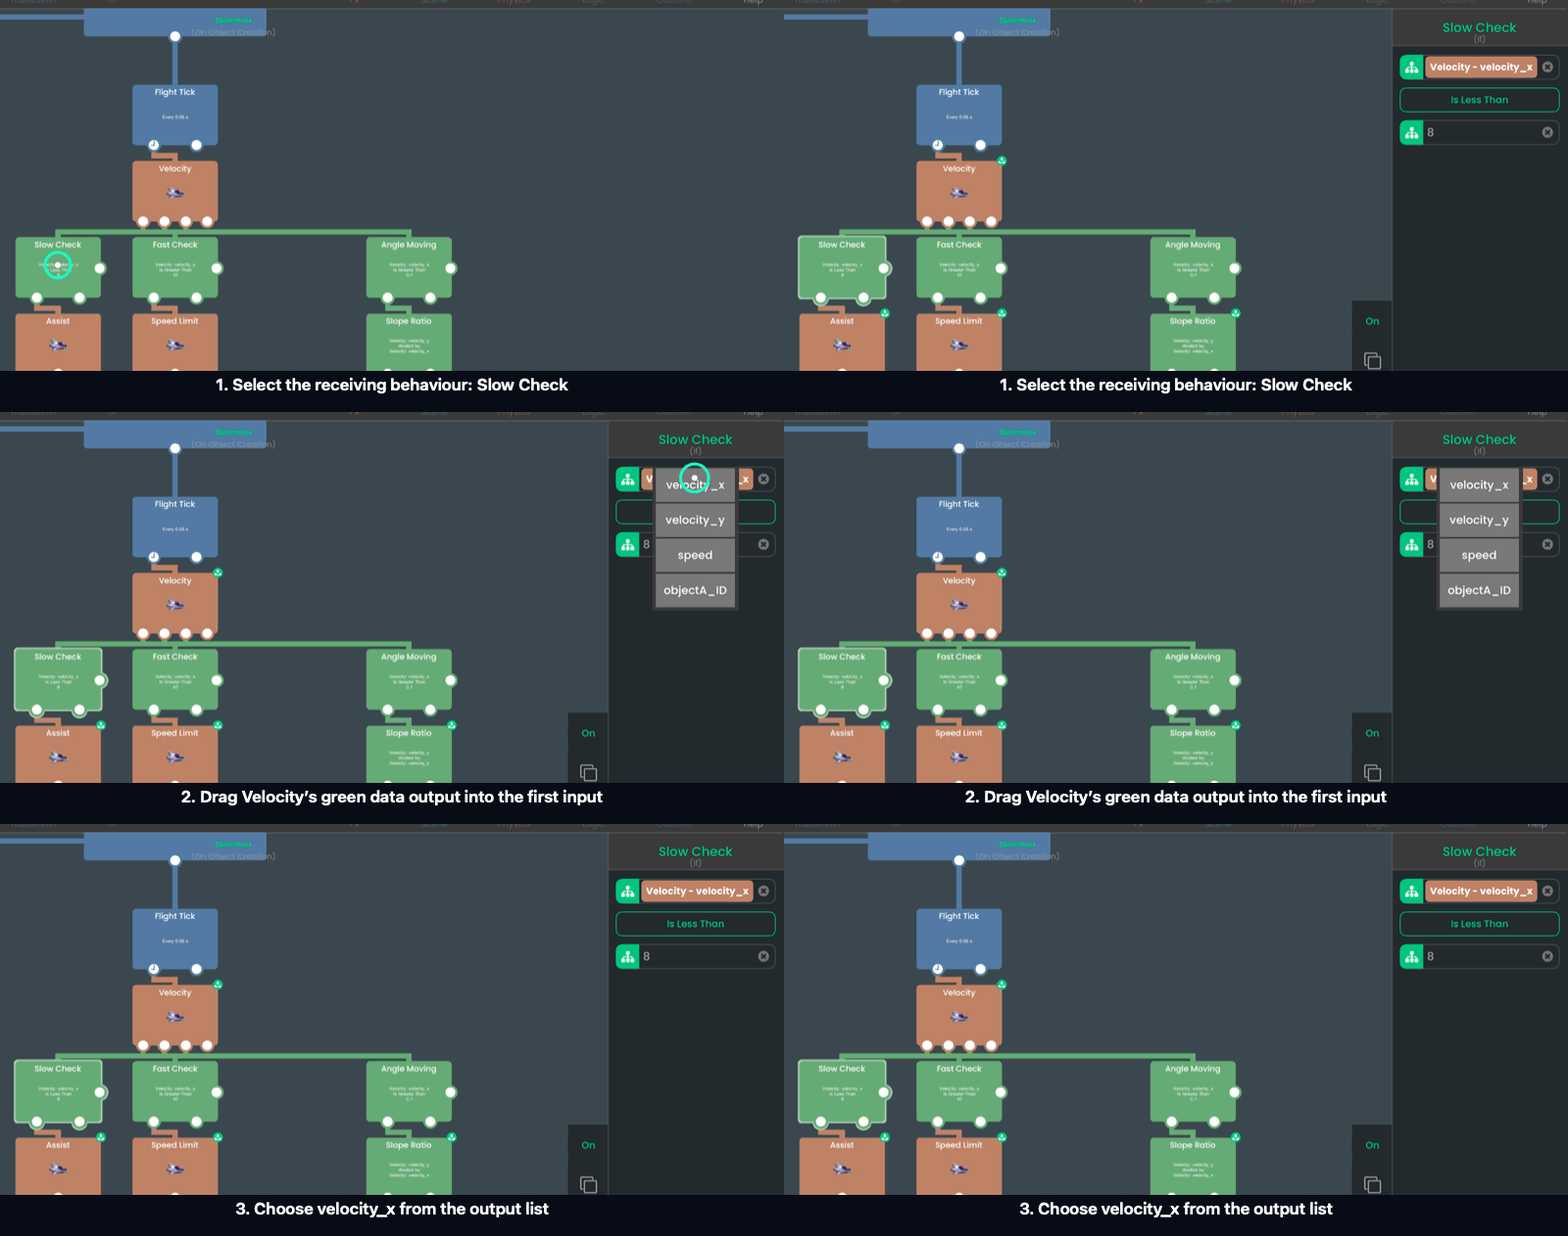
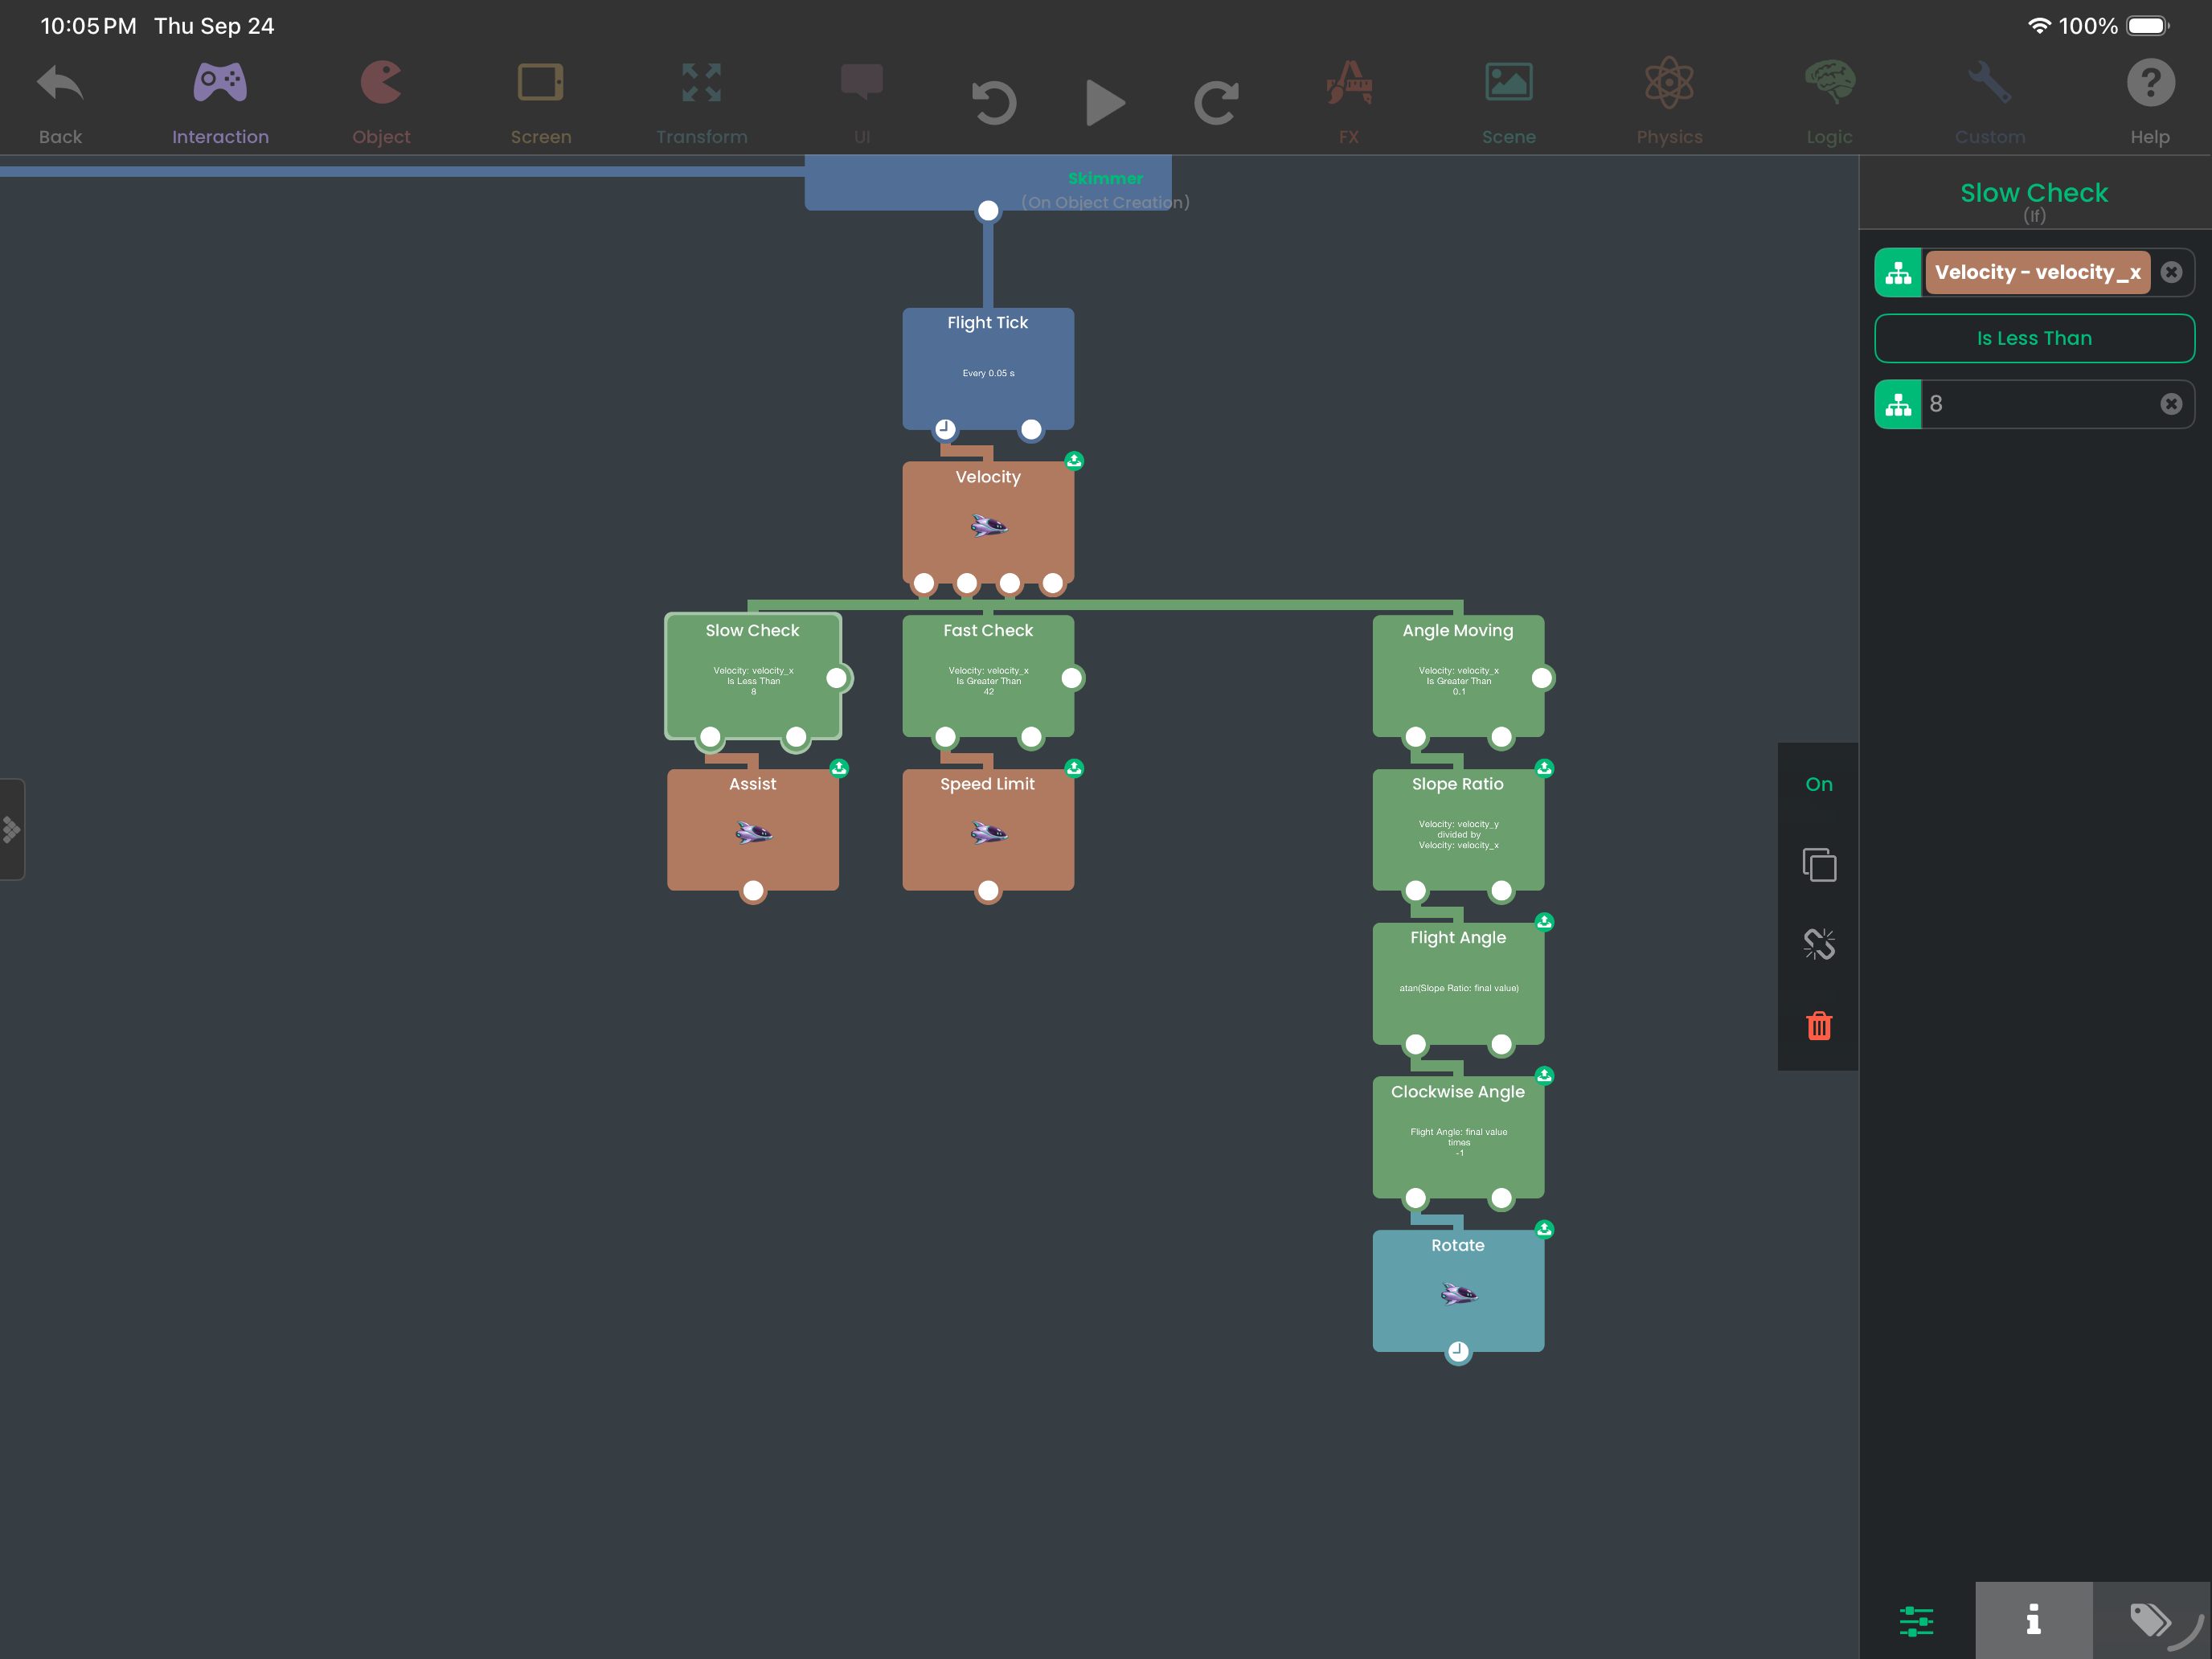
See Sharing Values Between Behaviors and If. The green button inside an input field creates a Change Input Field behaviour; use the output icon on the source block for this drag.
Build: Turn toward movement
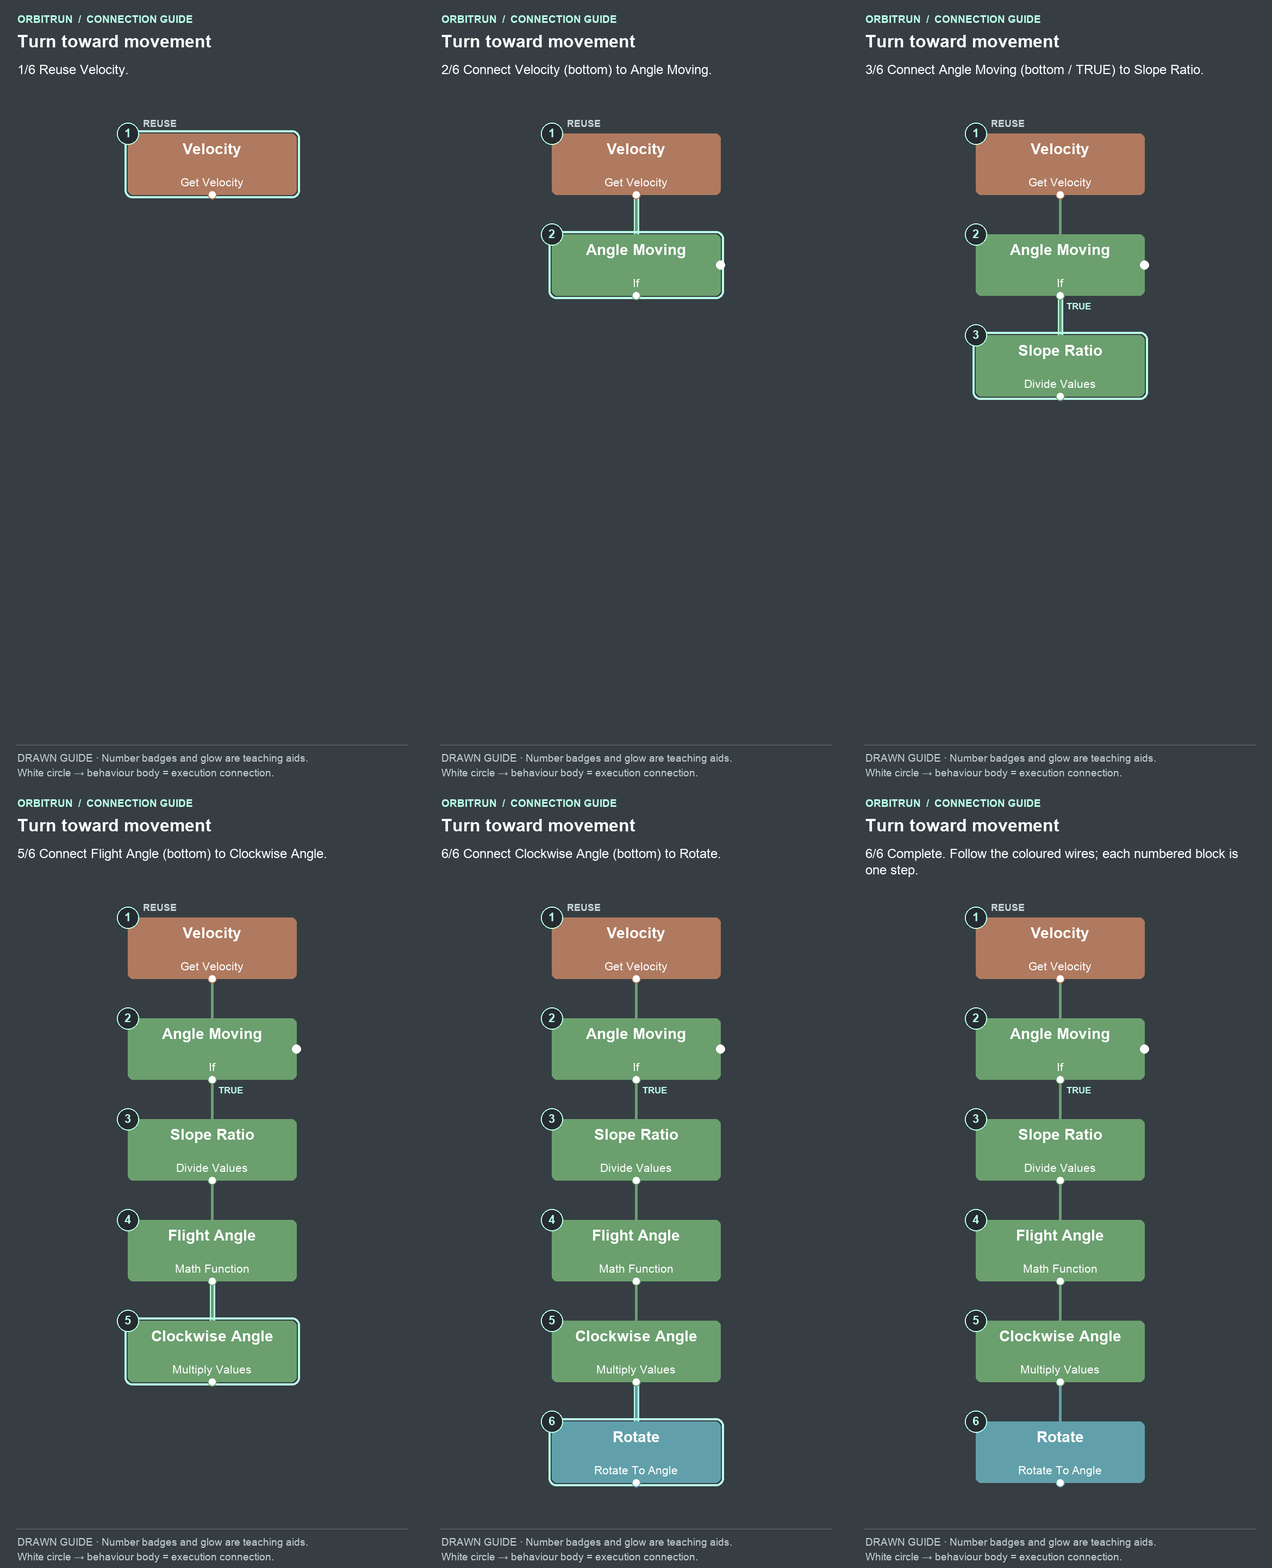
Open the completed diagram as a still image.
- Reuse Velocity.
- Add If and name it Angle Moving. Drag an unused bottom white circle on Velocity onto the Angle Moving block.
- Add Divide Values and name it Slope Ratio. Drag an unused bottom white circle (true) on Angle Moving onto the Slope Ratio block.
- Add Math Function and name it Flight Angle. Drag an unused bottom white circle on Slope Ratio onto the Flight Angle block.
- Add Multiply Values and name it Clockwise Angle. Drag an unused bottom white circle on Flight Angle onto the Clockwise Angle block.
- Add Rotate To Angle and name it Rotate. Drag an unused bottom white circle on Clockwise Angle onto the Rotate block.
Set the properties:
- Angle Moving: Velocity’s X Velocity > 0.1.
- Slope Ratio: first number = Velocity’s Y Velocity; second number = Velocity’s X Velocity.
- Flight Angle: Arctangent, taking Slope Ratio’s result.
- Clockwise Angle: first number = Flight Angle’s result; second number = −1.
- Rotate: target Skimmer; angle = Clockwise Angle’s result. Use a short duration for a smooth turn.
Use the green output drag for each referenced number. Do not type a formula into a number field. Use the behaviours to calculate it, then place their results into the receiving fields.
Try it: Play without touching for a few hills. The ship should turn nose-down on descents and nose-up on climbs. It should keep moving after slowing down.
Why it works: atan(vy / vx) gives the movement slope. The positive-X check avoids division near zero; multiplying by −1 converts the angle to the artwork's rotation direction. This approach fits a forward-only game. A game that allows backward movement needs a direction-aware angle calculation such as atan2 or additional quadrant handling.
The assist and cap change only horizontal velocity. Maintaining Y preserves the current jump or fall. The 42 value is an X-velocity cap, so the total speed displayed later can exceed 42 during a steep dive.
8. Turn world position into a score
Distance means horizontal metres travelled from the starting X coordinate, not distance from the camera.
Build: Turn position into distance
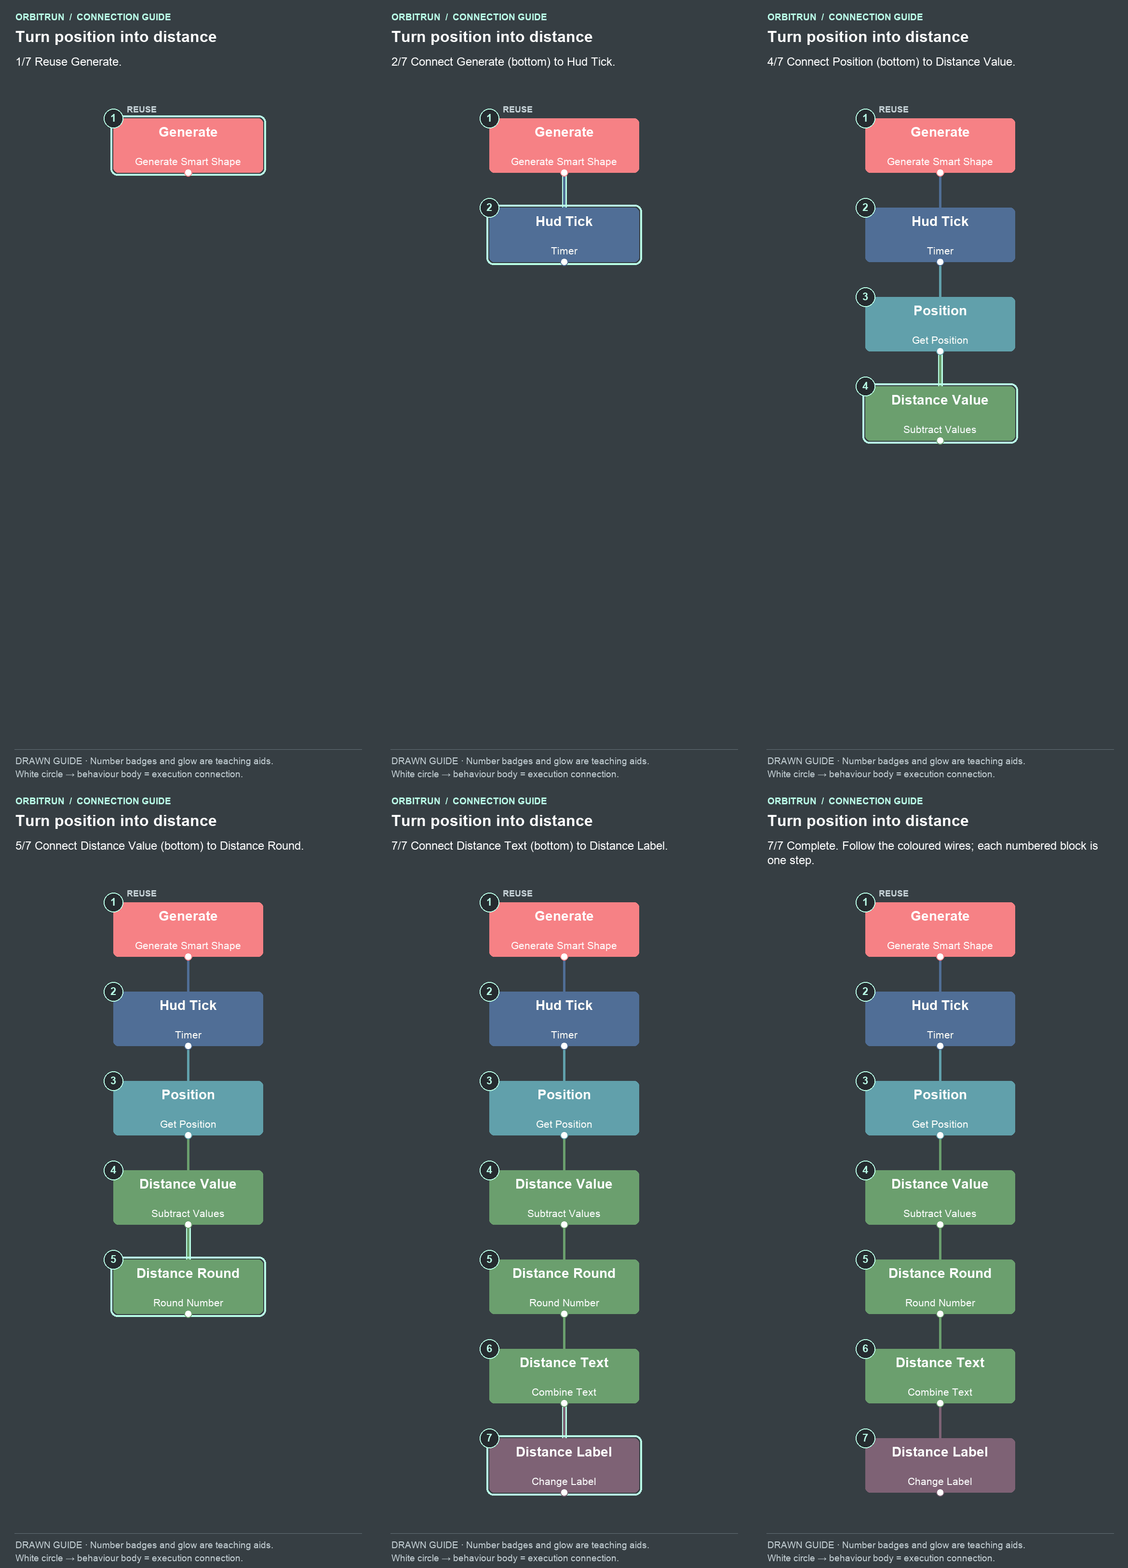
Open the completed diagram as a still image.
- Reuse Generate.
- Add Timer and name it Hud Tick. Drag an unused bottom white circle on Generate onto the Hud Tick block.
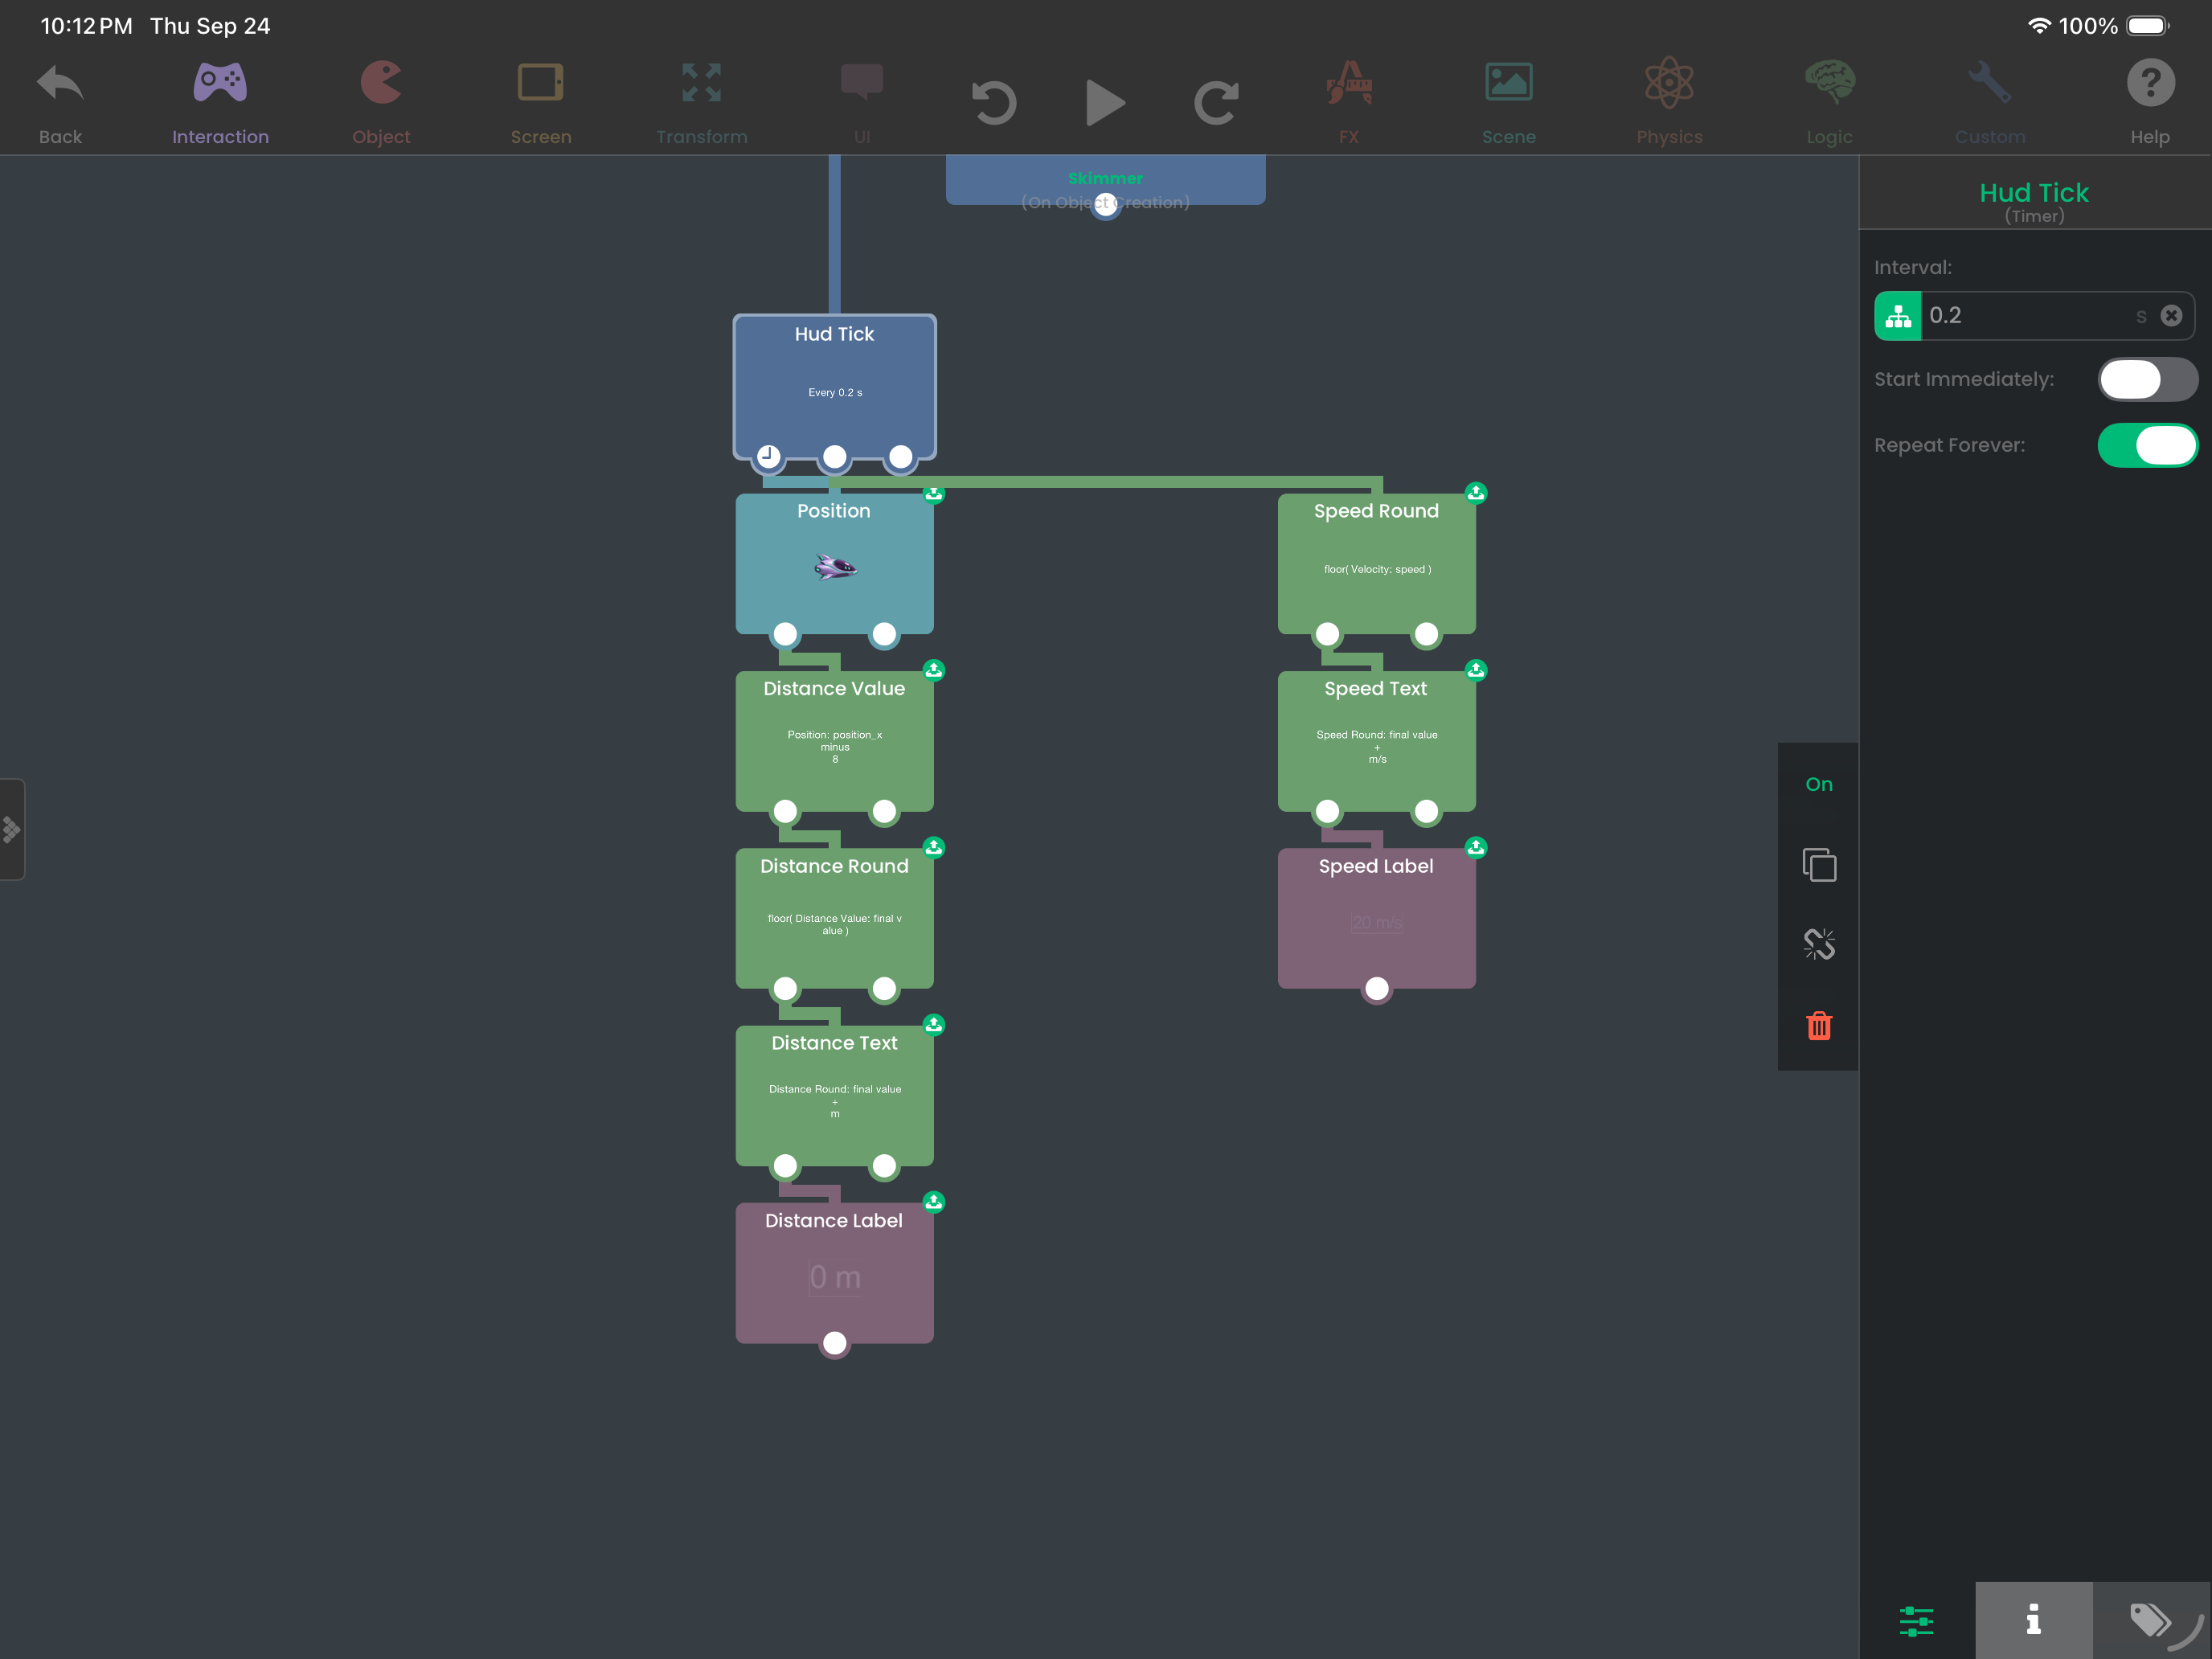
- Add Get Position and name it Position. Drag an unused bottom white circle on Hud Tick onto the Position block.
- Add Subtract Values and name it Distance Value. Drag an unused bottom white circle on Position onto the Distance Value block.
- Add Round Number and name it Distance Round. Drag an unused bottom white circle on Distance Value onto the Distance Round block.
- Add Combine Text and name it Distance Text. Drag an unused bottom white circle on Distance Round onto the Distance Text block.
- Add Change Label and name it Distance Label. Drag an unused bottom white circle on Distance Text onto the Distance Label block.
Set the properties:
- Hud Tick: 0.2 seconds; Repeat Forever On; Start Immediately Off.
- Position: Skimmer; Screen Coordinates Off.
- Distance Value: first number = Position’s X Position; second number = 8.
- Distance Round: Distance Value’s result; mode Floor.
- Distance Text: first input = Distance Round’s result; second input =
m; Space On. - Distance Label: target Distance; text = Distance Text’s Combined Text.
Watch the output drag: put world x into the calculation
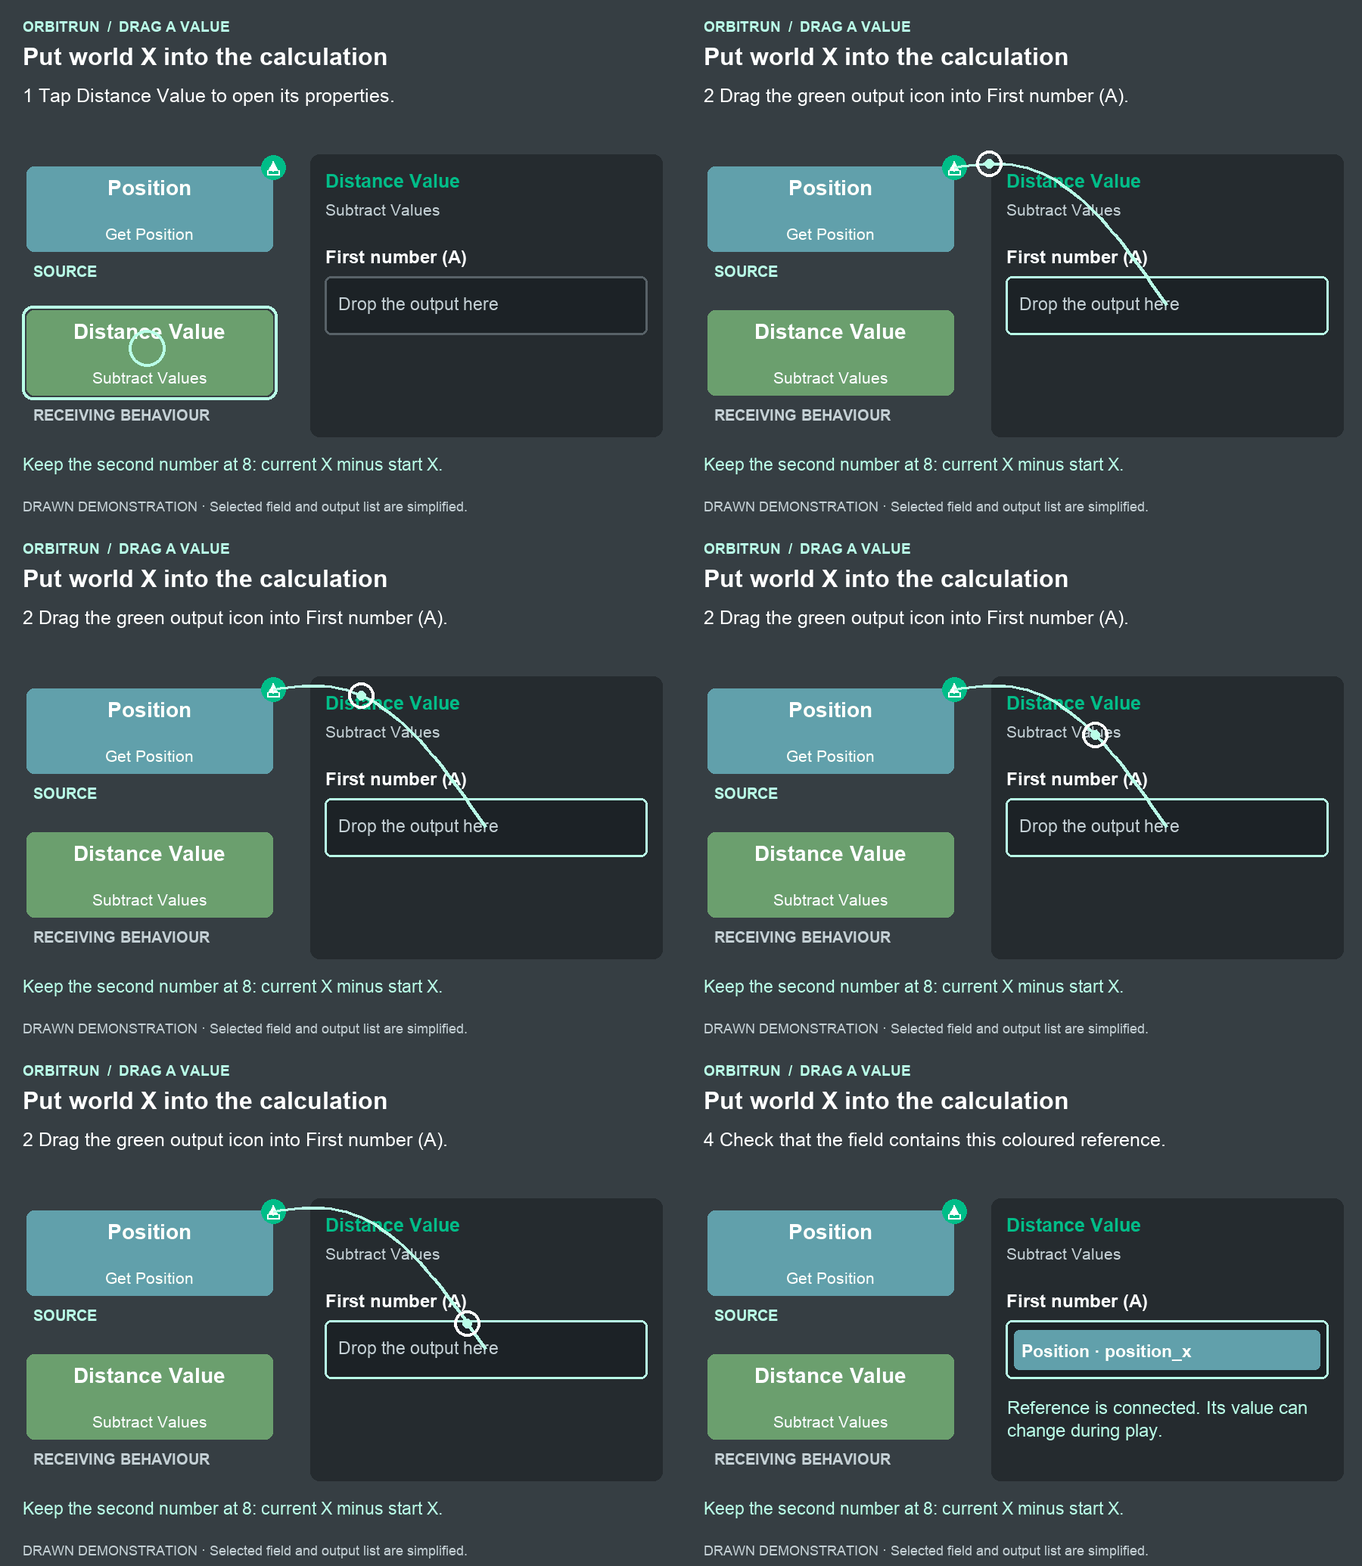
After the drop: First number (A) contains Position · position_x. Keep the second number at 8: current X minus start X.
Build: A second HUD branch
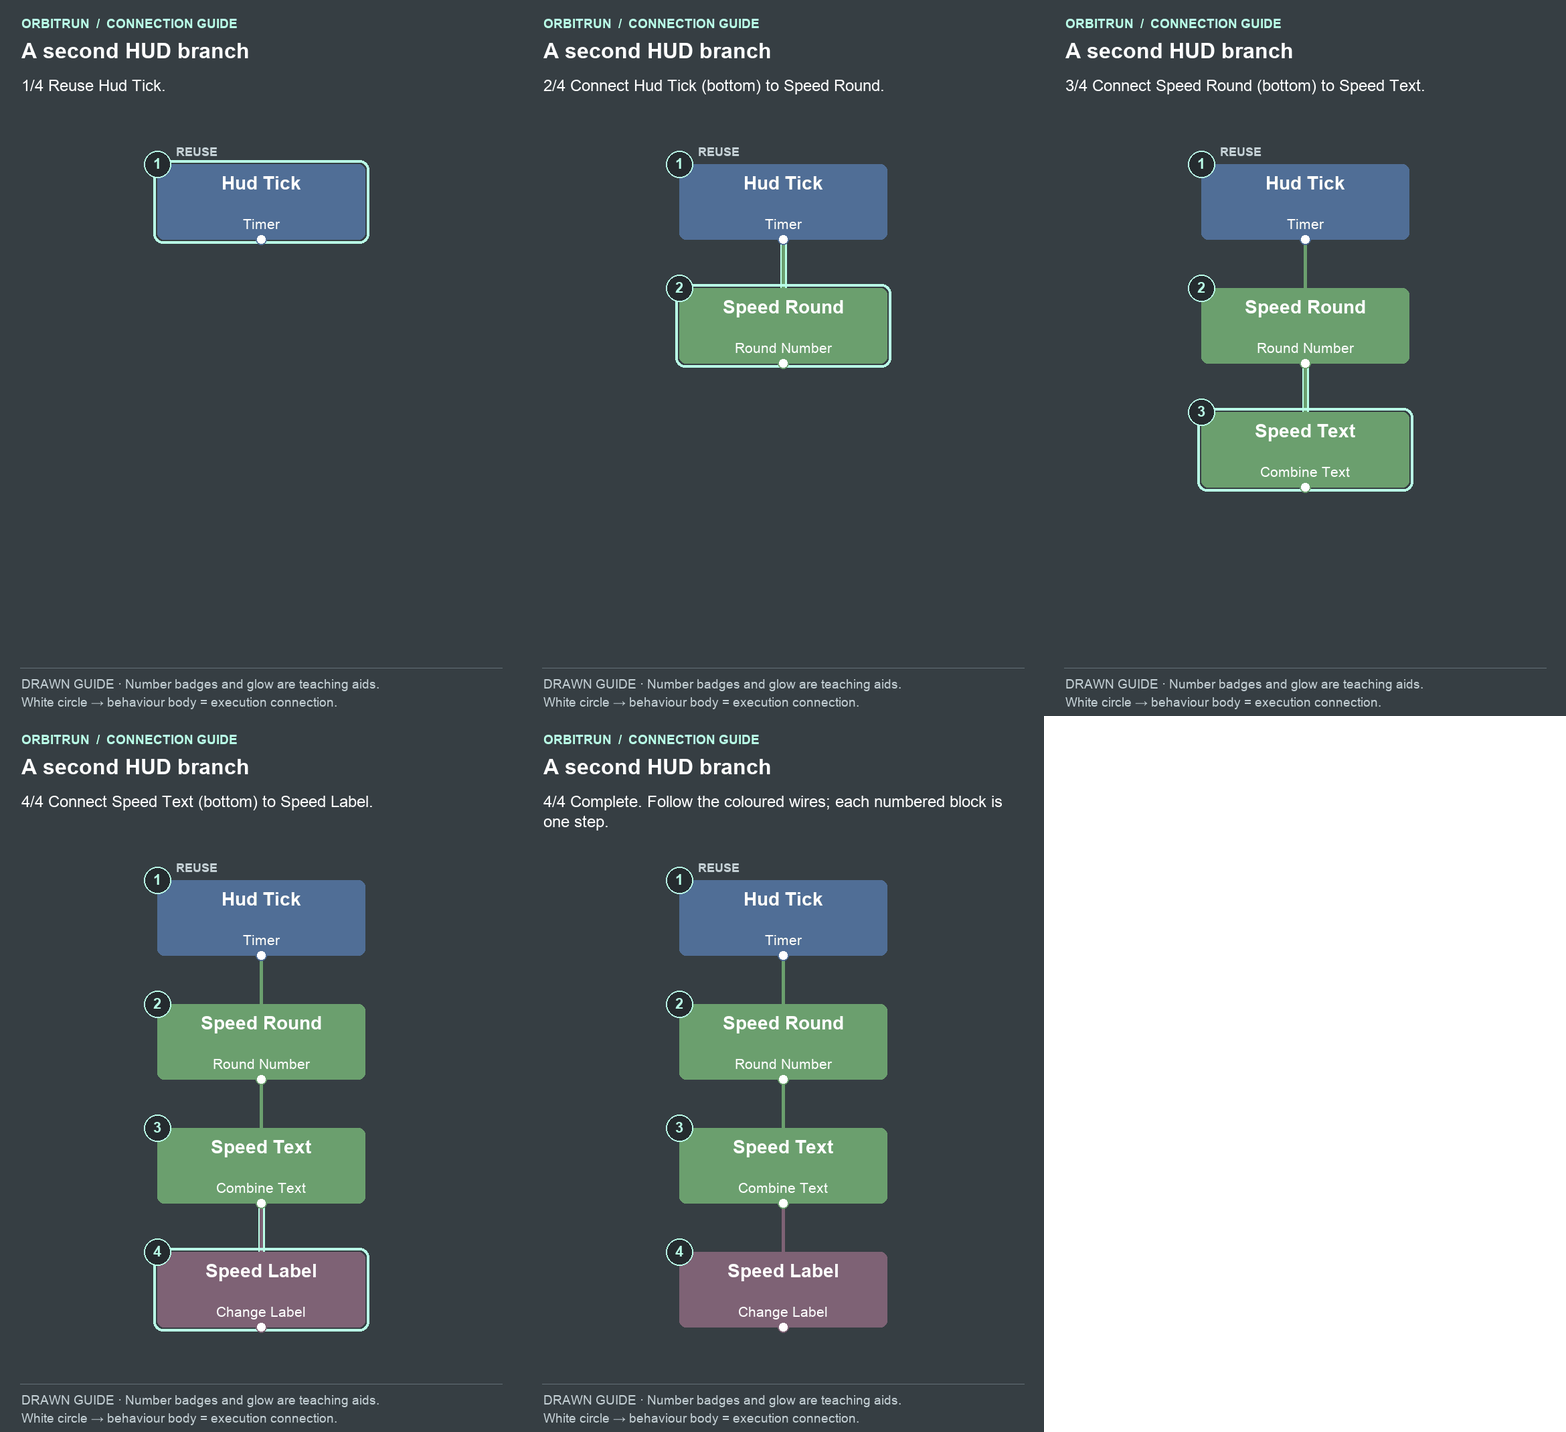
Open the completed diagram as a still image.
- Reuse Hud Tick.
- Add Round Number and name it Speed Round. Drag an unused bottom white circle on Hud Tick onto the Speed Round block.
- Add Combine Text and name it Speed Text. Drag an unused bottom white circle on Speed Round onto the Speed Text block.
- Add Change Label and name it Speed Label. Drag an unused bottom white circle on Speed Text onto the Speed Label block.
Set the properties: Speed Round reads Velocity’s Speed output and uses Floor. Speed Text combines Speed Round’s result with m/s, Space On. Speed Label targets Speed and reads Speed Text’s Combined Text.
Drag Velocity’s data into Speed Round’s number field. The execution connection comes from Hud Tick, as the diagram shows. Reading Velocity’s value does not require an execution wire from Velocity to Speed Round.
Try it: launch and watch Distance rise from near zero. At world X 108 m, the displayed distance should be 100 m because the ship started at X 8 m. Camera movement should not reset the score.
Why it works: Velocity was already sampled by Flight Tick. The HUD can read that latest result without adding a second fast velocity loop. Updating text five times per second is enough for this display; physics continues between these updates.
The Set Label reference describes the label-change behaviour (labelled Change Label in this editor).
9. Count down from 90 seconds
Build: Build the countdown
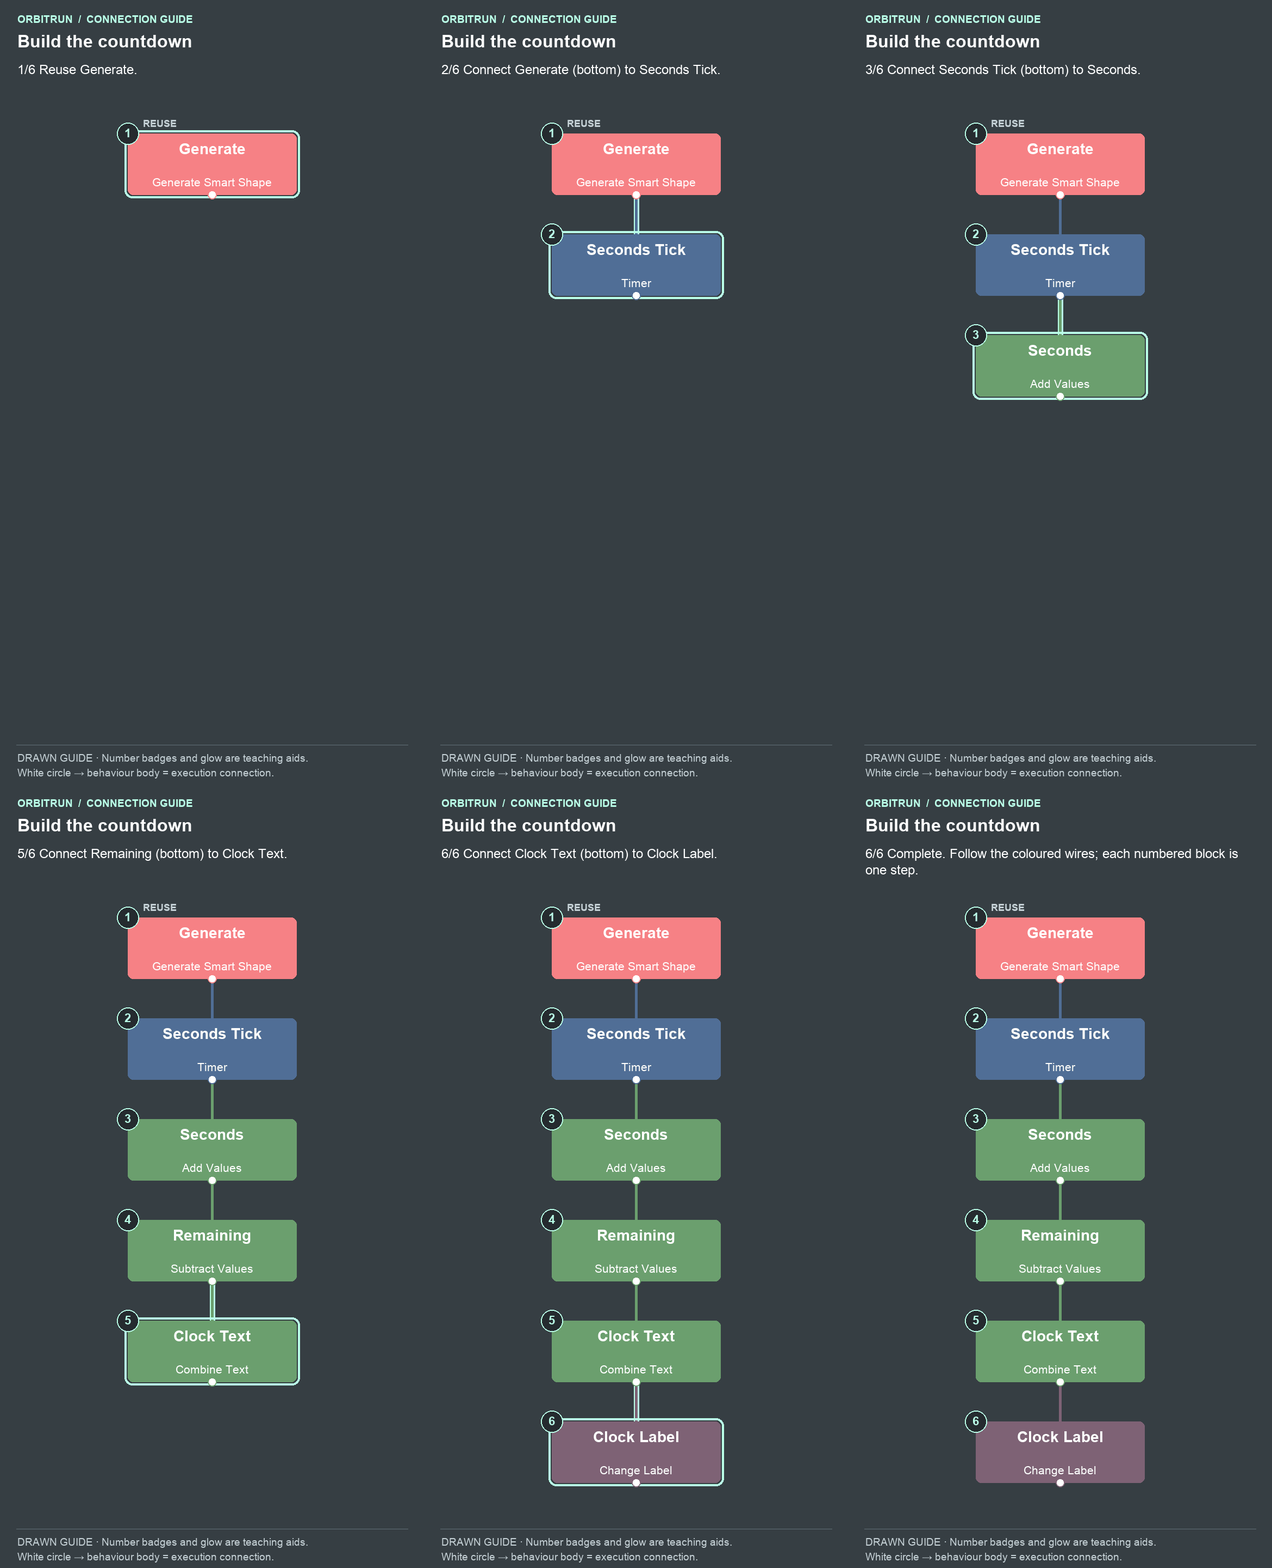
Open the completed diagram as a still image.
- Reuse Generate.
- Add Timer and name it Seconds Tick. Drag an unused bottom white circle on Generate onto the Seconds Tick block.
- Add Add Values and name it Seconds. Drag an unused bottom white circle on Seconds Tick onto the Seconds block.
- Add Subtract Values and name it Remaining. Drag an unused bottom white circle on Seconds onto the Remaining block.
- Add Combine Text and name it Clock Text. Drag an unused bottom white circle on Remaining onto the Clock Text block.
- Add Change Label and name it Clock Label. Drag an unused bottom white circle on Clock Text onto the Clock Label block.
Set the properties: Seconds Tick uses 1 second, Repeat Forever On, Start Immediately Off. Seconds adds 1 to its own previous result, starting at 0. Remaining subtracts Seconds’ result from 90. Clock Text combines Remaining’s result with s, Space On. Clock Label targets Clock and uses Clock Text’s Combined Text.
Watch the output drag: use a behaviour’s own result
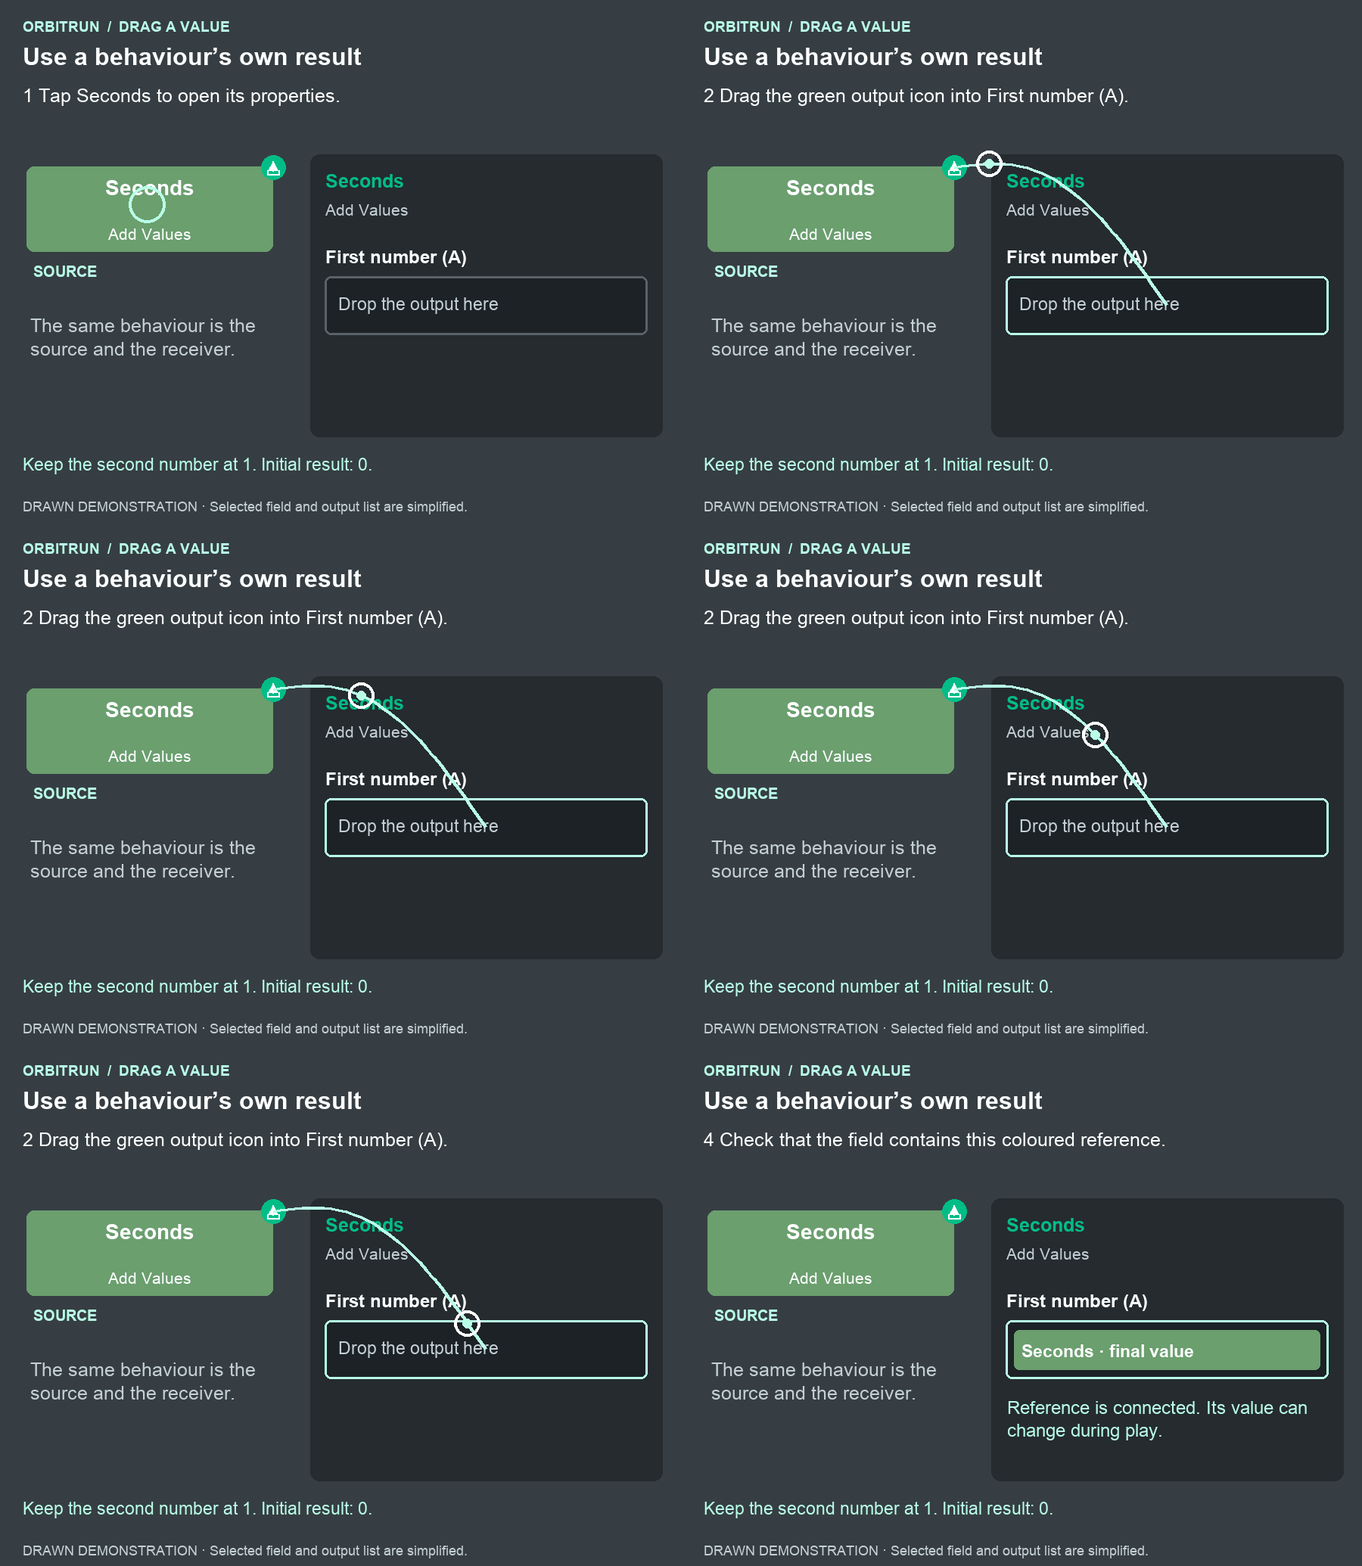
After the drop: First number (A) contains Seconds · final value. Keep the second number at 1. Initial result: 0.
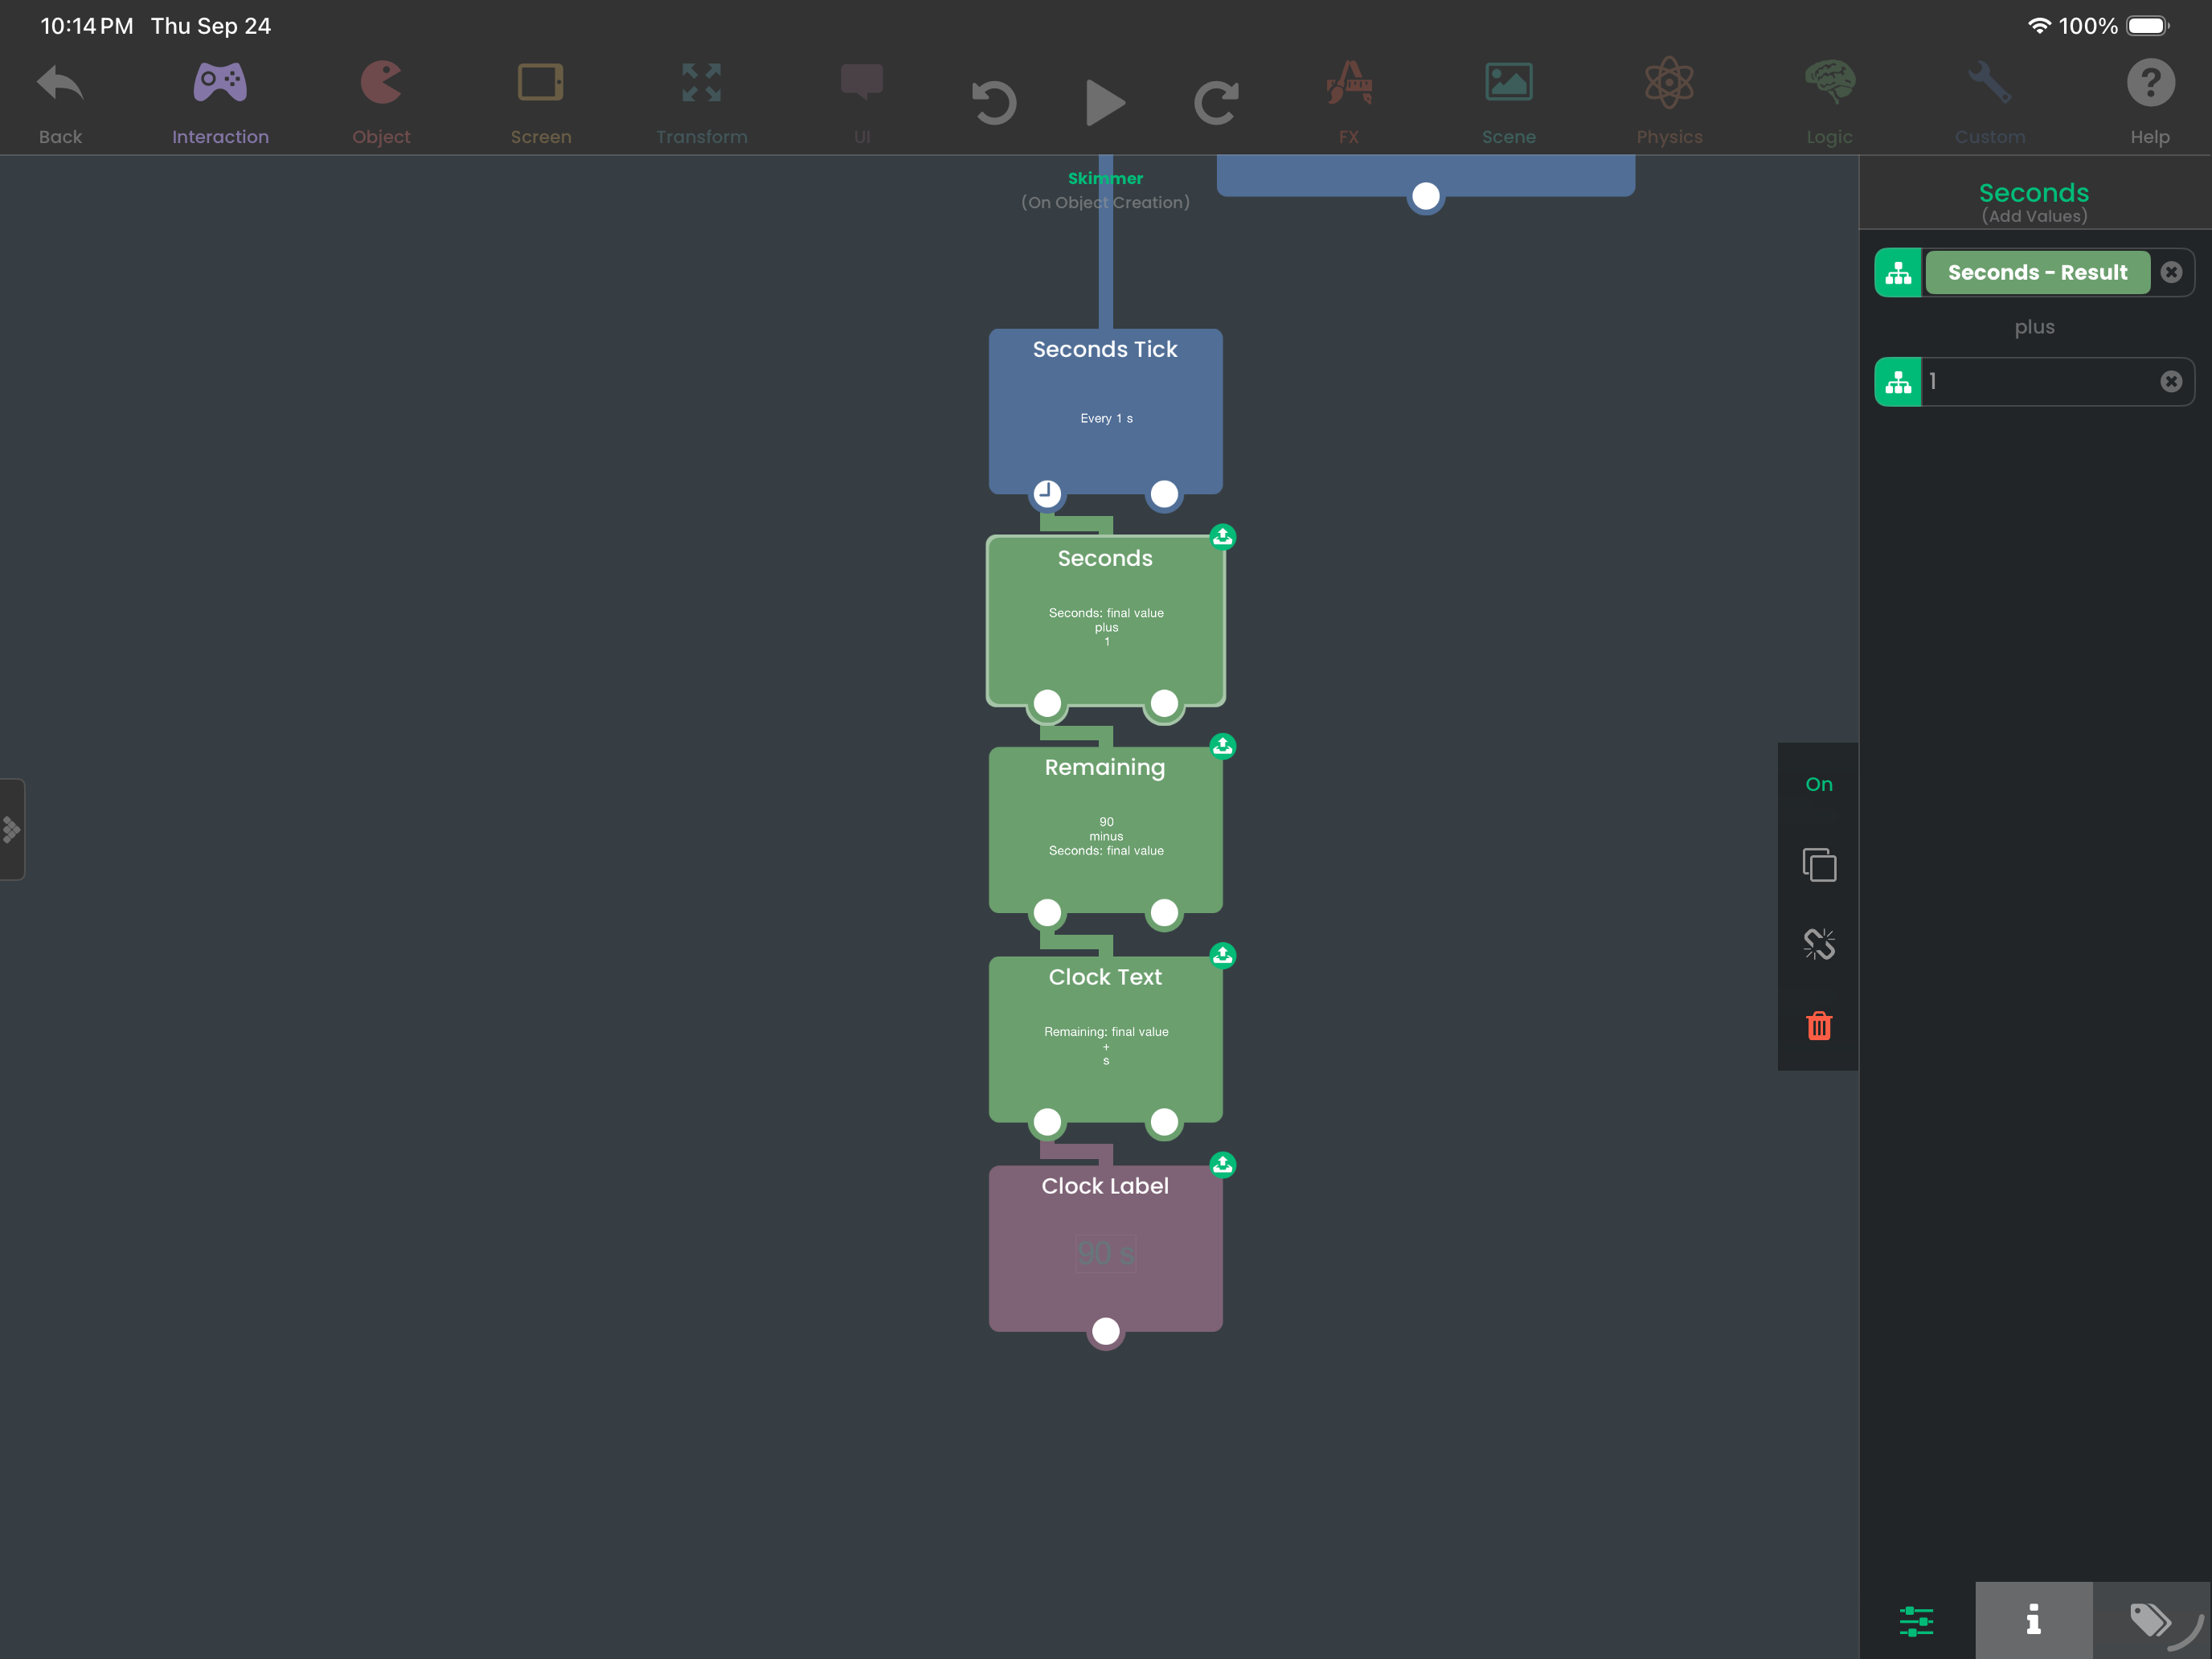
For a self-reference, keep Seconds selected and drag Seconds’ own green output icon into its first number field. Choose its result (shown as final value in the output reference). Set the second number to 1. At the first tick the clock changes from 90 s to 89 s.
See Timer for repeat and immediate settings.
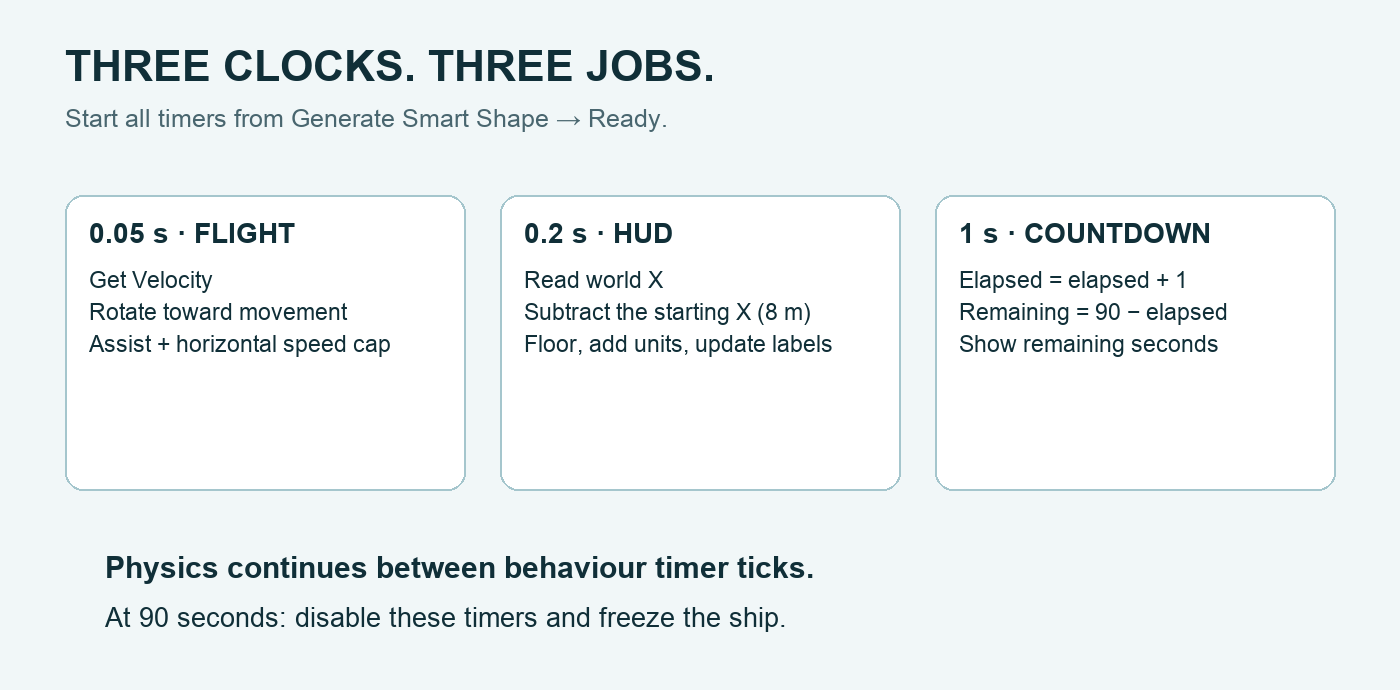
Try it: wait on the title screen. The timer should not count down yet. Launch and check that the clock changes once per second. At this checkpoint the run does not end at zero—we add that in Part 3, so stop this test early.
Why it works: the display timer and the actual run limit have different jobs. Part 3 adds a one-shot 90-second timer to finish the run. A timer-based display is suitable for this sample; for games that require exact real-time timing across interruptions, derive remaining time from an elapsed-time source instead of assuming every callback lands precisely on time.
Make the feel your own
Change one value per experiment, then replay:
- Change Dive gravity from −32 to −24. Does holding feel less forceful?
- Change the assist from 12 to 10. Does the game feel harder on a poor landing?
- Change Hud Tick from 0.2 to 0.5 seconds. Notice how the display becomes less smooth while the ship still moves normally.
Restore the tutorial values before Part 3 — Three worlds and replay. If your build differs, compare it with checkpoint 09-countdown.