

Art Studio: Keyboard, Mouse, and Quick Reference
Art Studio works with touch, Apple Pencil, a mouse, and a trackpad. The same project can move between Drawing and Rig & Animate, but many shortcuts depend on the active workspace. For example, P chooses Pen in Drawing and Pivot in Rig & Animate.
This reference uses ⌘ for Command, ⌥ for Option, ⇧ for Shift, and Esc for Escape. A letter on its own means press it without a modifier. Delete is the backward-delete key; forward Delete is also supported for canvas selections and rig selections.
Find a shortcut inside Art Studio
- Activate the workspace you are using.
- Press ⌘/ to open its shortcut reference. Drawing also exposes Keyboard Shortcuts… in its Actions menu.
- Click or tap the search field, or press ⌘F.
- Type an action such as
zoom,save,mesh, orframe. You can also search the displayed shortcut text. - Choose Done or press Esc to close the reference.
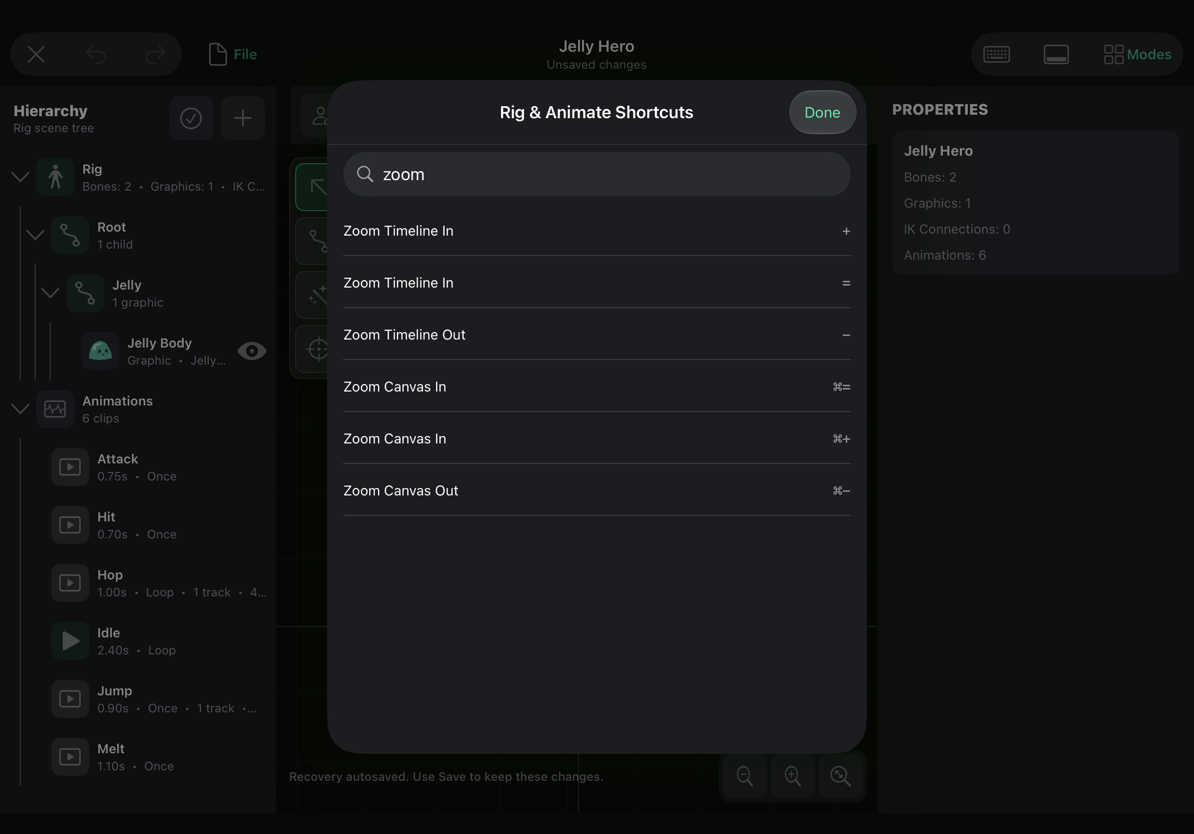
Hover over a control with a mouse or trackpad to see its tooltip where available. On a connected iPad keyboard, the system's Command-key shortcut discovery can also expose the current commands.
While you are typing in a name, numeric field, or text layer, ordinary typing takes priority. A dialog also handles its own commands rather than forwarding them to the canvas behind it. If a canvas shortcut appears inactive, finish editing the field and close any open dialog first.
Touch and pointer navigation
These gestures apply to the canvas area, not every list or inspector in the app.
| Input | Drawing canvas | Rig canvas |
|---|---|---|
| One finger or primary mouse drag | Use the active drawing/selection tool | Use the active rig tool or handle |
| Two-finger drag on the screen | Pan the canvas | Pan the canvas |
| Pinch | Zoom | Zoom |
| Mouse wheel | Zoom around the pointer | Zoom around the pointer |
| ⌥ + mouse wheel | Pan vertically | Pan vertically |
| ⌥⇧ + mouse wheel | Pan horizontally | Pan horizontally |
| Two-finger trackpad scroll | Pan | Pan |
| ⌘ + trackpad scroll | Zoom around the pointer | Zoom around the pointer |
| Secondary mouse button while drawing | Use the secondary color where the drawing tool supports it | Not a substitute for a rig tool |
When rig bones and editing guides are hidden, dragging the rig canvas pans the view. Show the bones again to pose them.
Mouse-wheel events and continuous trackpad scrolling are treated differently. You do not need Option to zoom with a mouse wheel; Option changes wheel scrolling to pan. Trackpad scrolling pans unless Command is held.
In Drawing, use the zoom readout to check magnification. ⌘0 fits the active canvas to the available space. In Drawing, ⌘1 returns to 100% actual size. Double-clicking is not a zoom command.
Space plays or pauses animation. It is not a temporary hand/pan tool. Use the navigation gestures above to move around without drawing or posing.
Working in a narrow window
Some toolbar titles collapse to icons when the window is narrow. File, Modes, and editing commands are still available. Hover for their names on Mac, or use the keyboard reference. Open the inspector only when needed to leave more space for the artwork.
Shared project and workspace commands
| Shortcut | Action | Touch/menu equivalent |
|---|---|---|
| ⌘S | Save the current Studio project | File → Save Project |
| ⇧⌘S | Save As / save an independent copy | File → Save As… |
| ⇧⌘O | Open an .hpstudio project from Files/Finder | File → Open Project… |
| ⇧⌘E | Choose a game-asset export | File → Export Game Asset |
| ⌘W | Close Art Studio | Close button |
| ⌘Z | Undo | Undo button |
| ⇧⌘Z | Redo | Redo button |
| ⌥⌘1 | Drawing workspace | Modes → Drawing |
| ⌥⌘2 | Rig & Animate workspace | Modes → Rig & Animate |
| ⌘/ | Current workspace's shortcut reference | Keyboard Shortcuts |
Save preserves the editable project; it does not silently refresh the exported character in your scene. See Save projects and export game assets for Save As, portable files, and output updates.
Drawing: select a tool
| Shortcut | Tool | Shortcut | Tool |
|---|---|---|---|
| P | Pen | V | Mirror Pen |
| B | Fill | A | Replace Color |
| E | Eraser | N | Smudge / Blend |
| L | Line | R | Rectangle |
| C | Ellipse | G | Linear Gradient |
| K | Radial Gradient | T | Text |
| M | Transform | Z | Magic Select |
| S | Rectangle Select | H | Lasso |
| U | Lighten | J | Darken |
| Q | Dither | O | Eyedropper |
The toolbar buttons choose the same tools. Selecting a tool does not necessarily apply an operation immediately: selection, shape, gradient, and transform tools still need a gesture or a confirmation in their controls.
Brushes, colors, and the view
| Shortcut | Action |
|---|---|
| [ / ] | Decrease / increase brush size |
| ⌘B | Brush Settings |
| X | Swap primary and secondary colors |
| D | Reset colors |
| 1–9 | Choose that numbered color from the selected palette, if it exists |
| ⌥⌘P | Primary Color Picker |
| ⌥⌘S | Secondary Color Picker |
| + or = / − | Zoom the canvas in / out |
| ⌘+ or ⌘= / ⌘− | Zoom the canvas in / out |
| 0 or ⌘0 | Fit canvas |
| ⌘1 | Actual size, 100% |
| ⌥G | Show/hide pixel grid |
| ⌥⇧G | Toggle Snap to Grid |
| ⌥L | Show/hide Live Tiles |
| ⌥⇧L | Open Generate Tileable Texture while using tile mode |
| ⌘I | Show/hide inspector |
| ⇧⌘L | Layers inspector |
| ⇧⌘P | Palette inspector |
The pixel grid is only drawn when individual pixels are large enough to see: 700% zoom or greater. Turning the grid on does not itself change the zoom. If it is enabled but not visible, zoom in. This is separate from snapping.
Live Tiles shows repeated neighbors around the central drawing area. Draw in the central tile to watch the seams update. Tile generation is an additional operation; turning on the preview does not automatically modify the artwork.
Selection, previews, and canvas size
| Shortcut | Action |
|---|---|
| ⌘A | Select all |
| ⌘D | Deselect |
| ⇧⌘I | Invert selection |
| ⌘C | Copy selection |
| ⌘X | Cut selection |
| ⌘V | Paste selection |
| Delete or forward Delete | Delete selected pixels |
| Arrow keys | Move an active selection by 1 pixel |
| ⇧ + arrow keys | Move an active selection by 10 pixels |
| ⌘T | Transform selection or layer |
| Return | Apply the active adjustment/transform/raster preview, or enter editing for the selected text layer |
| Esc | Cancel an active adjustment/transform/raster preview; otherwise clear the selection |
| ⌥⌘C | Resize Canvas controls |
| ⌥⌘X | Crop immediately to the active selection; otherwise open Crop Canvas controls |
For a reliable deselect action, use ⌘D, Esc, or the selection controls. A drag with Rectangle Select makes a rectangle; it is not a general-purpose “click away” command. Clicking the empty workspace outside the drawable canvas can clear the selection.
With a selection active, choosing Crop crops the canvas to that selection’s rectangular bounds immediately. Without a selection, Crop opens its canvas controls. Resize changes the canvas dimensions. After applying either operation, check the dimensions shown in the editor and use Undo if the result is not what you intended.
Layers
| Shortcut | Action |
|---|---|
| ⇧⌘N | New pixel layer |
| ⌘J | Duplicate selected layer |
| ⌘E | Merge layer down |
| ⇧⌘Delete | Delete layer |
| ⌘G | New layer group |
| ⌘[ / ⌘] | Move layer backward / forward |
| ⌥⌘↑ / ⌥⌘↓ | Select layer above / below |
Layer names belong to your project. They are not automatically translated when you change hyperPad's interface language.
Drawing animation and cycles
These commands need frame-animation mode where noted. Use Modes → Keyframe Animation to show its timeline.
| Shortcut | Action |
|---|---|
| ⌥⌘A | Toggle Drawing's frame-animation mode |
| Space | Play/pause the Drawing animation |
| ⌥N | Add a new frame |
| ⇧N | Duplicate the frame |
| ⌥⇧Delete | Delete frame |
| ⌥← / ⌥→ | Previous / next frame in the displayed timeline |
| ↑ / ↓, with no pixel selection | Previous / next frame |
| ⌥O | Toggle onion skin |
| ⌥⌘N | New animation cycle |
| ⌥⌘R | Rename animation cycle |
| ⌥⌘9 | Toggle 9-slice authoring |
An arrow key moves pixels when a pixel selection exists. Clear the selection first if you intend to navigate frames with Up/Down, or use Option-Left/Right.
Import and export from Drawing
| Shortcut | Action |
|---|---|
| ⌘O | Import Artwork or Palette |
| ⇧⌘E | Export Game Asset choices in the combined Studio project |
Image Frames and Slice Sprite Sheet are available through File → Import. The separate Export Drawing Files submenu includes Selected Frame PNG, PNG Sprite Sheet, and Animated GIF. It uses Drawing content even if a rig is present in the project.
Rig & Animate: tools and panels
| Shortcut | Action | What to expect |
|---|---|---|
| V | Select | Inspect bones or attached artwork |
| B | Create Bone | Drag to make a bone; subsequent drags can continue a chain |
| F | Smart Pose | Pose through the rig's interactive handles |
| I | Advanced IK | Use the advanced posing controls |
| P | Pivot | Adjust the relevant pivot |
| M | Mesh Tools | Open mesh actions for suitable selected artwork |
| T | Toggle Setup / Animation Timeline | Switch the authoring context |
| G | Toggle Rig / Baked Preview | Compare the rig preview with sampled frames |
| H | Show/hide bones and editing guides | Inspect the artwork without the overlays |
| ⌘I | Properties Inspector | Open the selected item's properties |
| ⌘L | Bone Hierarchy | Open the hierarchy |
| ⇧⌘P | Rig Presets | Open samples/presets |
| ⌘O | Import or Bind Artwork | Attach artwork through the rig import flow |
| ⌥⌘A | Project Artwork | Access Drawing layers and rig parts |
| ⌘D | Duplicate selected rig item | Applies to a suitable rig item, not timeline key selection |
| [ / ] | Move selected artwork backward / forward | Changes artwork order |
| ⌘E | Export Baked Animation | Open clip selection and output-quality review |
The F tool is labeled Smart Pose by default. If you change its posing style, its title becomes Direct Pose; the shortcut remains F.
Hiding bones changes the editor display. It does not delete bones, remove keys, or strip the saved rig. Show them again when you need to manipulate the rig.
Playback, timeline, and canvas zoom
| Shortcut | Action |
|---|---|
| Space | Play/pause |
| ← / → | Previous / next frame |
| ⌥← / ⌥→ | Previous / next key time |
| S | Toggle frame snapping |
| K | Add Key menu |
| + or = / − | Zoom the timeline in / out |
| 0 | Fit the timeline |
| ⌘+ or ⌘= / ⌘− | Zoom the rig canvas in / out |
| ⌘0 | Fit the rig canvas |
In Rig & Animate, the Command modifier distinguishes canvas zoom from timeline zoom. It is useful to enlarge the timeline while leaving the character at the same on-screen size.
Frame stepping uses the rig's configured sampling frame rate. Jumping to a key uses actual key times, which may differ from the next sampled frame.
Edit keys and copy poses
| Shortcut | Action |
|---|---|
| ⌘A | Select all visible timeline keys |
| ⌘C | Copy selected keys |
| ⌘X | Cut selected keys |
| ⌘V | Paste keys |
| ⌘R | Retime selected keys |
| ⇧⌘C | Copy pose |
| ⇧⌘V | Paste pose |
| ⇧⌘M | Mirror pose |
| Delete or forward Delete | Delete selected keys; otherwise the suitable selected rig item |
| Esc | Finish mesh editing, clear key selection, and stop playback |
Key editing is also available through the timeline's touch controls. Use its multi-selection control to select several keys; Edit Keys appears when keys are selected. A copied pose is a snapshot of a pose, while copied keys include timing information. Choose the operation that matches whether you want to reuse a shape or a timed movement.
In Retime Selected Keys, the timing scale is measured from the first selected key. A scale of 200% spreads their timing to twice its original length; 50% compresses it. The frame shift then offsets that group: negative values move it earlier. Keys outside the selection stay in place. Invalid times or collisions are rejected rather than silently changing other keys.
Mesh point editing
When a mesh point is selected for editing, it takes priority over ordinary frame stepping:
| Shortcut | Action |
|---|---|
| Arrow keys | Move the selected point by 1 unit |
| ⇧ + arrow keys | Move the selected point by 10 units |
| Esc | Finish mesh-point editing |
In rig coordinates, Up increases the vertical coordinate and Down decreases it. Use the canvas view to judge the movement rather than assuming the top-left image-coordinate convention used by Drawing.
Finish point editing before using Left/Right for timeline frames. In Setup, mesh edits change the base shape; in animation authoring, deformation changes belong to animation keys. Check the active mode before adjusting a point.
Dialogs and smaller editors
The visible buttons remain the authoritative way to confirm or cancel a dialog. Keyboard equivalents are available for the common operations below.
| Context | Shortcut | Action |
|---|---|---|
| Editable dialogs with Apply/Create | ⌘Return | Apply or create |
| Most Studio dialogs | Esc | Cancel or close |
| Most Studio dialogs | ⌘W | Close dialog |
| Save As | ⌘Return | Save the copy |
| Still/game-asset export review | ⌘Return | Export the asset |
| Baked export review | ⌘Return | Export selected clips |
| Baked export review | ⌘W | Close export review |
| New Art Studio Project | ⌘1–⌘5 | Graphic, Keyframe Animated Object, Bones/Rig, 9-Slice Graphic, Editable Text |
| Save As folder browser | ⇧⌘N | New Folder |
| Save As folder browser | ⌘↑ | Parent Folder |
| Save As folder browser | ⌘Return | Choose Folder |
| Shortcut reference | ⌘F | Focus shortcut search |
| Atlas/sprite-sheet preview dialogs | ⌘+ / ⌘− / ⌘0 | Zoom preview in / out / fit |
| Tile generation preview | + or = / − / 0 | Zoom in / out / fit tile preview |
| Tile generation preview | ⌘R | Try another texture variation |
| Tile generation preview | ⌘Return | Apply generated texture |
Return while typing normally finishes that field's editing behavior. Command-Return is the explicit dialog-level confirmation. Do not assume plain Return always exports or saves the whole project.
Some controls have a circular value dial. Drag the dial to adjust it, or select the value to enter an exact number. A disabled action may need valid input, a selection, or completion of a calculation before it becomes available.
A short practice session
Try these steps on a new project or a saved copy:
- In Drawing, press P, draw a small shape, then press ⌘Z and ⇧⌘Z to undo and redo the stroke.
- Press S, select part of the shape, nudge it with an arrow, then use ⌘D to deselect.
- Roll the mouse wheel to zoom. Hold ⌥ and roll to pan; add ⇧ for horizontal movement. On a trackpad, use two-finger scrolling and then Command-scroll.
- Press ⌘0 to fit the canvas.
- Press ⌥⌘2 to enter Rig & Animate, load a sample, then press H to hide the bones and Space to preview.
- Press H again, stop playback, and compare + with ⌘+: one enlarges the timeline, the other the rig canvas.
- Press ⌘/, search
export, then close the reference with Esc. - Save with ⌘S. Export through File when you want a game asset.
Quick troubleshooting
The same key does something different after I switch modes.
Tool letters and editing commands are contextual. Use the Drawing or Rig & Animate table, or open the current workspace's reference with Command-/.
Typing a name seems to disable shortcuts.
That is intentional. Finish editing the text field before sending commands to the canvas.
Arrow keys move a point or pixels instead of changing the frame.
Clear the pixel selection in Drawing, or finish mesh-point editing in Rig & Animate. Option-Left/Right also have distinct navigation meanings in each workspace.
I cannot see the pixel grid.
Enable it, then check that Drawing is zoomed to at least 700%. Grid visibility does not change the zoom for you.
Zoom affects the wrong part of Rig & Animate.
Use Command with +/−/0 for the canvas. Without Command those shortcuts affect the timeline.
The shortcut worked but the game did not change.
You may have saved only the editable project. Export or update the linked game asset, then check it in the game.
Terms you will see
| Term | Meaning in Art Studio |
|---|---|
| Project | Editable source: Drawing, rig, and related animation work |
| Game asset | Exported graphic or animation usable by a scene |
| Layer | A separately editable part of a Drawing document |
| Frame | One picture or sampling time in an animation |
| Cel | A layer's artwork at a particular animation frame; held exposures can reuse it |
| Cycle / clip | A named animation sequence; Drawing uses animation cycles and rig authoring uses clips |
| Key | A recorded rig property value at a particular time |
| Pose | The arrangement of a rig at one time |
| Bone | A transform in a parent/child rig hierarchy |
| Attachment | Artwork placed on a rig bone |
| Pivot | The point around which a transform acts |
| IK | Inverse kinematics: moving a target so a chain of bones follows it |
| Mesh | Vertices and triangles that allow artwork to deform |
| Weight | How strongly a bone influences a mesh point |
| Bake | Render rig animation into sprite frames |
| Retina rendition | An additional 2× image rendition for the same logical size |
| Source link | The connection between an exported asset and the editable project that produced it |
Your project, layer, bone, clip, and asset names remain your own text. Translating the interface does not rename your authored content, and the shortcut letters remain the same.