

Art Studio: Bones and Rig Animation Guide
Rig & Animate turns separate pieces of artwork into a character, creature, vehicle, or flexible prop. You assemble the parts, give them a connected skeleton, and save poses along an animation timeline. Art Studio fills in the movement between those poses.
You can start with an included preset, replace its graphics, or build a rig from your Drawing layers. The editable project keeps your drawing, rig, artwork, mesh weights, and animation keys. Export creates a game asset from that work. Saving the project and exporting an animation are separate actions.
This guide covers the rigging workspace from first use to advanced controls. Follow Create a walk cycle for a complete animation exercise, or Artwork and mesh deformation to customize a character and make flexible shapes.
Understand the pieces
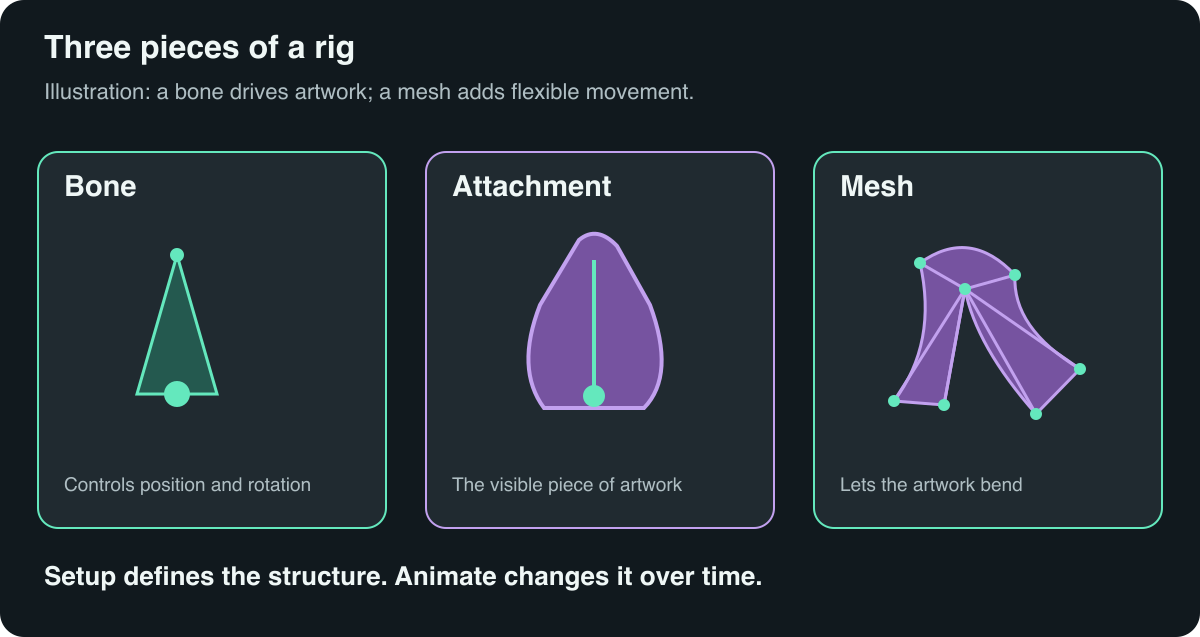
| Term | What it means | Example |
|---|---|---|
| Bone | A movable coordinate system with a joint and a tip. It can have child bones. | Upper arm, forearm, hand. |
| Parent / child | A child follows its parent's movement, then adds its own local movement. | Rotating an upper arm carries the forearm and hand with it. |
| Root | The top of the hierarchy. Keep it steady for an animation intended to move through the game under behaviour control. | The whole character's starting reference. |
| Artwork | The editable image used by a part. | A sleeve image. |
| Attachment | A placed instance of artwork, with its own pivot, transform, visibility, colour, and optional mesh. | The front sleeve attached to the front upper arm. |
| Slot | A place on a bone for artwork. Alternatives in the same slot can be exchanged with attachment-swap keys. | Open and closed versions of a hand. |
| Pivot | The point around which a graphic rotates or scales. | The sleeve's shoulder joint. |
| Mesh | A grid of triangles that lets an image bend instead of behaving as one rigid rectangle. | A scarf, wing, jelly body, or flag. |
| Weight | How strongly a bone influences a mesh point. | A scarf point following two neighbouring scarf bones. |
| Clip | One named animation with its own duration and playback mode. | Idle, Walk, Attack. |
| Key | A recorded value at a specific time. | A hand rotation at frame 6. |
Bones do not draw pixels themselves. A bone without artwork is a useful control, but it will not appear in an exported sprite. Hiding the bone overlay changes the editor view; it does not hide the character's graphics.
First session: explore a complete character
- Create or open an Art Studio project and choose Modes → Rig & Animate.
- Open Presets above the canvas.
- Choose Nova · Platformer Courier. Use the animation chooser to preview Walk or Run. The preview's Play/Pause and bone-visibility controls let you study the movement before loading it.
- Read the short learning tip. Each preset is intended to demonstrate something specific: planted feet, overlapping cloth, recoil, deformation, or another reusable technique.
- Choose Use Preset. In a project that already has a rig, this becomes Replace with Preset. Save a copy first if you want to keep the previous character alongside your experiment.
- Pause playback. Select a named bone in the hierarchy, then select its artwork. Notice how the right inspector changes.
- Use File → Save Project to keep the editable work. Use Save As… when you want an independent practice copy.
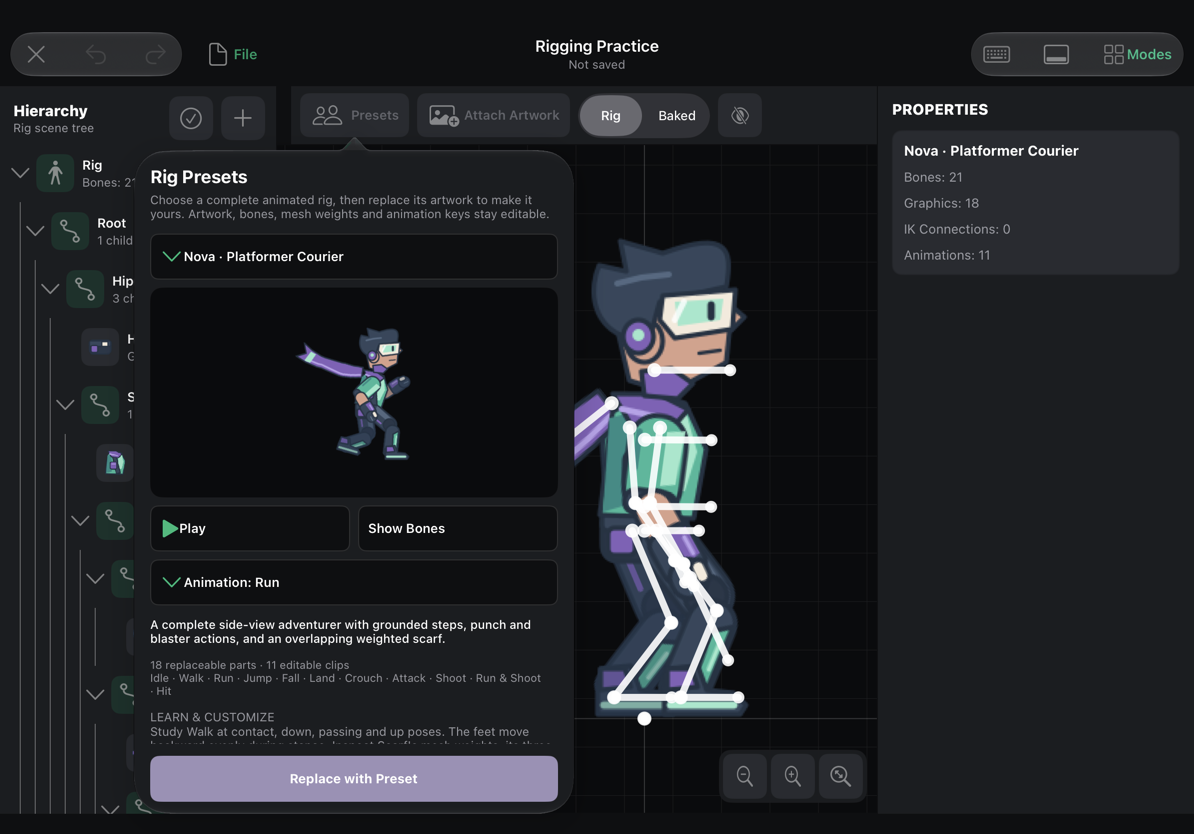
A preset is a complete editable example. It is not a separate generator that must stay connected to your project. After loading it, you can rename clips, change keys, replace parts, alter weights, and delete anything you do not need.
Find your way around
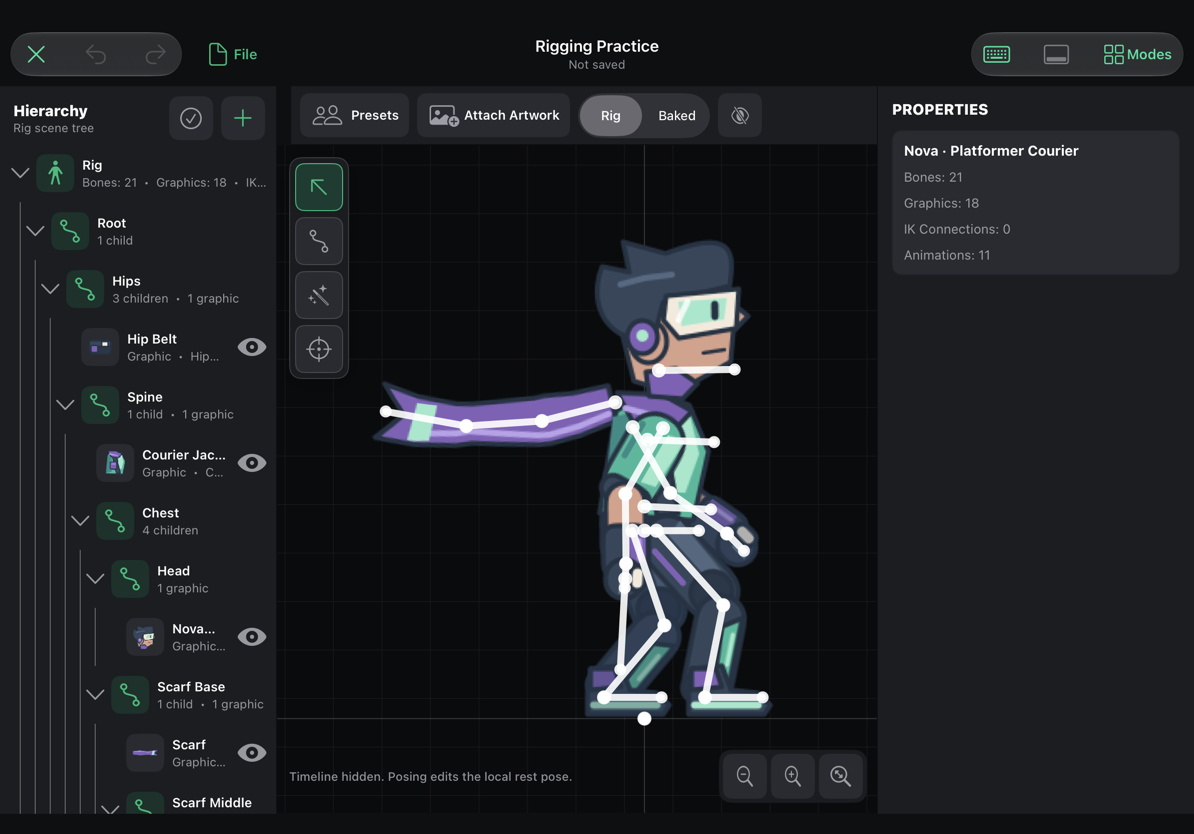
| Area | What to use it for |
|---|---|
| File | Save the project, save a copy, import artwork, open project artwork, and export game assets. |
| Modes | Switch between Drawing and Rig & Animate. |
| Hierarchy | Select bones, their graphics, IK controls, and animation clips. Expand a bone to inspect its children. |
| Canvas tool palette | Select, Create Bone, Smart Pose, and Pivot. Hold Smart Pose for its advanced choices. |
| Presets | Load a complete teaching rig and its animations. |
| Attach Artwork | Bind drawing content to the rig, or import artwork. |
| Mesh | Contextual tools for the selected graphic's mesh. Select artwork first if this button is absent. |
| Rig / Baked | Compare the editable rig preview with sampled baked frames. Rig is the normal choice while authoring. |
| Eye button | Hide or show bones and editing guides to check the actual artwork. |
| Canvas zoom and Fit | Inspect a detail or frame the complete rig. |
| Inspector | Edit the selected item's properties and find contextual actions. |
| Animation timeline | Choose times, add and select keys, retime movement, edit curves, use ghosts, and record motion. |
The hierarchy and inspector become drawers when the window is narrow. Use their sidebar buttons to open them. Timeline toolbars scroll horizontally when there is not enough room for every action. A hidden contextual control usually means you need to select the relevant item first.
Navigate with touch, Pencil, mouse, or trackpad
- Touch: pan with two fingers; pinch to zoom around your fingers. A one-finger drag on a joint, graphic, or mesh point edits that item. In Select, dragging empty canvas pans it.
- Mouse wheel: zoom around the pointer. Hold Option to pan; Option-Shift pans horizontally.
- Trackpad: scroll to pan; hold Command while scrolling to zoom at the pointer. Pinch also zooms.
- Fit: use the canvas Fit button after a close-up. Canvas zoom buttons are separate from timeline zoom.
- Mouse tooltips: pause the pointer over a control for its purpose and, where applicable, its shortcut.
Setup and Animate change what an edit means
Timeline hidden means Setup. Bone poses and mesh-point changes edit the base rig. Use this state to assemble the skeleton, place artwork, set pivots, choose parents, and adjust the underlying mesh.
Timeline visible means Animate. Posing bones writes animation keys at the playhead. Moving mesh points writes deformation keys for the current clip. Use the timeline button or T to switch between the two states.
Check this before dragging a joint. If you meant to change only frame 6 but the timeline was hidden, you edited the base rig. Undo, show the timeline, choose the clip and frame, then try again. If you meant to fix the rest shape of a mesh, hide the timeline first.
Build and inspect a skeleton
- Start in Setup. Select Create Bone (B).
- Drag from the intended joint toward the tip: shoulder to elbow, for example.
- The next drag continues from the selected tip. To make a different branch, start near the appropriate existing tip or choose a different parent in the hierarchy.
- Name bones by purpose:
Upper Arm Front,Forearm Front,Hand Front. Consistent names make replacements, selection, and animation editing much easier. - Select a bone with Select (V) and inspect its name, parent, X/Y, rotation, scale, and display length.
- Apply deliberate numerical changes with Apply Setup Transform. Use Undo if a parent or length change produces the wrong result.
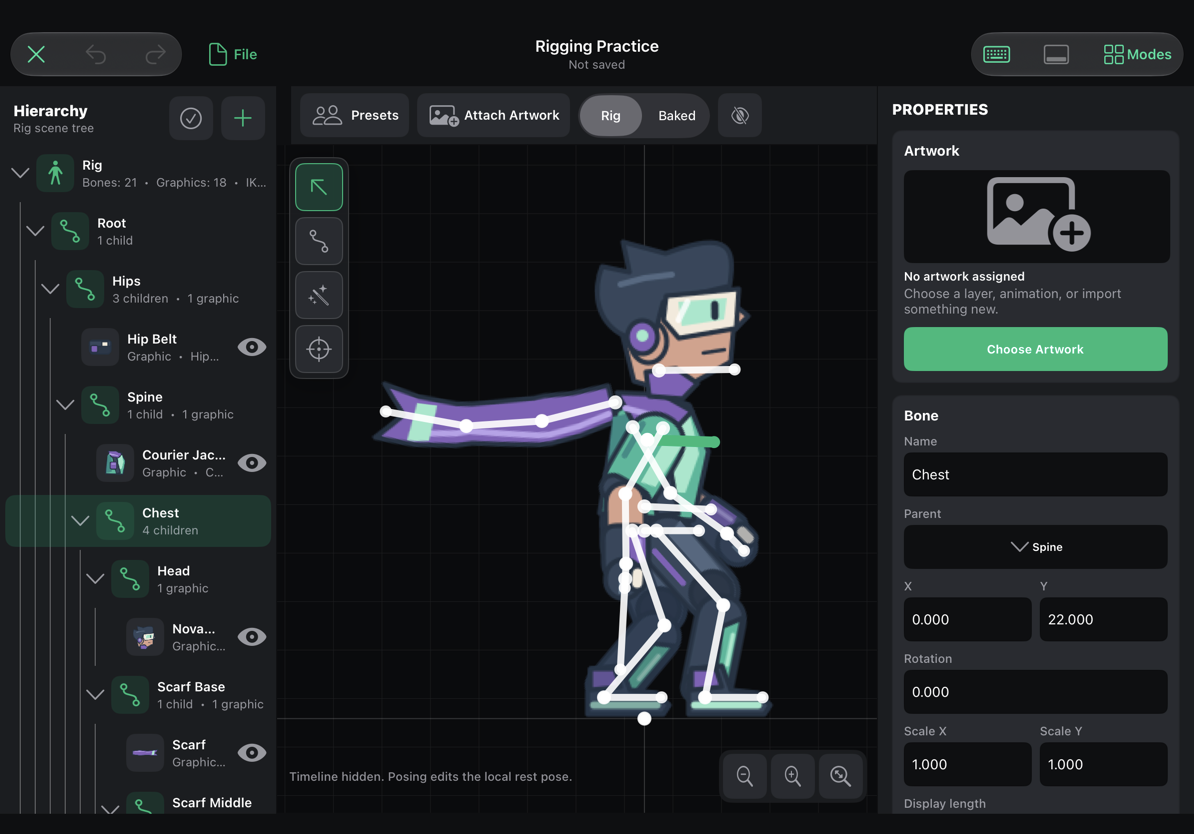
The values in the inspector are local to the parent. Rotating a forearm changes the elbow relative to the upper arm; it is not a world-space compass heading. The visual length helps you aim and connect bones. Changing it does not automatically redraw a longer sleeve.
Use the hierarchy's add and contextual actions to add a child bone, add artwork, create an IK control, duplicate, delete, or change the parent. Its multi-select control is for bones. The timeline has a separate + Select control for keys.
Smart Pose, Direct Pose, and IK
Select Smart Pose (F) for ordinary posing. Its label changes to Direct Pose if you switch the pose style. Smart Pose is designed for grabbing a joint or tip and letting the connected chain follow. Dragging a shaft rotates a bone. Hold the pose tool to choose another style or open more options.
Direct Pose gives precise control of individual bones. Drag the joint to move that bone; drag the shaft to rotate it. In Setup, dragging its tip also aims and resizes the bone. The inspector's numeric controls are useful when you need a reproducible value.
Smart Pose makes temporary chain solving convenient. Persistent IK stores a reusable target and rules in the rig. Use it when an endpoint must keep following a target, such as a hand reaching for a handle or a planted foot.
Attach artwork and keep the drawing connected
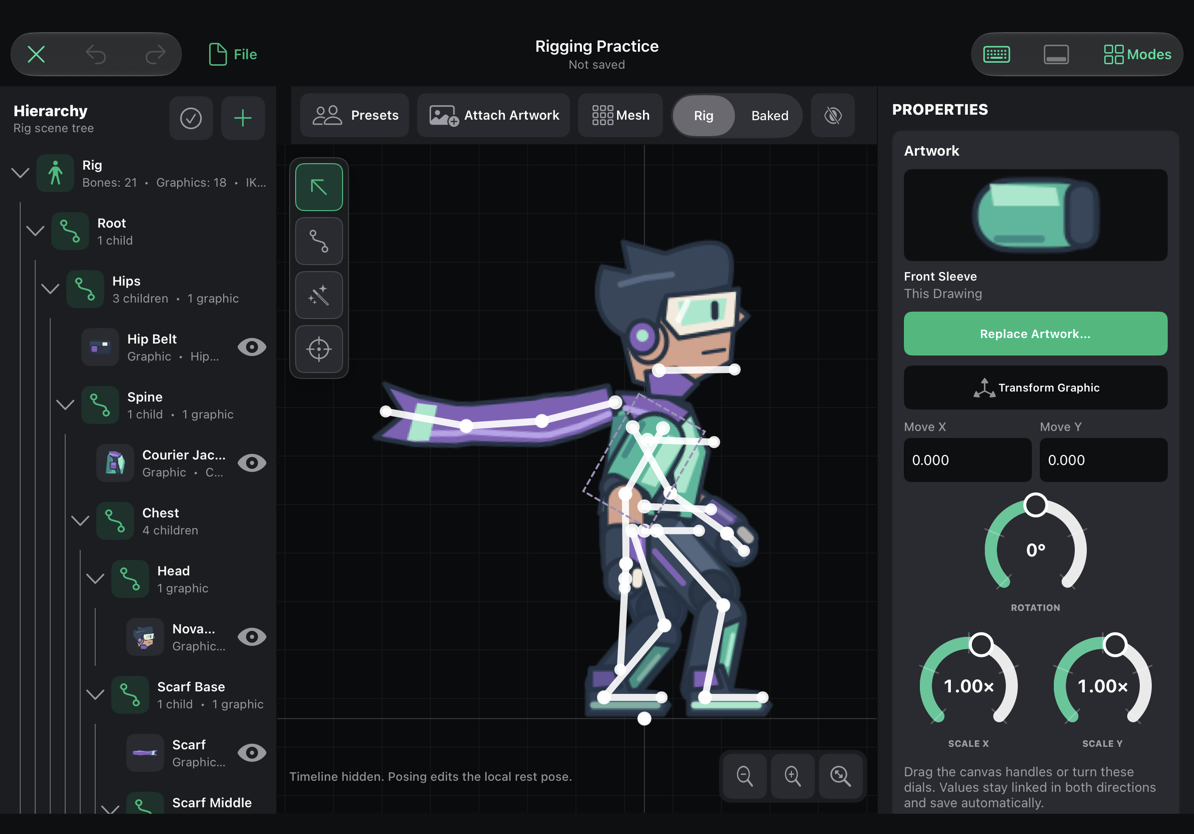
Select a bone and choose artwork for it, or select an existing attachment and choose Replace Artwork…. The gallery can offer Drawing layers, sprite-sheet cells, and named drawing animation cycles. Imported images can also become rig parts.
For a cutout character, draw separate pieces on named layers. A single flattened character can be attached as one graphic, but its painted limbs do not become separate movable parts automatically. Use separate artwork for rigid limbs, or a mesh for a shape that needs to bend.
The main Drawing canvas can be empty when your rig comes entirely from a preset. The preset's graphics still exist as project artwork. Open File → Project Artwork → Edit Selected Part or choose a Rig Part by name to edit those pixels. The artwork tutorial explains the two workflows and how changes return to the rig.
Use Transform Graphic to fit artwork to its bone without moving the skeleton. Use Pivot (P) to move its rotation centre without shifting the visible image. Use the attachment's Backward / Forward controls, or [ / ], to resolve front/back overlaps.
Clips, keys, and the timeline
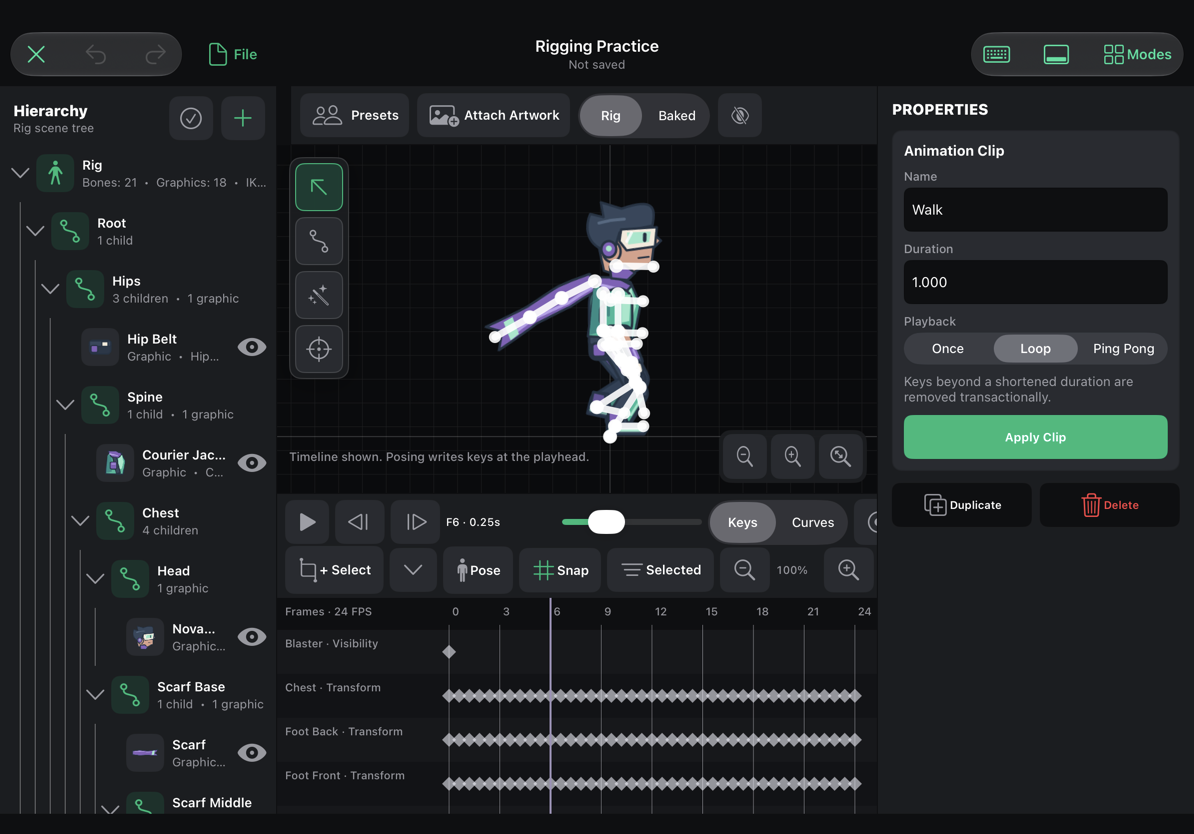
Choose a clip under the hierarchy's animations. The inspector shows its Name, Duration, and Playback: Once, Loop, or Ping Pong. Apply Clip commits the change. Shortening a clip removes keys beyond its new end; Undo restores the previous state.
Use Add → Add Clip to start an independent animation. Duplicate a clip when you want a variation that starts with its existing keys.
The timeline shows frames using the current publication frame rate. The playhead slider scrubs through time, arrows move one frame, and Space plays or pauses. Snap keeps key placement on those frame boundaries. The timeline's +, −, and Fit change the view of time; they do not resize the artwork.
Add the right kind of key
Key (K) shows options based on the selected item:
| Selection | Available key types |
|---|---|
| Bone | Transform. In Animate, posing also creates transform keys. |
| Attachment | Visibility, Color / Opacity, and Attachment Swap (Cel). |
| IK constraint | IK Target and IK Influence. |
| Mesh attachment | Use Mesh → Key Current Deformation in Animate, or drag a mesh point to key its deformation. |
A key stores a value at a time. It does not mean “advance to a different PNG.” A rig clip can combine movement, visibility, colour, attachment changes, IK controls, and deformation.
Select and edit keys
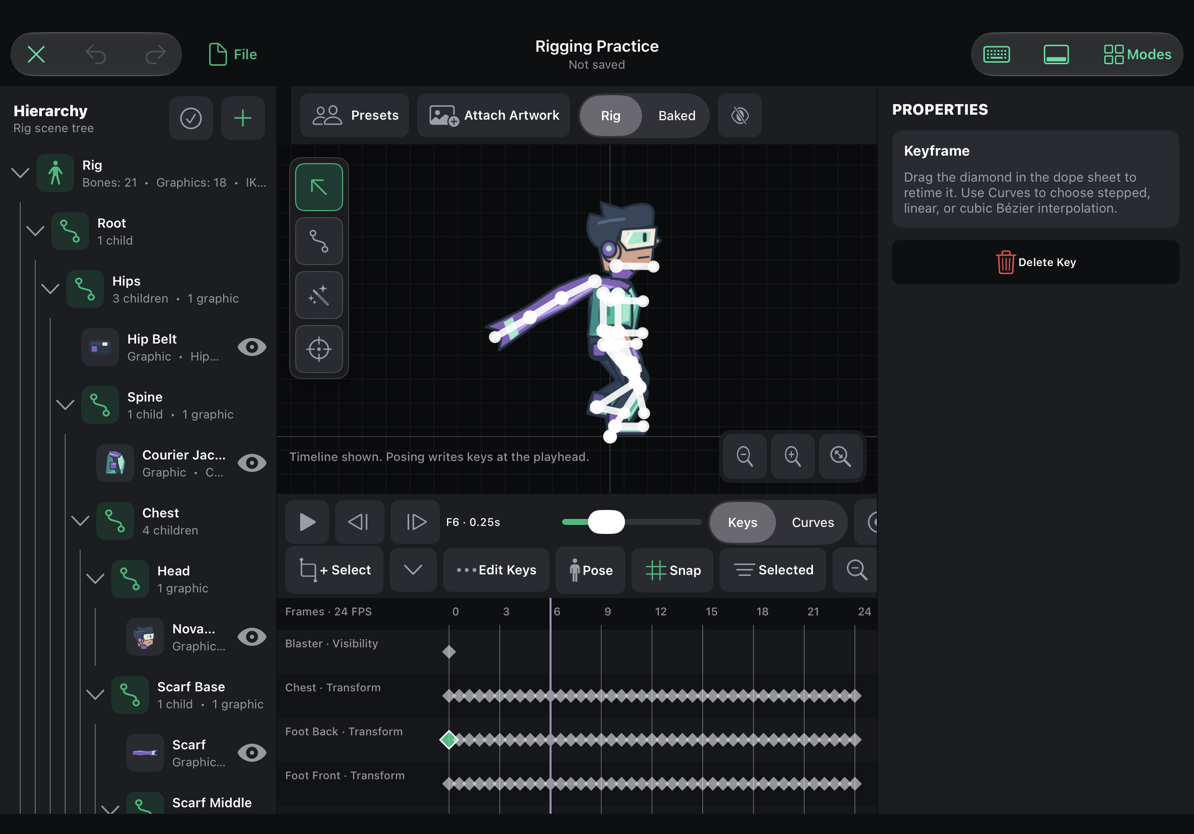
Tap a diamond to select it. + Select lets you tap additional keys or drag a selection box; Shift-click also adds keys with a pointer. Use the neighbouring selection menu for Select All Visible Keys, Clear Key Selection, and Paste at Playhead.
Edit Keys appears when keys are selected. It contains Copy, Cut, and Retime Selected Keys…. Retime scales timing from the earliest selected key, then shifts by a frame offset. A smaller percentage compresses the action into less time; a larger percentage makes it slower. Unselected keys stay where they are. Collisions and times outside the clip are rejected rather than silently destroying keys.
Pose copies or pastes a pose at the playhead, or mirrors it. Copying a pose and copying keys solve different problems: a pose captures the current configuration; key copy carries selected timed values. Mirror uses recognised left/right bone pairs, so inspect the result on an asymmetrical or differently named skeleton.
Curves and smooth motion
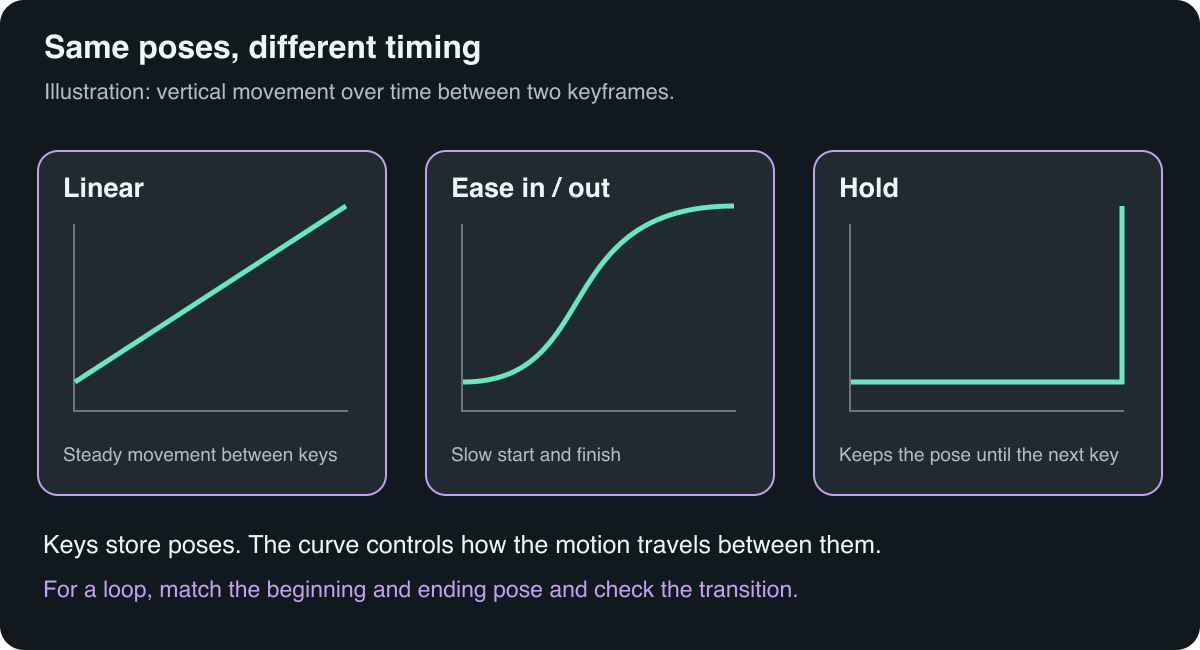
Select a continuous key, then choose Curves. Use the interpolation control for Stepped, Linear, or Bezier, and drag the Bézier handles to shape the transition.
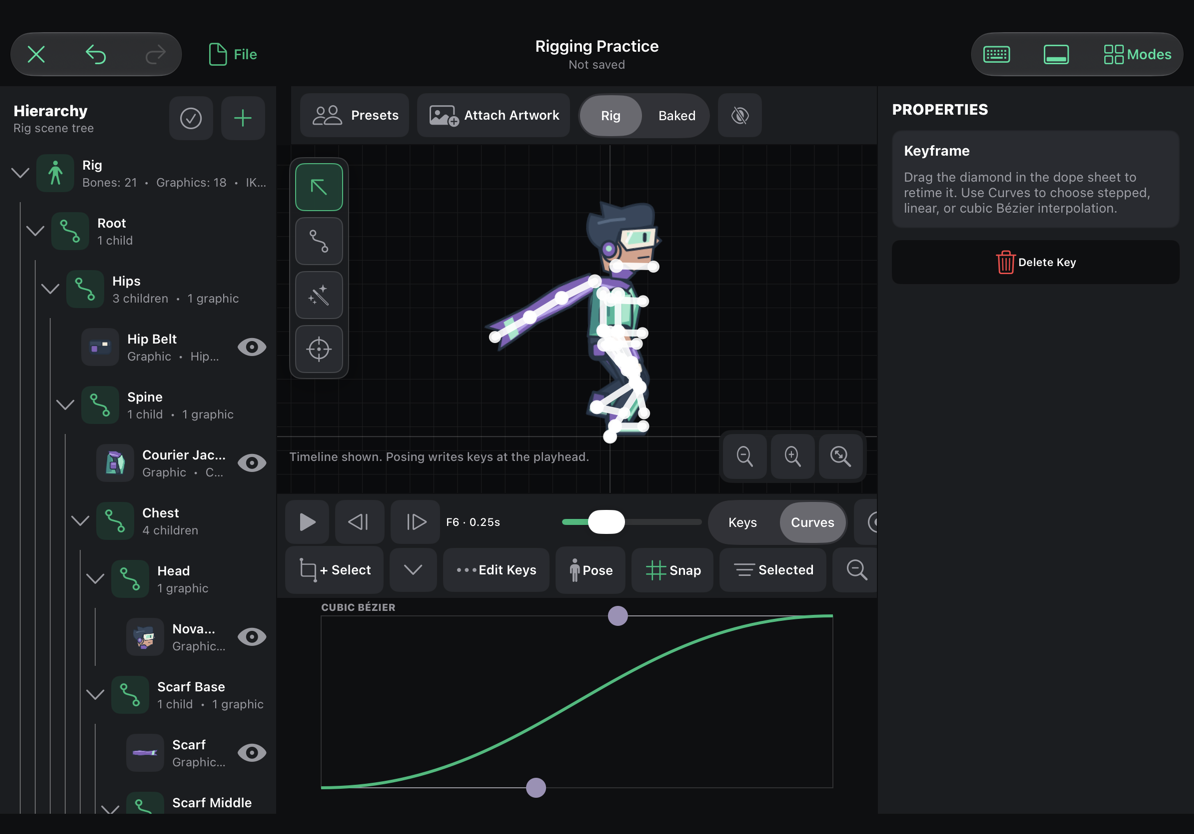
- Stepped holds a value until the next key. It is useful for deliberate pose holds and graphic swaps.
- Linear moves steadily between values. It is often the right starting point for a walk, a rotating wheel, or an already carefully sampled motion.
- Bézier changes acceleration. Use it for settling, anticipation, and ease into a held pose.
Applying strong ease-in/ease-out to every walk key makes the character hesitate at every pose. Smooth animation depends on timing, contact, arcs, and coordinated body movement as well as interpolation. The walk-cycle tutorial shows those decisions in context.
Pose ghosts
Open the stacked-poses button in the timeline and enable Show previous / next poses. Choose the number of surrounding frames and their opacity. Previous poses are red; upcoming poses are green.
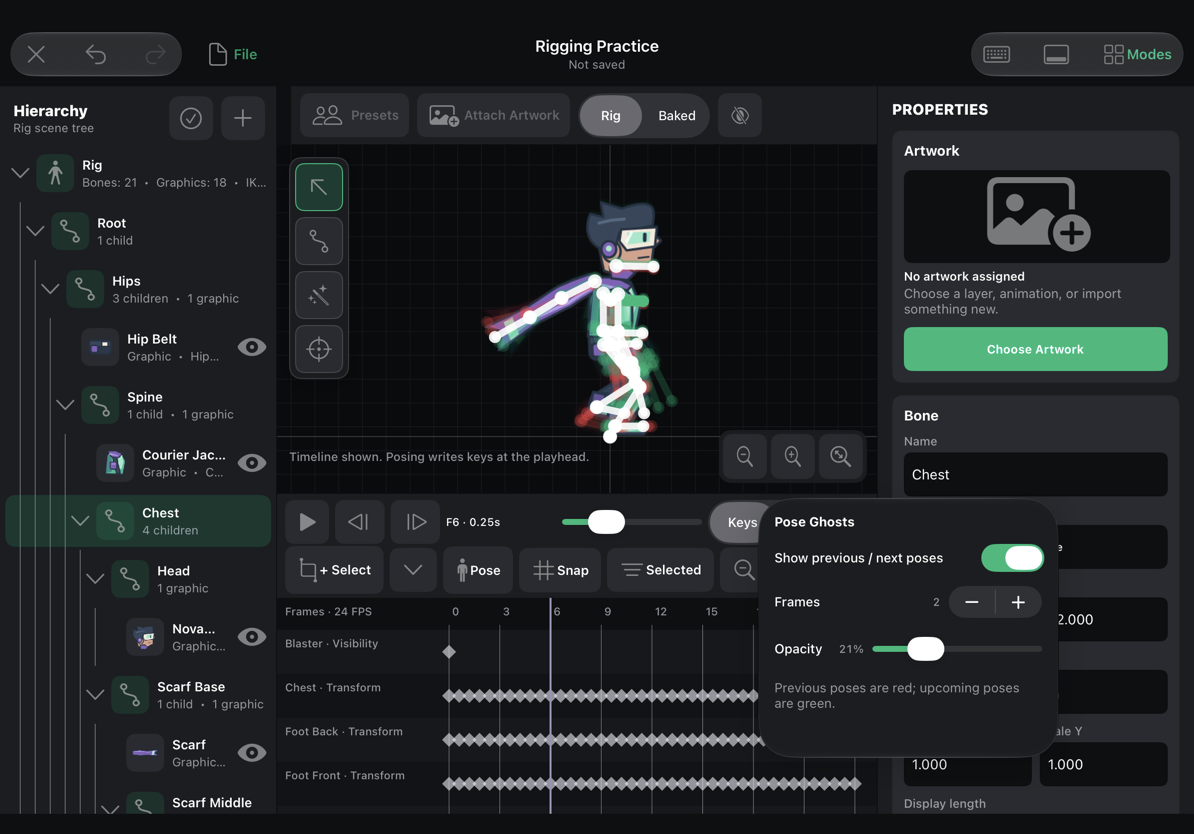
Use ghosts to spot a foot sliding, a hand jumping abruptly, or a motion arc changing direction. Turn them off when judging the final artwork. Hide Bones hides the editing guides and ghosts together so you can see the clean result.
Persistent IK and joint constraints
Select the last bone of a chain. Hold Smart Pose and choose Create IK Constraint…, or use the selected bone's IK action in the inspector. Choose the chain root and end, whether the driven handle is the joint or tip, and a point or bone target.
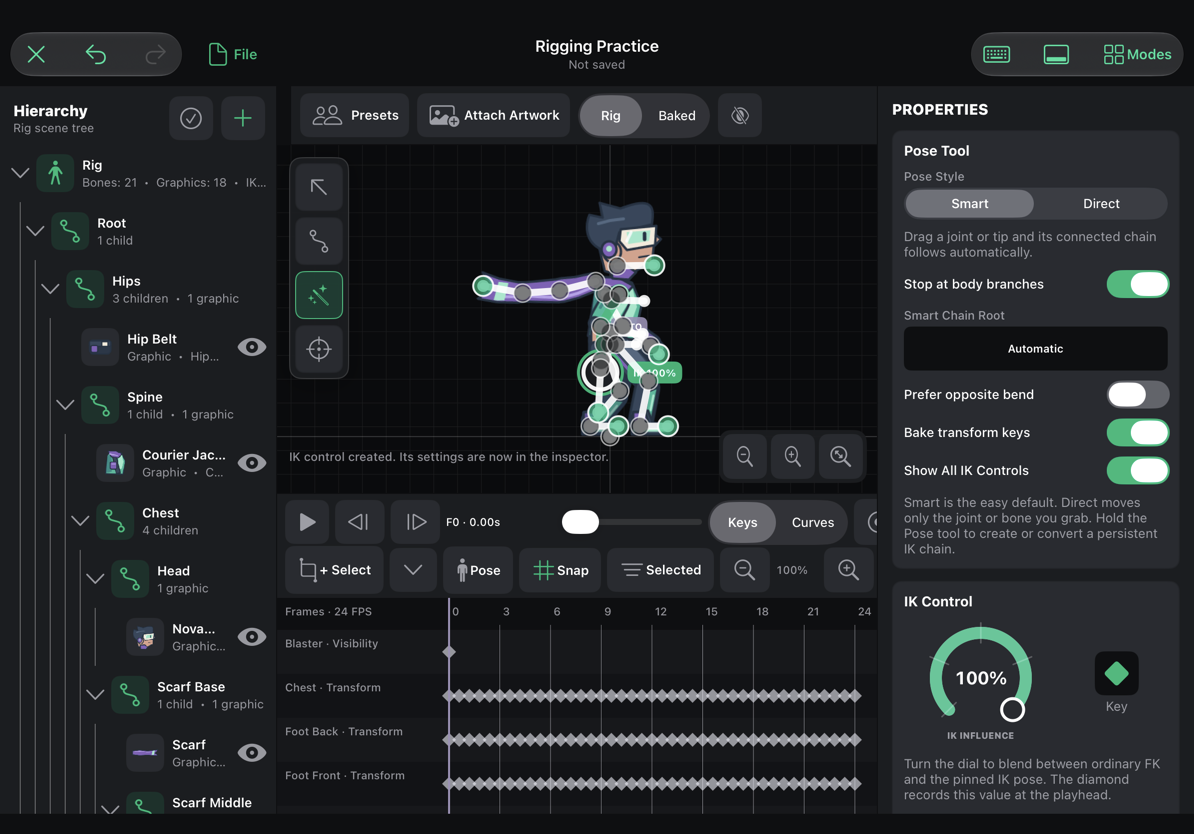
Influence controls how strongly the target drives the chain. Bend Direction selects the side of the bend. Allow Stretch permits stretching when enabled. Leave it off for a limb that should keep its length. Drag the target to test the result before animating it.
You can key the target and influence. To turn a particular solved pose into ordinary bone keys, use Bake at Playhead in the IK inspector. This writes the visible transform pose and keys that constraint's influence to zero at that time. It is different from exporting a baked sprite animation.
For a joint that should not bend backwards, open Joint Constraints on the bone. Pose or turn the angle dial, capture Set Start, then Set End. The green wedge shows the allowed movement. Precise Values exposes numeric limits when needed. Test the complete motion after adding limits; an unreachable target may require a different pose or chain root.
Record a hand-performed motion
- Show the timeline, select a clip, and put the playhead before its end.
- Select a bone or IK handle. Press the round Record motion control.
- Choose a recording rate if necessary: 12, 24, 30, or 60 FPS.
- Drag the control through the motion. Recording samples the gesture into editable transform keys.
- Stop recording, play it back, and clean up unwanted keys or timing.
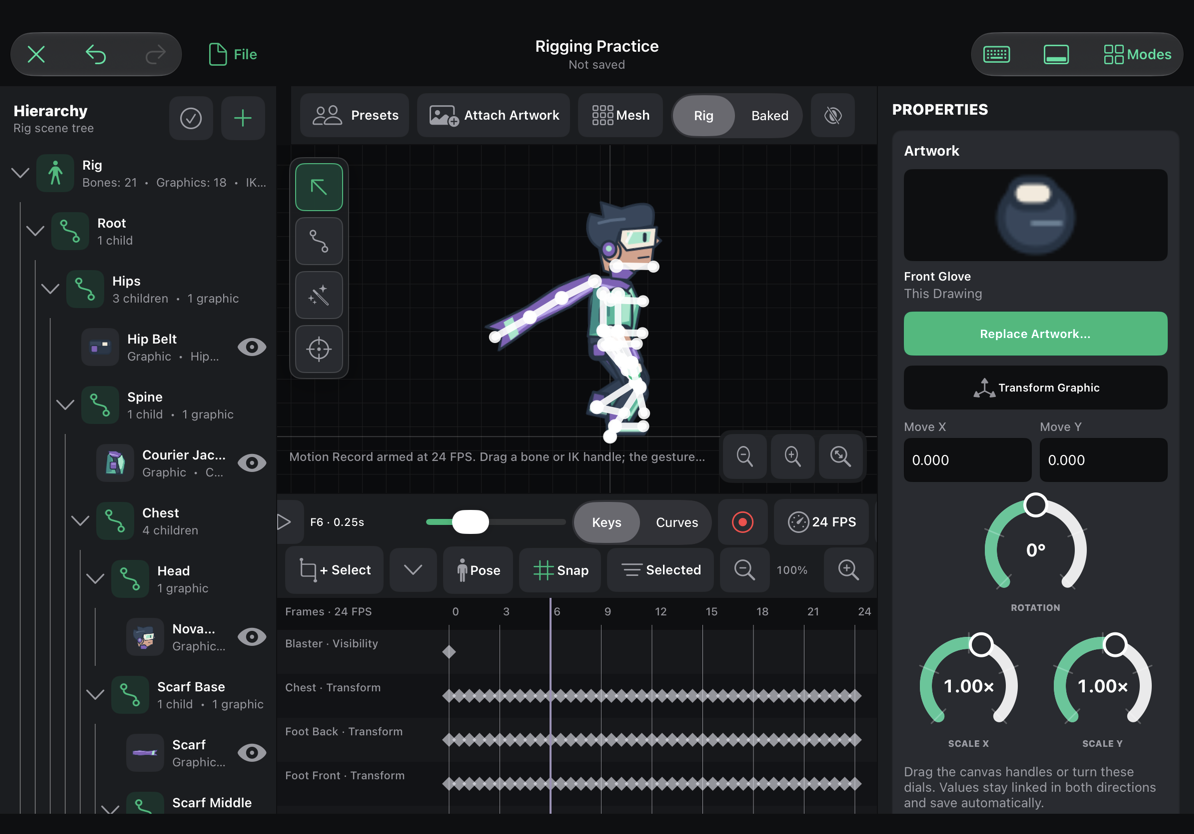
Recording is for a live pose gesture, not screen video. A higher rate creates more keys. Use ordinary key poses when you want carefully timed contact; use motion recording for gestures whose shape is easier to perform than to plot.
Meshes, replacement, and output
Meshes combine two complementary controls. Bone weights make broad bends as the skeleton moves. Deformation keys move individual points over time. Use the mesh tutorial to inspect Nova's weighted scarf and animate Mochi's silhouette.
Replace Artwork preserves the selected part's rig relationship, pivot, animation keys, and mesh data. Fit or Stretch the replacement in its preview and test several clips before applying it. A very different silhouette may need different mesh-point placement even though the rig data remains intact.
File → Save Project saves the editable source. File → Export Game Asset creates usable output. For a rig animation, choose the baked animation export and review its clips, sampling rate, bounds, and size before exporting. Use the normal Rig preview during authoring and Baked to verify sampled output.
Today, the ordinary game-facing result of this workflow is a baked animated asset. Samples with names such as Upper Body · … illustrate partial animation layers for future runtime blending; they are not a promise that the current game engine blends live bone layers. Full clips are the practical starting point for current exported animation cycles.
Useful rig shortcuts
These shortcuts apply when the canvas/workspace has focus. While editing a text field, ordinary typing and text-editing commands take priority.
| Action | Shortcut |
|---|---|
| Select / Create Bone / Smart Pose / Pivot | V / B / F / P |
| Advanced IK | I |
| Setup ↔ Animate timeline | T |
| Play / Pause | Space |
| Previous / next frame | Left / Right arrow |
| Previous / next key | Option-Left / Option-Right |
| Add key / mesh tools | K / M |
| Snap to frames | S |
| Timeline zoom / Fit | + or − / 0 |
| Canvas zoom / Fit | Command-+ or Command-− / Command-0 |
| Hide bones / Rig↔Baked preview | H / G |
| Copy / cut / paste keys | Command-C / Command-X / Command-V |
| Select visible keys / retime | Command-A / Command-R |
| Copy / paste / mirror pose | Shift-Command-C / Shift-Command-V / Shift-Command-M |
| Move selected artwork backward / forward | [ / ] |
| Nudge selected mesh point | Arrow keys; add Shift for a 10-unit nudge |
| Finish mesh editing / clear key selection | Escape |
| Undo / Redo | Command-Z / Shift-Command-Z |
| Save project / Save As | Command-S / Shift-Command-S |
| Presets / keyboard shortcut reference | Shift-Command-P / Command-/ |
When something feels wrong, first check the selected clip, playhead, Setup/Animate state, and selected item. These four pieces of context determine what most rigging controls do.