How To Make A Multiplayer Game on iPad

Part 1: Introduction
Preferred Prerequisites
In this tutorial, you'll set up a server and connect your game to it, so you can add multiplayer to your project with the Socket.io Behaviors. We'll cover advanced features and Behaviors in hyperPad, so we strongly recommend working through some other tutorials first and getting comfortable with the app before you continue.
This tutorial assumes you have a good understanding of hyperPad's core features and a basic understanding of written programming, because you'll write JavaScript to build the game server. It also assumes some basic knowledge of networking and the difference between a server and its clients.
The goal here is to show you what it takes to add multiplayer to your game, rather than how to build the game itself. We'll explore the relationship between Socket.io clients and the server, and how they talk to each other through the Socket.io Behaviors.
Requirements
To create and host the server, you'll need a computer that can run Node.js (Mac, Windows, and so on). This tutorial covers installing Node.js and setting it up. If you host the server on your home network, you'll likely need to change your gateway's port-forwarding settings to accept connections from outside your local network.
For this tutorial, we've already made a simple demo game: two players play tag in a small maze. We'll explore how the example project uses the Socket.io Behaviors, so we recommend you download the project and open it in hyperPad.
Download the completed hyperPad example project here: Multiplayer tag tutorial.tap
Overview
In this tutorial, we'll go over the basics of creating a server for your game. The server handles most of the game's details, such as scoring and game lobbies. Then we'll create Behaviors that send information from the game to the server and back.
Here's the general flow of the game:
1. From the main menu, the game connects to the server and lets the player create or join a game.
a. If they create a game, load the waiting room.
b. If they join a game, load a list of available game rooms.
c. When two players are in a waiting room, the game launches.
2. In a game, the server randomly places the players in one of four areas and makes one of them "It".
a. Tagging the other player randomizes both players' locations, swaps the It status, and adds a point for the player who made the tag.
b. If no one is tagged within a certain time, the server removes 1 point from the player who is It and swaps the It status, then randomly places the players in the spawn zones again.
3. Once a player reaches a certain number of points, the game loads an overlay declaring the winner. Then the players disconnect from the room and return to the main menu.
Part 2: Setting Up the Server
A Socket.io server is a JavaScript application that uses the Socket.io library and listens for player connections. Socket.io is a JavaScript networking library that handles a lot of the hard parts of building a networked application for you. More on that below.
Download and Install Node.js
To get started, head over to Node.js and download it onto the computer (Mac, Windows, and so on) you want to host the server on. When the download finishes, run the installer and follow its instructions. You can leave every option at its default. Node.js lets you run JavaScript applications on their own, without a web browser.
Downloading and Running the Example Server
Next, download this tutorial's Multiplayer Server Example from GitHub:
https://github.com/hyperPad/multiplayerServerExample
Click the "Code" button (called "Clone or download" in the screenshot below) and select "Download ZIP". This downloads a copy of the server example's code.
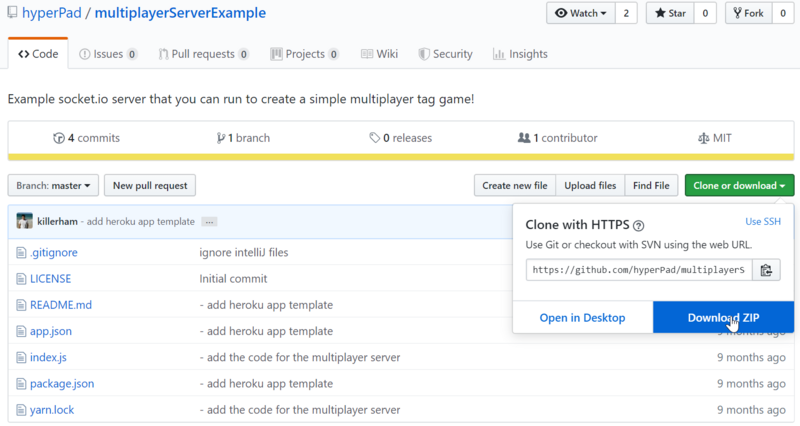
Extract the ZIP. Inside you'll find a few small files. The most important one is "index.js", which is the code for the server. Next, open your command line or terminal inside the server example folder.
Type "npm install", press Enter, and let it run. npm is a package manager. It reads the package.json file and downloads the packages the server needs (including Socket.io!).

When the command finishes, you have everything you need to run the server. In the terminal, type "node ." and the server will start.

That's it! Your server is now listening on port 3000 for incoming Socket.io connections.
"node ." runs Node.js in the current directory, where it looks for the directory's index file and runs it. By default, that's the "index.js" JavaScript file. It holds most of the server's code, and we'll walk through it in this tutorial.
Leave the terminal open, because closing it also closes the server. The terminal prints messages when players connect or disconnect, when rooms are created or destroyed, and when other events happen.
Note: To allow connections from outside your home network, you'll likely need to open port 3000 on your home gateway. The steps vary from network to network, but you can usually find a guide by searching online for port forwarding on your modem or router. You may need to stop and restart the Node.js server after you change port-forwarding settings.
Part 3: Connecting to the Server
Once the server is running, you can connect to it from a hyperPad game. Connecting should be the first thing that happens in your project, whichever Scene you're on, since everything needs to talk to the server. It's best to attach these Behaviors to an Object on the Global Layer so they apply across all Scenes.
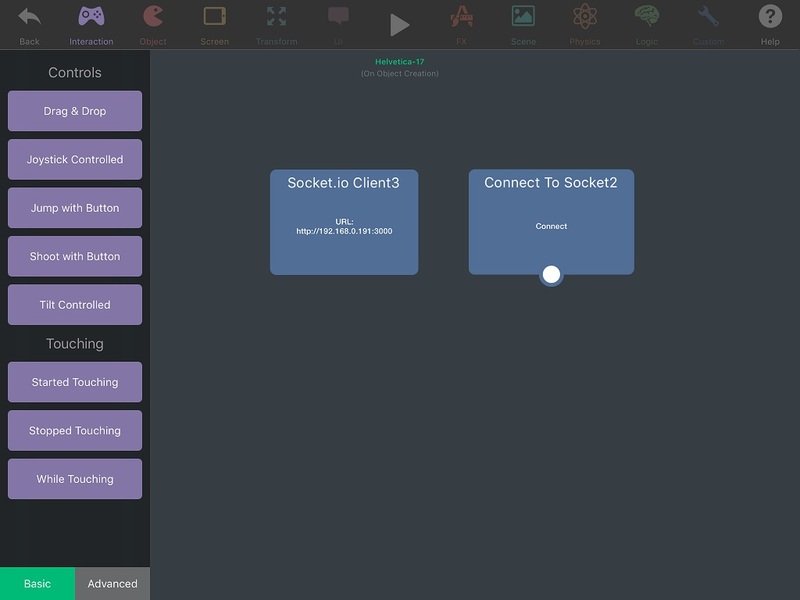
In the example project, the Global Layer "Server" label contains the Behaviors above. (You can download the project in Part 1 of this tutorial, under Requirements.)
These two Behaviors are all you need to connect to the server. First, under the Custom tab, grab the Socket.io Client Behavior and drop it in. Enter your server's URL in the URL tab of its properties window. In the picture above, our server's URL was "http://192.168.0.191:3000", including the protocol and port. Change this to match your server's URL, or the connection will likely fail when you start the game.
Now the game has the server info, but it still needs to connect. For that, you need the Connect to Socket Behavior. Drop one in, open its properties, select the client in the empty box, and set the Function property to "Connect".
Now, when the project loads, it connects to the server automatically.

Part 4: Creating and Joining Rooms
The next step is to create the game lobbies where players join and play together.
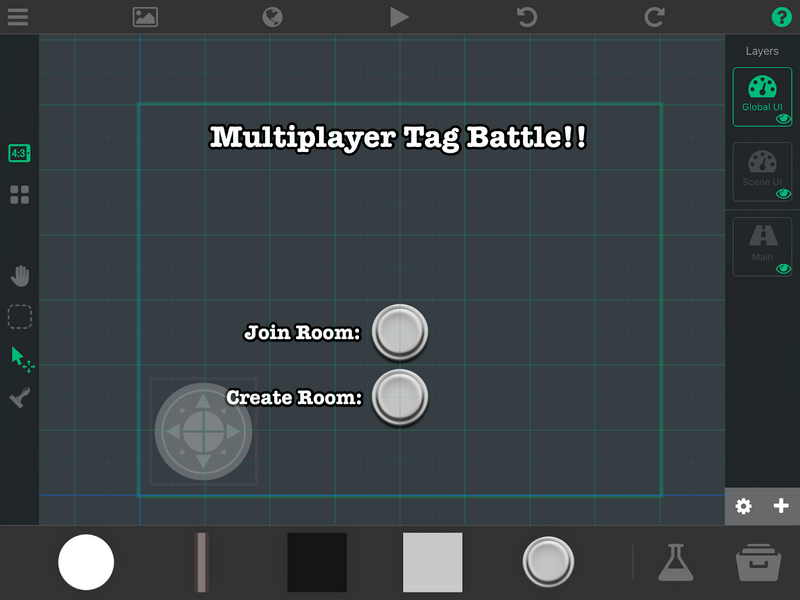
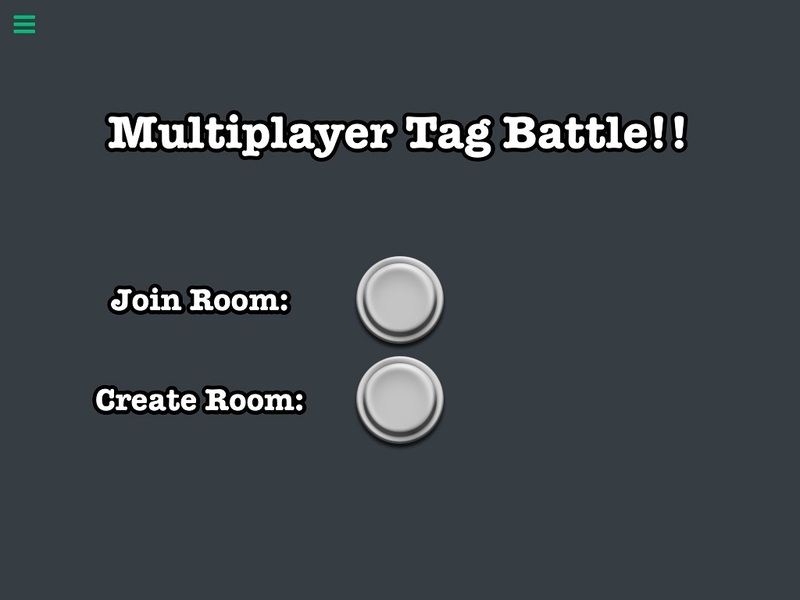
Here's our simple Main Menu screen. Players tap one of the buttons to start a room or look for available rooms.
Creating Rooms
Let's look at how the game talks to the server to create a room.
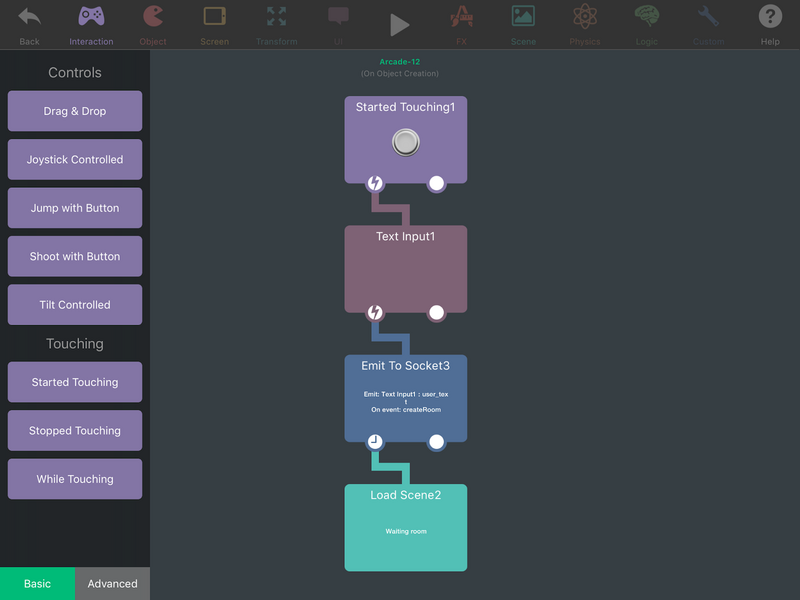
Pretty simple, right? When the player touches the button, they're prompted to type in a room name. The game emits that name to the server, the server creates the room, and the game loads the waiting room Scene.
From here on, we'll use Emit to Socket a lot, because it's the main way to send data to the server. Think of it as the "online version" of Broadcast Message and Receive Message (Emit to Socket does both at once).
Now we need to add some code to the server so it creates the room when it receives the message from the Emit Behavior.
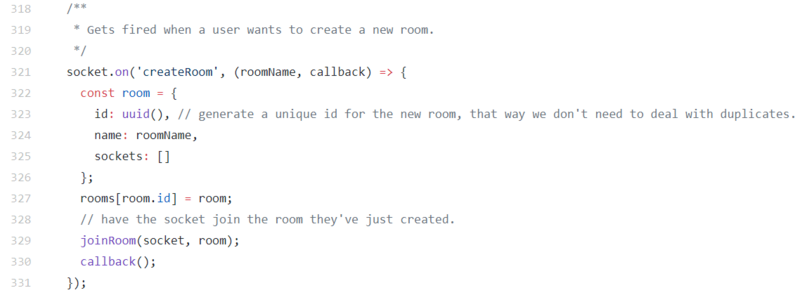
socket.on('createRoom', (roomName, callback) => {
This line creates a socket event (as a lambda expression) on the server that listens for Emits with the event 'createRoom'.
The first parameter is the value passed through the Emit to Socket Behavior, in this case the room name the player typed in. Here, we've named that parameter 'roomName'.
The second parameter is a function we call later in the socket event to signal the client. The Emit to Socket Behavior only continues once the server calls the callback function. Here, we've named that parameter 'callback'.
const room = {
  id: uuid(),
  name: roomName,
  sockets: []
};
This creates a structure that holds the key information about a room.
'id' is a unique identifier generated by the utility function 'uuid()'. Later, it lets us pick out this room from a list of many other rooms.
'name' is set to the name the player typed in earlier.
'sockets' starts as an empty array. Later, it keeps track of the player sockets connected to the room.
rooms[room.id] = room;
'rooms' is a global list of the rooms that are currently active. Since we're creating a new room, we store it in the list by its ID.
joinRoom(socket, room);
This calls the global function 'joinRoom' (line 29), which adds the player's socket to the room's 'sockets' array. The player created the room, so this makes them join it, too.
callback();
});
Finally, we call the callback function to tell the client the room was created. That lets Emit to Socket continue, which loads the Waiting Room Scene next. This is also the end of the 'createRoom' socket event.
Joining Rooms
Joining rooms works a little differently, because we need to access the information from a different Scene than the button's.
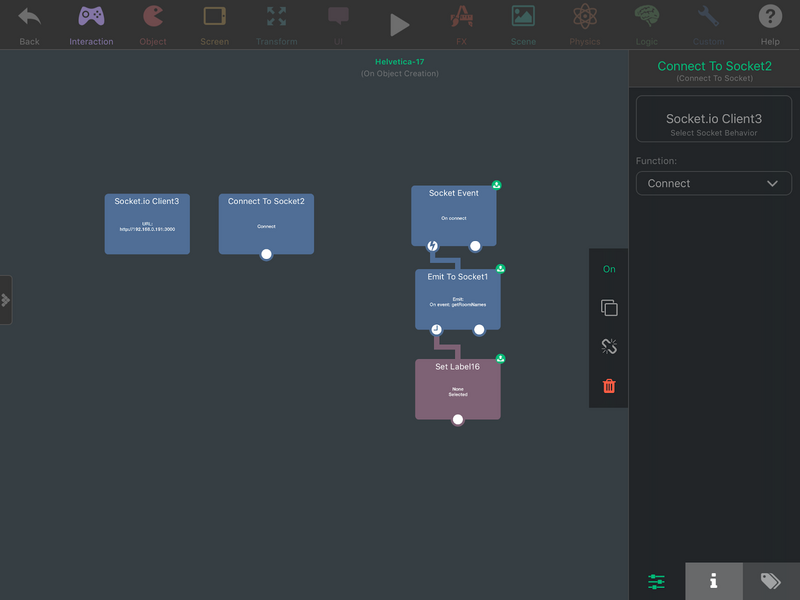
For joining rooms, we placed the start of our Behaviors on the Global Layer, next to where we connect to the server. That way we can access the information from any Scene, in this case the room list. The button simply loads the player into the room list Scene.
Here's our second Behavior for talking to the server. Think of Socket Event as Receive Message: it only activates once the server broadcasts the set message.
A good way to think about it: Socket Event reacts only to information coming from the server, while Emit to Socket runs in reaction to things that happen locally.
As for the logic, once we connect to the server, we Emit the 'getRoomNames' request to get the names of any available rooms.
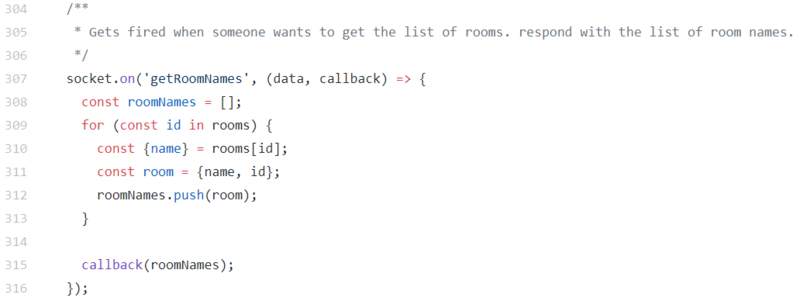
Then we set up a label the player can tap to enter a room.
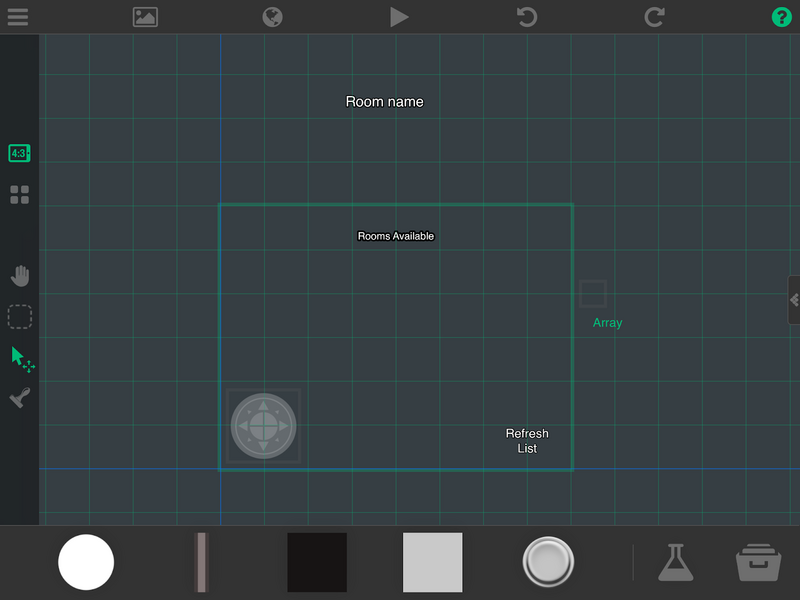
This is our Room List Scene. It loads and displays any available game rooms. Tapping a room name loads the player in. Thanks to the Behaviors we set up earlier, the list automatically loads any open rooms and spawns a label for each room name. If nothing shows up, the Refresh List button repeats the Behaviors to load them again.
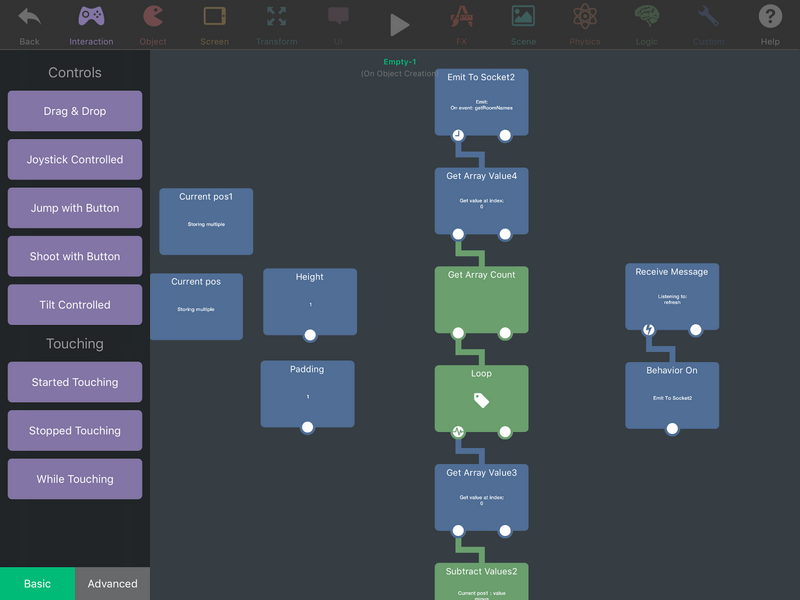
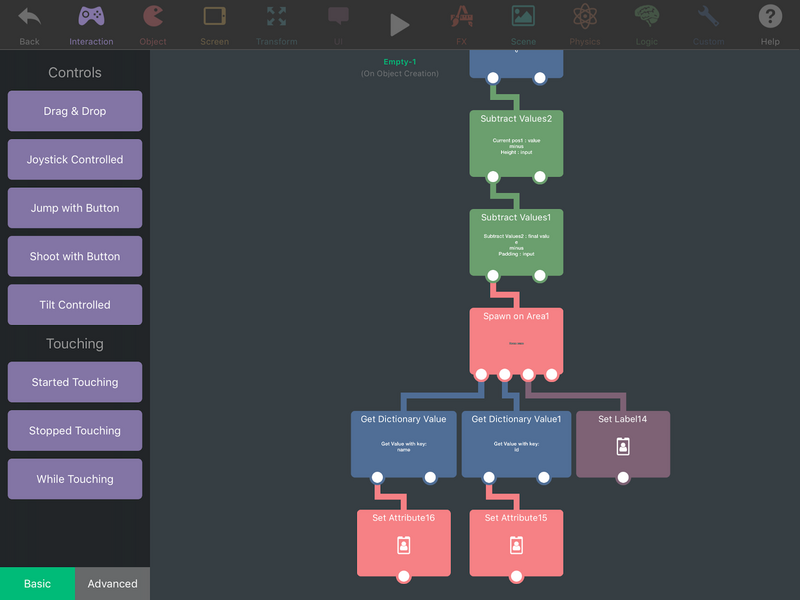
Here's the logic that sets up the list. We won't go into much detail, since we only want to see how it connects to the server.
It starts with an Emit to Socket Behavior that asks the server for information on available rooms. Next comes a Get Array Value Behavior. All data from the server arrives as an Array, and the information we need is in the first value, so we set Get Array Value to get the value at index 0. From there, the Behaviors extract the data, create a label for each room, and spawn the labels on screen.
Next, let's look at the Object the player taps. In our Scene, it's the label called Room Name.
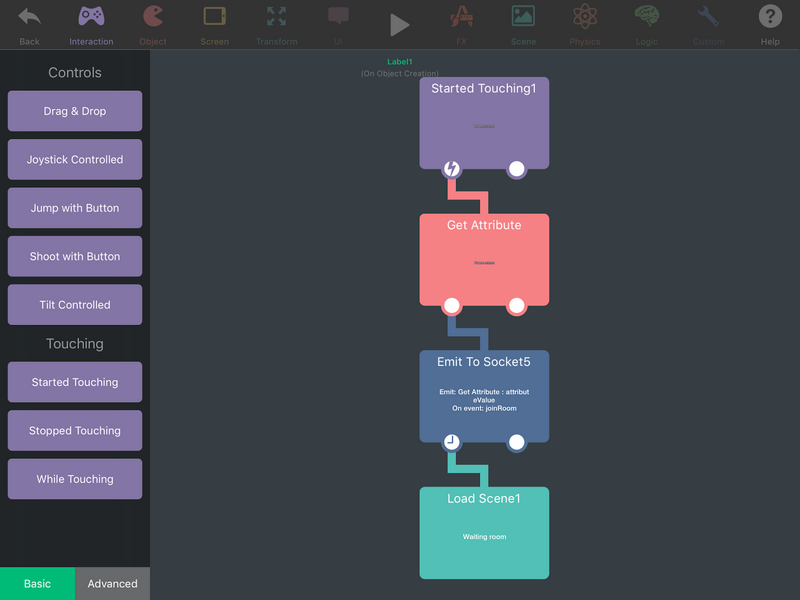
This text acts as a button once it spawns, but we still need to attach the ID of the room we want to connect to. To do that, we grab the room ID with the Get Attribute Behavior set to dynamic. Then we emit to the server that we want to join this room, and load the waiting room.
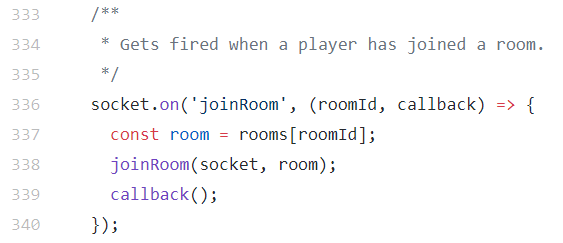
socket.on('joinRoom', (roomId, callback) => {
This is the entry point for the socket event 'joinRoom'. The first parameter's value is the ID of the room we want to join, which was emitted to the server. Here, we named the parameter 'roomId'.
const room = rooms[roomId];
joinRoom(socket, room);
Using the roomId from the client, we find the right room on the server. Then we call the global function 'joinRoom' (line 29) with the socket of the player who wants to connect and the room itself. We'll look at the 'joinRoom' function in a moment.
callback();
});
Finally, we call the callback function to tell the client to continue loading the Waiting Room Scene. This is the end of the 'joinRoom' socket event.
So, what's going on in the 'joinRoom' function? Let's take a look.
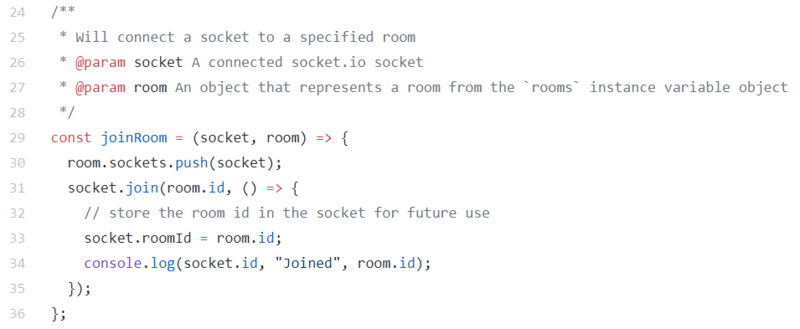
room.socket.push(socket);
As mentioned earlier, the 'room.socket' member array keeps track of the sockets connected to a room. This line adds the socket to that array.
socket.join(room.id, () => {
  socket.roomId = room.id;
  console.log(socket.id, "Joined", room.id);
});
This is the call that actually connects the client to a room. First we tell the socket to join a room by its ID. When that's done, the callback runs and attaches the room ID to the socket. Finally, we log to the console that a player has joined a room.

The Waiting Room
The waiting room is a Scene that holds players while they wait for someone else to join, or for the game to begin.
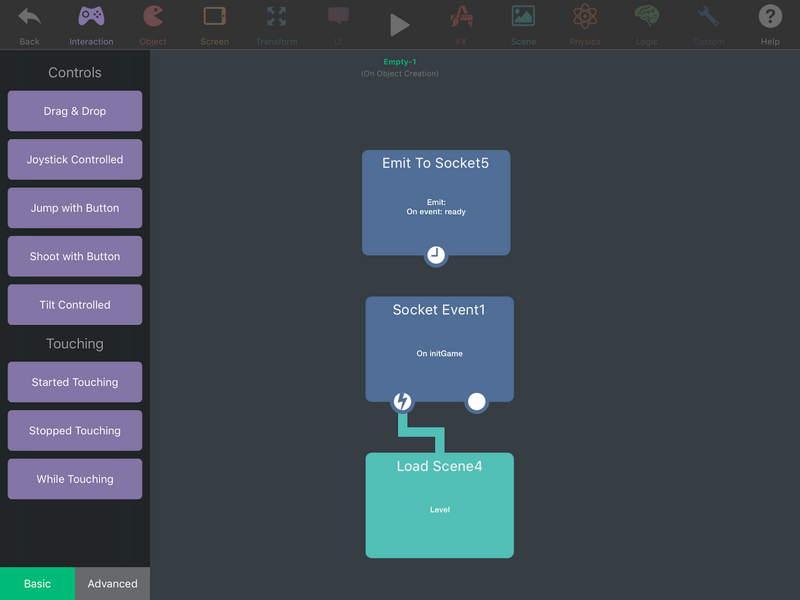
When a player enters the room, the game emits a 'ready' message to the server. Once the server receives two of these, it sends a message that the game is starting ('initGame'). We pick up that message with a Socket Event and load the game level. That's it for the Behaviors. If you like, you can add a button that disconnects the player from the room and sends them back to the main menu.
Now let's look at the server code to see what happens on that end.
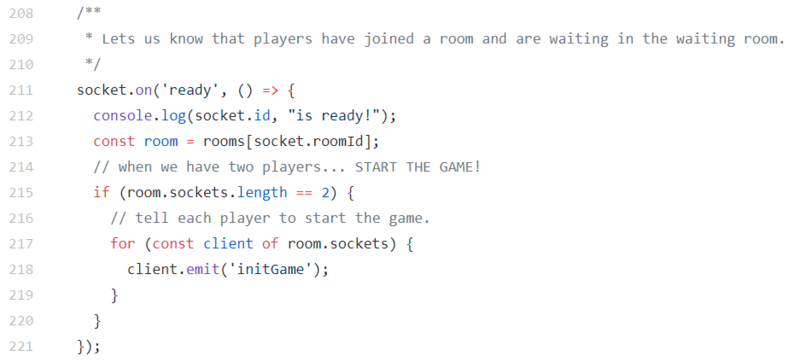
This is the 'ready' event, called when a client has joined a room and is ready to play.
const room = rooms[socket.roomId];
Since we attached the room ID to the socket, we can get the room and check whether the game can start.
if (room.sockets.length == 2) {
Here we check whether two players are now waiting in the room. Let's say they are, so we continue and start the game.
for (const client of room.sockets) {
  client.emit('initGame');
}
With two players in the room, we loop through each socket and emit the 'initGame' event, so each client loads the Level Scene, as shown earlier.
Part 5: Gameplay
Now for the main part. This is where 90% of the work goes. Below is the game level we designed for this tutorial.
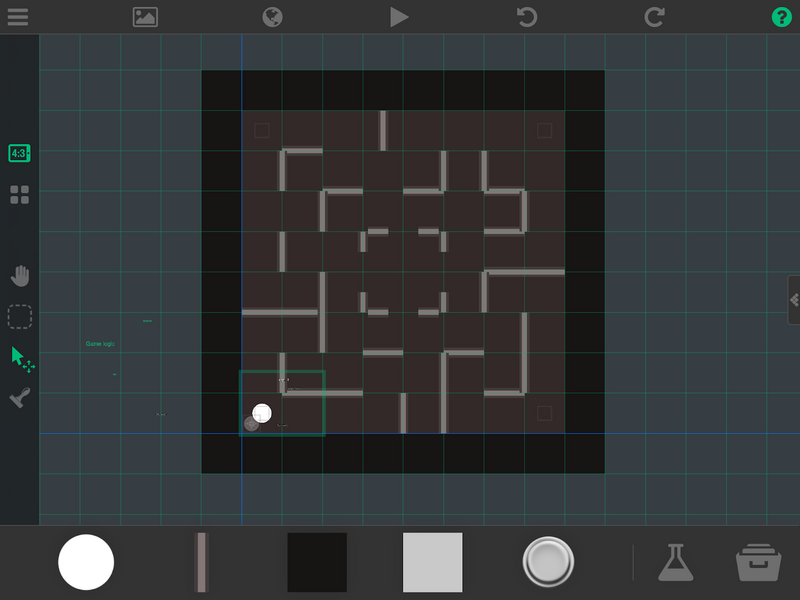
Before we get into that, though, there's a label titled "Game Logic". Let's open it up and take a look.
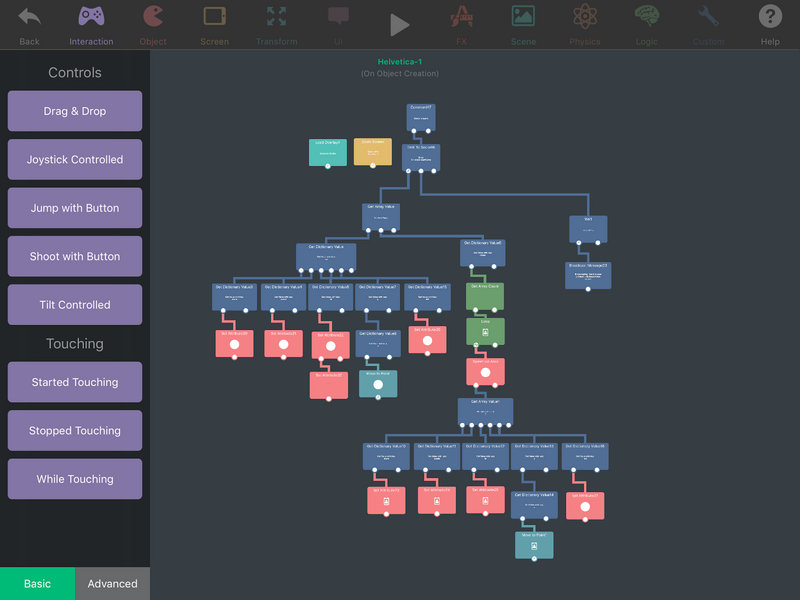
Wow, that's a lot of Behaviors! Don't worry, this is simply how we spawn the players into the game. Let's take a closer look.
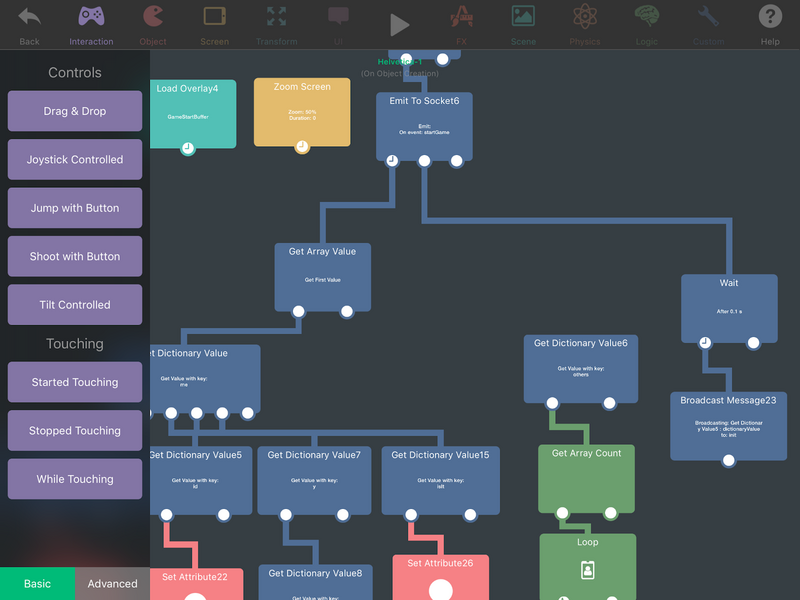
We start with an Emit to Socket Behavior that tells the server our game has started, using the event 'startGame'. Then we take the first value of the array the server returns and use Get Dictionary Value to grab the Attributes our Object needs. A separate Behavior Tree does the same for the opponent. Finally, we broadcast the message 'init' to the player Object to get things started.
Let's see what happens on the server when we emit the 'startGame' event.
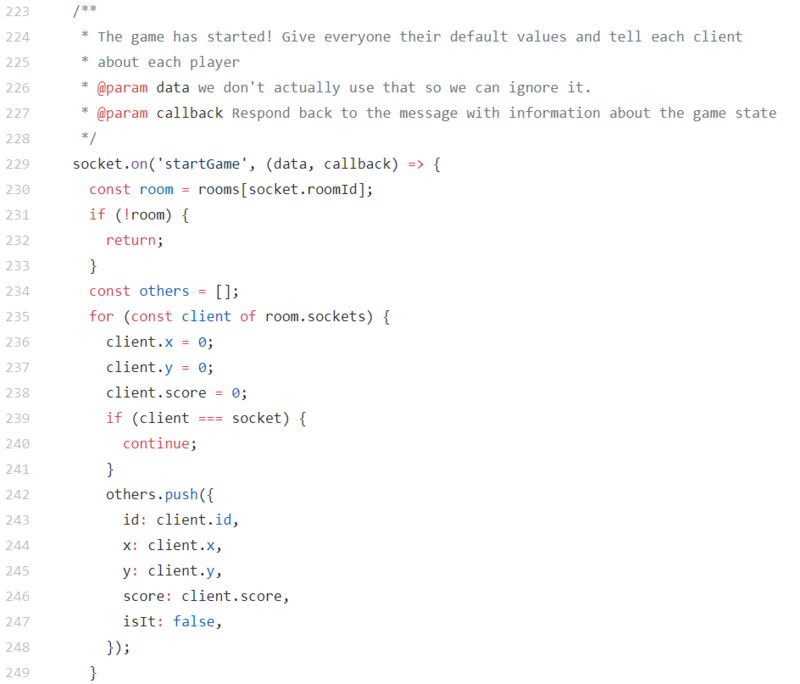
The first half of this socket event sets some starting values on each client, then adds every client except the one that emitted the event to the local 'others' array.
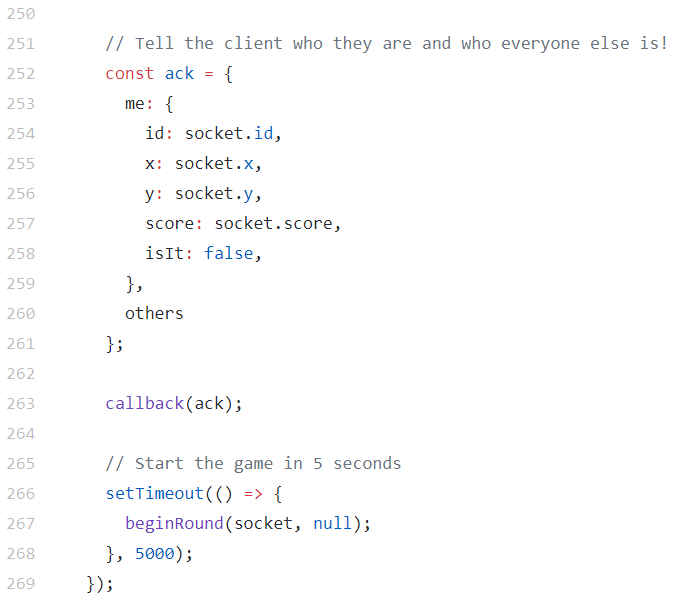
The second half creates a local dictionary called 'ack'. It holds information about us and about the other client(s). We send that information back to the client by passing 'ack' to the callback function, which becomes the result of the Emit to Socket Behavior that made the call.
After that, a 5-second timeout starts the round, now that everyone has the information they need to play. The 'beginRound' function (line 99) controls some game-specific logic for this project. We won't go into detail, but it handles where to spawn the players, checks scores, and tells the clients who is It.
As mentioned before, the "Game Logic" label sends the 'init' message when everything is ready. Now let's look at the Behaviors on the player Object that receive the 'init' message.
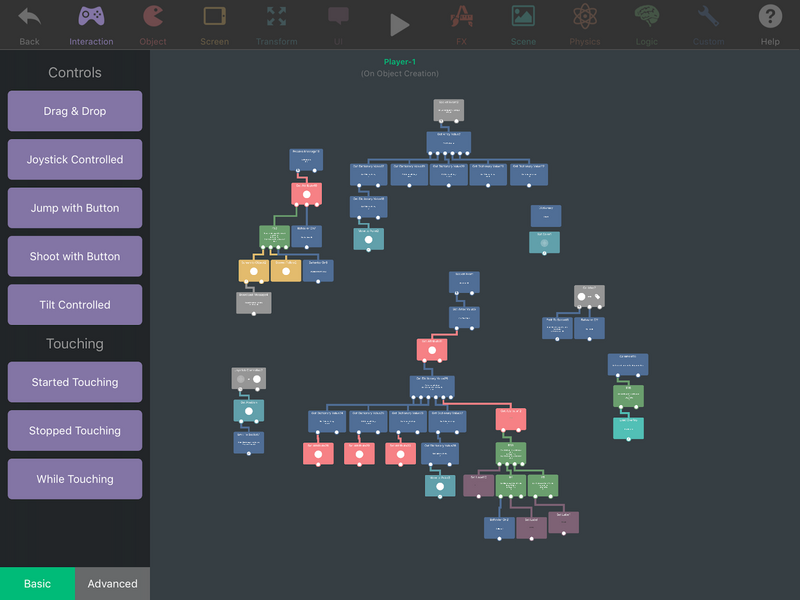
You can see several Behavior Trees on the player. We'll start with the upper-left tree.
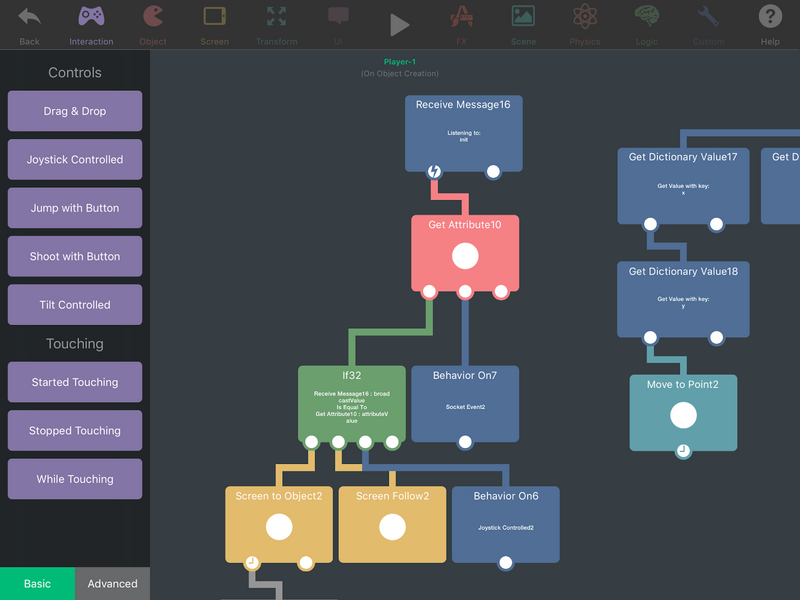
This is the Behavior that starts up almost everything else in the game.
First, it receives the 'init' message from the "Game Logic" label. Then it grabs our Object's server ID, turns on one of our Socket Events, and sets up the game screen so the camera follows our character.
Movement Syncing
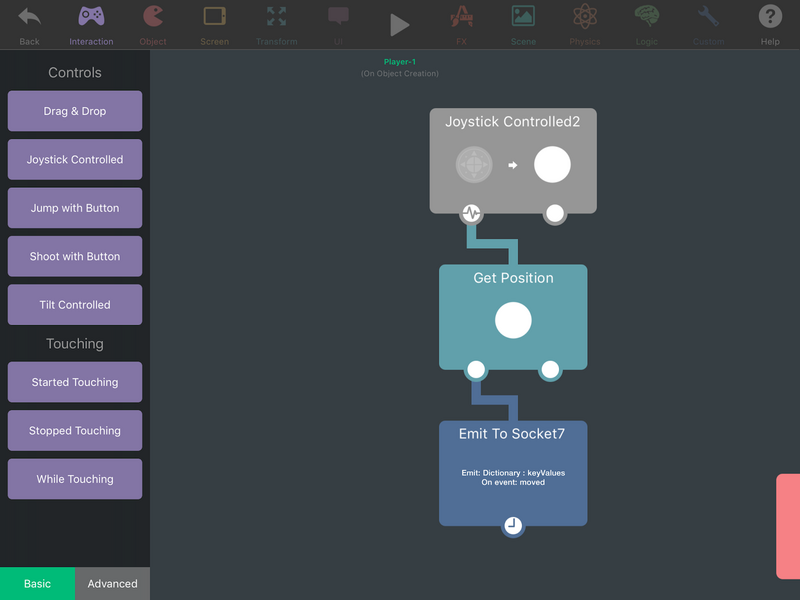
This is one of the most important Behaviors. This small tree updates the player's position on the server every time you move the joystick. You've probably noticed it references some dictionary values. Those come from a standalone dictionary Behavior that holds the player's X and Y positions.
Let's look at the 'moved' event on the server.
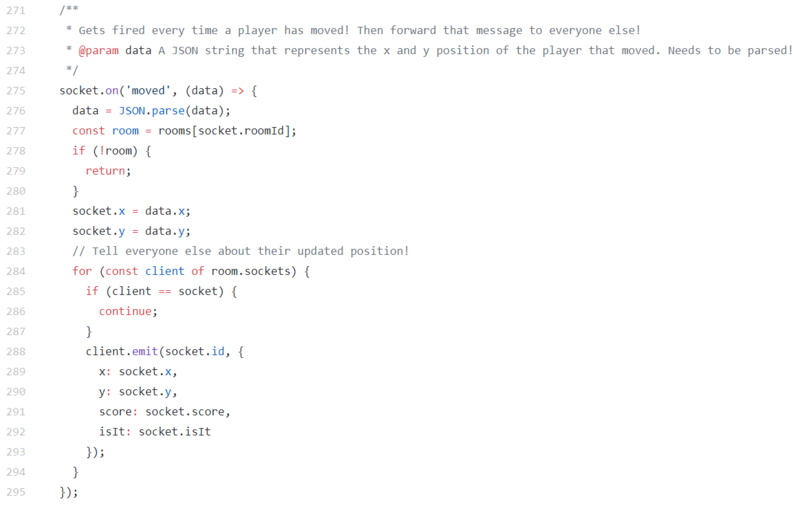
data = JSON.parse(data);
When a client sends a dictionary to the server, the server has to parse it to read the data easily. That's because hyperPad encodes dictionaries as a JSON structure when it emits them to a server. This line parses the JSON string and stores the dictionary back in the same local 'data' variable.
socket.x = data.x;
socket.y = data.y;
Here, we update the X and Y positions stored on the socket with the new values from the client.
for (const client of room.sockets) {
  if (client == socket) {
    continue;
  }
  client.emit(socket.id, {
    x: socket.x,
    y: socket.y,
    score: socket.score,
    isIt: socket.isIt
  });
}
Next, we loop through all the clients and send them our new position and other details, skipping ourselves (the emitting client doesn't need to know its own position).
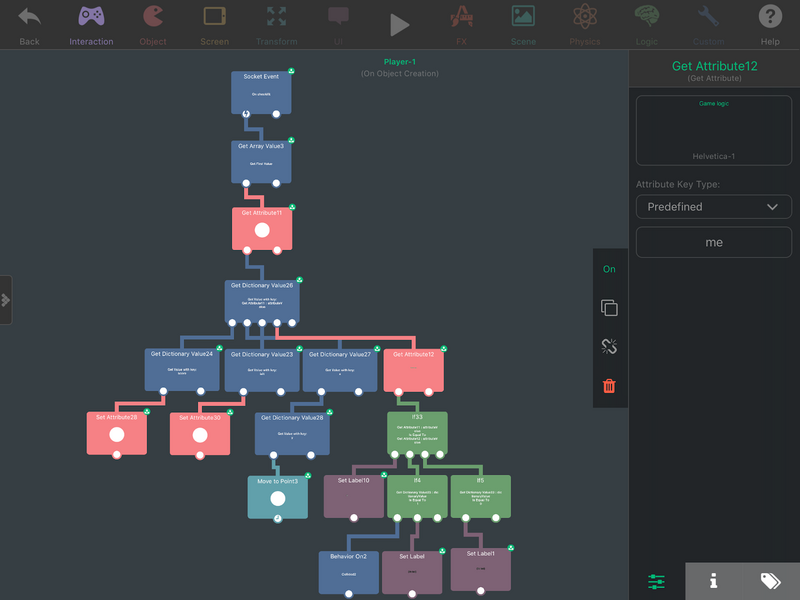
This tree controls most of the game. We use a Socket Event for when the server decides which player is It, which 'beginRound' (line 99) emits on the server.
Then we grab our Object's server ID from the array and use Dictionary Value to break it into the pieces of data it contains. From there, we grab our Score, whether we're It, and our Object's X and Y positions, then apply them to the Object's Attributes. The rest of the Behaviors set up and control the game's UI.
Conclusion
That was a lot to take in. If you made it this far, you should now understand how to use the Socket.io Behaviors to create multiplayer experiences for your players.
Try it yourself! Take a game you've already made and give it an online feature, such as a high-score leaderboard Scene that connects to a server and requests the top 10 scores and player names to display.
It's hard to teach a scripting language like JavaScript in a single article. Luckily, if you get stuck, there are plenty of other resources for writing JavaScript applications with Node.js and Socket.io:
Learn JavaScript - https://developer.mozilla.org/bm/docs/Web/JavaScript
Learn Socket.io - https://socket.io/docs/
Learn Node.js - https://nodejs.org/en/docs/
Try It Yourself!
Now that you've seen what hyperPad can do, it's your turn. Download hyperPad on your iPad and start building your ideas. You can make your own multiplayer game to share with friends and family, and our YouTube tutorials are there to help.
Learn, create, and share your apps and games with the world, and join the hyperPad community of creators.
Try hyperPad Starter free. When you want more projects and App Store export, upgrade to hyperPad for a one-time USD $14.99, with no subscription. You keep 100% of your revenue.