

Build OrbitRun with Smart Shape — Part 5: Find the flow
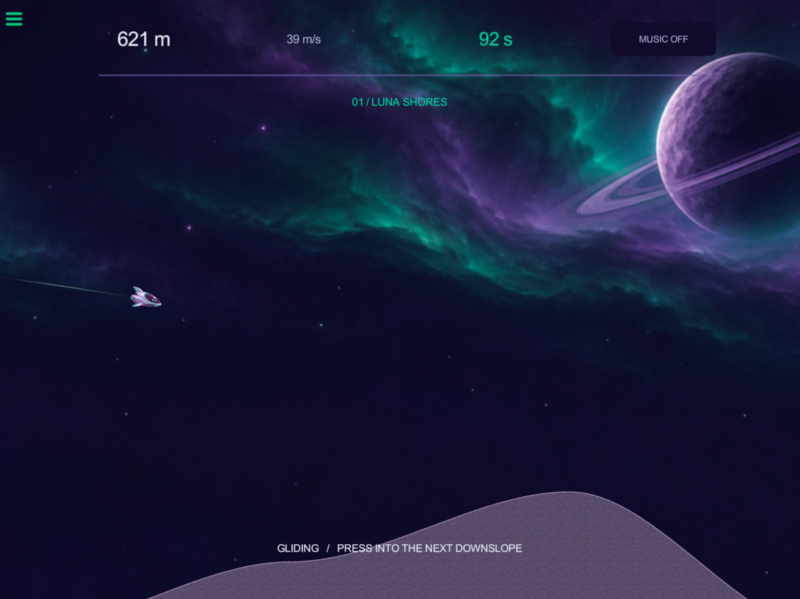
A working prototype is only the beginning. Now tune OrbitRun into a faster hill surfer: press into a downhill, release as it turns uphill, carry that momentum into the sky, and let the camera reveal the landing.
Continue from Part 4, or checkpoint 15-recovery in the checkpoint pack. This part deliberately changes the prototype values taught earlier. Compare one checkpoint at a time to feel what each change contributes.
The movement and camera lessons take inspiration from Andreas Illiger's Tiny Wings browser demo and the gameplay video. OrbitRun keeps its own original art and audio.
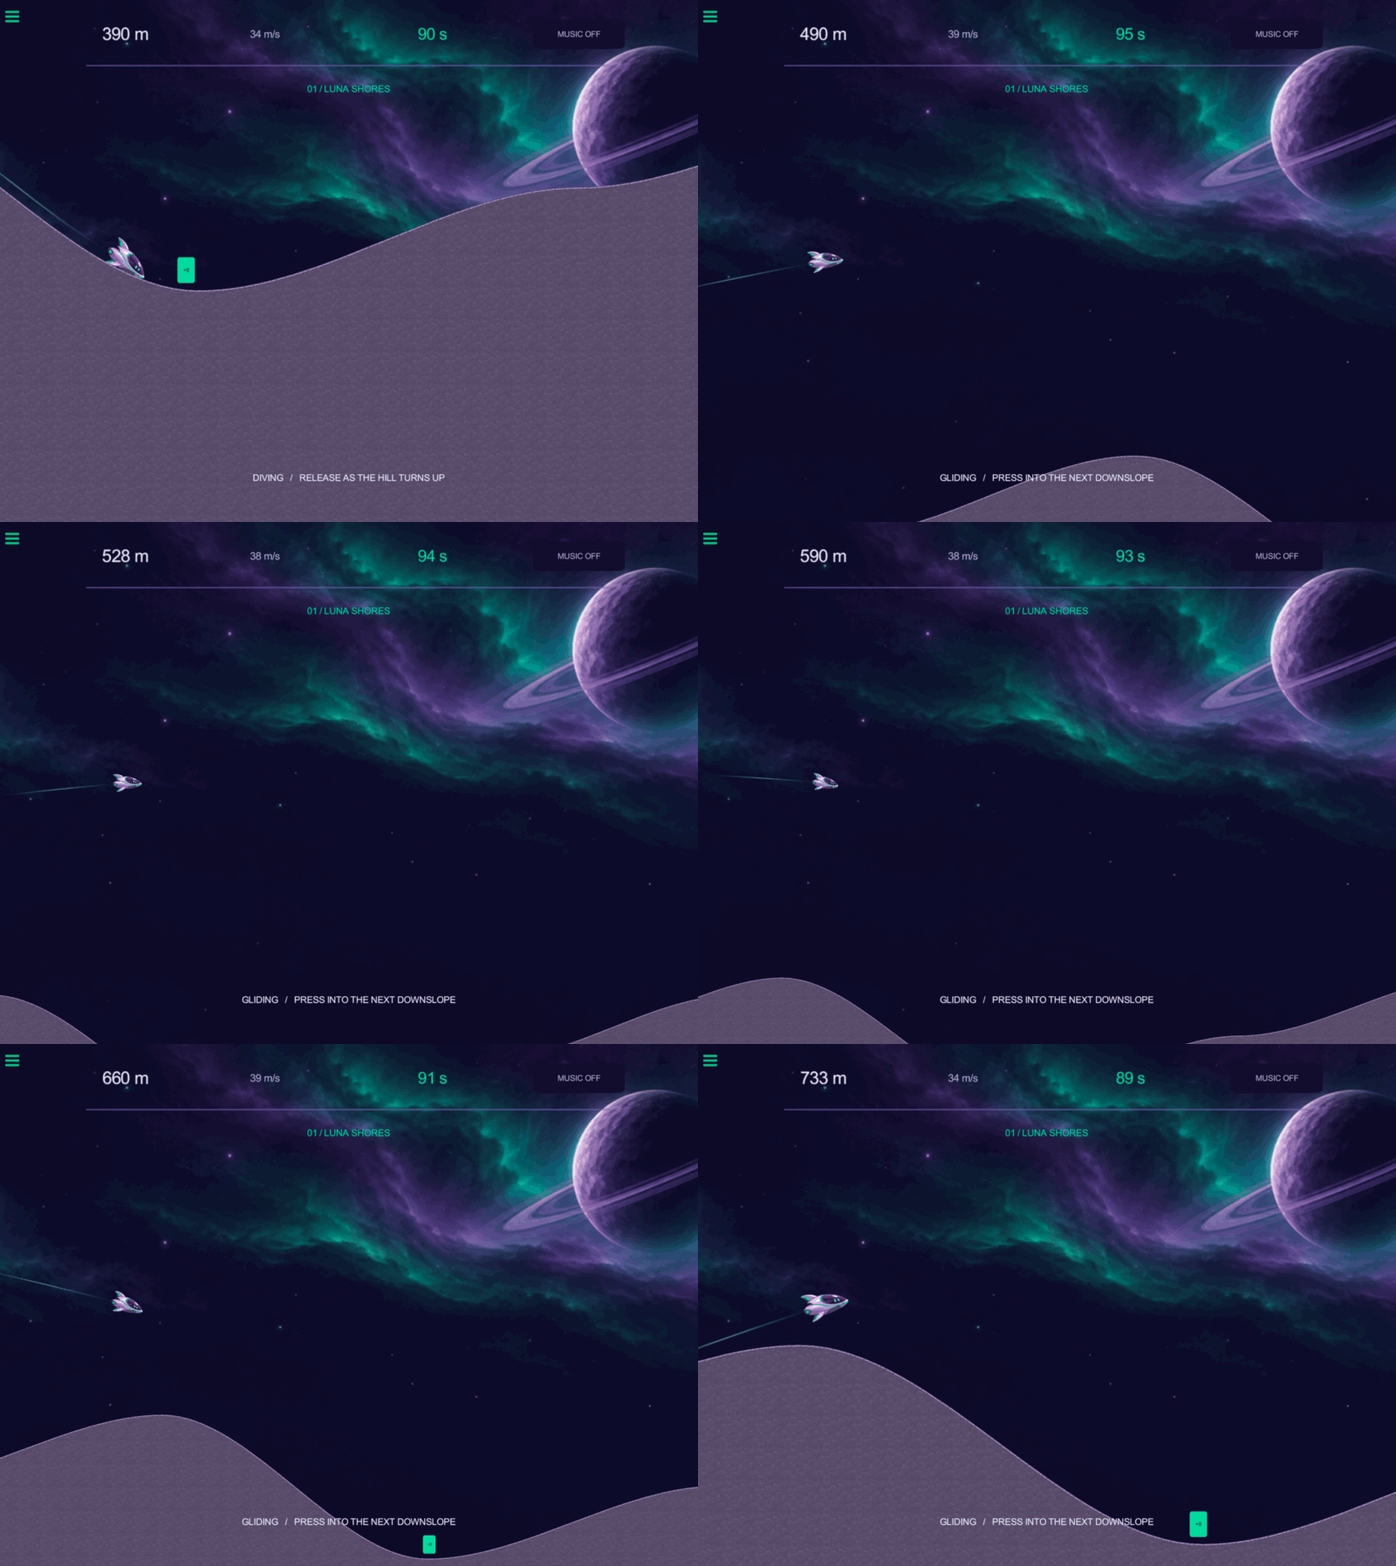
Recorded from the completed checkpoint, including the batteries added in Part 6. Watch the ship shrink and the visible stretch of terrain grow as it rises.
Tap a screenshot or diagram to open its full-size image and inspect the details.
Reading the diagrams: white connectors run the next behaviour; the green output icon supplies a value to a field. If uses the bottom for true and right side for false. REUSE means keep the existing behaviour. The animated guides add teaching highlights; the editor recordings show the real gestures.
16. Make the downhill heavy and the uphill light
The useful release point is the valley, when the slope starts rising. Holding all the way to the crest spends the climb fighting the stronger gravity.
- Open Skimmer's behaviours. Select Generate and change the terrain settings below.
- Change Dive, Release, and Launch to the new values.
- Update both sides of the assist and cap pairs: the comparison and the velocity they apply must agree.
- Generate: height 14 m, spacing 24 m, variation 28%, friction 0. The slopes redirect momentum into a climb.
- Launch: X velocity 28 m/s, Y 0, for a stronger start.
- Dive: object gravity X 0, Y −60, for a strong downhill pull.
- Release: object gravity X 0, Y −4, for more time in the air.
- Slow Check and Assist: if X velocity < 18, set X to 18; Maintain Y On. This helps recover from poor landings.
- Fast Check and Speed Limit: if X velocity > 58, set X to 58; Maintain Y On. Good landings can build speed up to this cap.
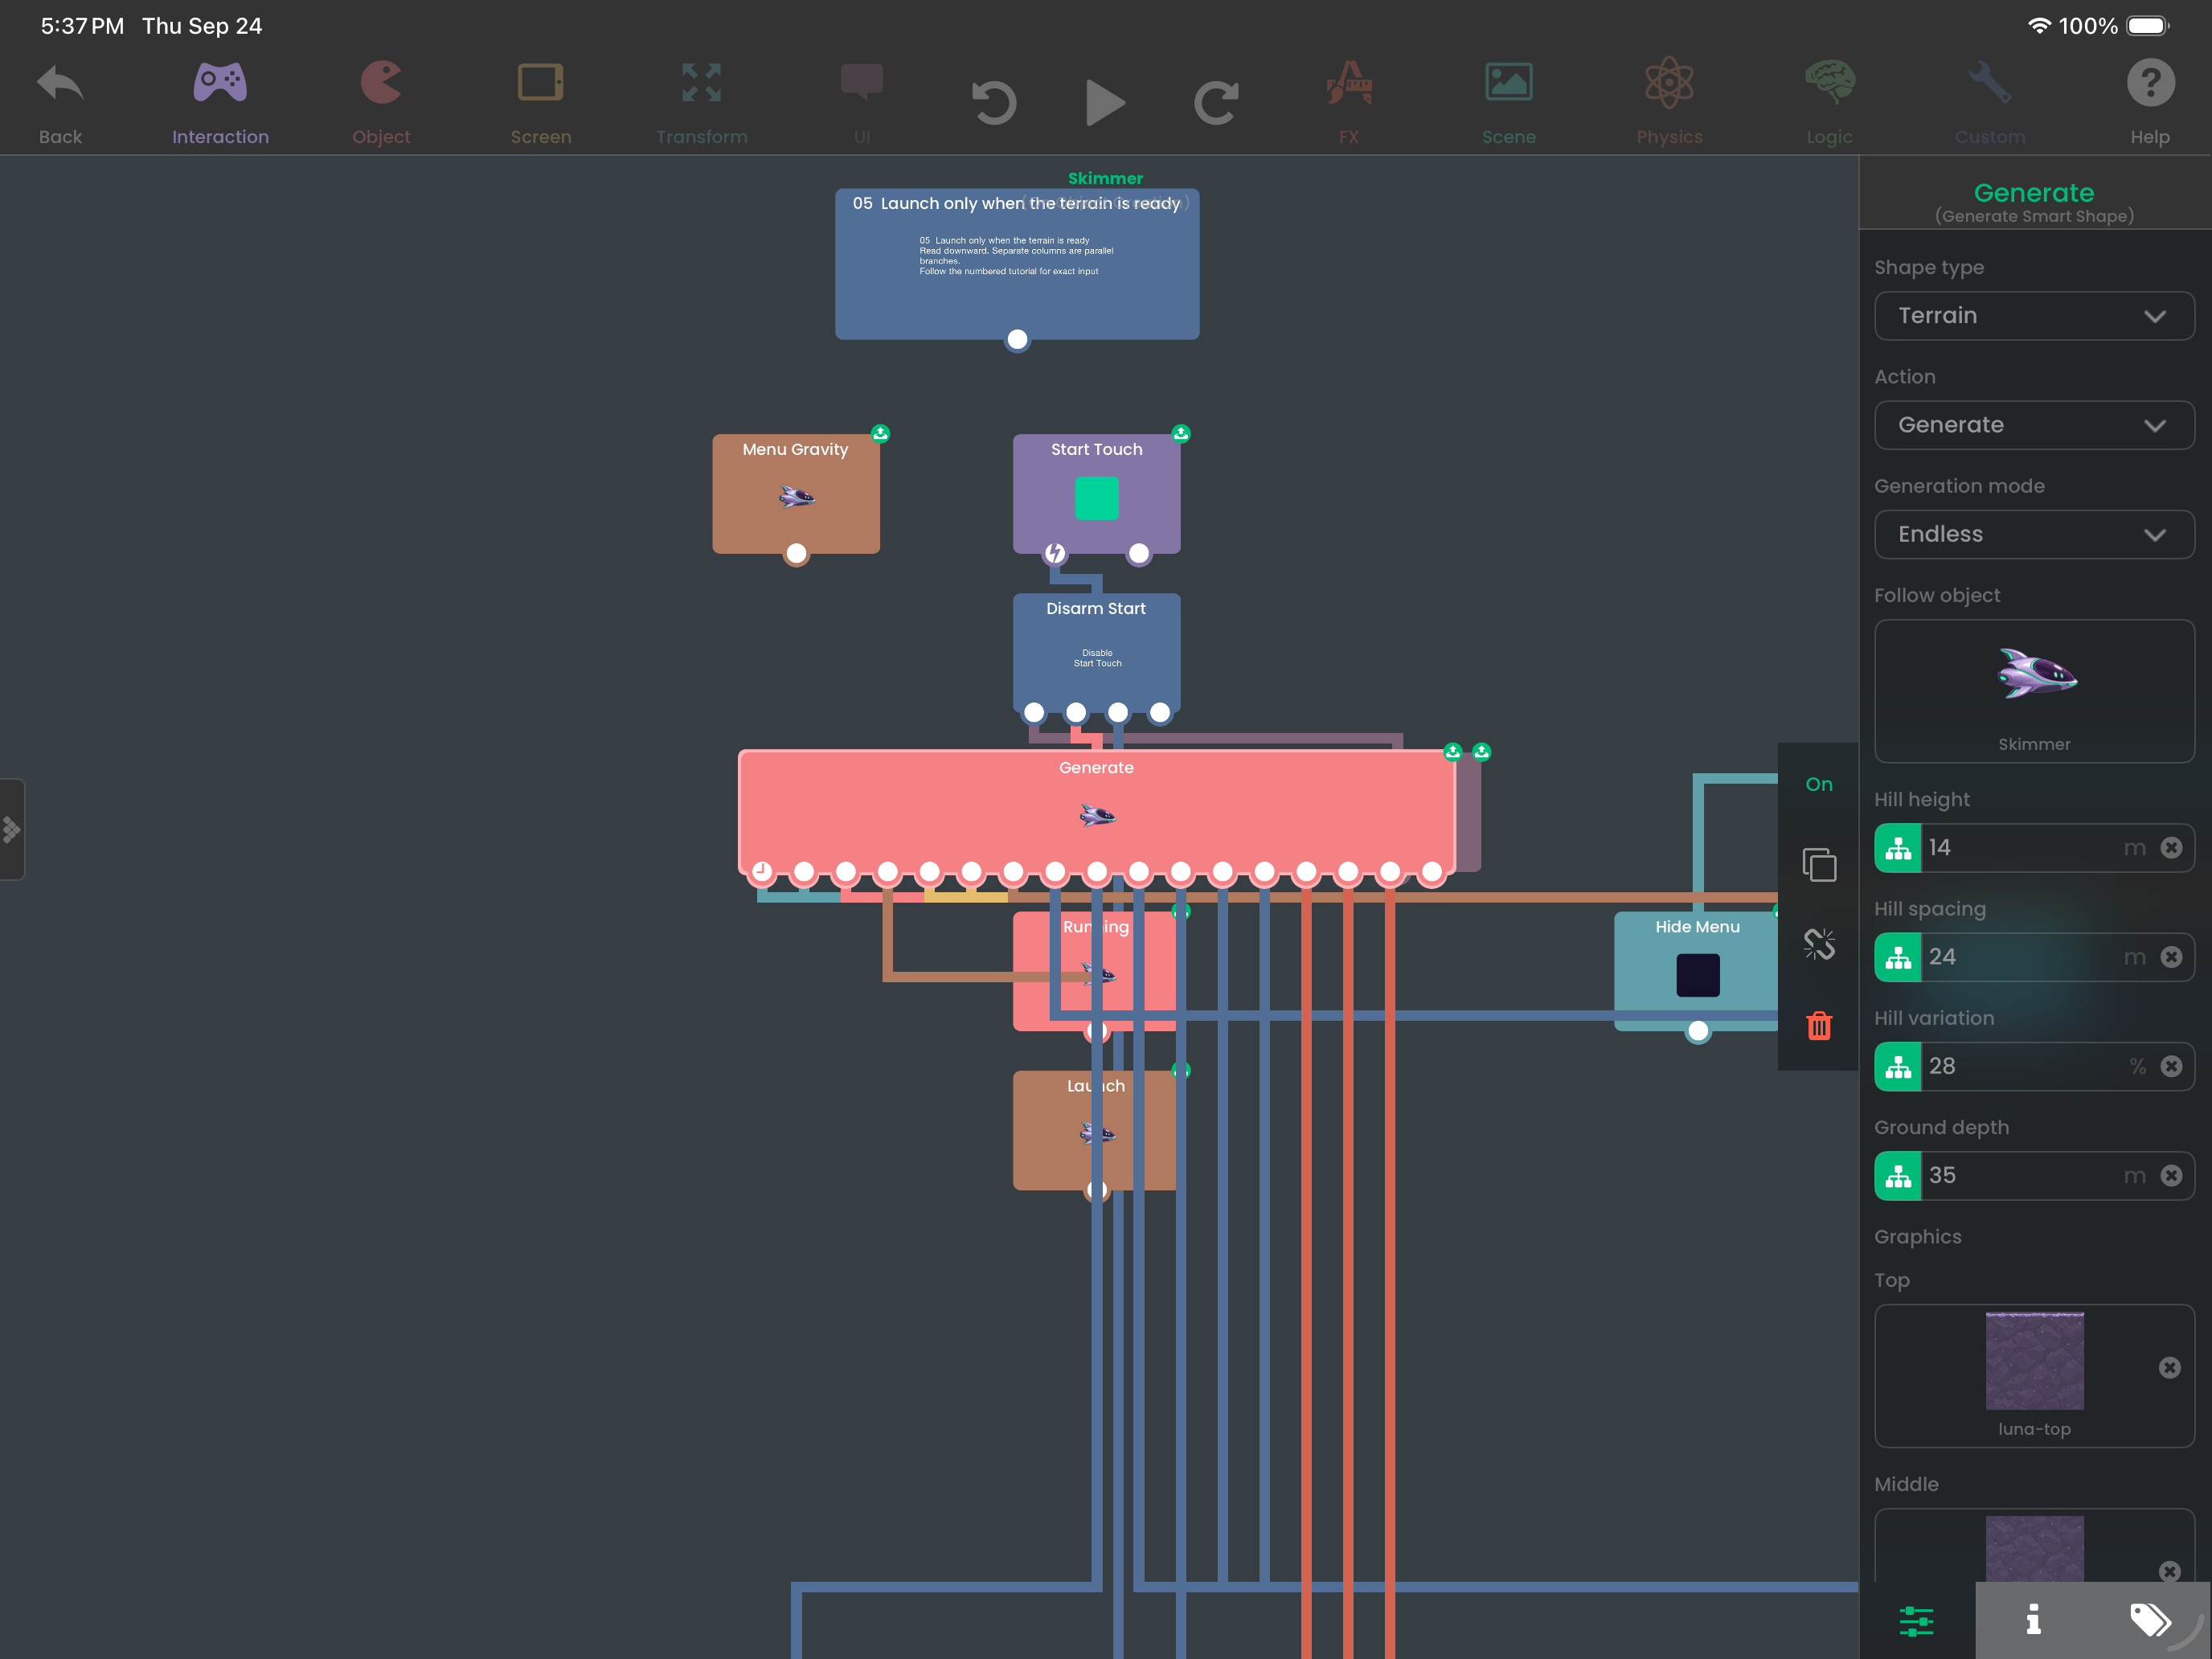
- Change Dive Cue to
DIVING / RELEASE AS THE HILL TURNS UP, and Glide Cue toGLIDING / PRESS INTO THE NEXT DOWNSLOPE. - Update the title instructions to
Hold on the downhill. Release on the uphill. Build speed, then soar.
Try it: first fly without pressing. Then replay, press while descending, and lift at the bottom of a valley. Compare height and horizontal distance. Finally, deliberately hold up a slope: the difference teaches the timing better than watching the speed number alone.
Why it works: gravity adds downward acceleration. On a downhill, the collision surface redirects that motion along the slope. On an uphill, lighter gravity lets the ship retain more of its climb. These are starting values for this ship size and terrain, not universal physics settings.
Tuning exercise: change only Release from −4 to −6. The flight becomes shorter. Change only Dive from −60 to −45; presses become gentler. Keep the 0.05-second timer unchanged while comparing, so you are testing the physics rather than several systems at once.
17. Give the player room to see a landing
A centered camera hides too much of the upcoming hill. An unchanging zoom also makes high flight hard to read.
Establish the framing
Keep Screen to Object and Zoom Screen open while adjusting this view.
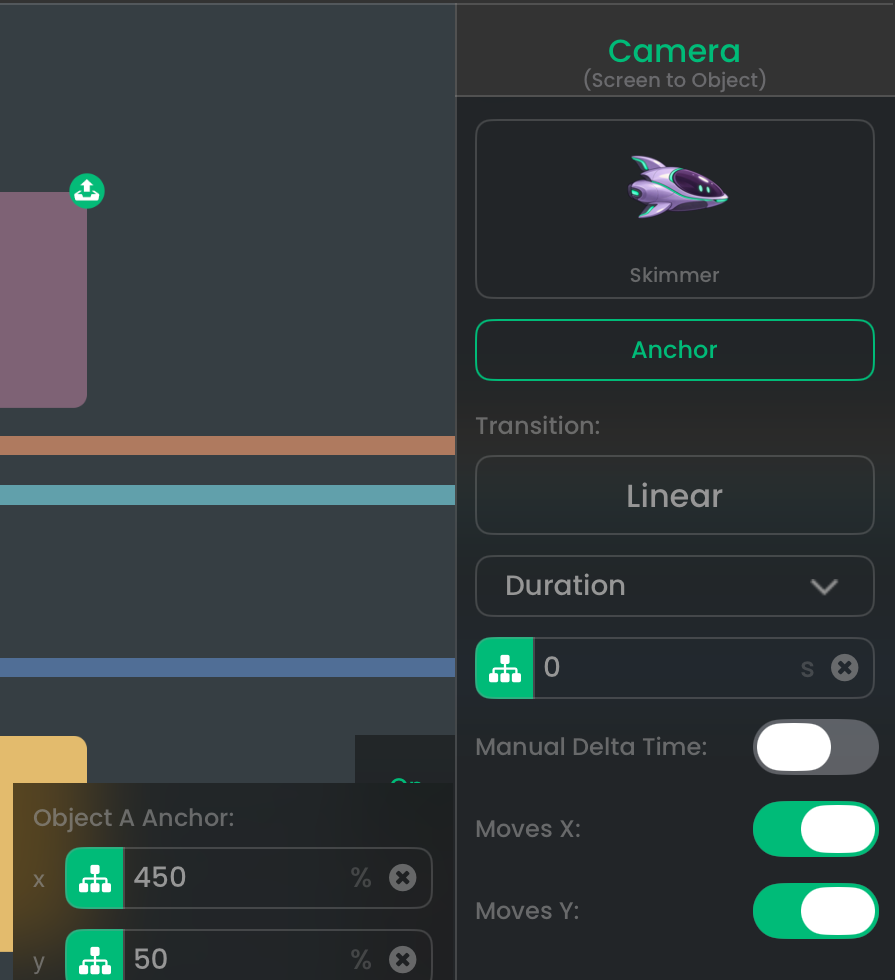
- Select Camera, the Screen to Object behaviour created in step 5. Target Skimmer, duration 0. Open its Anchor settings and set relative X to 450%, Y to 50%. This offset centers a point ahead of the ship, placing the ship toward the left side of the screen.
- Keep the existing connection from Camera’s bottom circle to Follow, using Screen Follow on Skimmer, both X and Y enabled. Screen Follow preserves the framing established by Screen to Object.
- Set the initial Zoom Screen behaviour, alias Zoom, to 75%, duration 0. Keep the HUD on Scene UI.
Calculate a zoom target from height
Add a new commented group, 17 Frame the landing and ease the zoom, following the diagrams below.
- Camera Height (Get Position) — Skimmer, Screen Coordinates Off
- Camera Denominator (Add Values) — A = Camera Height's Y Position; B = 2
- Camera Ratio (Divide Values) — A = 1800; B = Camera Denominator's result
- Camera Near (If) — Camera Ratio's result > 75
- Camera Near Zoom (Zoom Screen) — Zoom 75%, duration 0.45 s
- Camera Far (If) — Camera Ratio's result < 22
- Camera Far Zoom (Zoom Screen) — Zoom 22%, duration 0.45 s
- Camera Air Zoom (Zoom Screen) — Zoom from Camera Ratio's result, duration 0.45 s
Follow the connections in the three guides below. Leave the three Zoom Screen outputs unconnected. They are effects, not the clock driving the next update.
Build: Calculate the zoom target
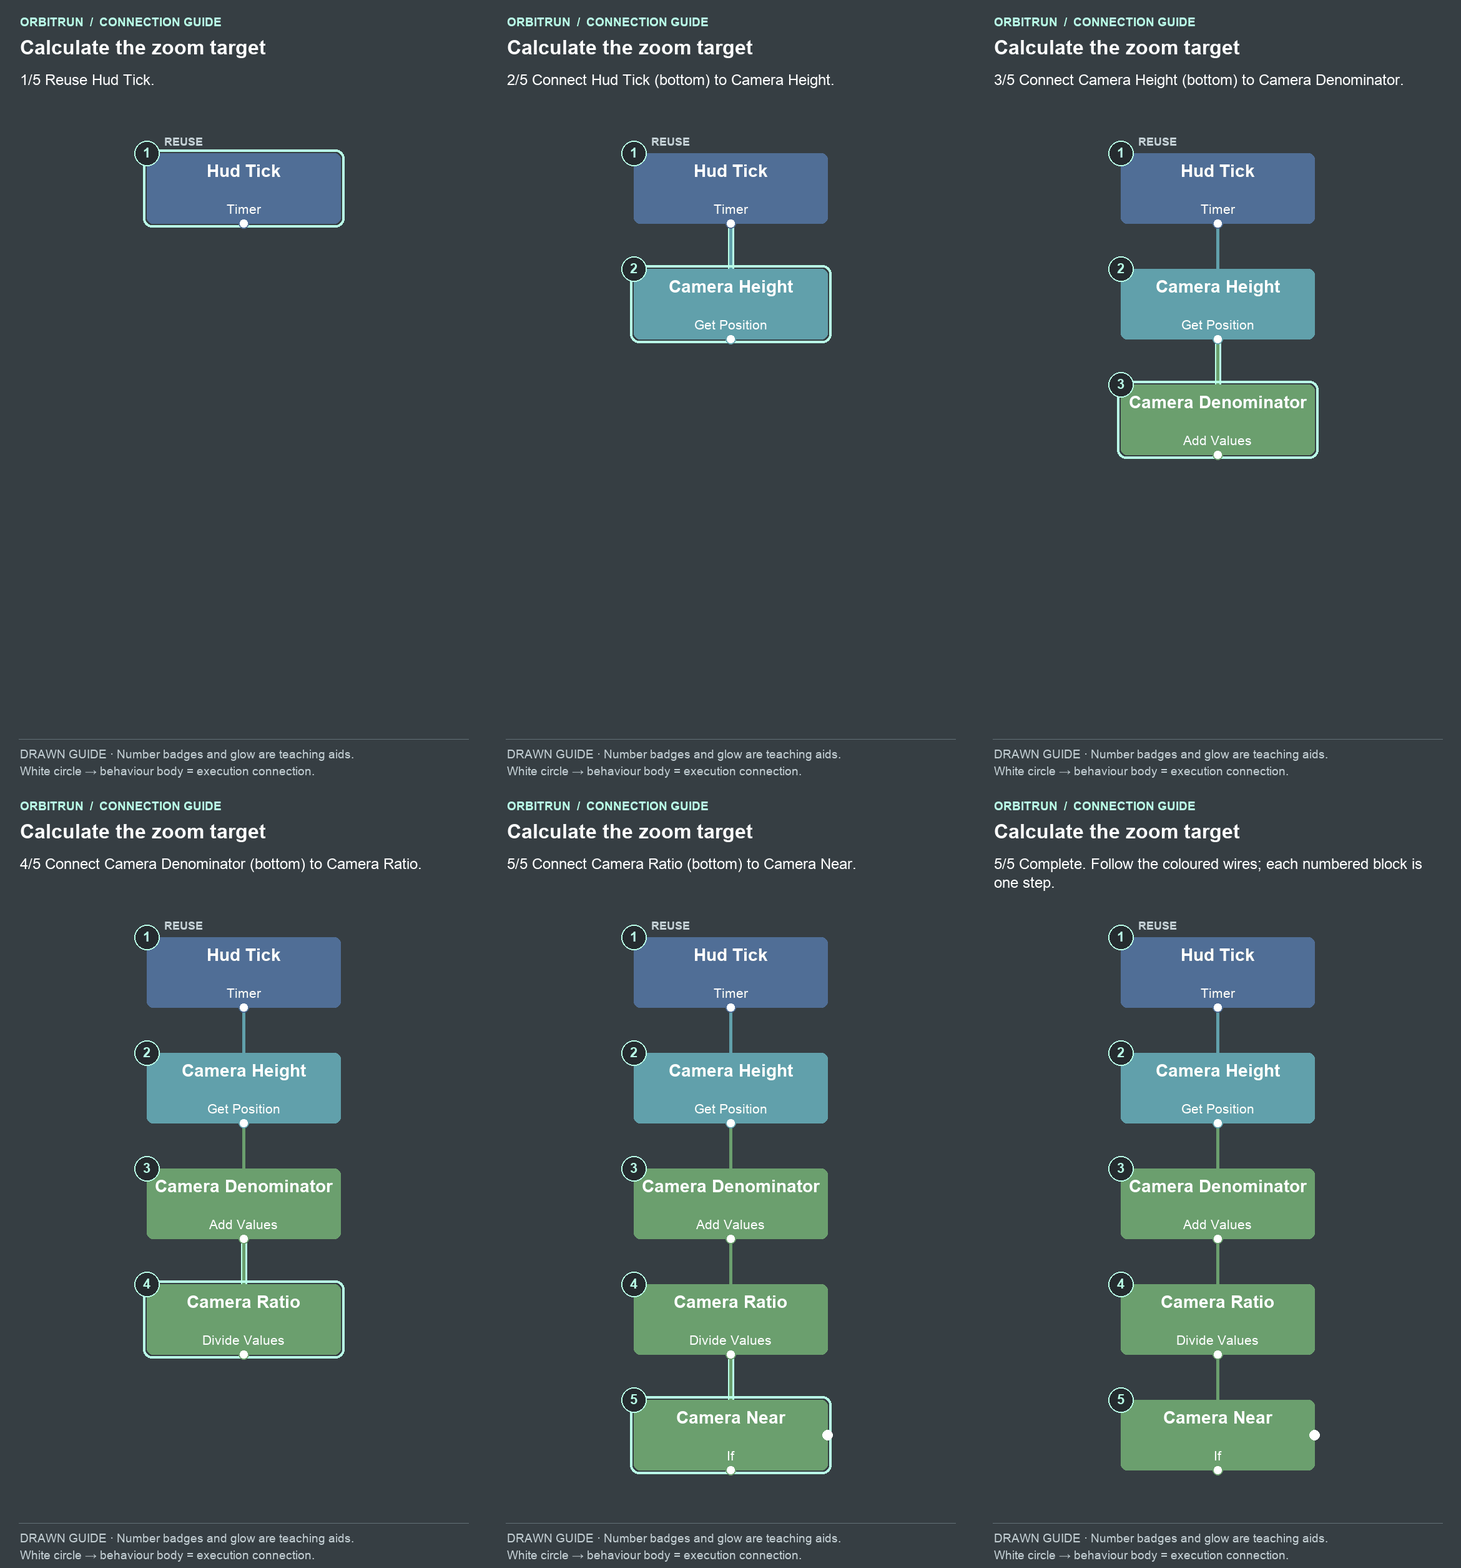
- Reuse Hud Tick.
- Add Get Position and name it Camera Height. Drag an unused bottom white circle on Hud Tick onto the Camera Height block.
- Add Add Values and name it Camera Denominator. Drag an unused bottom white circle on Camera Height onto the Camera Denominator block.
- Add Divide Values and name it Camera Ratio. Drag an unused bottom white circle on Camera Denominator onto the Camera Ratio block.
- Add If and name it Camera Near. Drag an unused bottom white circle on Camera Ratio onto the Camera Near block.
Build: First, check the near limit
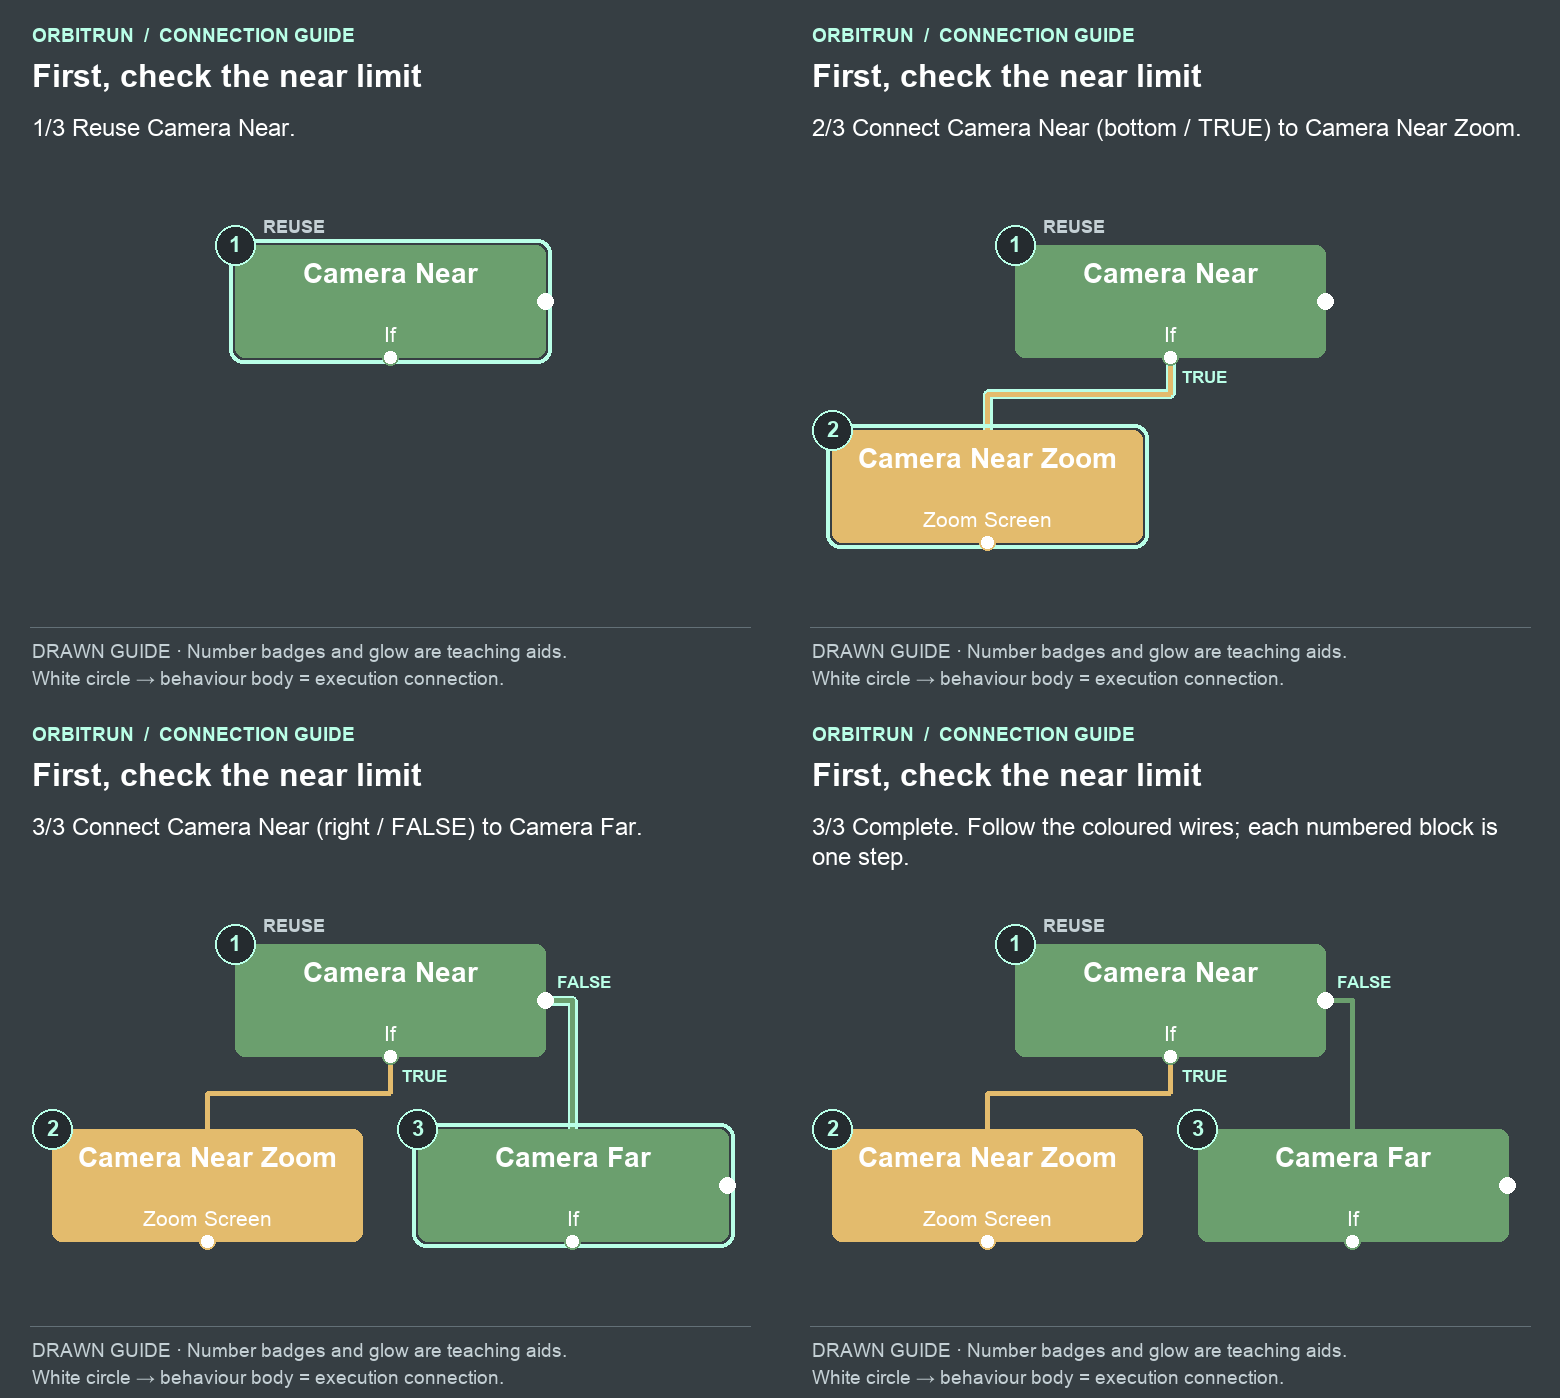
- Reuse Camera Near.
- Add Zoom Screen and name it Camera Near Zoom. Drag an unused bottom white circle (true) on Camera Near onto the Camera Near Zoom block.
- Add If and name it Camera Far. Drag the right-side white circle (false) on Camera Near onto the Camera Far block.
Build: Then check the far limit
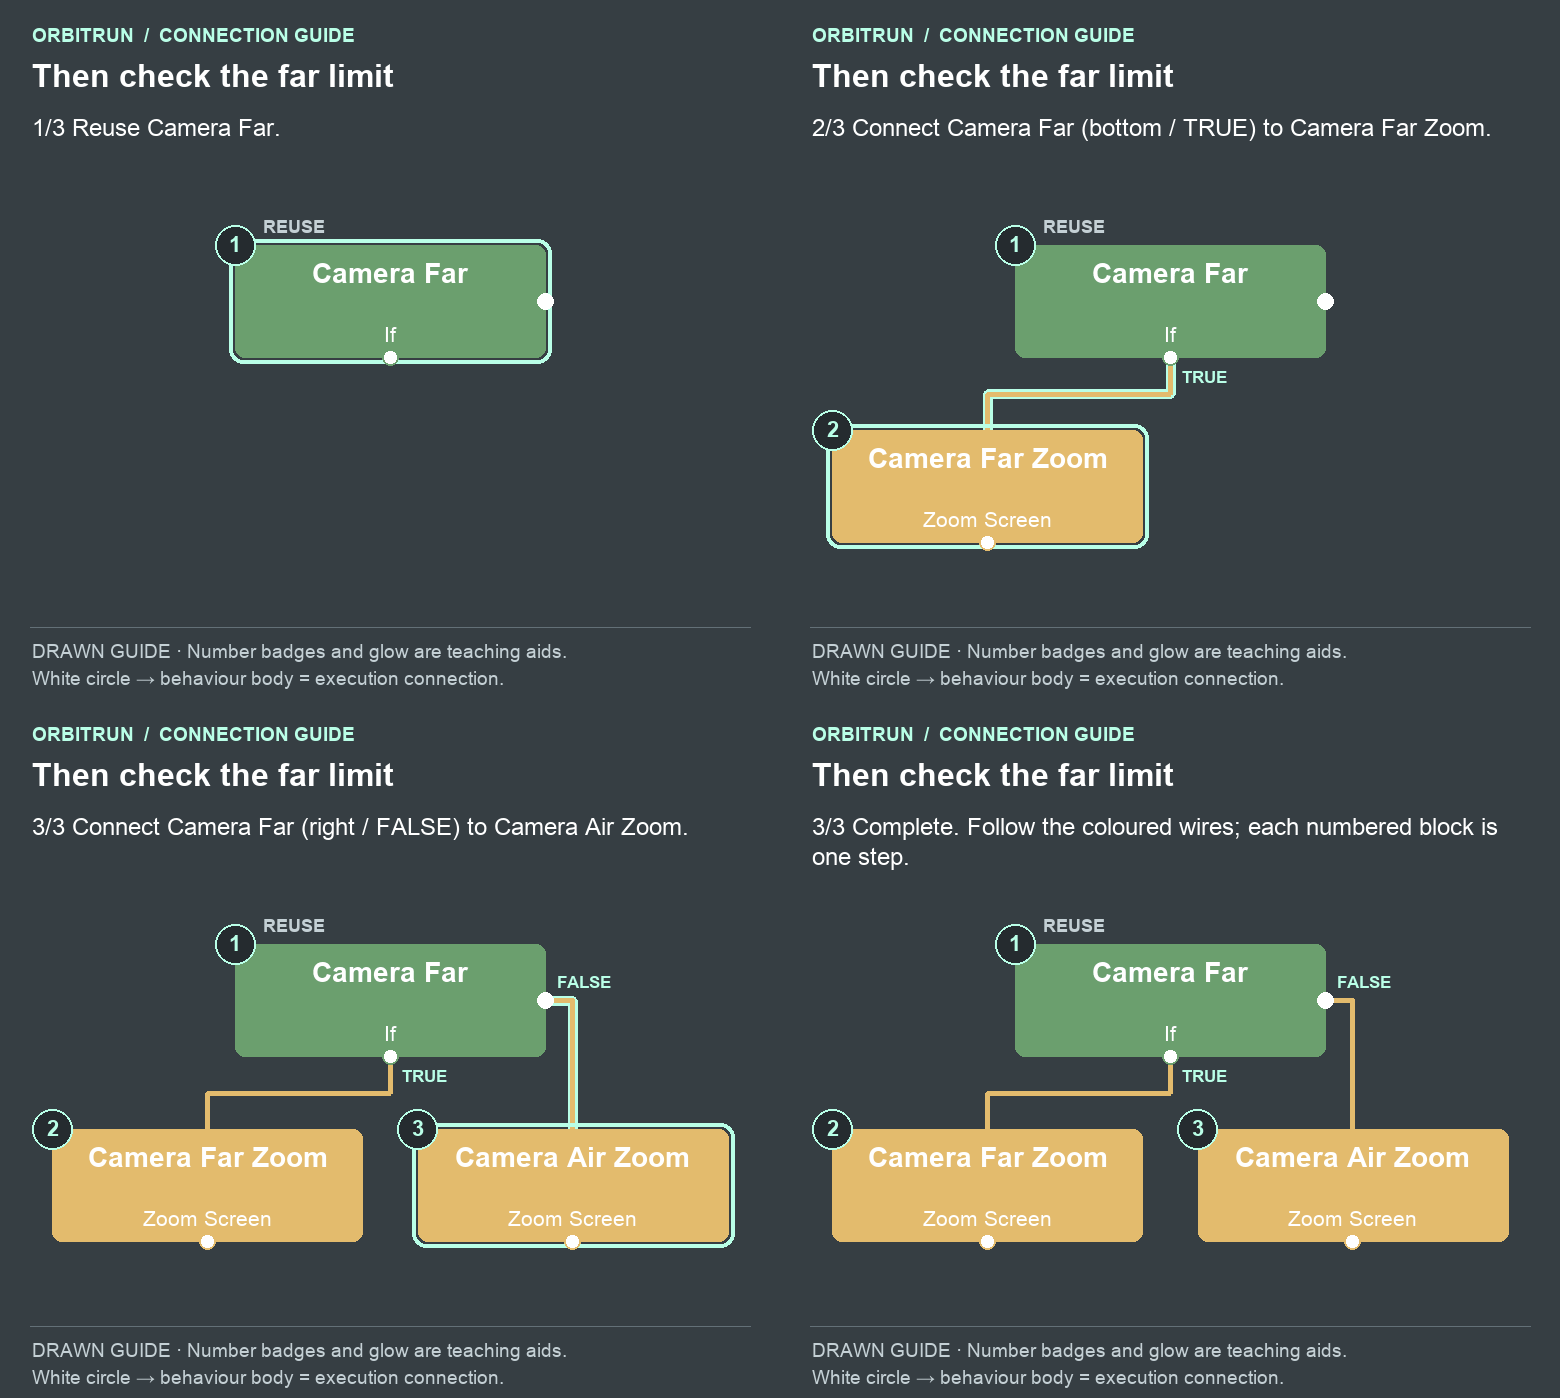
- Reuse Camera Far.
- Add Zoom Screen and name it Camera Far Zoom. Drag an unused bottom white circle (true) on Camera Far onto the Camera Far Zoom block.
- Add Zoom Screen and name it Camera Air Zoom. Drag the right-side white circle (false) on Camera Far onto the Camera Air Zoom block.
Watch the output drag: let height control the zoom
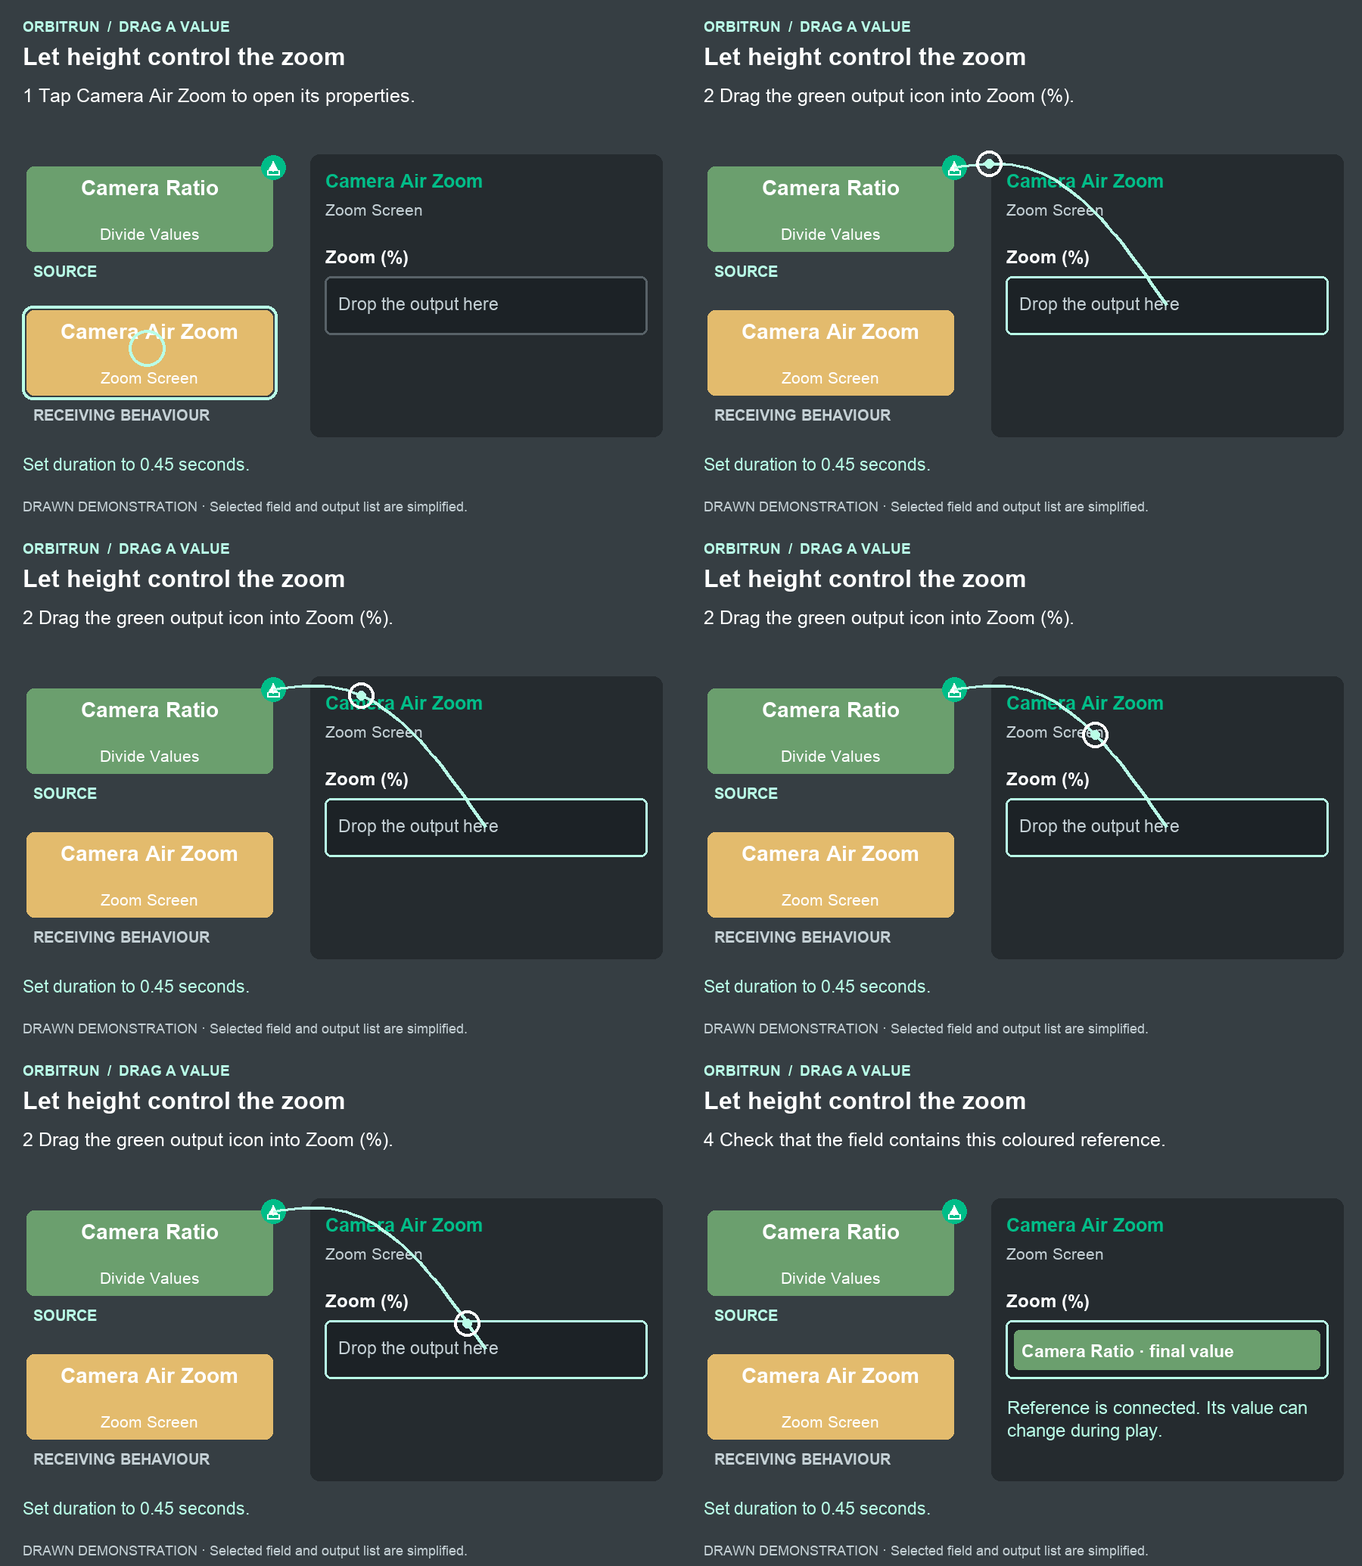
After the drop: Zoom (%) contains Camera Ratio · final value. Set duration to 0.45 seconds.
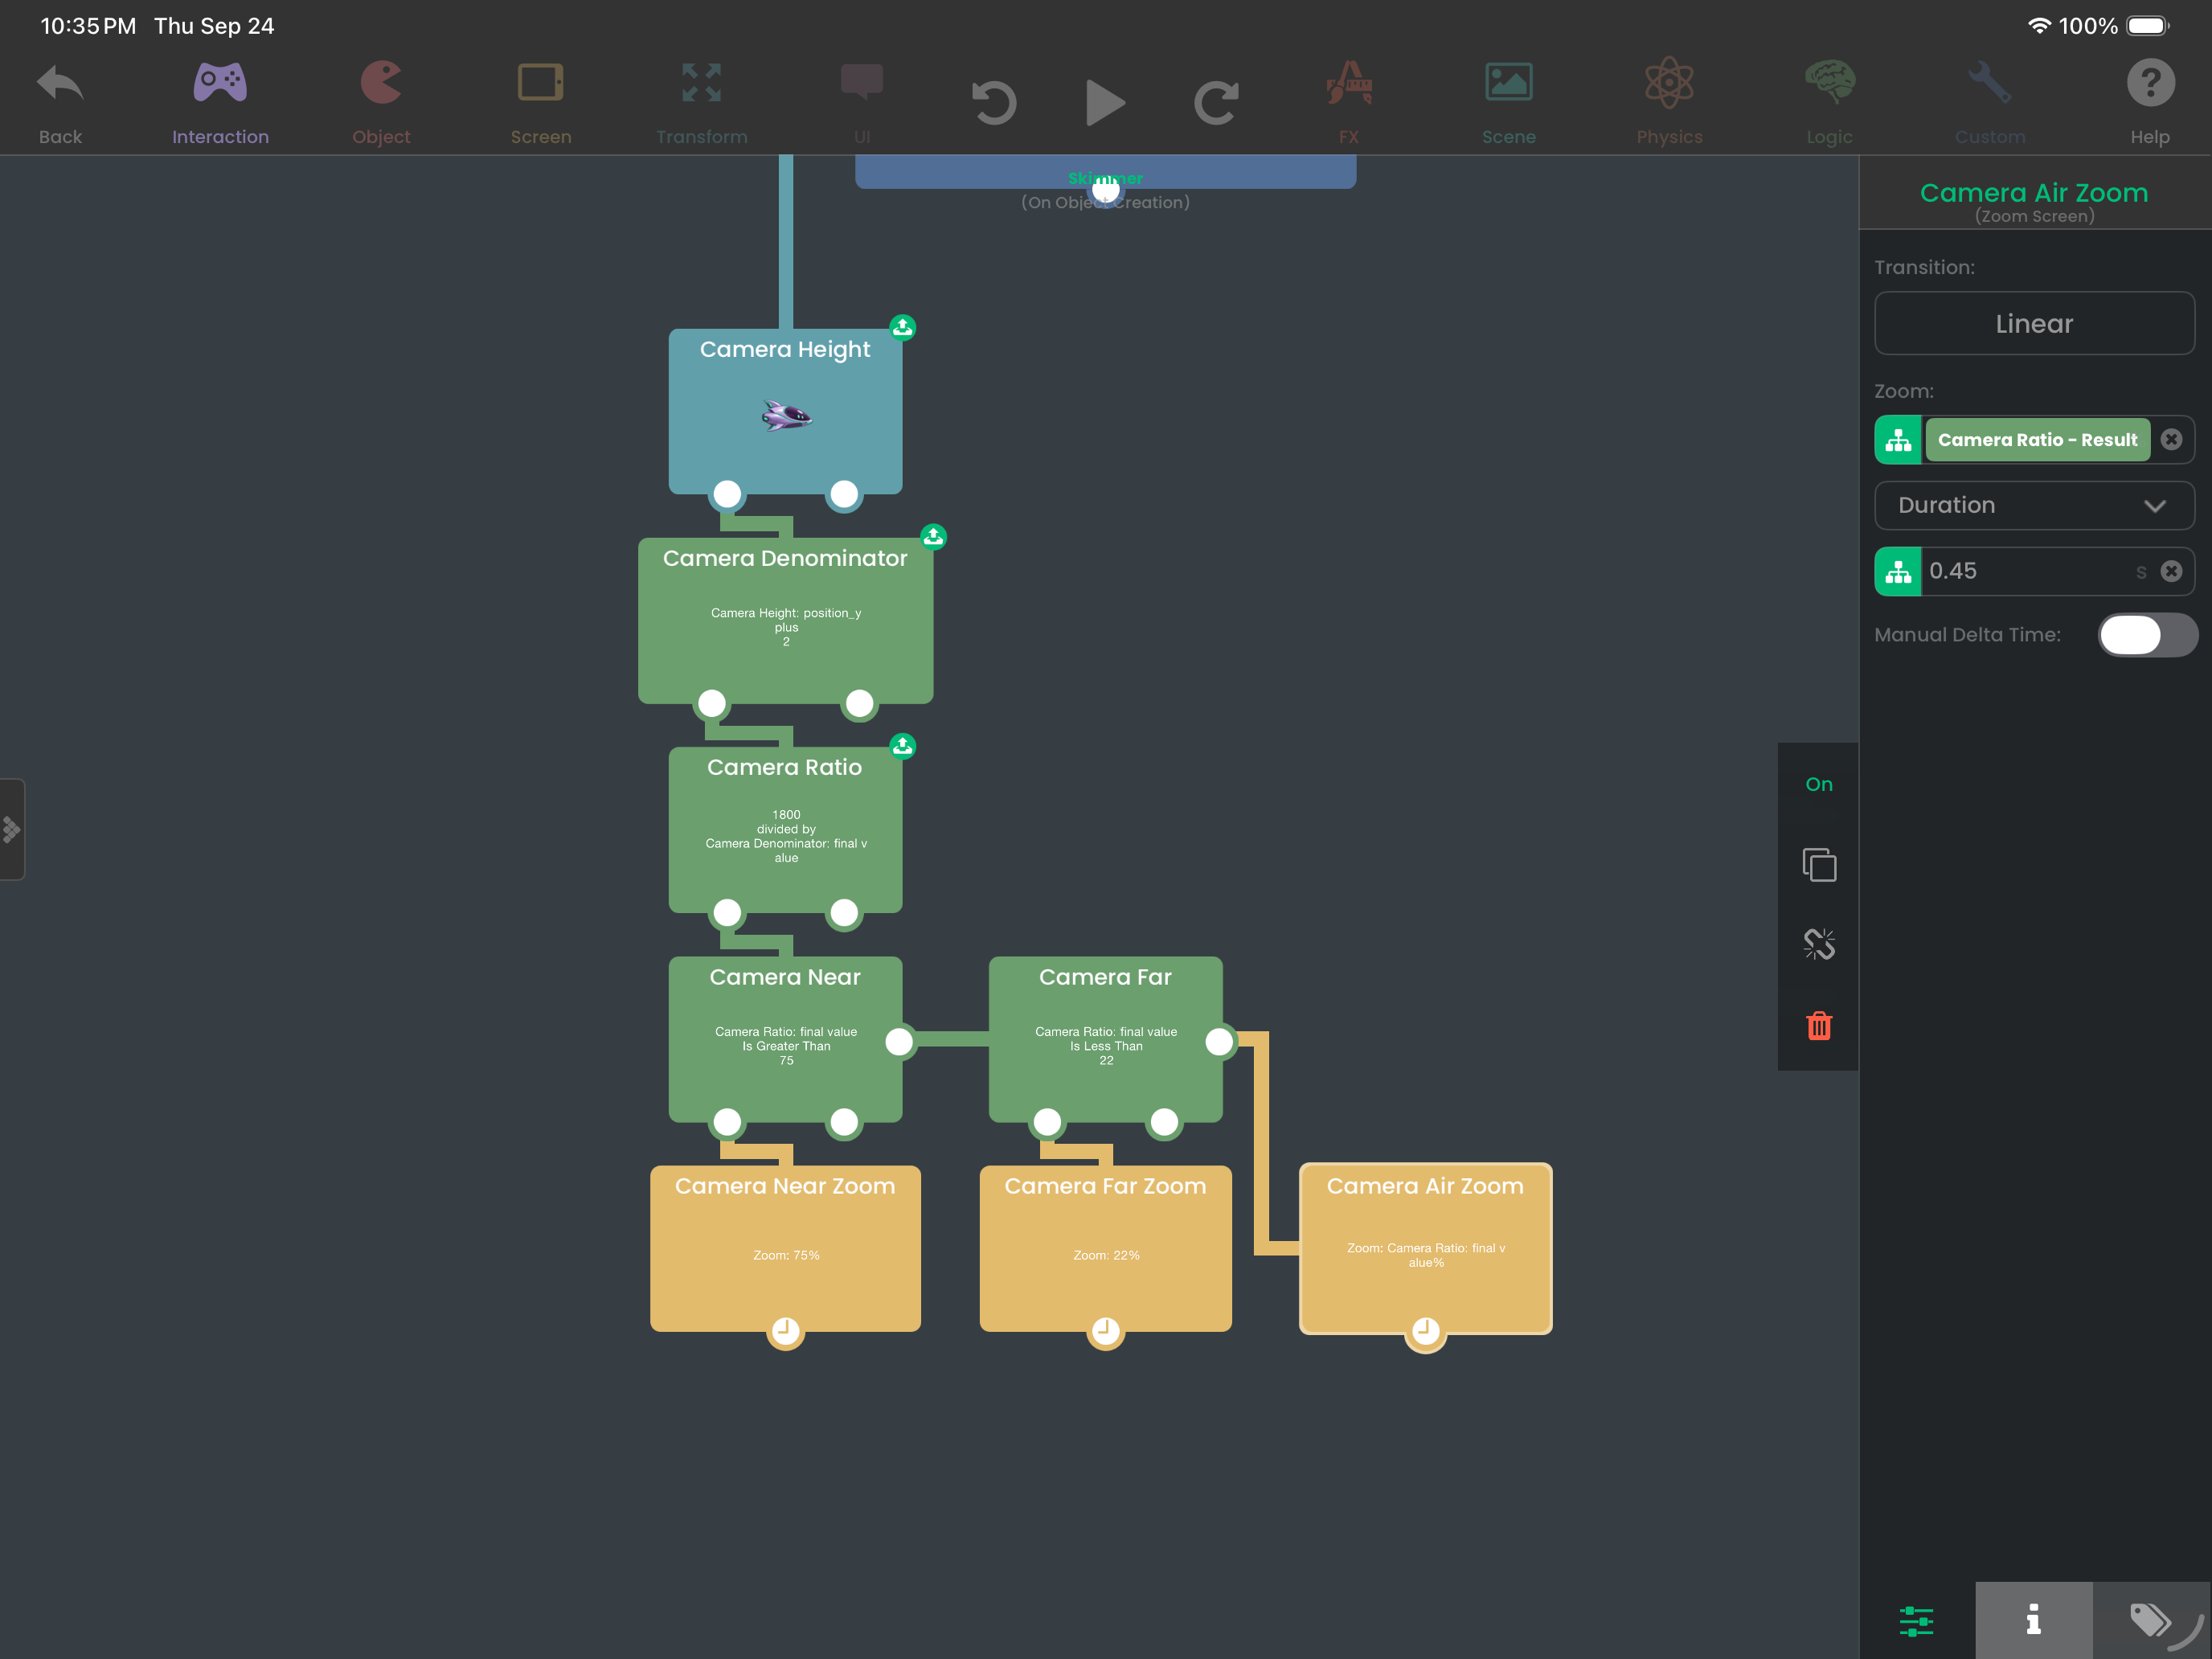
The relationship is target zoom = clamp(1800 / (world Y + 2), 22, 75). You build it with the behaviours in the list; do not paste that expression into a numeric input.
- 22 m — 75% after the upper bound
- 40 m — About 43%
- 60 m — About 29%
- 90 m — 22% after the lower bound
Try it: watch the ship near the hills, then during a high glide. The course should occupy less of the screen as the ship rises. The score, energy, and buttons should remain the same size. If the HUD shrinks, it is on a world layer instead of Scene UI.
Why it works: the target responds to height, while the 0.45-second transition softens each update. Hud Tick supplies a new target every 0.2 seconds, so the zoom eases toward a moving target. Bounds prevent extreme close-ups or a tiny unreadable ship. The constants assume this course's world position and height; a course far below Y −2 needs a different offset and denominator guard.
18. Increase the pace as the run continues
Add cruiseSpeed using the Object Attributes workflow shown in Part 1. Read it with Get Attribute.
Keep elapsed time as a steadily increasing quantity. Later, batteries will add remaining energy; they should not make the game easier by winding the pace back.
- Add an object attribute on Skimmer named
cruiseSpeed, with initial value 18. - Build the two groups shown below: calculate the pace, then apply it to the velocity checks.
- Pace Progress (Multiply Values) — A = Seconds' result; B = 0.12
- Pace Base (Add Values) — A = Pace Progress's result; B = 18
- Pace Clamp (If) — Pace Base's result > 36
- Pace Max (Set Attribute) — Skimmer,
cruiseSpeed= 36 - Pace Current (Set Attribute) — Skimmer,
cruiseSpeed= Pace Base's result - Pace Read (Get Attribute) — Read Skimmer's
cruiseSpeed - Pace Cap (Add Values) — A = Pace Read's Attribute Value; B = 40
- The first guide gives Pace Progress two triggers: Seconds updates it during play; Generate initializes it at launch.
- Remove Velocity’s direct execution wires to Slow Check and Fast Check. The second guide routes both checks through Pace Read. Keep the existing rotation and feedback connections.
- Set Slow Check's second value and Assist's X velocity to Pace Read’s Attribute Value output.
- Set Fast Check's second value and Speed Limit's X velocity to Pace Cap’s result output. Keep Maintain Y On on both Set Velocity behaviours.
Build: Raise the cruise speed
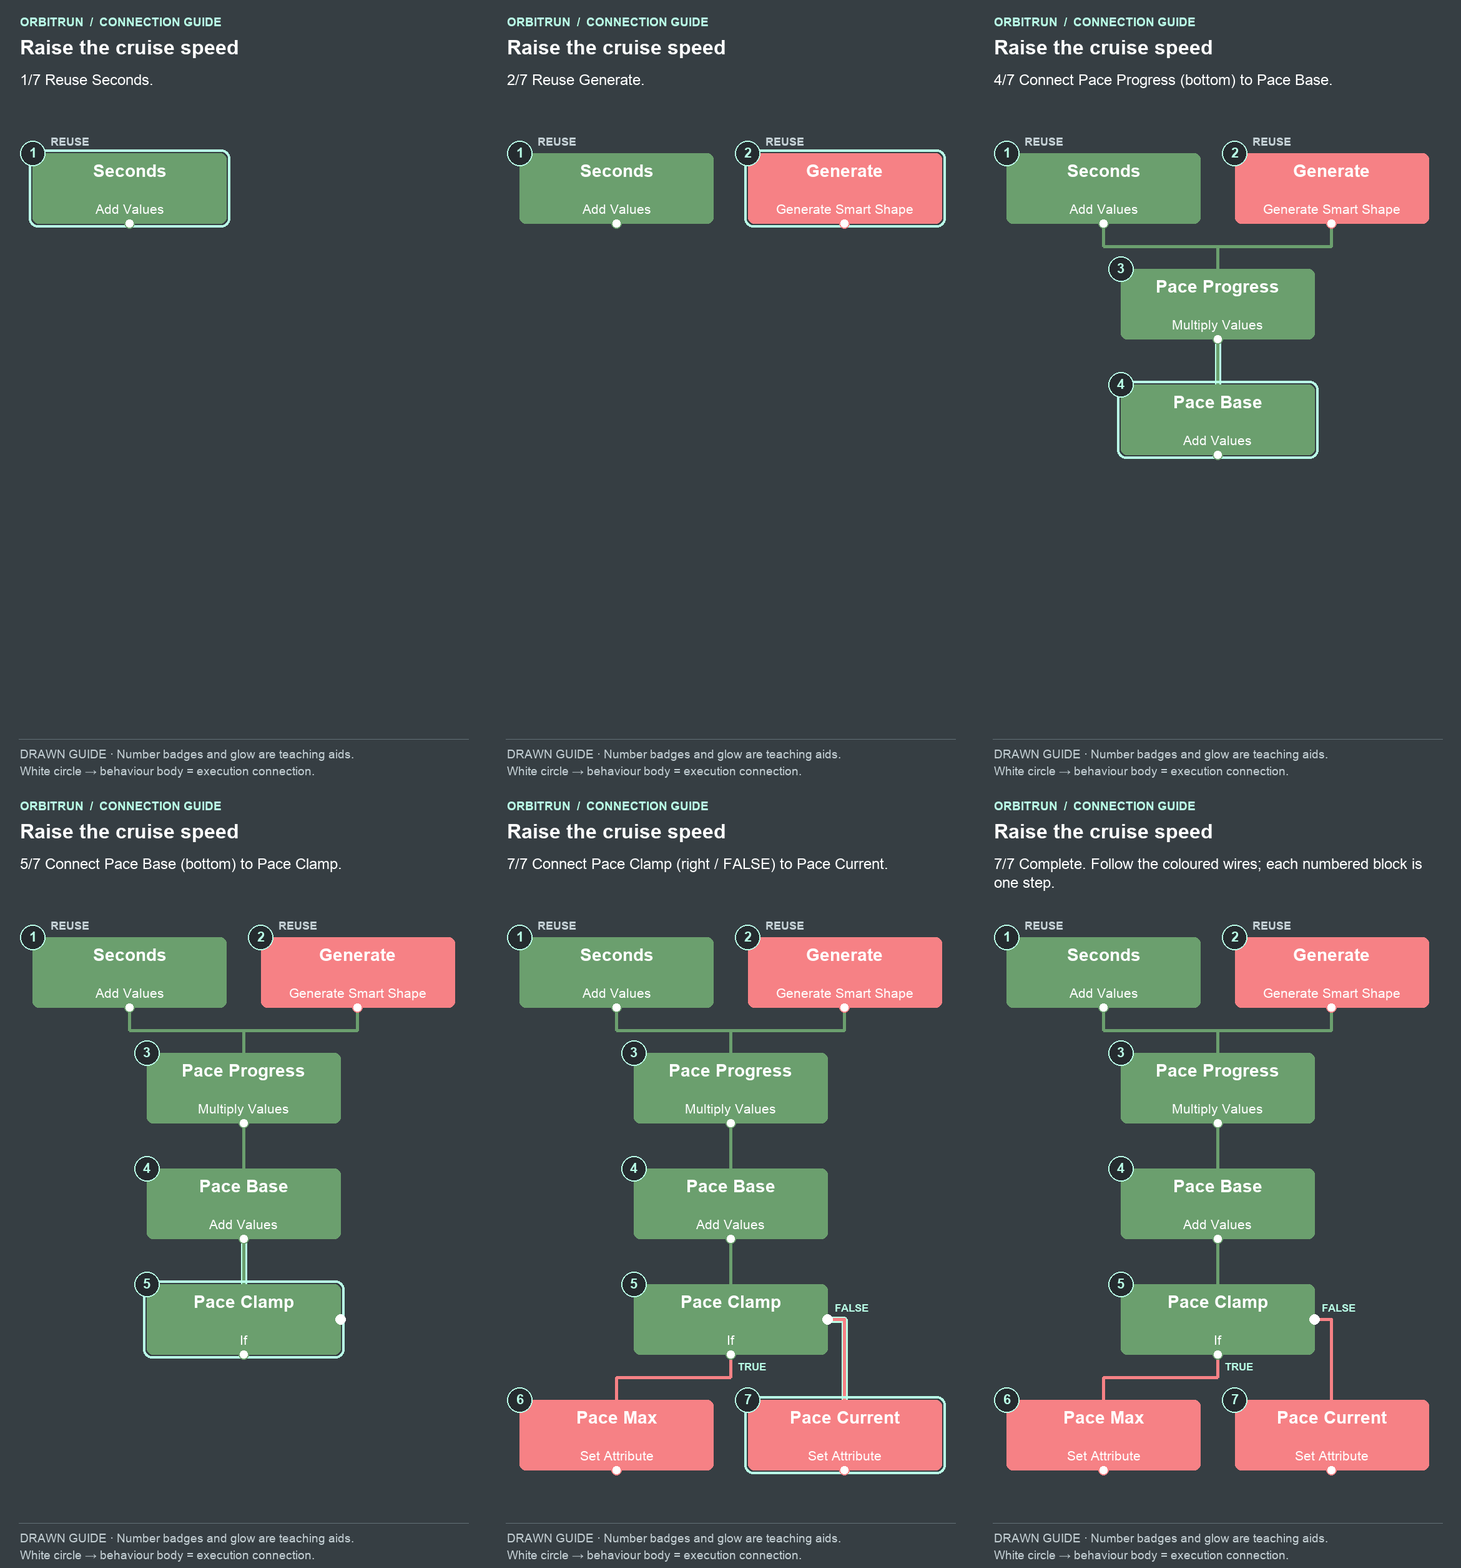
- Reuse Seconds.
- Reuse Generate.
- Add Multiply Values and name it Pace Progress. Drag an unused bottom white circle on Seconds onto the Pace Progress block. Drag an unused bottom white circle on Generate onto the Pace Progress block.
- Add Add Values and name it Pace Base. Drag an unused bottom white circle on Pace Progress onto the Pace Base block.
- Add If and name it Pace Clamp. Drag an unused bottom white circle on Pace Base onto the Pace Clamp block.
- Add Set Attribute and name it Pace Max. Drag an unused bottom white circle (true) on Pace Clamp onto the Pace Max block.
- Add Set Attribute and name it Pace Current. Drag the right-side white circle (false) on Pace Clamp onto the Pace Current block.
Build: Apply the changing pace
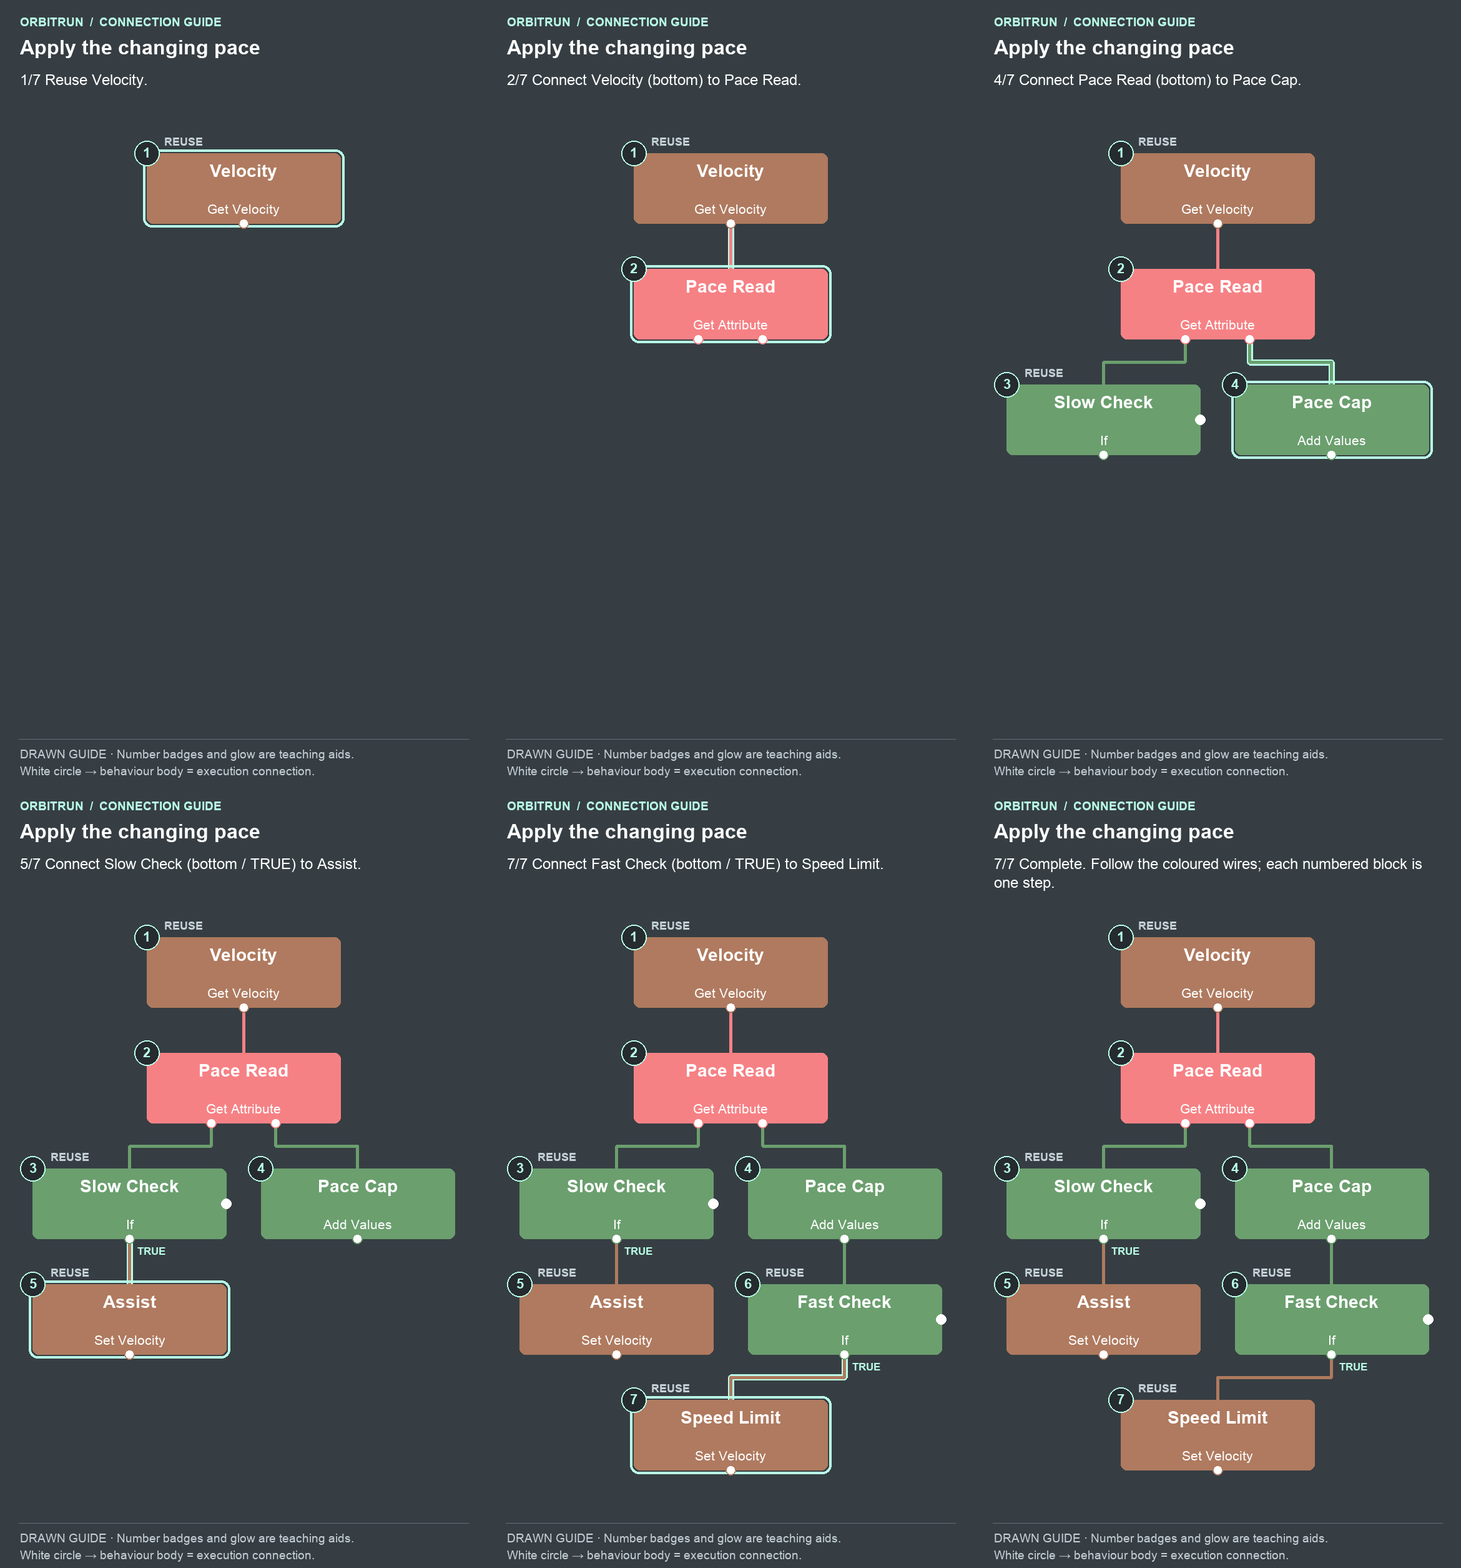
- Reuse Velocity.
- Add Get Attribute and name it Pace Read. Drag an unused bottom white circle on Velocity onto the Pace Read block.
- Reuse Slow Check. Drag an unused bottom white circle on Pace Read onto the Slow Check block.
- Add Add Values and name it Pace Cap. Drag an unused bottom white circle on Pace Read onto the Pace Cap block.
- Reuse Assist. Keep the existing true/bottom connection from Slow Check to Assist.
- Reuse Fast Check. Drag an unused bottom white circle on Pace Cap onto the Fast Check block.
- Reuse Speed Limit. Keep the existing true/bottom connection from Fast Check to Speed Limit.
Watch the output drag: feed the new pace into assist
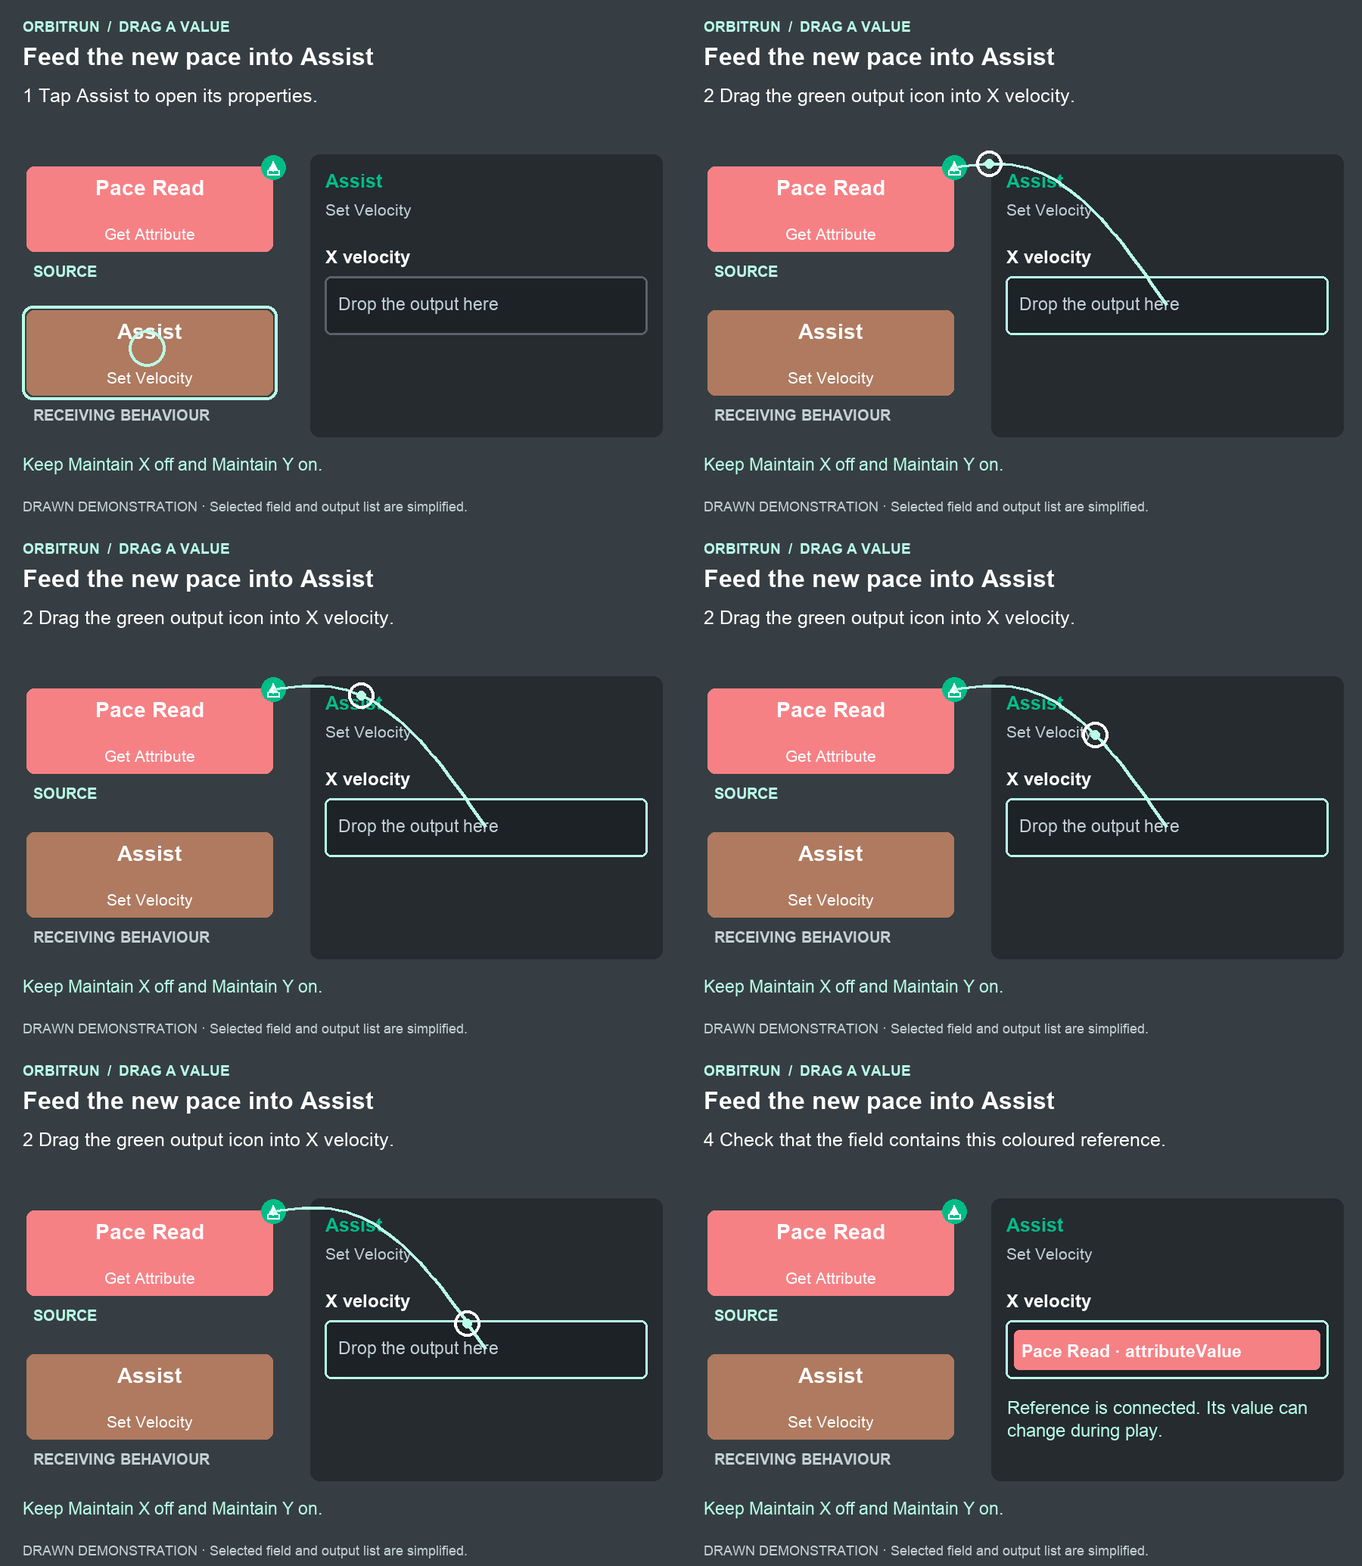
After the drop: X velocity contains Pace Read · attributeValue. Keep Maintain X off and Maintain Y on.
The cruising floor is 18 m/s at launch, 21.6 after 30 s, 25.2 after 60 s, and 28.8 after 90 s. It eventually stops rising at 36 m/s; the horizontal ceiling remains 40 m/s above it, up to 76 m/s. A well-timed downhill can take the ship above the cruising floor.
Try it: compare the early and late portions of a run. You have less time to react to each hill as the floor rises. Good landings still matter because they can earn speed above that floor. The floor is an accessibility assist; reduce its growth rate or remove it for a more demanding momentum game.
Why it works: an unbounded difficulty curve eventually becomes unplayable. The cap makes long battery-assisted runs manageable while preserving the feeling of increasing pace.
Next: Part 6 — Batteries and longer flights. Checkpoint 18-rising-pace contains everything in this part.