

Art Studio: Tileable Textures and 9-Slice Graphics
A tile repeats. A 9-slice panel stretches selected regions while protecting its corners. Choose the workflow that matches the game asset you are making: floors and walls often need tiles; interface panels and buttons often need 9-slice artwork.
Paint a tile while seeing its neighbors
Create a small Graphic project for a texture, such as a 32 × 32 stone or grass tile. Paint a solid base color first, then add a few shapes that cross the edges. Select the Tile toggle beside the canvas zoom controls, or press ⌥L. This enables Live Tiles.
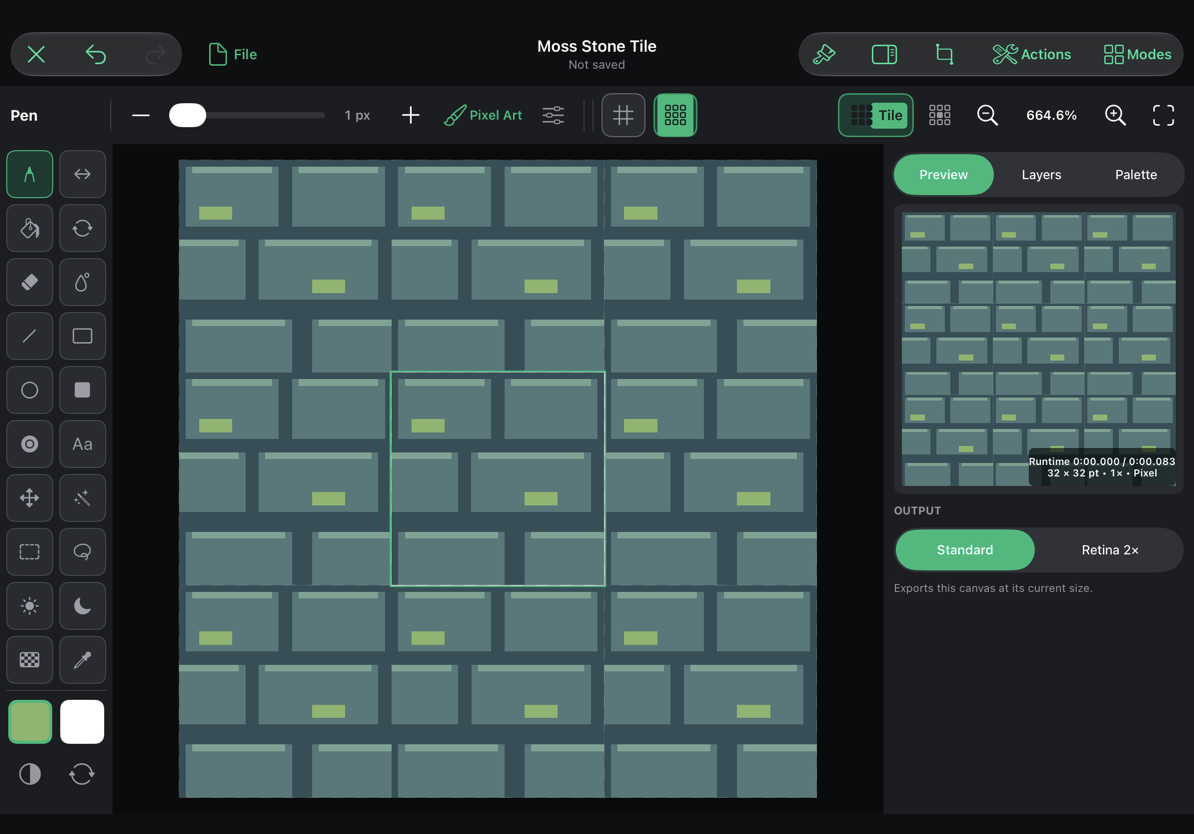
The central canvas stays editable. Its eight neighbors repeat the current composite, including the diagonal corners, and update while you draw. They are repeated copies, not flipped reflections. Draw on the center tile; use the surrounding copies to see where the joins fall.
- Look at the left/right join. Do the colors and shapes connect?
- Check the top/bottom join.
- Check the four-way corner intersections.
- Zoom out and look at the repeated pattern as a whole. A large obvious feature can form a visible grid even when its edges match perfectly.
For a wall texture, offset the rows of stones so vertical seams do not all line up. For grass, vary the clusters and keep the edge colors compatible. Leave enough quiet areas that the repeated texture does not compete with a game character.
Turning Live Tiles off restores the regular drawing viewport. It does not add the neighboring copies to the asset or enlarge the saved canvas.
Generate matching edges from your drawing
With Live Tiles enabled, the contextual Generate Tileable Texture… button appears. It opens a preview window that rebuilds selected edge bands using your existing artwork. This is useful for improving a texture that is close to tiling but has visible seams.
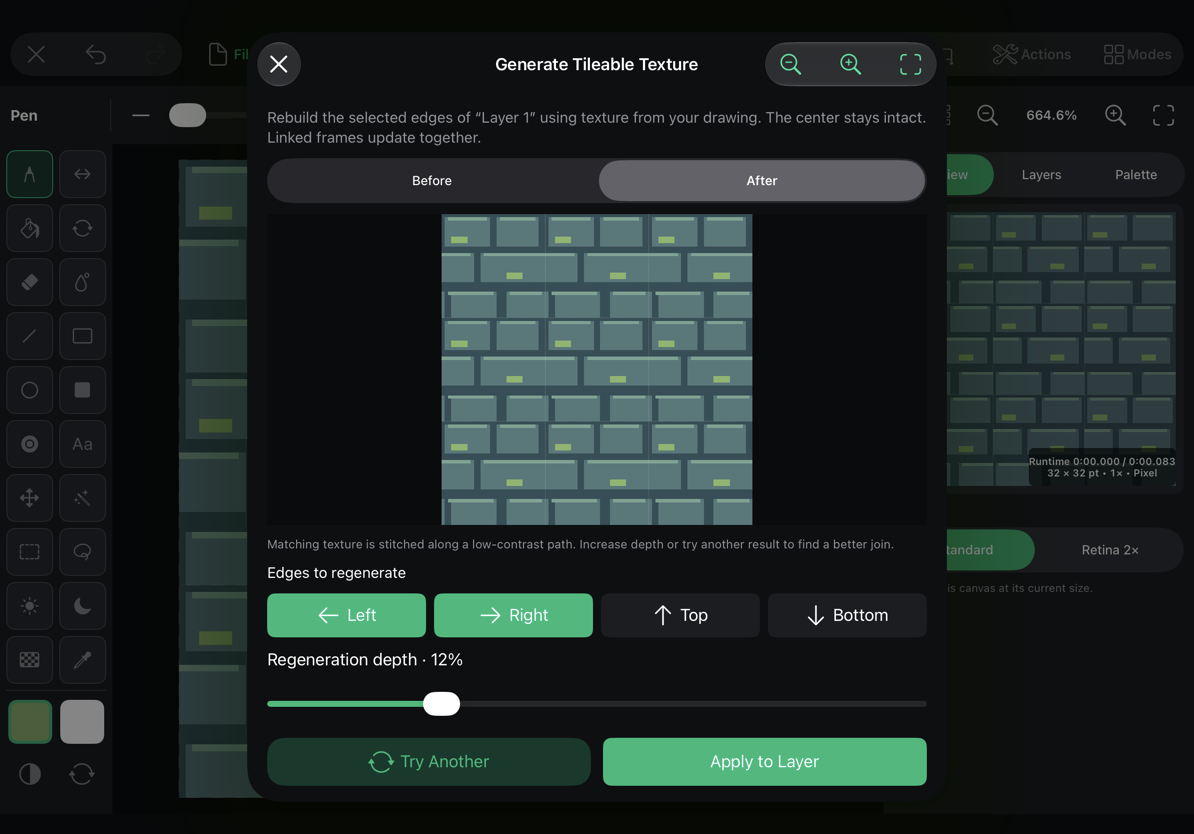
- Select the pixel layer you want to change. The generator works on that layer, so check that it contains the texture you intend to repair.
- Open Generate Tileable Texture… (⇧⌥L).
- Choose Left, Right, Top, and/or Bottom under Edges to regenerate.
- Adjust the edge width. A larger band lets the generator change more of the artwork near each chosen edge; the center stays intact.
- Switch between Before and After. Check several joins, including corners.
- Choose Try Another if a different variation would suit the pattern better.
- Choose Apply to Layer to commit, or Cancel to keep the original. Apply is one undoable edit.
The stone example selects Left and Right with a regeneration depth of 12%, leaving the horizontal row boundaries alone. Choose the sides that need work in your own artwork rather than changing every edge automatically.
The generator uses the drawing you give it. It may still need hand-painted cleanup, especially around recognizable objects or strong directional lines. Avoid promising yourself a perfect texture from one click: inspect the result in Live Tiles and paint any remaining discontinuities.
Text stays editable and cannot be used directly as the selected generator layer. Linked cels update together. If Alpha Lock is enabled, transparency remains unchanged, so an alpha seam can remain even if the colors join. Layer masks also affect the result. Keep a project copy before a major texture redesign.
The generator has its own preview pan/zoom controls. ⌘R tries another variation and ⌘Return applies the prepared result.
Check a tile before export
- Look for both color jumps and mismatched transparency at every join.
- Test the texture at its intended game scale, not only at a large editing zoom.
- Keep smooth/pixel texture filtering appropriate to the artwork.
- Export the center tile as a still game graphic from File. Use that graphic where the game needs a repeating texture, such as a Smart Shape.
Create a 9-slice panel
Create a single-frame project and draw a panel with a clear border and a simpler center. This example uses a 32 × 32 purple panel. A border around six pixels thick leaves room for the rounded corners.
Choose Modes → 9-Slice Layout, or press ⌥⌘9. You can also choose the 9-slice starting option in the new-project wizard.
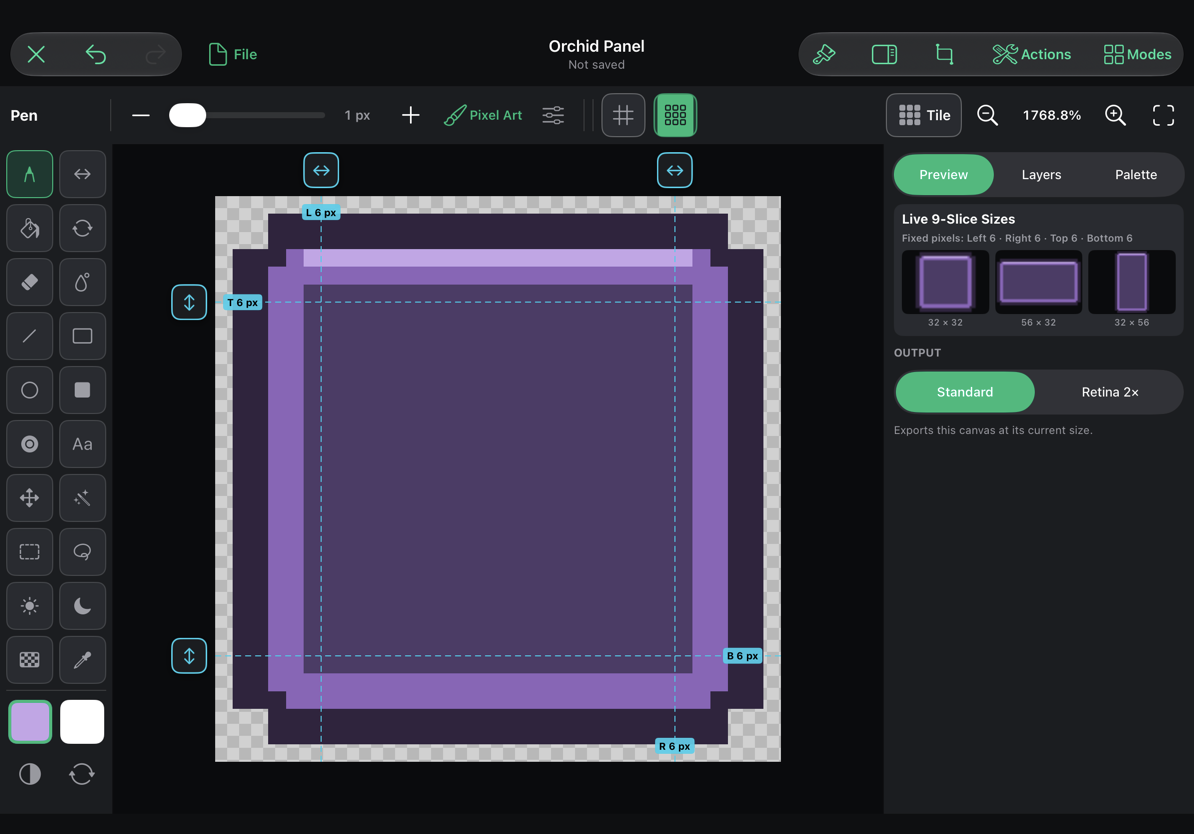
Four guides divide the image into nine regions:
| Region | Behavior when the panel changes size |
|---|---|
| Four corners | Keep their shape and size. |
| Top and bottom edges | Extend horizontally. |
| Left and right edges | Extend vertically. |
| Center | Extends in both directions. |
Drag the guide handles so the corners sit entirely within their fixed regions. The labels show the fixed margins in pixels. For the example, use 6 pixels on all four sides. The Preview inspector shows the panel at multiple sizes; inspect the wide and tall versions as well as the original.
If a rounded corner becomes distorted, move the corresponding guide farther into the image so the entire curve stays in a fixed corner. If a decorative detail is stretched, either include it in a fixed region or simplify the area that needs to stretch. Avoid placing text in the part of a panel that must stretch; a separate text asset or game object is usually easier to reuse.
9-slice authoring requires a single frame. If the project already contains several animation frames, make a separate single-frame panel project or remove the extra frames before enabling this mode. Frame animation and a 9-slice runtime image solve different problems.
Save the Studio project to retain the editable drawing and guide positions. Export the 9-slice game asset through File when it is ready, then resize it in a game scene to confirm that the corners and border remain clean.