Creating Your First Interactive Book: A Beginner's Guide


Traditional books have long held a special place in our hearts. Digital technology has opened the way for a new kind of storytelling: interactive books. They combine the narrative depth of traditional books with interactive elements that invite readers to take part in the story. From interactive illustrations to branching storylines, interactive books give readers of all ages a richer, more engaging experience.
Everyone has a story to tell
Whether you're a seasoned developer or new to app creation, making your own interactive book can feel both thrilling and daunting. With the right tools and guidance, it's easier than you might think. In this post, you'll learn how to create a basic interactive book in hyperPad.
You don't need any coding experience. By following this tutorial, you'll understand the concepts you need to put together an interactive book without code. Anyone can become an author with hyperPad.
Project Structure
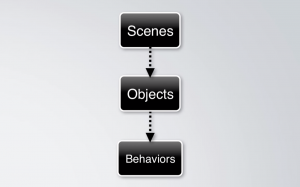
A hyperPad project is broken down into Scenes, Objects, and Behaviors.
Scenes:
Scenes contain all the Objects for your app, and they're a great way to organize the different parts of your app. For example, you can use a new Scene for each page of a book.
Objects:
Objects are individual items within the Scene. This includes any text or illustrations. Each Object can have its own Behaviors.
Behaviors:
Behaviors are what make your Scenes and Objects interactive and bring them to life.
Importing Images:
You can import images and illustrations from your Camera Roll and Dropbox. hyperPad automatically creates non-retina images for you, so when you create illustrations, work with a 2048×1536 image size in mind. The maximum image size you can import is 2048×2048 pixels.
If you want exact control over how your text looks, you can also import it as PNGs with transparent backgrounds.
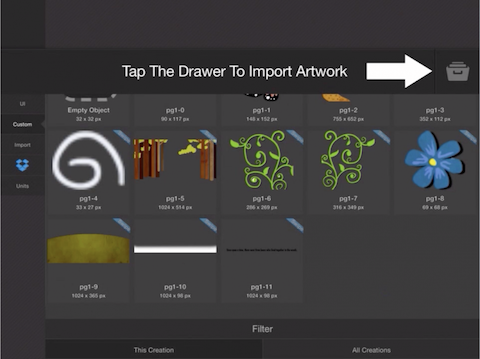
Once you've imported all your images, open the Object Drawer to start adding them to your Scene.
Adding Behaviors
Making your Objects interactive is easy. First, tap the Object you want to make interactive. Then, in the Object Properties, tap the "Behaviors" button to open the Behavior Editor.
For this tutorial, here's the interaction you'll create: when a reader touches the Object, it moves to a specific position.
From the "Input" category, drag the "Started Touching" Behavior onto the canvas.
By default, the Started Touching Behavior selects the current Object. You can change this by tapping the Object graphic in the Behavior properties.
Next, drag in a "Move To Point" Behavior and connect it to the "Started Touching" Behavior you added in the previous step. "Move To Point" moves the Object to a selected point on the canvas.
You can enter the exact location in the X/Y fields in the "Behavior Properties". You can also choose the location visually.
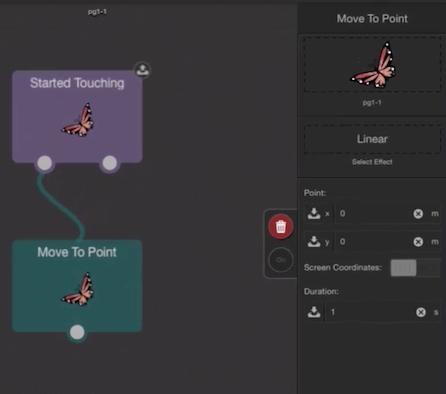
To do this visually, tap the Object graphic in the Behavior properties. Select the Object you want to move, then drag the blue target to where you want it.
When you're happy with the position, tap the checkmark icon to accept it. Notice that the X and Y fields in the Behavior properties fill in automatically.
If you press "Play" now, you'll see it work exactly as the Behaviors are laid out. The Object moves after you touch it.
Page Turns & Scenes
Now that your first page has interactions, you may want to add more pages and the ability to swipe between them.
There are a few ways to add the swipe gesture. You can add the Behavior to a specific Object in your Scene, or add it to the Global Behaviors so it affects all the Scenes in your book.
For this tutorial, add the swipe gesture to the Global Behaviors so you don't have to add it to each new Scene.
To start, open the "Creation Menu" by pressing the icon in the top left corner.
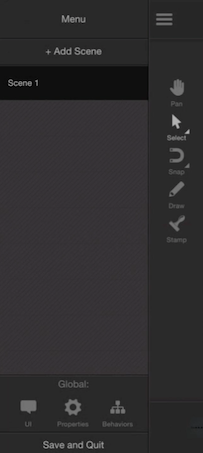
Then tap the "Global Behaviors" button at the bottom to open the Behavior Editor. The Behaviors you add here affect your entire project and run when each Scene loads.
Next, drag in a "Swipe Left" Behavior, and tap it once it's on the canvas to open the Behavior properties.
Notice the "Swipe on anything" toggle. If it's set to "Off", you must swipe on a specific Object for the event to trigger. Set it to "On" so you can swipe anywhere, without being restricted to a specific Object.
Note: If you add a "Swipe" Behavior to the Global Behaviors, it won't have a specific Object selected. The Object it's restricted to is the "Background". If you don't set the toggle to "On", it may look like it works. But other Objects covering the background can interfere with the swipe, especially if they have their own touch input Behaviors.
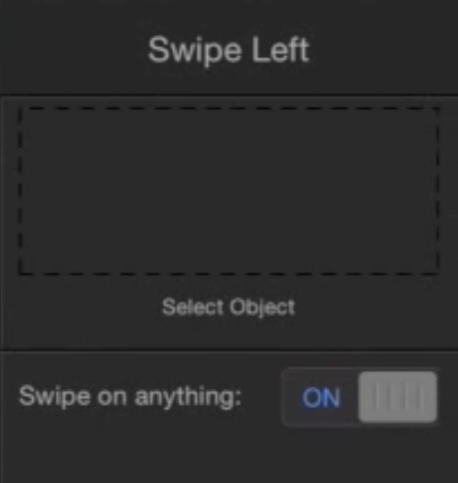
Next, add a "Load Next Scene" Behavior and connect it to the Swipe Behavior. The next Scene now loads when you swipe your finger toward the left side of the screen.
If your project has no other Scenes, the current Scene reloads. If you're on the last Scene in your project, the next Scene is the first one in the Scenes list.
Now add a new Scene to your project. Press play, and you'll see your swipe gesture work in both Scenes without adding any more Behaviors.
That's all you need to know to create an interactive book in hyperPad. Experiment with different Behaviors to add all kinds of interactions to your books.
Congratulations! You've created your first interactive book with hyperPad. Keep going: experiment with different Behaviors and interactions to make your storytelling even richer.
Other Recommendations for Beginners
Want to grow your app development skills? Here are some recommended books to help you on your journey:
This comprehensive guide is a beginner-friendly introduction to iOS app development. It covers everything from Xcode basics to building user interfaces and adding features like animations and sound.
Learn Swift programming with this hands-on guide, which suits beginners. You'll learn the fundamentals of the Swift language and get practical experience through guided tutorials and exercises.
Explore the principles of interaction design and learn how to create intuitive, engaging user interfaces. This book offers practical tips for designing interfaces that delight users.
With these resources, you'll be well prepared to continue your journey into app development and interactive storytelling.
Books aren't the only way to learn. If you learn best by doing, start making your own interactive adventures in hyperPad today. Our community on Discord can help show you the way. We also offer personal support: reach out to us on our socials or at marketing@hyperpad.com.
Start with hyperPad Starter, which is free and includes one project. When you want more projects and App Store export, hyperPad is a one-time USD $14.99. Turn your Procreate designs or digital art into interactive comics, games, and more, then export them to the App Store. Start your game dev journey with hyperPad today and bring your ideas to life!